

De un vistazo – Quick look
MATERIAL Y PIEZAS
MEDIA & PARTS:
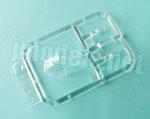
- Plástico inyectado (128 piezas), plástico transparente (3 piezas).
- Injected plastic (128 parts), clear plastic (3 parts).
CALCAS – DECALS:
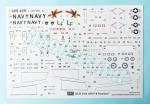
- Insignias nacionales, matrículas, distintivos de unidad, líneas y marcas del fuselaje, cola y alas además de numerosos estarcidos. Aspecto fino y brillante, nítidas y sin exceso de soporte en la mayoría.
- National markings, registers, unit badges, lines and markings for fuselage, tail and wings plus lots of stencils. Thin and glossy appearance, sharp and no excess of carrier film in most of them.
OPCIONES – OPTIONS:
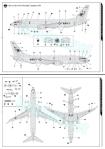
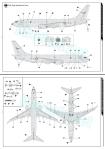
- Boeing P-8A. US Navy. VP-16 “War Eagles”. Singapore, 2014.
- Boeing P-8A. Royal Australian Air Force.
INSTRUCCIONES – INSTRUCTIONS:
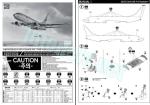
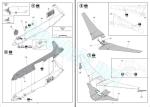
- Dos folletos doblados del mismo tamaño impresos en blanco y negro. El primero, de 8 páginas, contiene una tabla de colores con equivalencias en varias gamas de pintura y 15 pasos de montaje. El segundo tiene 6 páginas y muestra los dos últimas secuencias del montaje, 4 páginas de perfiles y un plano numerado de piezas.
- Two folded leaflets of the same size printed in black and white. The first one has 8 pages and contains a color chart with paint matches from several manufacturers plus 15 assembly steps. The second leaflet has 6 pages and shows the last two assembly sequences, 4 pages of profiles and a numbered parts plan.
LO MEJOR – THE BEST:
- Molde limpio. Excelente detalle externo. Montaje en apariencia sencillo.
- Clean tool. Excellent external detail. Apparent ease of assembly.
LO PEOR – THE WORST:
- Carlinga por debajo del resto en detalle.
- Cockpit detail is below the rest.
VALORACIÓN – CONCLUSION:
- Oportuna y excelente edición del Poseidón en la escala 1/144 ya que no había maquetas de plástico anteriores. Los aficionados al tema y la escala no debería perdérsela.
- A timely and excellent new tool kit of the Poseidon in 1/144 scale, as there were no previous plastic kits. Fans of the topic and scale should not miss it.

La maqueta
Ciertamente, Academy ha tenido buena vista al lanzar un molde nuevo del P-8A Poseidón en la escala 1/144, aunque no es el primero en las escalas más pequeñas. Ya hace años Hasegawa hizo uno propio a 1/200 y también hay un par de maquetas de resina de Welsh Models de tamaño 1/144. Lo mejor de esta edición no es tanto la originalidad, como la oportunidad que ofrece al modelista de montar este avión en plástico a este tamaño y aprovechar, si lo desea, la variedad de calcas de diferentes países que hay actualmente en el mercado. Por lo que he visto, creo que únicamente faltan de la India.
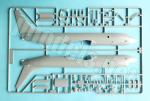
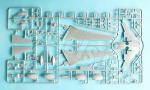
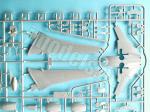
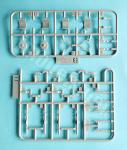
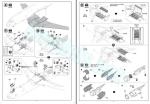
La caja contiene cinco bastidores, uno de ellos de piezas transparentes, una extensa hoja de calcas para dos versiones y dos folletos de instrucciones. Las piezas poseen un notable nivel de moldeado y carecen de rebabas o marcas evidentes salvo en la cara interna de las tapas de los pozos, aunque se pueden disimular con sencillez al ser muy leves.
El montaje es convencional, comenzando por las partes que quedarán dentro del fuselaje tras unir sus mitades, como la carlinga, bodega de armas o el pozo delantero, por ejemplo. Terminado el fuselaje, el proceso continúa con las alas y los pozos del tren principal para seguir con el tren de aterrizaje, motores, armamento y, posteriormente, los estabilizadores y cono posterior del fuselaje. Finalmente, se añaden las pequeñas antenas y dispositivos electrónicos sobre el fuselaje. A primera vista, la construcción del modelo no ofrece inconvenientes más allá de lo que puedan dictar tanto la unión de la pieza inferior de las alas con los mamparos de los pozos como la adición de las aletas de antenas por su pequeño tamaño.
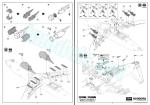
Durante el armado de la maqueta podemos elegir colocar el tren plegado y los pozos cerrados, simulando el avión en vuelo, aunque no se proporciona base alguna para sostenerlo. La bodega de armas y la torre de infrarrojos también tienen esta alternativa.
Academy ha incluido una extensa hoja de calcas de muy buen aspecto que ofrecen dos posibilidades de terminación, una del Escuadrón VP-16 de la Marina norteamericana, primera unidad que recibió el avión para sus operaciones, y otra de la Fuerza Aérea australiana, segundo país extranjero que obtuvo este modelo tras la India.
Carlinga
Los lados de la carlinga tienen una marca de eyector que tal vez no merezca la pena rellenar por su situación retrasada y baja. El interior contiene un suelo y un panel trasero añadido. El suelo está moldeado con los asientos, una consola de instrumentos entre ellos, palancas y pedales. El panel de instrumentos viene separado y no tiene detalle ni calca. Los asientos muestran los reposacabezas, pero el detalle es en general bastante simple y sólo está ahí para cubrir el hueco. Tampoco cabe esperar mucho más a este tamaño. Líneas en relieve moldeadas en las mitades del fuselaje ayudan a pegar la carlinga correctamente en su interior.
La cubierta tiene un grosor medio y las ventanillas vienen muy bien marcadas. La pieza muestra una transparencia excelente.
Fuselaje
El fuselaje comprende dos mitades completas, salvo el cono posterior, e incluye las superficies verticales de cola, que encajan una dentro de otra al estar las dos caras del timón vertical en la pieza derecha del fuselaje. Las mitades cuentan con las acostumbradas pequeñas clavijas de alineación en los bordes.
Además de la carlinga, antes de pegar las mitades hay que añadir un contrapeso de 6 gr en la parte anterior, el pozo de la rueda delantera, las ventanillas de los puestos de observación a cada lado, únicas que tiene este avión, la pequeña torreta de sensores infrarrojos debajo del fuselaje y la bodega de armamento. Las instrucciones aconsejan añadir también la rueda delantera y sus soportes, pero no es imprescindible.
El dispositivo de infrarrojos está muy bien reproducido y tiene una base separada. La bodega de armas consta de tres piezas, dos de ellas los mamparos delantero y trasero. Estos elementos muestran un detalle sobresaliente, muy nítido para esta escala y al que se le puede sacar partido con la pintura. Las compuertas de la bodega están separadas en cuatro piezas para poder montarlas plegadas sobre sí mismas. Los lados internos también están reproducidos con finura. Dentro de la bodega podemos colocar cinco torpedos moldeados con las aletas y los contenedores de los paracaídas. Parecen los usuales Mark 54 que lleva el avión.
El pozo delantero, la bodega de armas y la torre de infrarrojos tienen piezas alternativas para mostrarlos cerrados.
Las superficies externas del fuselaje están muy bien grabadas con líneas de anchura y profundidad adecuadas, pero también traen múltiples paneles, accesos y puertas. En la parte delantera vemos varios dispositivos representados en relieve, como los carenados del equipo de guerra electrónica (ESM) o los lanzadores de contramedidas defensivas.
La zona dorsal y ventral cuentan con múltiples aletas cuyos huecos habremos abierto antes de pegar las mitades del fuselaje y las de las alas. La zona ventral también lleva otros carenados, como los de las antenas direccionales CDL (Common Data Link, Enlace de Dato Común) o del escáner ESM. La parte posterior muestra diferentes aberturas para el lanzamiento de sonoboyas y el parachoques de cola. El cono de cola está seccionado para pegar una pieza en su extremo que contiene tanto las salidas abiertas de la unidad de potencia auxiliar (APU) como el sistema láser infrarrojo contra misiles guiados por calor (DIRCM).
Alas, motores y cola
Para lograr unas alas lo bastante finas para concordar con la escala, Academy las ha separado parcialmente. La pieza inferior encaja en la superior y contiene una parte de la zona ventral del fuselaje con los huecos de los pozos. Los extremos de la pieza cubren sólo hasta casi la mitad de la envergadura de las alas. Las superficies de control están todas moldeadas en la pieza superior. Las puntas están separadas y provistas de lengüetas para pegarlas superpuestas a los extremos. Sin embargo, faltan las luces de aterrizaje junto a las raíces de las alas.
El detalle de las superficies me parece excelente ya que muestran numerosos accesos, actuadores en relieve en piezas separadas, además de líneas de diferente anchura para simular las superficies móviles. Las mitades superiores de las alas incluyen una lengüeta amplia que es en realidad el fondo de los pozos de las ruedas. Ambas lengüetas se pegan sobre los mamparos delantero y trasero de los dos pozos. Las zonas internas de los pozos están simplemente detalladas con líneas paralelas en relieve. Con este sistema simple, pero efectivo, de unir las alas se cubre perfectamente el hueco interno de la cavidad del fuselaje.
Bajo las alas hay cuatro puntos de anclaje divididos en mitades para situar otros tantos misiles AGM-84D Harpoon muy bien reproducidos.
Los motores tienen separadas las góndolas y el carenado, en ambos casos seccionados en mitades. Las mitades del carenado contienen la toma del motor con los anillos externos separados y el ya clásico disco simulando los álabes en relieve. El escape posterior también viene aparte, así como lo que parece una pequeña carena de salida a un lado.
Los estabilizadores son bastante finos y van pegados al fuselaje mediante lengüetas moldeadas en su extremo. Las superficies verticales van encajadas a la altura del timón, moldeado en una mitad, como queda dicho arriba. El extremo superior está detallado con el sistema de comunicación por satélite.
Tren de aterrizaje
El delantero consta de dos tapas en el pozo detalladas por dentro y una pata bien representada compuesta de cinco piezas. Las ruedas tienen las llantas bien marcadas pese a su tamaño. La alternativa para colocar el pozo cerrado es una pieza que simula las compuertas unidas.
El tren principal tiene dos tapas a cada lado en posición cerrada. Las patas son finas y constan de cinco piezas, incluidos los brazos de plegado y las tapas auxiliares. Las ruedas poseen buena factura y las llantas también están bien grabadas por ambos lados. La pieza alternativa tiene las ruedas moldeadas con las tapas y realmente es semejante al avión real en vuelo.
Calcas
La hoja muestra insignias nacionales (las australianas, de baja visibilidad), matrículas, distintivos de unidad, líneas y marcas del fuselaje, cola y alas, además de numerosos estarcidos que cubren también los del armamento.
Finalmente, parece que Academy ha decidido, al igual que Revell hace años, imprimir sus calcas en Italia. La hoja así lo indica, pero no señala el fabricante. Sea Cartograf o cualquier otro, lo cierto es que los motivos son nítidos, carecen de exceso de soporte en su mayoría y su aspecto es fino y brillante.
Instrucciones
Como suele suceder últimamente, Academy ha decidido incluir las instrucciones en dos folletos en lugar de en un solo con tamaño incómodo de manipular. Ambos tienen el mismo tamaño y están impresos en blanco y negro. El primero, de ocho páginas, contiene una tabla de colores con pinturas equivalentes de Humbrol, Gunze Sangyo, Lifecolor, Testors-Modelmaster, Revell, Vallejo y AK y 15 capítulos de montaje. El segundo tiene seis páginas y muestra los dos últimas secuencias del montaje, cuatro páginas de perfiles y un plano numerado de piezas.
Como cabe esperar, los acabados muestran aviones monocolores en la mayor parte de las superficies. Tanto el Poseidón de la Marina norteamericana como el australiano llevan un gris azulado claro (FS16515).
Valoración
Este Poseidón de nuevo cuño y gran detalle debería ser bien recibido por los modelistas seguidores de los aviones de este tamaño. La edición es muy oportuna, ya que hasta ahora no había sino ediciones de resina en la escala 1/144 y las maquetas de tamaño mayor son ciertamente grandes, no aptas para cualquier vitrina.
Aunque las calcas parecen bastante buenas y no deberían dar problemas, el modelista que desee terminar la maqueta con otras diferentes puede recurrir a gran variedad de juegos recientes de varios fabricantes.◊


The kit
Academy have certainly hit the nail releasing a new tool P-8A Poseidon in the 1/144 scale, although it’s not the first kit in the smaller scales. Hasegawa released their own 1/200 kit years ago, and there are also a couple of 1/144 resin kits from Welsh Models. The best thing about this release isn’t so much its originality, but rather the opportunity it offers modellers to have this aircraft in plastic at this size and take advantage, if desired, of the variety of decal sets from different countries currently on the market. From what I’ve checked, the Indian markings are the only one missing.
The box contains five sprues, one of them of clear parts, an extensive decal sheet for two versions, and two instruction leaflets. Parts have a remarkable standard of molding and are free from flash or visible marks except inside the well covers, but these can be easily addressed as they are very small and shallow. Assembly is conventional, starting with the parts that will remain inside the fuselage after the halves are joined, such as the cockpit, weapons bay, and nose well, for example. Once the fuselage is finished, the process continues with the wings and main gear wells, followed by the landing gear, engines, armament, and then the stabilizers and tail cone. Finally, the small antennas and electronic arrays are added to the fuselage. At first glance, the kit’s construction shows no drawbacks beyond those that might be found in the fitting of the lower wing piece to the well bulkheads and the addition of the antenna fins due to their tiny size.
During assembly we can choose to install the landing gear folded and the wells closed, simulating the aircraft in flight, though no base is provided for this. The weapons bay and infrared turret also have this choice. Academy have included an extensive and very nice decal sheet offering two finishes, one from the US Navy VP-16 Squadron, the first unit to operate the aircraft, and another from the Australian Air Force, the second foreign country to obtain this aircraft after India.
Cockpit
The cockpit sides have an ejector mark that might not be worth filling as it is too low and rearward. The interior contains a floor and a rear bulkhead. The floor is molded with the seats, a console between them, control columns, and pedals. The instrument panel is separate and has no detail or a decal. The seats show the headrests, but detail is quite simple and is there only to fill the gap. One shouldn’t expect much more at this size either. Raised lines on the fuselage halves help align the cockpit properly.
The canopy includes the cockpit roof and is not very thick. The windshield is very well rendered. The piece has excellent transparency.
Fuselage
The fuselage comprises two halves molded without the tail cone, but including the vertical tail surfaces, which fit inside each other as the two vertical rudder sides come with the right fuselage piece. The halves have the usual small alignment pins on the edges.
Before gluing the halves together, a 6g ballast is needed inside the nose. The nose wheel well, the observation windows on each side (the only ones in this aircraft), the small infrared sensor turret under the fuselage, and the weapons bay are also attached in this stage. The instructions also show the nose wheels attachment here, but you can add them later.
The infrared device is very well reproduced and has a separate base. The weapons bay consists of three pieces, two of them being the front and rear bulkheads. These elements show outstanding detail, very sharp for this scale, which can be greatly enhanced with painting. The bay doors are separated into four pieces so they can be assembled folded onto themselves. The inner sides are also finely rendered. Inside the bay, we can place five torpedoes molded with their fins and air stabilisers. They look the usual Mark 54s carried by the aircraft.
The forward well, weapons bay, and infrared turret have alternate parts to show them closed.
The external fuselage surfaces are well detailed with recessed lines of appropriate width and depth, but also feature multiple panels, access points, and doors. At the front, we see several raised devices, such as the electronic warfare equipment (ESM) fairings and the defensive countermeasures launchers.
The dorsal and ventral areas have multiple fins with holes that are opened before gluing the fuselage and wing halves together. The belly also features other fairings, such as those for the directional CDL (Common Data Link) antennas and the ESM scanner. The rear fuselage shows several openings for the sonobuoy launchers and the tail bumper. The tail cone is sectioned to install a piece containing both the open exhausts of the auxiliary power unit (APU) and the DIRCM (Directed Infrared Counter Measure) system.
Wings, engines and tail
To achieve wings thin enough to match the scale, the lower half piece fits into the upper one and contains a section of the ventral fuselage with the well openings. The lower piece covers only about half the wing span. The control surfaces are all molded in the upper piece. The tips are separated and provided with tabs for gluing them overlapping the tips. However, the landing lights near the wing roots are missing.
Surface detail is excellent, showing lots of access points, raised actuators in separate pieces, and lines of different width to simulate moveable surfaces. The upper wing halves include wide tabs that are actually the bottom of the wheel wells. Both tabs are glued on the front and rear bulkheads of the wells. The wells interior is simply detailed with parallel raised lines. This simple but effective wing attachment system perfectly hides the internal fuselage gap.
There are four underwing hardpoints divided into halves for attaching four very nice AGM-84D Harpoon missiles.
The engines have separate nacelles and engine cowls, both molded in halves. Inside the nacelle halves, which include the pylons, are the engine fan cowls with the outer nose cowl apart and the usual disc molded with raised fan blades. The rear plug is also separate, as well as what seems a small exhaust outlet on one side.
The thin stabilizers are attached to the fuselage by means of tabs molded on the fuselage. The vertical surfaces have the rudder molded on one side, as described above. The fin is detailed with the satellite communication system on top.
Undercarriage
The front well is provided with two covers detailed on the inside and a nice wheel strut in five pieces. The wheels have sharp rims despite their size. There is an alternative piece to pose the well closed.
The main landing gear has two covers on each side in the closed position. The legs are thin and consist of five pieces, including the folding arms and auxiliary covers. The wheels are one-piece and the rims are also well detailed on both sides. The alternative piece has the wheels molded with the covers and it truly looks the part.
Decals
The sheet shows national markings (the Australian roundels are low visibility), registrations, unit badges, lines and markings on the fuselage, tail, and wings, as well as lots of stencils that also include the armament.
Academy seems to have decided to print their decals in Italy, like Revell years ago. The sheet indicates this, but doesn’t name the manufacturer. Whether Cartograf or another, the fact is that decals are sharp, mostly free of excess support, and have a thin, glossy appearance.
Instructions
As is often the case lately, Academy have chosen to include the instructions in two folded leaflets instead of one, which wouldn´t have been easy to handle and checked. Both are the same size and printed in black and white. The first, eight pages long, contains a color chart with equivalent paints from Humbrol, Gunze Sangyo, Lifecolor, Testors-Modelmaster, Revell, Vallejo, and AK, plus 15 assembly chapters. The second has six pages showing the last two assembly chapters, four pages of profiles, and a numbered parts plan.
As expected, paint finishes show single-color aircraft on most surfaces. Both the US Navy and Australian Poseidons are finished in a light blue-gray (FS16515).
Conclusion
This new and nicely detailed Poseidon should be welcomed by modellers who enjoy 1/144 aircraft. The release is quite timely, as we only had resin kits in this scale, and a larger size Poseidon is certainly not suitable for any shelf.
Although decals look quite good and shouldn’t pose any problems, modellers who wish different decals can resort to a wide variety of recent sets from various manufacturers.◊
Publicado – Published: 6 / 2025
©www.jmodels.net

Debe estar conectado para enviar un comentario.