

De un vistazo – Quick look
MATERIAL Y PIEZAS
MEDIA & PARTS:
- Plástico inyectado (114 piezas), plástico transparente (18 piezas).
- Injected plastic (114 parts), clear plastic (18 parts).
CALCAS – DECALS:
- Insignias británicas y noruegas, diversos paneles de instrumentos, insignias de unidad, marcas del fuselaje, matrículas y numerosos estarcidos. Aspecto brillante y fino. Buena nitidez y sin exceso de película de soporte.
- RAF and Nowwegian markings, several instrument panels, unit badges, fuselage stripes and plenty of stencils. Thin and glossy appearance. Sharp with no excess of carrier film.
OPCIONES – OPTIONS:
- Westland Sea King HAR.3. Escuadrilla N.º 78 de la RAF. Base Mount Pleasant (Islas Malvinas). Enero de 1991.
- Westland Sea King Mk.43. Real Fuerza Aérea Noruega. Escuadrilla N.º 330. 1996.
- Westland Sea King HAR.3. RAF No. 78 Squadron. RAF Mount Pleasant (Falkland Islands). January 1991.
- Westland Sea King Mk.43. Royal Norwegian Air Foce. No. 330 Squadron. 1996.
INSTRUCCIONES – INSTRUCTIONS:
- Folleto A4 de 20 páginas impreso en color. Contiene un resumen histórico sobre el helicóptero, 66 capítulos de montaje y 4 páginas de perfiles. Colores con equivalencias de pinturas de Humbrol. Claras y bien impresas.
- 20-page A4 brochure printed in black and white. It shows a historical summary about the helicopter, 66 assembly chapters and 4 pages of profiles. Colours show matches in Humbrol paints. Clear and well printed.
LO MEJOR – THE BEST:
- Buen detalle exterior. Alternativas de montaje. Acabados de pintura diferentes.
- Nice external detail. Assembly options. Varied paint choices.
LO PEOR – THE WORST:
- Marcas de eyector internas.
- Pin marks on the interior sidewalls.
VALORACIÓN – CONCLUSION:
- Mejor por fuera que por dentro, donde Airfix ha dejado marcas. Razonables alternativas de montaje y de pintura. Para modelistas de nivel medio en adelante.
- Better detailed on the outside than the inside, where Airfix left some evident pin marks. Reasonable assembly and painting options. For modellers with standard and advanced modelling skills.

La maqueta
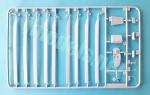
Esta es la primera reedición del nuevo molde del Westland Sea King que Airfix sacó por vez primera en 2015. A diferencia de la maqueta inicial, que representa la versión HC.4 empleada como aeronave de asalto de comandos por la Royal Navy, en esta ocasión se trata del modelo de búsqueda y rescate HAR.3 (o Mk.43 para la Marina noruega), caracterizado por una cabina más amplia dotada de más ventanillas y con una mayor capacidad de combustible.
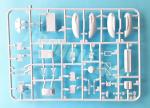
La maqueta consta de cinco bastidores de piezas, un bastidor transparente, una amplia hoja de calcas y el folleto de instrucciones. Las piezas están limpias de rebabas, sin embargo hay grandes marcas de eyector negativas en el interior del fuselaje, que sólo serán relevantes si deseamos mostrarlo, y en los respaldo de los asientos de los pilotos, aunque estas son más leves y pueden enmendarse con sencillez. Los paneles me parecen bien ejecutados, con líneas finas sin excesiva profundidad, pero marcadas con nitidez.
Las alternativas de montaje incluyen colocar el tren de aterrizaje plegado para mostrar la maqueta en vuelo, situar las palas del rotor principal y el extremo de cola plegados y la posibilidad de colocar las compuertas laterales abiertas. Hay también dos pequeños dispositivos específicos para la versión de la RAF bajo la cola. Como novedad Airfix ofrece la opción de colocar un pequeño motor eléctrico, que vende por separado, para mover las aspas del rotor principal. La adición del motor supone abrir huecos en la zona ventral del fuselaje y la base del rotor, así como recortar las filas de asientos en el interior de la cabina.
Carlinga e interior
l suelo interno es de una pieza, con la zona de la carlinga sobreelevada. La carlinga muestra los pedales, las palancas y el panel de instrumentos unido a la consola intermedia, ambos representados en una sola calca. Los asientos están colocados sobre bastidores pegados al suelo. El panel de los controles de arranque va pegado sobre el techo, que viene unido al parabrisas transparente, y también tiene una calca.
La pieza del parabrisas y techo posee una transparencia excepcional y contiene pequeños limpiaparabrisas bien definidos en relieve. Las ventanillas laterales y los paneles acristalados delanteros vienen en sendas piezas finas y con los marcos bien reproducidos.
La carlinga está limitada en su parte posterior por un panel parcialmente abierto. La cara trasera tene una marca de eyector que se apreciará si dejamos la puerta lateral abierta. Tras él se sitúan varios paneles, estantes y contenedores sin apenas detalle. El compartimento del operador de sistemas electrónicos viene también en una sola pieza unido al panel de instrumentos plano y sin calca. El asiento es similar al de los pilotos con su bastidor separado.
La parte trasera contiene dos filas de asientos a los lados, de los que hay que recortar dos en el lado diestro y cuatro en el siniestro. Hay también una camilla en uno de los lados, dos asientos más separados en la parte de cola, dos balsas salvavidas almacenadas y el panel que cierra el fuselaje.
Antes de pegar las mitades del fuselaje hay que añadir las ventanillas laterales, los tubos de salida de los escapes, el techo de la zona de carga y un panel situado sobre este que muestra la base del rotor principal.
Dado el abigarrado interior del Sea King y la escala, no era esperable que Airfix lo reprodujese al milímetro, pero en este caso con un interior más simple pero más atinado acaso hubiese acertado más.
Fuselaje y cola
Las mitades del fuselaje tienen la zona ventral, el morro y las tomas de aire separadas. Los paneles grabados me parecen finos y bien ejecutados y hay algún detalle moldeado in situ, como las argollas de amarre y la costura de unión de la cola al fuselaje, que está bien reproducida.
La pieza del morro lleva marcados tanto el panel de acceso a la batería como el foco controlable por el piloto, pero sin pieza transparente. Las tomas de aire vienen separadas de su carenado y este lleva por delante una pantalla deflectora para protegerlas. Tras el rotor también tenemos el dedal del radomo.
La pieza ventral cubre toda la zona excepto la punta bajo la carlinga, que viene separada en una pieza a la que hay que añadir los faros de aterrizaje delanteros transparentes antes de pegarla y posteriormente un sensor que sobresale del perfil del morro. También hay un par de antenas paralelas que introducir desde dentro en la panza.
Diversas antenas, soportes, dispositivos electrónicos y los tubos Pitot se reparten por todo el fuselaje, la zona ventral y la cola. Sólo parecen faltar dos pequeñas antenas del buscador bajo el morro, pero a quien desee añadirlas no debe resultarle difícil. Junto a la rueda trasera hay que colocar una pequeña tubería de expulsión de combustible.
La compuerta lateral derecha es una pieza transparente fina con la ventanilla bien marcada en relieve. Parece un acierto que Airfix la proporciones de esta manera ya que en lugar de añadir una ventanilla más, sólo hay que enmascararla, de esta forma la pieza es lo bastante fina para poder colocarla abierta si se desea. Sobre la compuerta hay un cabrestante formado por los soportes, la carena externa y el gancho enrollado al eje.
La puerta de acceso del lado opuesto es también transparente y puede ponerse abierta. Muestra las dos hojas y la ventanilla bien marcadas, pero las escaleras de acceso carecen de las barandillas y sus soportes, no están horadadas como las reales y además tienen un par de marcas situadas entre los escalones que serán difíciles de limpiar.
El extremo de la cola está separado en mitades y puede situarse plegado con piezas alternativas para cubrir el hueco del cono y las bisagras finamente reproducidas sobre el fuselaje. La luz anticolisión en la punta está bien marcada. El estabilizador horizontal es una pieza aparte.
Hélices y tren de aterrizaje
El cabezal del rotor principal está formado por dos mitades para pegar las palas entre ellas. El detalle es muy simple, pero no se aprecia mucho al estar tapado por la carena del cabezal. Las palas son finas, lisas como corresponde, pero carecen de detalle en las puntas. El eje es una simple varilla introducida sobre el fuselaje.
La maqueta cuenta con dos rotores de cola con las palas moldeadas con el cabezal. Las piezas no son opcionales y el que deberemos emplear en esta maqueta tiene las varillas de control y las bisagras mejor marcadas. Las palas son finas y lisas.
La cubierta del tren de aterrizaje principal consta de dos mitades con las luces de navegación bien definidas y el hueco interno sin detalle. Los soportes vienen por separado. La forma de las patas y el brazo de plegado son más bien correctos, pero las patas carecen de los huecos laterales. Acertadamente Airfix nos proporciona dos juegos de ruedas, con y sin peso, para colocar el tren desplegado o no. Las ruedas son decentes y tienen el buje externo detallado. La rueda de cola viene en una sola pieza y muestra buena definición tanto en el neumático como en la horquilla.
Calcas
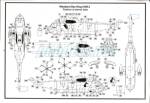
La hoja es bastante amplia. Muestra insignias británicas y noruegas, diversos paneles de instrumentos, insignias de unidad, marcas del fuselaje, matrículas así como un buen número de estarcidos. Las calcas tienen aspecto brillante y fino, muestran buena nitidez y carecen de exceso de soporte.
Instrucciones
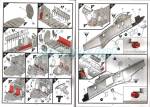
El folleto de instrucciones tiene un tamaño A4 y consta de veinte páginas impresas en color. Contiene un resumen histórico sobre el helicóptero, 66 etapas de montaje más cuatro páginas de perfiles, dos de ellas dedicadas a la posición de los estarcidos. Como siempre en Airfix, los colores pertenecen a la gama de esmaltes de Humbrol. Los pasos de construcción de la maqueta son claros y las alternativas de montaje se exponen con claridad.
Creo que Airfix ha escogido bien las opciones de pintura, ya que son muy diferentes. Mientras el aparato británico está pintado en gris marino oscuro, el noruego lleva zonas pintadas de naranja fluorescente y bandas de este color en la panza combinadas con el blanco del fuselaje.
Valoración
La maqueta me parece una opción bastante razonable para representar un Westland Sea King a esta escala. Lástima que esté parcialmente lastrada por las marcas internas y por el escaso detalle de los paneles internos de la cabina, pero en la parte externa hay que reconocer que Airfix casi ha acertado en todo.
Como cualquier maqueta, tiene algunas piezas mejorables y otras que puede aportar el modelista de cierto nivel para refinar el modelo final, y que creo que le sentarían bastante bien ya que se trata de un buen punto de partida para hacerlo.
Las alternativas de pintura son variadas y en el caso de la RAF difieren de las más usuales libreas en amarillo o en la combinación gris y rojo, aunque, por lo que a mí respecta, también me gustan estos helicópteros de salvamento en esos colores.◊


The kit
This is the second kit of the new Westland Sea King that Airfix first released in 2015. Unlike the initial kit, which represents the HC.4 version used as a commando assault helicopter by the Royal Navy, this is the search and rescue HAR.3 variant (or Mk.43 for the Norwegian Navy), characterized by a larger cockpit with more windows and a greater fuel capacity.
The kit consists of five frames of parts, a clear frame, a large decal sheet and the instruction booklet. Pieces are quite clean and have no evident flash. However, there are large negative pin marks on the inside of the fuselage, which will only be relevant if we wish to show it, and on the backs of the pilots’ seats, although these are slight and can be easily cleaned up. Panels are nice and rendered in thin lines without excessive depth, but clearly engraved.
Assembly alternatives include placing the landing gear folded to show the model in flight, folding the main rotor blades as well as the tail boom and the possibility of placing the side doors open. As a novelty, Airfix offers the option of installing a small electric motor, which is sold separately, to rotate the main gear blades. The addition of the engine involves opening holes in the ventral fuselage and the rotor base as well as trimming the rows of seats inside the cabin.
Cockpit and interior
The internal floor is in one piece, with the cockpit area raised. The cockpit shows the pedals, sticks and an instrument panel attached to the middle console, both represented in a single decal. The seats are placed on frames glued to the floor. The overhead control panel is glued to the roof, which is a clear part moulded with the windshield, and also has a decal.
The windshield and roof piece has exceptional transparency and contains small, well-defined raised wipers. The side windows and front glazed panels come in two fine pieces with nice frames.
The cockpit is closed at the rear by a partially open panel. The panel rear side has an ejector mark that will be visible if we leave the fuselage entry door open. Behind it are several panels, shelves and containers with hardly any detail. The electronics operator compartment also comes in one piece attached to a flat instrument panel without a decal. The seat is similar to the pilots’ with a separate frame.
The rear section contains two rows of seats on either side, of which two on the right side and four on the left have to be cut out. There is also a stretcher on one side, two more single seats in the tail section, two stowed life rafts and a rear panel at the fuselage end.
The side windows, the exhaust pipes, the roof of the cargo bay and a panel located above it showing the base of the main rotor are added before gluing the fuselage halves together.
Given the Sea King’s crammed interior and the scale, one should not expect Airfix would reproduce it in full, but with a simpler but better detailed interior they might have been more successful.
Fuselage and tail boom
The fuselage halves have the ventral area, nose and air intakes separated. The engraved panels look fine and there are some details moulded in place, such as the tie-down rings and the joint between the fuselage and the tail cone, which is well reproduced.
The nose piece show both the battery access panel and the pilot-controlled spotlight, but this has no clear piece. The air intakes come separate from their fairing and there is a deflector in front to protect them. Behind the main rotor we also have the radome thimble.
The ventral piece matches the entire belly except the tip under the cockpit, which comes separated in a piece. This includes a pair of vertical landing lights in a clear piece glued from the inside and a sensor that protrudes from the nose profile. There are also a pair of parallel antennas to be inserted from inside in the belly piece.
Several antennas, small electronic devices and the pitot tubes are spread throughout the fuselage, ventral area and tail boom. Only two small seeker antennas under the nose seem to be missing, but those who wish to add them should not find it difficult. A small fuel jettison pipe is fitted next to the rear wheel.
The right side hatch is a thin transparent piece with the window finely reproduced. It is a good idea that Airfix have provided it like that, as instead of adding another window, the piece only needs to be masked. This way the door is thin enough to be left open if desired. Above the hatch is a rescue winch made up of the struts, the outer fairing and the hook rolled up around the axle.
The entry door on the opposite side is transparent and can be left open too. The two segments and the window are clearly engraved, but the boarding stairs lack the handrails, are not perforated like the real ones and have a couple of marks between the steps that will be difficult to clean up.
The tail cone is separated in halves and can be posed folded with alternative pieces to cover the cone gap and the hinges finely moulded on the fuselage. The anti-collision light on the tip is correctly rendered. The horizontal stabilizer is a separate piece.
Propellers and undecarriage
The main rotor head is made up of two halves to glue the blades in between. Detail is very simple, but will not be too evident as it is covered by the head fairing. The blades are thin, smooth as expected, but lack detail at the tips. The axle is a simple rod inserted into the fuselage.
The kit includes two tail rotors with the blades moulded with the head. The parts are not optional and the one to use here has the control rods and the hinges better refined. The blades are thin and smooth.
The main landing gear sponsons consist of two halves with sharp navigation lights and the internal well without detail. The struts come separately. The shape of the legs and the retraction arm are rather correct, but the legs lack the side perforations. Airfix provide us with two sets of wheels, with and without weight, to place the gear deployed or not. The wheels are decent and have the external hub detailed. The tailwheel comes in one piece and shows good definition in both the tire and the fork.
Decals
The sheet is extensive and shows British and Norwegian markings, several instrument panels, unit badges, fuselage markings, registers as well as plenty of stencils. Decals have a glossy and thin appearance, sharpness and lack excessive carrier film.
Instructions
The instruction booklet is printed in A4 size and has twenty color pages. It contains a historical summary about the helicopter, 66 assembly stages plus four pages of profiles, two of them dedicated to the position of the stencils. As usual, paints belong to the Humbrol enamel range. Construction steps are comprehensible and the assembly alternatives are clearly stated.
I think Airfix have selected the paint finishes quite well, as they are very different. While the British machine is painted in dark sea gray, the Norwegian counterpart has some surfaces painted in fluorescent orange and stripes of this color on the belly combined with a fuselage in overall white.
Conclusion
This kit seems a very reasonable option to represent a Westland Sea King at this scale. It is a shame it is partially hindered by the marks and the lack of detail on the internal panels, but on the outside it is fair to admit Airfix have got almost everything right.
Like any kit it has some parts that can be improved and others that a modeller with some skill can scratchbuild to get a refined model. I think these additions would suit the kit quite well as it is a good starting point for doing so.
Paint alternatives are varied and in the case of the RAF machine it differs from the more usual yellow or grey / red liveries, although, as far as I am concerned, I also like these rescue helicopters in those colours.◊
Publicado – Published: 8 / 2024
©www.jmodels.net

Debe estar conectado para enviar un comentario.