
De un vistazo – Quick look
MATERIAL Y PIEZAS
MEDIA & PARTS:
- Plástico inyectado (124 piezas), plástico transparente (6 piezas).
- Injected plastic (124 parts), clear plastic (6 parts).
CALCAS – DECALS:
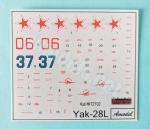
- Impresas por Decograph. Estrella soviéticas, numerales y decenas de estarcidos. Las calcas presentan buen registro y nitidez, aspecto mate y en apariencia fino, con mínimo exceso de soporte.
- Printed by Decograph. Soviet stars, aircraft numbers and tens of stencils. Decals show a good register and sharpness, have a thin matt finish with minimal excess of carrier.
OPCIONES – OPTIONS:
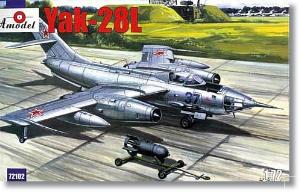
- Yakovlev Yak-28L. Soviet Air Force. Blue 37. 1970s.
- Yakovlev Yak-28L. Soviet Air Force. Red 06. 1970s.
INSTRUCCIONES – INSTRUCTIONS:
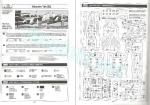
- Folleto de tamaño A4 y 6 páginas impreso en blanco y negro. Muestra una breve historia del avión con datos técnicos, un plano de piezas numerado, 12 capítulos de montaje y una página de perfiles. Las referencias de color pertenecen a la gama de pinturas esmalte de Humbrol.
- 6-page A4 brochure printed in black and white. Shows a short historical and technical summary about the aircraft, a numbered parts plan, 12 assembly steps and a page of profiles. Colors belong to Humbrol enamel paints range.
LO MEJOR – THE BEST:
- Tema inusual. Opciones de montaje (flaps, bodega de armamento).
- Unusual topic. Assembly choices (flaps, bomb bay).
LO PEOR – THE WORST:
- Montaje laborioso. Carlinga escasa.
- Not a straightforward build. Sparse cockpit.
VALORACIÓN – CONCLUSION:
- Siendo el molde más accesible de este avión en la escala 1/72, no parece muy sencilla de montar porque necesita mejoras, pero puede ser una buena opción para el modelista experto aficionado a los reactores poco corrientes.
- Being the most available tool to have a 1/72 Yak-28, it’s not very easy to build as it needs to improve some elements, but it can be a nice choice in the hands of the expert modeler who is fond of unusual jets.

La maqueta
Amodel tiene nada menos que nueve cajas del molde del Yak-28 que lanzó en los primeros años de este siglo y que son las maquetas de referencia en la escala 1/72 si consideramos solamente las marcas más conocidas.
Esta edición nos presenta un modelo L, o Brewer-B para la OTAN, del que se fabricaron algo más de una centena de aparatos. La L de esta variante procede del dispositivo Loto, un sistema de enlace de datos que reemplazó al radar anterior del Yak-28B. Este mecanismo de dirección involucraba a dos estaciones terrestres móviles que dirigían al avión a su objetivo y le daban mayor precisión en el ataque en cualquier clima, de día o de noche. Por evolucionado que pareciese, los rusos finalmente optaron por no emplearlo en los sucesivos modelos, ya que era complejo y vulnerable a interferencias al depender de unidades en tierra.
La caja trae nueve bastidores de piezas, dos de ellos iguales, un bastidor transparente, la hoja de calcas y las instrucciones. Como en otras maquetas de este fabricante, el motivo de tanto bastidor se debe a que cada uno de ellos no contiene un número elevado de piezas, pero no por esto la cuenta de elementos deja de ascender a más de un centenar.
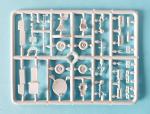
El aspecto del molde de serie limitada resultará familiar para los que conozcan o hayan hecho alguna maqueta de Amodel. Aunque a primera vista las piezas no son excepcionales, están correctamente moldeadas y grabadas con líneas finas y bien trazadas. Hay mínimos restos de rebabas en algunas superficies y naturalmente las inevitables líneas de molde que no deben dar demasiado trabajo al no ser pronunciadas. En cambio, no hay marcas de eyector que nos entorpezcan el montaje. Como de costumbre, es en las piezas más pequeñas donde más se nota la catadura del molde, pero no por eso dejan de ser usables en la maqueta.
La maqueta desde luego no es sencilla de montar para el modelista medio y además creo que puede necesitar un nivel de destreza medio-alto para quienes lleven un camino recorrido con las series limitadas, especialmente porque ciertos detalles serán susceptibles de mejorarse o afinarse a lo largo del armado.
Las alternativas de montaje son dos: colocar los alerones extendidos y bajados y mostrar la bodega abierta con una bomba en su interior o bien mostrar esta bomba sobre un carro de transporte fuera del avión, como se aprecia en la caja. En cambio, las terminaciones de pintura sólo nos ofrecen dos aparatos de color metálico con numerales distintos.
Revisión
La carlinga, cuyos lados son lisos sin marcas, dispone de un suelo para el piloto con palanca, consolas laterales y asiento separados. Las consolas no tienen detalle alguno ni calcas. El asiento es parecido al real, pero su factura es sólo pasable. El panel va pegado a su cubierta y muestra los instrumentos bien grabados. El puesto de operador de radar/navegante no es en realidad tal, ya que su asiento va pegado por delante de los lados del pozo delantero, que Amodel ha situado entre las dos carlingas. El puesto del navegante no tiene suelo, pero sí el panel de instrumentos, parecido al real pero muy grueso, con los indicadores grabados además de las dos ventanillas laterales y algunos instrumentos añadidos próximos a ellas. Para una cabina tan abigarrada como la del Yak-28, la de esta maqueta resulta bastante pobre.
La bodega de bombas está formada por dos paneles, delantero y trasero, de forma oval pegados al techo y lados rectos del habitáculo. Estos sólo cuentan con tres líneas grabadas en su interior por todo detalle. Para mostrar el interior de la bodega la pieza de las compuertas, separada del fuselaje, debe cortarse por la mitad. En el interior se puede colocar un soporte y una bomba que no he logrado identificar. Podría tratarse de una FAB-3000, una de las que podía transportar el Yak-28, pero le falta el característico resalte plano alrededor de la punta.
La bomba está despieza en dos mitades, sus aletas y el anillo en la parte posterior. Alternativamente, también podemos colocar este artefacto sobre un carro de transporte con horquillas y pequeñas ruedas.
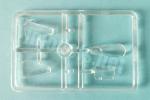
La cubierta del piloto no está mal de grosor y tiene el parabrisas bien reproducido. La cubierta de salida del navegante también es transparente y posee su pequeña ventanilla grabada. El morro acristalado está separado en mitades con el grabado de los paneles muy fino, tal vez demasiado si pensamos que hay que enmascararlos. En el interior hay que colocar un elemento de tres piezas que debe ser algún tipo de sistema electrónico. El tubo pitot viene separado.
Las piezas transparentes no son malas y se pueden emplear en la maqueta, pero a mi parecer les conviene un pulido para mejorar el brillo y la transparencia.
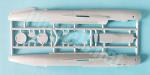
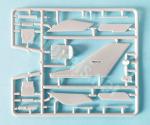
Las mitades del fuselaje están bien grabadas con múltiples líneas de panel y accesos. La aleta bajo el puro de cola está moldeada en una de las mitades y el capotaje dorsal posee definición. El cono de cola está separado y le falta una pequeña antena de contramedidas electrónicas, difícil de reproducir en este tamaño por su finura .
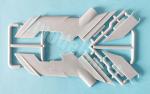
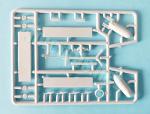
El despiece de las alas es un tanto inusual porque los elementos desgajados de cada una son las góndolas de los motores y una parte de la superficie inferior comprendida entre el motor y el fuselaje. El grabado de los paneles es adecuado y fino pero los bordes muestran algunas mínimas rebabas por limpiar. El alambrado está bien reproducido y las puntas incluyen las luces anticolisión más los compensadores con las finas puntas aparte. Las luces de navegación no están grabadas. Por debajo de las puntas aparecen los pozos de las ruedas auxiliares, que parecen poco profundos y no demasiado bien definidos. Los alerones y flaps vienen separados. Como he dicho arriba, los flaps pueden ponerse en posición neutra o extendidos y bajados siguiendo los perfiles que las instrucciones proporcionan. Las alas se añaden al fuselaje mediante lengüetas.
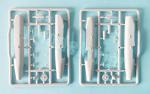
Los motores constan de dos mitades detalladas con varias pequeñas tomas en el exterior. Dentro hay que colocar el capotaje del compresor de la toma con sus puntales y una pieza redonda que simula la estructura de la salida, pero el detalle está poco marcado en relieve. La posición del capotaje en la toma está marcado en el interior del motor, pero no así el de la salida. Los motores se pegan bajo las alas con la ayuda de una sección de cada motor que está moldeada con las alas. Como complemento, tenemos un par de depósitos en mitades unidos con vástagos.
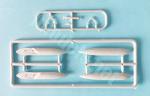
Las superficies de cola también disponen de lengüetas para pegarlas. La aleta vertical incluye el filete y las superficies muestran buen grabado por ambas caras. El timón está bien marcado con mayor anchura, lo mismo que en los estabilizadores.
Las compuertas de los pozos muestran buen detalle en su interior. El tren delantero tiene la pata dividida en dos secciones, lo que no le beneficia en firmeza, y los brazos extensores aparte en una pieza muy fina. El tren posterior tiene una composición algo diferente de sólo dos piezas. Las ruedas son idénticas en ambos casos. Tienen los neumáticos bien marcados y las llantas mejor definidas por fuera que por dentro, donde se ha querido replicar el sistema de freno, pero de forma muy tenue.
Las ruedas auxiliares están moldeadas con las patas y el brazo extensor. La tapa tiene el extremo que cubre parcialmente la rueda bien representado. Estas piezas necesitan una limpieza cuidadosa de las pequeñas rebabas y líneas que contienen.
La hoja de calcas está impresa por Decograph y contiene estrella soviéticas, numerales y decenas de estarcidos. Las calcas presentan buen registro y nitidez, aspecto mate y apariencia fina. Contienen un mínimo exceso de soporte.
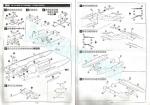
Las instrucciones están impresas en blanco y negro en un folleto de tamaño A4 de seis páginas que muestra una breve historia del avión con datos técnicos, un plano de piezas numerado, doce capítulos de montaje y una página de perfiles. Las referencias de color pertenecen a la gama de pinturas esmalte de Humbrol.
Valoración
Considerándolo todo, creo que la maqueta trae lo necesario para lograr una más que decente reproducción del avión, si el modelista está dispuesto a mejorar algunos elementos, especialmente en la carlinga porque el escaso detalle interno resultará evidente.
El Yak-28 no ha logrado tener tanto renombre como otros del periodo de la Guerra Fría, pero resulta igual de importante en el desarrollo del arsenal soviético de aquellas décadas, y por tanto interesante para el modelista que desee probar caminos distintos a los habituales. Lástima que sólo tengamos por ahora las maquetas de Amodel como única posibilidad de intentarlo.◊


The kit
Amodel has no fewer than nine boxings of the Yak-28 tool they released in the early years of this century, which are the kits of reference in the 1/72 scale if we consider only the most well-known brands.
This release presents an L variant, or Brewer-B for the NATO, of which just over one hundred aircraft were produced. The «L» in this variant comes from the Loto device, a data link system that replaced the Yak-28B’s previous radar. This guidance mechanism involved two mobile ground stations that directed the aircraft to its target and gave it greater accuracy in attacks in any weather, day or night. As advanced as it seemed, the Russians ultimately chose not to use it in subsequent variants, as it was complex and vulnerable to interference due to its dependance on ground units.
The box contains nine sprues of parts, two of them identical, a clear sprue, the decal sheet, and the instructions. As with other kits from this manufacturer, the reason for so many sprues is that each one doesn’t contain a large number of parts, but the total number of pieces still exceeds one hundred.
The appearance of this short-run tooling will be familiar to those who know or have built any Amodel kits. Although at first glance parts aren’t outstanding, they are well-molded and engraved with fine, well-defined lines. There are minimal traces of flash on some pieces and, naturally, the unavoidable seam lines, which shouldn’t cause too much trouble as they aren’t prominent. On the other hand, there are no ejector marks to hinder assembly. As usual, the tool’s nature is most noticeable in the smaller parts, but they are still usable in the kit.
The kit is certainly not easy for the average modeler to assemble, and I believe it may need a medium-to-high level of skill for those familiar with short runs, especially since certain details will be subject to improvement or refinement during assembly.
There are two assembly options: either display the flaps extended and lowered, showing the bomb bay open with a bomb inside, or display the bomb on a trolley outside the aircraft, as shown on the box. Paint finishes only offer two metallic-colored aircraft with different numbers.
Review
The cockpit, with smooth, clean sidewalls, features the pilot’s floor with a control lever, separate side consoles, and a seat. The consoles lack any detail or decals. The seat resembles the real one, but it is only passable. The instrument panel is attached to the panel shroud and has the gadgets clearly engraved. The radar operator/navigator’s station is not actually a station, as the seat is attached to the front of the forward wheel well, which Amodel has positioned between the two cockpits. The navigator’s station lacks a floor, but it does have an instrument panel, similar to the real one but very thick, with engraved gauges, two side windows, and some additional instruments near them. For a cockpit as intricate as that of the Yak-28, this cockpit is quite basic.
The bomb bay consists of two oval-shaped panels, front and rear, attached to the roof and straight sides of the bay. These panels have only three engraved lines inside. To show the interior of the bomb bay, the belly door piece, separated from the fuselage, is cut in half. Inside, there is a rack and a bomb, which I haven’t been able to identify. It looks like a FAB-3000, one of the bombs the Yak-28 could carry, but it lacks the characteristic flat ridge around the nose.
The bomb is provided in two halves with separated fins, and ring. Alternatively, it can also be placed on a trolley comprising the forks and four small wheels.
The pilot’s canopy is reasonably thick and has a well-reproduced windshield. The navigator’s exit panel is also transparent and has a small engraved window. The glazed nose is separated into halves with very fine panel engraved, perhaps too fine considering they need to be masked. Inside, a three-piece component, likely some kind of electronic device is added. The pitot tube is separate. Clear parts are not bad and can be used in the kit, but in my opinion, they would benefit from polishing to improve their gloss and transparency.
The fuselage halves are well-engraved with multiple panel lines and accesses. The fin under the tail cone is molded on one of the halves, and the dorsal spine fairing is well-defined. The tail cone tip is separate but a small ECM antenna is missing, which is not strange, as it is difficult to render at this size due to its fineness.
The wing breakdown is unusual because the detached components of each wing are the engine nacelles and a section of the lower surface between the engine and the fuselage. Panel lines are again well-engraved and thin, but the edges show some minor flash that needs cleaning. The wing fences are convincing and the wingtips include the anti-collision lights plus the mass balances with the thin tips apart. The navigation lights are not engraved. Below the wingtips are the outrigger wheel wells, which look shallow and not very well defined. The ailerons and flaps are separate. As mentioned above, the flaps can be set in the neutral position or extended and lowered according to the profiles provided in the instructions. The wings are attached to the fuselage using tabs.
The engines consist of two halves detailed with several small intakes on the exterior. Inside we have the intake centre-body with the struts and a round piece simulating the afterburner outlet, but detail is a bit disappointing. The position of the centre-body on the intake is marked inside the engine, but not the position of the outlet round piece. The engines are glued under the wings with the help of a section of each engine molded to match the wings. The underwing load consists of a pair of fuel tanks in halves glued with attachment pins.
The tail surfaces also have tabs to attach them. The vertical fin includes the fillet, and the surfaces show correctly engraved detail on both sides. The rudder is well-defined as well as the stabilizers.
The wheel well doors show good detail inside. The front landing gear has a split leg, which doesn’t improve its rigidity, and the extension arms are separate, very thin pieces. The rear landing gear has a slightly different composition of only two pieces. The wheels are identical in both cases. The tires are clearly marked, and the rims are better defined on the outside than on the inside, where the braking system has been replicated, but very subtly.
The auxiliary wheels are molded with the legs and extension jacks. The end of the cover that partially hides the wheel is well represented. These parts require careful cleaning of the small flash and seam lines they have.
The decal sheet is printed by Decograph and contains Soviet stars, aircraft numbers, and tens of stencils. The decals have good registration and sharpness, a matte finish, and thin appearance. They contain minimal excess of carrier film.
The instructions are printed in black and white in a 6-page A4 booklet that includes a brief history of the aircraft with technical data, a numbered parts diagram, twelve assembly chapters, and a page of profiles. Color references are from the Humbrol enamel paint range.
Conclusion
All things considered, I believe the kit provides everything necessary for a more than decent reproduction of the aircraft, but the modeler will need to improve some elements, especially in the cockpit, as the lack of internal detail will be quite evident.
The Yak-28 hasn’t achieved the same renown as other aircraft from the Cold War period, but it was equally important in the development of the Soviet arsenal during those decades, and therefore interesting for modelers who wish to explore different untrodden paths. It’s a shame that, for now, Amodel kits are our only option for trying this.◊
Publicado – Published: 11 / 2025
©www.jmodels.net

Debe estar conectado para enviar un comentario.