
De un vistazo – Quick look
MATERIAL Y PIEZAS
MEDIA & PARTS:
- Plástico inyectado (74 piezas), plástico cromado (20 piezas), vinilo (5 piezas), plástico translúcido (9 piezas), plástico traslúcido (2 piezas).
- Injected plastic (74 parts), chromed plastic (20 parts), clear plastic (9 parts), translucent plastic (2 parts), rubber (5 parts).
CALCAS – DECALS:
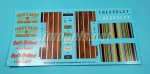
- Una hoja que incluye dos juegos de matrículas, salpicadero, dos juegos de rótulos comerciales, entarimado de madera para la caja, tapicería del asiento y varios estarcidos. Muy bien impresas.
- A sheet containing two sets of number plates and business signs, upholstery fabric for the seat and several stencils. Very well printed.
OPCIONES – OPTIONS:
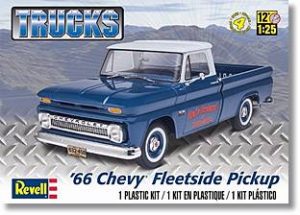
- 1966 Chevy Fleetside. Red´s Orchard & Fresh Market.
- 1966 Chevy Fleetside. John´s Diary & Fresh Market Farm.
INSTRUCCIONES – INSTRUCTIONS:
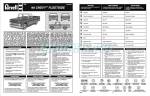
- Folleto algo menor de A4 de 12 páginas impreso en blanco y negro. Contiene una breve introducción histórica del vehículo en varios idiomas, 13 secciones de montaje, colores con referencias genéricas y una página de perfiles para pintar y colocar las calcas.
- 12-page booklet, a bit smaller than A4, printed in black and white. Shows a brief introduction to the vehicle in several languages, 13 assembly steps, generic color references and profiles to paint and set decals.
LO MEJOR – THE BEST:
- Al menos detalle suficiente. Calcas.
- At least enough detail for the scale. Decals.
LO PEOR – THE WORST:
- Puertas cerradas. Ausencia de ventanillas.
- Doors molded closed. Lack of window glasses.
VALORACIÓN – CONCLUSION:
- Se dejará montar bien, aunque exige muy buen acabado previo a pintar debido al material. Agradecerá algunas mejoras y extras. Para aficionados a los vehículos de época.
- Apparently a nice build, but it will need good surface finishing before painting due to the media. Some improvements and extras will surely enhance the finished model. For fans of classic vehicles.

Esta es una de esas maquetas con pedigrí cruzado. Pertenece a Revell, pero no a la casa alemana sino a la norteamericana de Illinois y está fabricada en China. Ha conocido varias ediciones anteriores en colores y aspectos diferentes desde 1996.
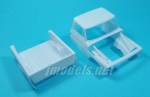
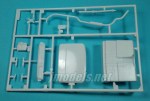
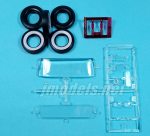
La caja contiene una hoja de calcas, las instrucciones, un bastidor de piezas cromadas, un bastidor transparente, un pequeño bastidor traslúcido con las luces de freno traseras, cinco neumáticos de vinilo sueltos, cinco bastidores de piezas más la caja de transporte y la cabina en piezas sueltas. En total, tiene algo más de 100 piezas.
Habiendo terminado hace tiempo este Ford F-1 de la misma marca, escala y serie (Trucks) puedo escribir con algo más de conocimiento sobre el montaje y algo de pintura.
El plástico es rígido y no sencillo de lijar, especialmente los pequeños restos de plástico en los bordes de las piezas, aunque observo que este Chevy está mejor moldeado que mi F-1, que me dio bastante trabajo en este sentido. El detalle general es bueno y hay marcas visibles en los lados interiores de la caja de transporte y en el panel trasero de la carlinga, aunque estas últimas dudo que lleguen a verse. También hay restos de expulsor en las piezas cromadas pequeñas y esto es más difícil de arreglar si no se cortan con precisión al sacarlas del bastidor. Hay que procurar lijar al mínimo para no perder el cromado. Algunas piezas tienen un grosor un pelín excesivo, pero no todas. También hay piezas delicadas y muy finas, como el volante y la barra de dirección.
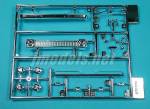
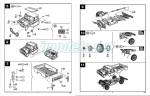
El ensamblado comienza por el motor, compuesto por 17 piezas. Como el capó puede abrirse, merece la pena detallarlo con algún cableado al menos. El bloque motor está dividido en mitades a las que hay que añadir el cárter, las culatas de balancines, la bomba de agua, el distribuidor, etc. En un segundo paso, lo detallaremos con el ventilador (sorprendentemente con palas muy finas) y su correa, tubos de salida de escape, el alternador y otras piezas. Más tarde añadiremos también el filtro de aire, la batería y las mangueras del radiador. Con todo esto, y algún detalle extra que podamos añadir, el motor va bien servido.
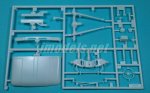
El bastidor del chasis es una pieza completa, excepto el parachoques trasero. En la parte delantera lleva la suspensión, la barra de dirección y un largo tubo de escape provisto de silenciador, que quizá sea mejor pegar tras haber acoplado el motor, y dos amortiguadores de factura pasable. En la parte trasera, además del parachoques, hay que incluir otros dos amortiguadores idénticos, el eje trasero, la barra de torsión, la rueda de repuesto y su anclaje. El motor va situado en una bancada moldeada al efecto con la barra de transmisión, que habrá de unirse a uno de los extremos antes de montar el motor en el bastidor.
Cada rueda, excepto la de repuesto, lleva dos piezas de plástico, una cromada y el neumático. Las de plástico son dos aros que forman la llanta y que, una vez pegados sujetan el neumático en medio de ellos. La pieza cromada es un embellecedor situado en la cara externa del tapacubos. Los neumáticos vienen separados. Muestran buen detalle en la banda de rodadura y banda exterior blanca que los realza más y le da al vehículo un toque de época.
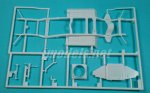
Aparte del motor, lo más divertido en mi Ford F-1 fue montar y pintar el interior del habitáculo. El sistema de montaje es idéntico en este Chevy Fleetside. Hay un suelo, dos piezas laterales que representan el lado interno de las puertas, un asiento, el salpicadero, el volante y la columna de dirección. Los pedales son un poco decepcionantes, simples piezas rectangulares pegadas a la parte anterior del suelo. El salpicadero está provisto de una calca para los indicadores y una pieza transparente colocada sobre ellos. La columna de dirección está detallada con la palanca de los indicadores y la de marchas. El asiento muestra buen detalle, con relieve ideal para aplicar la calca que simula la tapicería, un toque muy acertado para darle algo de vida a un interior cerrado, ya que las puertas no pueden mostrarse abiertas. Una vez pintado y cerrado el interior, nos queda una especie de caja abierta por arriba que debemos introducir en la carrocería por su parte inferior.
Antes de la operación anterior se debe haber pintado el interior de la cabina. Esta viene en una pieza con el morro. Esta pieza está complementada con una parte del panel trasero, el mamparo del motor y el radiador en dos piezas. Tras colocar los cristales y pegar el habitáculo en la forma que he descrito, se puede detallar por dentro con algunas piezas del motor, como la batería y el servofreno, y por fuera añadiendo el techo y las piezas cromadas de las manijas de las puertas, tapón de combustible y retrovisor.
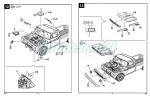
En el extremo delantero tenemos una pieza horizontal que sirve de receptáculo a la parrilla frontal cromada que contiene los faros. Los cristales de estos son dos piezas estriadas de buena factura. Por debajo de ellos también hay un paragolpes en pieza cromada. El capó consiste en cuatro piezas, las laterales con enganches que permiten mostrarlo abierto, y la frontal con los intermitentes delanteros incorporados sin piezas transparentes para representarlos.
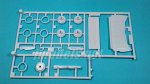
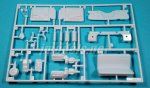
La caja de transporte viene igualmente en una pieza sin la puerta posterior. Sin hacer modificaciones la puerta no puede abatirse porque lo impiden un par de piezas a los lados de la caja que llevan las luces traseras y un par de cierres con cadenas en los pestillos muy mal representadas. Hay que añadir también la placa de matrícula trasera, si bien no hay pieza para la delantera, pero puede hacerse fácilmente con plástico. Tanto la caja de transporte como la carrocería delantera van simplemente pegados encima del bastidor. La caja tiene vástagos de unión, pero no veo ninguno en la cabina.
Las piezas transparentes están bien presentadas y tienen un grosor adecuado a la escala. Además del parabrisas y ventana trasera, el bastidor incluye los faros, el cristal del salpicadero, luces de posición traseras y, curiosamente, el depósito de agua de los limpiaparabrisas. En el bastidor también hay cristales para las ventanillas triangulares laterales, pero no para las ventanillas mayores. Tal vez Revell pensó que así puede apreciarse mejor el interior.
La hoja de calcas me parece muy bien impresa y la apariencia de estas es fina. Contiene matrículas, rótulos comerciales, el tapizado del asiento, el entarimado de madera de la caja y estarcidos para el habitáculo y exterior del vehículo, algunos con el nombre y logotipo del fabricante.
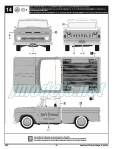
El folleto de instrucciones tiene 12 páginas de tamaño algo menor de A4 y traen una breve introducción sobre el vehículo en varios idiomas, una lista numerada de piezas, 13 secuencias de montaje y una página final con perfiles para pintar el exterior y colocar las calcas. Aquí sólo aparece una de las opciones, pero las calcas nos permiten escoger una segunda. También aparecen dos retrovisores en lugar del único que hay en la maqueta y la placa de matrícula delantera, que también falta. Los colores se relacionan con nombres genéricos sin códigos de marcas de pintura.
Comparando esta maqueta con la del Ford F-1 que he mencionado, el Chevy me parece mejor sobre la mesa, aunque está por montar. Al menos las piezas están mejor terminadas y carecen de las líneas de molde tiesas y difíciles de suprimir. Ya que la calidad del material es pareja, me permito aconsejar un buen pulido del exterior e imprimar la maqueta antes de pintarla. Este Fleetside está obviamente destinado a los amantes de los vehículos clásicos, aunque a los más heavies también les gustará ponerlo hecho una pena de óxido y porquería varia. Cuestión de gustos e imaginación.◊


This is one of those kits with a mixed pedigree. It is released by Revell, not by the German company but by their American counterpart in Illinois and it is made in China. The Fleetside has also been sold in several boxes in different colors and aspects since 1996.
The box contains a decal sheet, the instructions, a chromed sprue, a clear sprue, a little translucent red sprue with the rear brake lights, five loose vinyl tyres, five white plastic sprues plus the bed and the cab shell in loose parts. Altogether the kit has a bit more than 100 parts.
Having finished a similar Ford F-1 of the same manufacturer, scale and series (Trucks), I feel I can write about this pickup with a bit more experience about the assembly and painting.
Plastic is rigid and not easy to sand, especially the slight flash present on the edges of some parts, though I can see the Fleetside has a better factory finishing than my F-1, which gave me a lot of trouble with the cleaning of parts. Overall detail is good but some parts seem a bit too thick for the scale. There are negative sink marks on the bed panels and the cab rear panels, although I don´t think they will be seen once the cab is finished. There are also pin marks on the small chromed parts, and this is a bit more difficult to mend unless they are carefully trimmed off from the sprue. Sanding these parts should be minimal or else the chromed coat will be lost. You can also find thin delicate parts, such as the steering wheel and the steering axle.
Assembly starts with the engine, comprising 17 parts. As the hood can be posed open, I think it is worth adding some extra detail, such as the wiring. The cylinder block comes in halves with separate pieces for the oil sump, cylinder head covers, alternator, belt and fan (featuring very thin blades), exhaust manifolds and some other small pieces. Later, we will add the air filter, battery and the radiator hoses. With all this and some extra detail we wish to add, I guess the engine has more than enough.
The chassis frame comes in one piece except for the rear bumper. In the front section we have the suspension, steering axle and a very long exhaust pipe provided with a muffler, that you may wish to attach after having the engine in place, and two passable front springs. In the rear section there are separate parts for two similar springs, the torsion bar and the spare wheel and holder. Before the engine is placed on the body, it is advisable to attach only one of the transmission shaft endings.
Road wheels consist of a tyre, two plastic rings and a chromed hub. Plastic rings are attached to make the wheel rims with the tyre in between. The chromed part enhances the outer side of the hub. Tyres come loose and show good detail on the tread pattern and have a white band around the outer faces to give a vintage touch to the model.
Apart from the engine, the funniest task in my Ford F-1 was to build and paint the cab interior. Assembly is quite similar in this Chevy Fleetside. There is a floor, two sides rendering the doors, a seat, a dashboard, a steering wheel and the steering column. Pedals are a bit disappointing, being just rectangular pieces attached to the front floor. The nice dashboard is provided with a decal and a clear plastic part on it. The steering column is detailed with a gear lever and a turn indicator stalk. The seat has nice raised detail to render the upholstery fabric that is enhanced with decals from the sheet. A nice touch to spice up the interior as doors can´t be shown open, as said before. Once the cab in painted and closed, we have a weird boxlike section that it is inserted into the body shell from below.
Before the said assembly, obviously the interior cab shell must have been painted. This is a separate piece molded with the hood. Parts to be attached are a section of the rear wall, the engine bulkhead and the two-piece radiator. Once the clear parts have been added, the engine can be detailed with the battery and the brake booster inside the engine compartment as well as the chromed parts for door handles, filler cap and rearview mirror.
In the front section there is a horizontal piece to insert the chromed front grill containing the headlights. Clear parts for the lights are nice, being molded with raised detail. There is also a chromed bumper below them. The hood consists of four parts: the top, the sides, molded with a kind of plastic strut that allows to pose the hood open, and the front side containing the indicators without clear parts.
The bed comes in one piece without the tailgate. The tailgate can´t be opened without modifications because there is a couple of parts to place the rear lights and indicators that also contains the chain latches molded closed. There is also a rear number plate, but the front plate is missing. Anyway, it can be easily made with sheet plastic. Both the cab and the bed are attached onto the frame. The bed has attachment pins, but this is not the case with the cabin.
Clear parts are well made and have reasonable thickness for the scale. The sprue includes the windshield, the rear window, headlights, tail indicators, the dashboard glass and, curiously enough, the windshield washer reservoir. There are also pieces for the front quarter windows, but the main window panels are missing. Perhaps Revell thought the interior could be seen without them. There is also a translucent small red sprue containing the brake lights.
I think the decal sheet is quite well printed and decals look thin. It has two sets of number plates, business signs, upholstery fabric for the seat and several stencils for the body and dashboard, some of them with the car manufacturer´s name and logo.
The instructions booklet has 12 pages printed in black and white. It shows a short introduction to the vehicle in several languages, a numbered parts list, 13 assembly steps and a final page with profiles to paint and set decals. This page only shows one of the options, but the decal sheet lets us to finish a second one. The profiles also show two mirrors and a front number plate that are missing in the sprues. Colors appear as generic references without a match in the usual modelling paint ranges.
Comparing this kit with Ford F-1 I built, the Chevy seems clearly better, although it is still to be started. At least parts are better molded and lack stiff, hard-to-remove mold lines. Since the quality of the media is similar, I would recommend polish the kit thoroughly and prime it before painting. This Fleetside is obviously aimed at lovers of classic vehicles, although the extreme modeller will also like to finish it rusty, dirty and battered. A matter of taste and imagination.◊
Revisado / Revised: 9 / 2023
Actualizado – Updated: 4 / 2022
Publicado – Published: 3 / 2020
©www.jmodels.net


Debe estar conectado para enviar un comentario.