
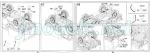
De un vistazo – Quick look
MATERIAL Y PIEZAS
MEDIA & PARTS:
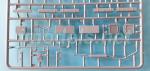
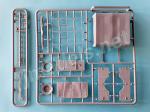
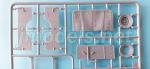
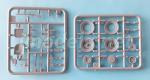
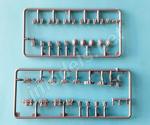
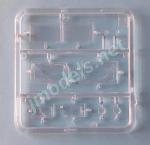
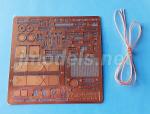
- Plástico inyectado (351 piezas), plástico transparente (9 piezas), fotograbado (108 piezas), hilo trenzado (1 tramo). Incluye 1 figura (7 piezas).
- Injected plastic (351 parts), clear plastic (9 parts), PE (108 parts), braided thread (1 length). One figure included (7 parts).
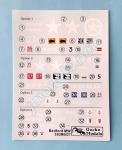
CALCAS – DECALS:
- Estrellas Aliadas con y sin círculo, matrículas y enseñas de unidad. Finas, nítidas y bien impresas.
- Allied white stars with and without circle, number plates and unit badges. Thin, sharp and well printed.
OPCIONES – OPTIONS:
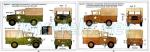
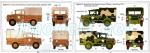
- Bedford MWD. Ejército Británico. 179º Regimiento Ligero de Ambulancias de Campaña. 11ª División Acorazada. Copenhague (Dinamarca), inicios de mayo de 1945.
- Bedford MWD. Ejército Británico. 4º Batallón Hallamshire. Regimiento Yorkshire & Lancashire. 147ª Brigada de Infantería. 49ª División de Infantería (West Riding). Fontenay-le-Pesnel (Normandía, Francia), Junio 1944.
- Bedford MWD. Marina Real. Xª Compañía. 30ª Unidad de Asalto. Costa del Canal (Francia), septiembre de 1944.
- Bedford MWD. Marina Real. Destacamento de Desactivación de Explosivos en Puertos (P Party). Destacamento Naval 1571. Cherburgo (Francia), julio de 1944.
- Bedford MWD. British Army. 11th Armoured Division, 179th Light Field Ambulance Regiment. Denmark, early May 1945.
- Bedford MWD. British Army. Hallamshire (4th) Battalion. Yorkshire & Lancshire Regiment. 147th Infantry Brigade. 49th (West Riding) Infantry Division. Fontenay-le-Pesnel (Normandy, France), June 1944.
- Bedford MWD. Royal Navy. X Troop. 30 Assault Unit. Channel Coast (France), September 1944.
- Bedford MWD. Royal Navy. Royal Navy Port Clearance Party (P Party). Naval party 1571. Cherbourg (France), July 1944.
INSTRUCCIONES – INSTRUCTIONS:
- Folleto apaisado de 36 páginas impreso en color sobre papel satinado. Contiene un sumario histórico multilingüe, un plano de piezas numerado, 52 capítulos de montaje y perfiles. Los colores tienen referencias genéricas. Muy claras.
- 36-page landscape booklet printed in color on satin paper. It contains a historical summary in several languages, a numbered parts plan, 52 assembly chapters and profiles. Color reference is generic. Very clear.
LO MEJOR – THE BEST:
- Bien detallada. Aparente sencillez de montaje pese al numeroso despiece. Puertas, capó y portón trasero separados.
- Nicely detailed. Apparently an easy build despite parts count. Separate doors, hood and cargo tray door.
LO PEOR – THE WORST:
- Algunas piezas muy delicadas de manipular. Fotograbados pequeños.
- Some parts are too brittle. Tiny PE parts.
VALORACIÓN – CONCLUSION:
- Aparenta menos dificultad de lo esperable por el número de bastidores. Un molde limpio y bien detallado que merece ser puesto a prueba por los aficionados a los vehículos del peso ligero.
- It seems less difficult to build than the number of frames can suggest. A clean and detailed kit that is worth trying by softskins fans.

La maqueta
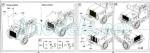
Gecko Models (GM) ha sacado ya varias cajas de este molde del camión británico Bedford MW y en el momento de escribir esta revisión quedan un par de versiones más por ver la luz. Y es que de un tiempo a esta parte vivimos una buena época para los aficionados a los vehículos militares ligeros británicos. No hay más que repasar los catálogos de varias marcas en las escalas 1/35 y 1/72 para constatarlo.
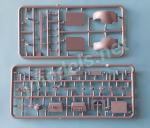
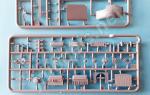
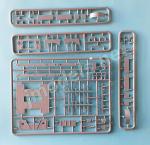
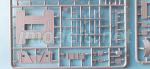
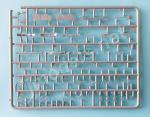
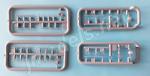
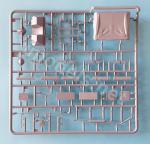
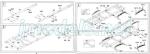
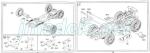
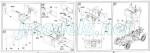
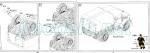
La maqueta de GM aturde al abrir la caja, pues encontramos 22 bastidores de plástico de pequeño/mediano tamaño, un bastidor transparente, una amplia plancha de fotograbados, un trozo de hilo trenzado, las calcas y un folleto de instrucciones muy bien editado. La cuenta sale a más de 400 piezas de diferente material y un despiece realmente excesivo. Está claro que esta no es maqueta para los cagaprisas del concurso de turno
Repasados a conciencia las piezas de plástico, sólo he encontrado una ligera marca en los largueros de los bastidores del chasis, que no se va a ver de cualquier forma, y leves líneas de molde en algunas pocas piezas. Hasta ahí el recuento de imperfecciones. En mi cuenta particular sí he de anotar que mi maqueta carece del bastidor de la figura del conductor y del bastidor donde figura el suelo de la carlinga y las puertas, motivo por el que esta revisión no cuenta con las fotos pertinentes. De todas maneras he dejado algunas anotaciones sobre la figura y las piezas en el apartado correspondiente. El lector debe saber que esas impresiones las hago basándome en fotos de otras revisiones visitadas en internet y no de primera mano, valga el símil.
Las piezas están bien moldeadas y son finas. El plástico tiende dureza media, tendiendo un poco a blando. Este detalle se puede apreciar más en las superficies de tela, como el toldo o la textura de los asientos. Quienes conozcan las maquetas de Takom ya saben de lo que escribo. Hay piezas extremadamente finas que se romperán o saltarán en pedazos a la menor tensión de unos alicates de corte, por ello hay que extremar el cuidado y la paciencia, además de usar otra herramienta para extraerlas. A mí ya me vale con una sierra de fotograbado y un tiento de arpista, pero cada cual debe buscar su método.
La maqueta representa un Bedford modelo MWD de carga general (General Service) con cabina cerrada. Esta versión se empezó a fabricar a partir de 1943, ya que el MWD inicial tenía cabina abierta con parabrisas plegable y techo de lona. Entre las variantes producidas estuvieron el MWC con cuba, el MWT empleado para remolcar cañones AA, el MWG dotado de un cañón de 2 libras o un cañón AA Oerlikon, el camión radio MWR y el MWV de señales. Algunos vehículos capturados fueron también empleados por los alemanes.
Chasis y suspensión
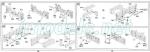
El montaje comienza por el bastidor del vehículo, formado por dos largueros con perfil en C cuadrada y seis travesaños, el más retrasado de los cuales está formado por siete piezas y contiene el enganche de remolque. La parte exterior de los largueros está detallada con diversas piezas pequeñas, la mayoría unidas después de formar el bastidor.
Los lados del bastidor están detallados con los depósitos de combustible y los estribos. En el caso del Bedford los depósitos iban debajo de los soportes y no encima. Cada depósito consta de varias piezas con el tubo de relleno por separado.
Las ballestas vienen bien detalladas, con especial definición en las abrazaderas y las bridas separadas en pequeñas piezas.
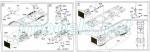
Motor y transmisión
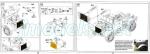
El motor está formado por dos mitades coronadas por una pieza separada para la culata y otra encima que representa la tapa de balancines. El detalle del bloque es pasable simplemente, pero hay piezas separadas muy bien reproducidas, como las poleas o la hélice estampada en las caras externas. Hay otras piezas para representar la bomba de agua, el filtro de aceite, la bomba de aceite, los colectores de escape el estárter y el motor de arranque.
Por delante del motor hay que situar el radiador, dividido en dos mitades más una parte superior con el tapón de relleno aparte. La cara delantera muestra un finísimo detalle en la rejilla muy bien reproducido. La cara trasera está moldeada con un hueco que aloja la parte frontal del motor, por lo que el manguito del radiador es muy corto. En un paso de montaje posterior montaremos el filtro de aire en forma de tambor con el conducto separado y un pequeño fotograbado en forma de asa. El filtro va situado sobre la pared del motor. El tubo de escape viene en una pieza y es tal vez lo más decepcionante del conjunto porque muestra líneas de molde muy evidentes. La pieza incluye el silenciador y el extremo no está horadado.
La caja de cambios tiene siete piezas, entre ellas la palanca de marchas que, según las instrucciones, hay que colocar sobre ella en este momento del montaje. Esto resulta poco prudente, pues la pieza puede romperse al manipular el chasis, y también poco práctico, ya que al montar la cabina sobre el bastidor, tendremos que hacer coincidir la palanca con el orificio que la aloja en el suelo de la cabina. Lo mejor es dejarla aparte por el momento y pegarla tras montar la cabina.
La transmisión está bien detallada y comprende el eje con las mitades de las juntas cardan separadas y el diferencial moldeado con el eje trasero, a su vez compuesto de tres piezas aparte.
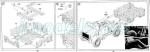
Ejes y ruedas
El eje delantero es de una pieza detallado con una fina barra estabilizadora, las bieletas y algunas pequeñas piezas más. Tras su instalación, hay que pegar los frenos de tambor. El eje trasero sólo cuenta con los frenos y la parte interna de la llanta.
Las ruedas me parecen excelentes y están moldeadas de manera poco común. La banda de rodadura está realizada de una pieza separada y muestra buen perfil en el dibujo sin las típicas líneas de molde a lo largo del centro. Los lados del neumático están unidos a la llanta, que viene en mitades y tiene rodamientos entre ellas que permiten introducirla en los ejes y girar la rueda. Los bujes son diferentes según el eje, en el delantero están detallados con piezas de fotograbado lisas, mientras que en el eje trasero están unidos a la llanta debido a la corona de tuercas situada alrededor del buje.
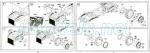
Cabina
Según las instrucciones el montaje de la cabina comienza por el panel frontal, pero puede iniciarse también por el suelo. Seguiré en este caso el orden de las instrucciones. El panel está fabricado de una pieza que tiene buena resolución en las molduras de la cubierta frontal donde sólo hay que pegar el breve salpicadero con los indicadores bien definidos en relieve. La pieza está detallada con el volante y la columna de dirección, los pedales, la barra de seguridad y una especie de guantera (o eso parece) en el lado del acompañante. La parte externa también lleva algunos dispositivos del motor, seguramente del sistema eléctrico.
El suelo es una pieza con molduras limpias en la parte anterior. Sobre ella hay que colocar los asientos, formados por varias piezas tales como los raíles, la base, el asiento (texturizado) y el respaldo. Entre ellos va situado el freno de mano y una caja detallada con la bomba de aire. Los fusiles de los tripulantes, que reproducen bastante bien el modelo Lee-Enfield Mk III de cargador corto, van dispuestos sobre una moldura en forma de culata y apoyados en el panel trasero del asiento del acompañante junto con algunas herramientas, como un pico con mango separado y una llave de rueda.
Unidos los dos subconjuntos descritos, sólo queda pegar los perfiles externos de la carrocería y colocar las puertas, detalladas con las manetas por ambos lados.
El parabrisas viene en una sola pieza transparente. La cara externa tiene los limpiaparabrisas de fotograbado, pero parece que GM ha olvidado los motores eléctricos. Por dentro, hay varias piezas de fotograbado que parecen simular pestillos para abatirlo. Dos finos perfiles moldeados con los soportes de los retrovisores sujetan los perfiles laterales del parabrisas a la carrocería.
Las ventanas laterales, dos por lado, están representadas con ligeras arrugas para reproducir el Perspex original, detalle que mejora mucho el realismo de la maqueta. Ambas van colocadas sobre las puertas, detalle por el que parece que GM no ha diseñado la maqueta para mostrarla con las puertas abiertas, pero en realidad los vanos están moldeados con los bastidores de cada puerta.
Antes de unir la cabina al chasis, hay que pegar un bastidor formado por dos largueros y tres travesaños. El toldo de la cabina es una sola pieza que muestra definición correcta por dentro y fuera. Los soportes son barra finas y muy quebradizas.
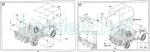
Carrocería
El morro del vehículo contiene un frontal, dos piezas laterales y el capó dividido en mitades que pueden mostrarse abiertas. Los lados muestran las aberturas de ventilación bien perfiladas y limpias de plástico. La cara frontal lleva una parrilla de fotograbado y los faros fabricados con las lentes separadas, de plástico transparente en el caso del faro estándar y de plástico en el de conducción nocturna. Puede montarse uno de cada tipo, o bien uno de los dos faros a la izquierda y el hueco del derecho cegado por una pieza redonda de fotograbado que simula la placa del número de vehículo, detallada posteriormente con una calca con el numeral en negro y fondo amarillo. La cara interna de la parrilla lleva dos perfiles para encajar el radiador.
Tras unir la parte frontal, queda por añadir el paragolpes, moldeado de una pieza, así como los enganches de remolque, la lona del radiador, que aparece enrollada, y la característica barra protectora en forma de toallero que consta de tres piezas.
Los guardabarros delanteros vienen de una pieza con los soportes del mismo material. La parte exterior está incluso detallada con pequeños muelles que los sujetan. Además, una vista de detalle en el paso 18 de las instrucciones nos indica cómo deben quedar también sujetos a los estribos. Las pequeñas luces de posición son piezas transparentes.
Caja de transporte
La caja tiene como base un bastidor moldeado con los guardabarros traseros. En ambos extremos de estos hay aletas guardabarros.
La reproducción del entramado de madera de la caja es muy bueno por ambas caras. La base lleva el hueco de la trampilla de acceso a la transmisión separado y dotado de pequeñas bisagras, así como el paragolpes trasero detallado con las luces. Por dentro, la caja cuenta con el forro enmaderado que salva los huecos de los guardabarros y la rueda de repuesto, cuya llanta tiene moldeados los soportes.
Los lados externos de la caja están detallados con variados perfiles de plástico y pequeñas piezas de fotograbado para los pestillos y herrajes, además de la pala. Bajo la parte trasera hay que colocar una caja de respeto y una lata de combustible, ambas detalladas con fotograbados en asas y soportes.
No por esperable deja de ser una buena anoticia en esta maqueta el hecho de que también el lado trasero pueda mostrarse abierto, al igual que el capó y las puertas de la cabina.
El bastidor del toldo es muy fino y las piezas, especialmente el marco superior, que viene completo, realmente frágiles y susceptibles de partirse fácilmente al cortarlas. Los más apañados lo sustituirán por cobre. El toldo es de una pieza fina y bien texturizada por dentro y fuera. La cara trasera está separada y muestra las correas y hebillas cerradas con buena definición. También se puede mostrar la parte trasera abierta con un perfil superior separado y otra pieza para simular los faldones enrollados. El tramo de hilo que GM proporciona sirve para replicar las cuerdas de sujeción a la caja.
Figura y complementos
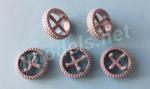
Debido a un error de fábrica, mi maqueta no incluye la figura del conductor, por ello la describiré someramente a partir de fotos de internet para no dejar colgado al lector. Está despiezada en siete partes, dos de ellas son cabezas alternativas tocadas con boina o gorra de faena. Las demás piezas son el tronco, brazos y piernas. Las piezas muestran algunas líneas de molde en los brazos y piernas, más puntos de salida del eyector en las cabezas y tronco.
Los detalles del uniforme parecen un poco blandos aunque no carecen de cierta definición, especialmente en las arrugas y los detalles en botas, cinturón y correas. La expresión facial es neutra y la postura representa al conductor sentado con las manos sobre el volante.
GM ha incluido un par de bastidores con algunos complementos para detallar varias figuras, como cascos, cartucheras, fusiles, mochilas, cantimploras y prismáticos. Las piezas son desiguales en calidad, así, por ejemplo, los prismáticos no son muy convincentes y muestran escasa definición y ligeras rebabas, mientras que las cartucheras, cascos y mochilas parecen mejor definidos.
Calcas
La hoja contiene estrellas Aliadas con y sin círculo, matrículas y enseñas de unidad. Los motivos son finos, con adecuada nitidez, saturación de color y buen registro.
Instrucciones
El folleto apaisado de 36 páginas está impreso en color sobre papel satinado. Contiene un sumario histórico multilingüe, un plano de piezas numerado, 52 capítulos de montaje y perfiles. Los colores tienen referencias genéricas. Los pasos de montaje no contienen errores e incluyen vistas detalladas a lo largo del proceso, así como información sobre las opciones de montaje donde procede.
GM ha incluido diferentes opciones de pintura, con acabados en varios colores y sólo uno de camuflaje con el patrón vulgarmente conocido como Mickey Mouse. Los vehículos representados pertenecen tanto al Ejército como a la Marina, lo cual es ya una variación sobre lo habitual.
Valoración
Aunque no escribo revisiones con el montaje de la maqueta en cuestión, me atrevería a decir que el león no es tan fiero como parece. El número de piezas y el excesivo despiece en algunos pasos de montaje no creo que deba echar atrás a ningún modelista interesado. Muchos de los subconjuntos no aparentan ninguna complicación, salvo que la alineación al montarlos dicte otra cosa.
Igualmente cierto es que tal vez no deberíamos poner muchas esperanzas en terminar este Bedford en muy escaso tiempo. Se me ocurren dos razones: el número de pequeños fotograbados y piezas delicadas que tiene y la pintura del interior. Esto último no tiene nada de extraordinario para quien hace maquetas de este tipo de vehículos.
El detalle en general está bien conseguido, con especial relevancia en las reproducciones de los cristales de las puertas, el motor, las ruedas y la cabina. Las opciones de pintura no son demasiado diferentes, pero tienen ciertas variaciones, y siempre se pueden buscar otras.
Aunque la figura del conductor que estaba en mi maqueta ha “huido” (acaso para no caer en mis manos), en el tiempo de escribir esta revisión me he dado cuenta que, pese a las piezas que me faltan, aún puedo montar el Bedford con un poco de maña y cambiando gato por liebre. Mire usted qué bien.◊


The kit
Gecko Models (GM) have already released several boxes of this British Bedford MW truck and at the time of writing this review there are a couple more versions yet to arrive. It seems these are good times for British softskins lovers. Just check any brand catalogue of 1/35 and 1/72 military kits to confirm this.
GM kit is stunning when you open the box, as we find 22 small / medium-sized plastic frames, a clear frame, a large photo-etched fret, a piece of braided thread, the decals and a very well edited instruction booklet. Parts count reaches more than 400 pieces in different media and breakup is clearly excessive in some assemblies. It is clear that this is not a kit to build just a week before a contest.
After checking plastic parts, I have only found a slight pin mark on the side members of the chassis frame, which will not be seen anyway, slight seam lines on a few pieces plus a few plastic nodes on the driver figure. That’s all in the blemishes record. In my private account I do have to note that my kit lacks the frame including the driver’s figure and the frame containing the cab floor and doors, which is the reason why this review does not show pictures of these parts. In any case, I have left some notes about the figure and the other pieces under the corresponding heading. The reader should know that I write these impressions based on photos from other reviews read on the Internet and not first-hand.
Pieces are well molded and thin. Plastic tends to be medium hard, a bit on the soft side. This feature can be seen more in fabric surfaces, such as the awning or the seat texture. Those who know Takom kits already know what I am writing about. There are extremely thin pieces that will break at the slightest tension of cutting pliers, so extreme care and patience is quite necessary, in addition to using a different tool to take them out of the frames. I usually get by with a thin PE modelling saw and a harpist’s touch, but everyone must find their own method.
The kit represents a Bedford MWD (General Service) with closed cabin. This version began to be manufactured in 1943, since the initial MWD had an open cabin with a folding windshield and a canvas roof. Among the variants produced were the MWC water bowser, the MWT used to tow AA guns, the MWG equipped with a 2-pounder gun or an Oerlikon AA gun, the MWR radio truck and the MWV signals version. Some captured vehicles were also used by the Germans.
Chassis and suspension
Assembly begins with the vehicle frame, made up of two side members with a square C profile and six cross members. The rear cross member comprises seven pieces and contains the tow hitch. The side members are detailed with some small pieces, most of them attached after the frame is completed.
The frame sides are also detailed with the fuel tanks and running boards. In the case of this Bedford the tanks hung under the supports. Each tank consists of several pieces with the filling fuel cap separately.
The leaf springs come well detailed, with special definition in the clips and shackles separated in small pieces.
Engine and transmission
The engine is made up of two halves topped by a separate piece for the cylinder head and another on top that represents the rocker cover. Detail of the block is simply passable but there are separate parts very well reproduced, such as the pulleys or the fan stamped on the propeller external faces. There are other parts to represent the water pump, oil filter, oil pump, exhaust manifolds, choke and starter engine.
The radiator is divided into two halves plus an upper part with a separate filler cap. The front face shows a very fine detail in the mesh. The rear face is molded with a gap that houses the engine front, so the radiator hose is very short. In a later assembly step we will add the air filter with a separate duct and a small photo-etched part in the shape of a handle. The filter is attached on the engine firewall. The one-piece exhaust is perhaps the most disappointing piece because it shows evident seam lines. The piece includes the silencer and the tail pipe is not open.
The gearbox has seven parts, including the gear lever which, according to the instructions, must be placed on it at this time of assembly. This is unwise, since the piece can break when manipulating the chassis, and also impractical because after finishing the cab, we will have to match the lever with a gap on the cabin floor. It is best to leave it aside for the moment and attach it after cab assembly is over.
The transmission is well detailed and includes the axle with separate cardan joint halves and the differential molded with the rear axle and comprising three pieces.
Axles and wheels
The front axle is one piece detailed with a thin stabilizer bar, the links and a few other small parts. After installation, you add the drum brakes. The rear axle only has the brakes and the inner rim side.
The wheels look excellent and are molded in an unusual way. The tread is molded separately, this avoids annoying seam lines in the middle. The sides of the tire are attached to the rim, which comes in halves and has bearings between them that allow wheel turning. The hubs are different depending on the axle. They are detailed with flat photo-etched discs at the front axle, while on the rear one they are molded with the rim due to the nuts around the hub.
Cab
According to the instructions, cab assembly begins with the front bulkhead, but the modeller can also start with the floor. In this text I will follow the order of the instructions. The bulkhead is made in one piece showing good definition in the moldings of the front middle bulge. There is only one piece to add, which is the small dashboard provided with clean and raised gauges. The bulkhead also contains the steering wheel and steering column, the pedals, a handle and a kind of glove compartment (or so it seems) on the passenger side. The external face also has a few separate instruments, probably belonging to the electrical system.
The floor is one piece with clean moldings on the front surface. The seats are made up of several pieces such as the rails, the base, the seat (textured) and the backrest. Between the seat is the handbrake and a box detailed with the air pump. The crew’s rifles, which are a nice rendition of the short-magazine Lee-Enfield Mk III, are attached on a butt-shaped molding and lean on the rear panel behind the passenger seat along with some tools, such as a pickaxe with a separate handle and a wheel wrench.
Once the two subassemblies described are finished, cab construction goes on with the side frames and the doors, detailed with handles on both sides.
The windshield comes in one clear piece. The external face has photo-etched windshield wipers, but the electric engines are missing. Inside, there are several photo-etched pieces that seem latches to fold it. Two thin frames molded with the mirror support arms join the windshield to the vehicle bodywork.
The side windows, two on each side, are represented with slight wrinkles to render the original Perspex, a detail that greatly improves the kit realism. Both are placed on the doors, a detail that suggests GM did not design the kit to show the doors open, but in fact the windows top frames are molded with the clear pieces.
Before attaching the truck cab, a frame containing two side members and three cross members is added on the chassis. The cab awning is a single piece that shows nice texture definition inside and out. The supports are thin and very brittle rods.
Body
The nose of the vehicle contains a front, two side pieces and the hood divided in halves that can be shown open. The sides show well-profiled and clean engine louvres. The front face has a photo-etched grille and the headlights. The standard headlight is provided with a separate clear lense but there is an alternative blackout headlamp. Assembly choices include one of each type or one of the two headlights on the left and a gap on the right covered by a round photo-etched piece for the vehicle number plate, which is later detailed with a decal showing a black number on yellow backgound. The inner grill face has two frames to fit the radiator.
Assembly continues with the bumper, molded in one piece, as well as the tow hitches, the radiator canvas, which is rolled up, and the characteristic towel rail-shaped bar molded in three pieces.
The front fenders come in one piece with supports made of the same material. The outside is even detailed with small springs that hold them in place. In addition, a detail view in step 18 of the instructions tells us how we should attached them to the running boards. The small lamps on the fenders are clear parts.
Cargo bed
The tray is attached on a frame molded with the rear fenders. These are detailed with separate mudflaps. The rendition of the wooden boxy structure is very good on both sides. The base has the transmission access hatch separated and features small hinges, as well as the rear bumper detailed with tail lights. On the inside, the tray has boxlike structures to cover the gaps in the fenders and the spare wheel with brackets molded in the rim.
The external sides of the tray are detailed with fittings and small photo-etched parts for the latches and holders, as well as a shovel. Under the rear end of the tray there is a sparebox and a fuel can, both detailed with photo-etched parts.
Although expected, it is still good news that we can show the tail gate open, as it happens with the hood and cab doors.
The awning frame is very thin and the parts, especially the upper frame, which comes in one piece, are really brittle and can break easily when cut. The skillfull modeller will replace it with copper wire. The awning is a thin piece well textured inside and out. The back side is separated and shows the straps and buckles with good definition. The part has a replacement to show it rolled. The length of thread that GM provide is used to replicate the ropes securing the awning.
Figure and accessories
Due to a factory mistake, my kit does not include the driver figure, so I will describe it briefly using photos from the Internet. The driver is broken up in seven parts, two of them are alternative heads wearing a beret and a cap respectively. The other pieces are the trunk, arms and legs. The pieces show some seam lines on the arms and legs, and plastic nodes on the heads and trunk.
Details of the uniform seem a little soft although do not lack some definition, especially in the wrinkles and on the boots, belt and straps. The facial expression is neutral and the pose shows him sitting with his hands on the wheel.
GM have included a couple of frames with some accessories to detail several figures, such as helmets, ammo poaches, rifles, backpacks and binoculars. Pieces are uneven in quality, so, for example, the binoculars are not very convincing and show little definition and slight flash, while the poaches, helmets and backpacks look better defined.
Decals
The sheet contains Allied stars with and without a circle, number plates and unit badges. Decals are thin, with adequate sharpness, color saturation and good registration.
Instructions
The 36-page landscape brochure is printed in color on glossy paper. It shows a multilingual historical summary, a numbered parts plan, 52 assembly chapters and profiles. Colors have generic references. Assembly steps are very clear and include inset views throughout the process, as well as information on assembly options where applicable.
GM have included paint options with finishes in two colors and only one camouflaged vehicle sporting the commonly known as Mickey Mouse pattern. The vehicles depicted belong to both the Army and the Navy, which is already a variation on the usual trend.
Conclusion
Although I do not write build reviews, I would say this lion is not as fierce as it seems. I don’t think parts count and breakup in some assembly steps should discourage any interested modeller. Many of the subassemblies do not look complicated, unless alignment during assembly says the opposite.
On the other hand, it is also true we should not hope to finish this Bedford in a very short time. Two reasons come to mind: the number of small photo-etched parts and delicate pieces and the painting of the interior, which is nothing new for someone used to building kits like this.
Detail in general is well done, especially in the rendition of the door windows, the engine, the wheels and the cab. Paint choices are not very different, but they have certain variations, and you can always look for others.
The driver figure has “fled” from my kit (perhaps to avoid falling in my hands) and I felt a bit discouraged by the lack of cab doors and floor, but while writing this review, I realized that despite the missing parts, I can still assemble the Bedford with a little skill and changing some bits here and there. Getting a kit with missing parts is no laughing matter, but it doesn’t really matter provided you have the last laugh.◊
Publicado – Published: 10 / 2023
©www.jmodels.net

Debe estar conectado para enviar un comentario.