
De un vistazo – Quick look
MATERIAL Y PIEZAS
MEDIA & PARTS:
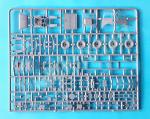
- Plástico inyectado (86 piezas), acetato (13 piezas).
- Injected plastic (86 parts), acetate (13 parts).
CALCAS – DECALS:
- Impresas por Techmod. Marcas tácticas y de unidad, numerales, escarapelas de la RAF y estrellas Aliadas con y sin círculo. Aspecto brillante y fino. Buen registro y saturación de color. Sin exceso de soporte.
- Printed by Techmod. Tactical and unit markings, numbers, RAF roundels and Allied stars with and without circle. Glossy and thin apperance. Good register and color saturation. No excess of carrier film.
OPCIONES – OPTIONS:
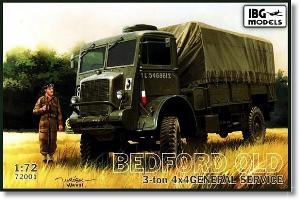
- Bedford QLD. 2º Regimiento Acorazado. 1ª División Acorazada Polaca.
- Bedford QLD. 9º Escuadrón de Carros de la Reserva. 2ª Brigada Blindada Polaca.
- Bedford QLD. Compañía de Suministros. 1ª División Acorazada Polaca.
- Bedford QLD. Servicio de aeródromo de una de las escuadrillas aéreas polacas.
- Bedford QLD. 2nd Armoured Regiment. Polish 1st Armoured Division.
- Bedford QLD. 9th Ind. Reserve Tank Squadron. Polish 2nd Armoured Brigade.
- Bedford QLD. Supply Company. Polish 1st Armoured Division.
- Bedford QLD. Airfield service of one of the Polish air squadrons.
INSTRUCCIONES – INSTRUCTIONS:
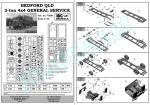
- Folleto doblado de 8 páginas impreso en blanco y negro. Contiene plano numerado de las piezas de plástico, códigos de pinturas de varias marcas, 12 etapas de montaje y dos páginas de perfiles. Claras.
- 8-page folded leaflet printed in black and white. Contains a numbered plastic parts plan, paint codes from several manufacturers, 12 construction stages and two pages of profiles. Clear.
LO MEJOR – THE BEST:
- Nivel de detalle aceptable en general. Chasis. Calcas.
- Overall acceptably detailed. Chassis. Decals.
LO PEOR – THE WORST:
- Moldeo de los bastidores. Deformaciones en algunas piezas. Toldo.
- Parts moulded too near the frames. Plastic sinks on some parts. Tarp.
VALORACIÓN – CONCLUSION:
- IBG no le sacó el partido posible después de tanto despiece. La maqueta tiene un buen chasis, una cabina con algunas ausencias y una caja a medio detallar con toldo totalmente descartable. Requiere cierta experiencia.
- IBG did not get the most out of this kit after so much parts breakup. The kit has a nice chassis, a cab with some missing elements and a half-detailed cargo tray with a completely disposable tarp. It needs some experience.

La maqueta
Antes de la aparición de esta maqueta en 2008 no había una en esta escala del popular camión británico Bedford QLD. Lo más cercano era hasta entonces la maqueta que Airfix llevaba produciendo décadas, pero a escala 1/76. Desde entonces IBG Models aprovechó el molde para sacar otros modelos diferentes de este vehículo, como el QLT (transporte de tropas), QLR (transmisiones), QLB (tractor de artillería) y hasta un vehículo de bomberos. En fechas más recientes el fabricante también ha sacado un par de versiones de repostaje de combustible (QL Refueller y QL Tanker).
La caja de este QLD trae dos bastidores, uno de ellos es común para todas las versiones y otro contiene las piezas de la caja de carga y toldo, una lámina de acetato, las calcas y las instrucciones. Las piezas tienen los bebederos muy cortos y hay escaso o ningún espacio entre las piezas y los bastidores. De esta forma es más improbable que las piezas se suelten o partan durante el transporte, pero también resulta mucho más delicado y difícil extraerlas de los bastidores, especialmente si son muy finas, como el tubo de escape, la transmisión y otras.
Las piezas están bastante limpias de rebabas y marcas de eyector excepto en el interior de la cabina. Además del depósito de combustible y el motor, todas las ruedas presentan un rechupe en el plástico en una de sus caras. Este desperfecto no resulta difícil de rellenar en las ruedas porque están situadas en el lado del neumático y además se puede de disimular colocando las caras dañadas vueltas hacia el interior del camión. El rechupe del depósito es más delicado, pero también se puede solucionar con algo de cuidado para no dañar el detalle adyacente.
La única opción de montaje es añadir o no el toldo, para lo cual hay que recortar los lados de la caja de transporte. Como alternativa también podemos montar el bastidor del toldo, compuesto de finas varillas de plástico.
Chasis y suspensión
El bastidor viene en una pieza con todos los travesaños excepto el primero y el último, que lleva el gancho de remolque separado. Hay piezas separadas para los soportes de las ballestas traseras y del motor. Las ballestas son distintas en los dos ejes, están limpias de rebabas y el detalle está bien definido por ambas caras.
Los ejes están unidos a los diferenciales, que presentan buena definición. El eje delantero cuenta también con una fina barra de torsión. Los tambores de freno son piezas separadas. El motor es de una pieza y muestra un pequeño rechupe en uno de los lados. Salvo eso, el detalle es bastante decente. El radiador viene aparte e igualmente está bien detallado por las dos caras.
La transmisión está compuesta por una caja de transferencia auxiliar, situada bajo uno de los travesaños intermedios, más tres ejes unidos respectivamente a los diferenciales y al motor. Es importante colocar bien la caja transfer para alinear correctamente los ejes. El tubo de escape es finísimo e incluye el silenciador en la pieza. Costará bastante no romperlo al sacarlo del bastidor.
A pesar de las deformaciones que tienen, las ruedas muestran buen detalle en la llanta y la banda de rodadura de los neumáticos sin líneas de molde.
En conjunto el chasis está bien detallado y solo se echan de menos los evidentes eslabones de remolque delanteros. Los neumáticos no son malos y pueden emplearse en la maqueta si se pueden reparar. La propia IBG ha lanzado recientemente repuestos de resina.
Cabina
El suelo es de una pieza moldeada con la cubierta del motor y las bases de los asientos. El panel delantero viene separado y detallado con el salpicadero, una pieza fina y que muestra los indicadores bien definidos. Las palancas, sin embargo, son algo gruesas y merecen un reemplazo. En el lado negativo hay que señalar la ausencia de los pedales y las formas de los asientos, cuadradas en los respaldos en lugar de redondeadas como los reales. La columna de la dirección y el volante son piezas separadas. La pieza de la columna tiene una lámina intermedia gruesa y nada convincente para reproducir el soporte triangular de la columna.
Los lados de la cabina y el techo son piezas separadas cuyo montaje incluye también el de los guardabarros delanteros, que a su vez están moldeados con los estribos. Todas las piezas, salvo los guardabarros y el techo muestran marcas de eyector que conviene rellenar antes de pegarlas. Las ventanillas son piezas de acetato encajadas en finos rebajes realizados en los marcos.
La cara frontal muestra la cubierta del radiador y una parrilla bien texturizada. El detalle añadido incluye el paragolpes y los faros. Estos últimos son realmente diminutos y carecen de soportes. Faltan los limpiaparabrisas sobre las ventanillas.
Los lados de la cabina tienen las puertas cerradas y el detalle es pobre en las bisagras y los tiradores. Los retrovisores son piezas separadas unidas a sus soportes. Los guardabarros presentan un grosor bastante aceptable pero carecen de soportes y de las luces de posición delanteras. El derecho incluye la placa con el numeral del vehículo impreso en una calca.
El lado trasero es fino y muestra buen detalle en el estampado de las superficies inferiores y en los perfiles situados por encima de él. El techo carece de apertura para la escotilla del acompañante y esta pieza va pegada directamente sobre la superficie. El hueco está cubierto por una lona texturizada.
Para montar la cabina correctamente es clave alinear los lados de manera adecuada. Parece que lo más fácil es pegar primero los guardabarros al suelo y añadir posteriormente la cara trasera, la frontal y por último el techo.
La cabina en general podemos darla por decente pese a que le faltan detalles en la parte anterior y algunos del interior son mejorables.
Caja de transporte
Entre la cabina y la caja hay que pegar una pieza en forma de escalera unida al chasis que representa el soporte de la rueda de repuesto y el depósito de combustible, del que ya he comentado su defecto de moldeado.
El suelo y los lados de la caja están separados. Ninguno de ellos muestra detalle en la tablazón de madera pero los herrajes laterales están bien perfilados. Los lados de la caja deben recortarse si se emplea el toldo, para lo cual las piezas tienen las líneas de corte grabadas en sus lados internos.
La parte inferior de la caja está detallada con los guardabarros separados y las cajas de respeto. Los primeros son algo gruesos y las segundas parecen un poco grandes.
En la parte superior podemos instalar el bastidor del toldo, compuesto por cinco finas varillas más tres arcos transversales. Estas piezas son muy delicadas y hay que extremar el cuidado al sacarlas de los bastidores. Como alternativa tenemos un toldo realmente malo moldeado en una pieza cuyos lados son completamente planos sin textura en la lona.
Calcas
La hoja está impresas por Techmod. Incluye marcas tácticas y de unidad, numerales, escarapelas de la RAF y estrellas Aliadas con y sin círculo. Los motivos tienen aspecto brillante y fino. Muestran buen registro y saturación de color sin exceso de soporte.
Instrucciones
Están impresas en un folleto doblado de ocho páginas en blanco y negro que contiene un plano numerado de las piezas de plástico, una tabla con códigos de pinturas de Gunze, Model Master, Humbrol y Vallejo, 12 etapas de montaje y dos páginas de perfiles. Las vistas explosionadas del montaje son claras y cada etapa incluye una imagen del resultado final tras terminarla, lo que resuelve dudas sobre la colocación de las piezas.
IBG incluyó en esta caja hasta seis posibles acabados de pintura con y sin camuflaje. Los vehículos pertenecen a unidades polacas del Ejército británico en Europa y uno de ellos a una unidad polaca de la RAF.
Valoración
Resumiéndolo todo, creo que este Bedford es un comienzo para esta escala. En general no es una maqueta para tirar, el motor y el chasis me perecen bien reproducidos, las calcas tienen la presumible calidad de Techmod y las instrucciones están bien diseñadas buscando la máxima claridad en el montaje. Con cierta destreza y experiencia se puede enmendar o incluir lo que le falta a esta edición.
Sin embargo, uno queda convencido de que IBG no le ha sacado todo el potencial que a priori tiene este vehículo. Entre los aspectos descuidados destacan la ausencia de algunas piezas muy evidentes en la cabina del camión, el toldo infumable y en especial las decepcionantes deformaciones de ciertas piezas, que dicen mucho del ausente control de calidad de algunos fabricantes.
Otro inconveniente del molde es que IBG metió demasiados elementos diminutos en un único bastidor común a todos los modelos del Bedford, y de ahí que las piezas carezcan de espacio en los bebederos para cortarlas. Es fácil romper algún elemento delicado y hay un puñado en la maqueta.
En general el montaje no aparenta dificultad salvo en zonas donde hay que cuidar la alineación de piezas, como en la cabina, o estas son diminutas y por tanto difíciles de manipular. Por estos motivos no recomendaría esta maqueta a los muy inexpertos.◊


The kit
Before the release of this kit in 2008 there was no Bedford QL truck in this scale, something strange given the popularity of this vehicle in WWII. The closest kit until then was the Bedford Airfix had been producing for decades but in 1/76 scale. Since then IBG Models have released other different variants of the QL, such as the QLT (troop carrier), QLR (wireless communication), QLB (artillery tractor) and even a fire tender. More recently the manufacturer has also released a couple of bowsers (QL Refueller and QL Tanker).
The box of this QLD includes two sprues, one of them is common for all versions while the other contains the pieces of the cargo tray and tarp, an acetate sheet, the decals and the instructions. Parts have very short gates and there is little or no space between the parts and the frames. This makes it more unlikely that parts will come loose or break during transport, but it is also much more delicate and difficult to remove them from the sprues, especially if they are very thin, such as the exhaust pipe, transmission and others in this kit.
The parts are fairly clean from flash and ejector marks except on the cab interior. In addition to the fuel tank and the engine, all the wheels have a sink in the plastic on one side. This damage is not difficult to fill in the wheels because they are located on the side of the tire and can also be hidden by placing the damaged sides facing the inside of the truck. The tank is more delicate, but it can also be solved with some care so as not to damage adjacent detail.
The only assembly option is whether or not to add the tarp, for which the sides of the cargo tray must be trimmed. As an alternative, we can also build the tarp frame, made of thin plastic rods.
Chassis and suspension
The chassis frame comes in one piece with all cross members except the first and last one, which has the pintle hook separated. There are separate parts for the rear leaf spring brackets and engine mount. The leaf springs are different on the two axles, they are clean from flash and detail is well defined on both sides.
The axles are joined to the differentials, which have good definition. The front axle also has a thin sway bar. The brake drums are separate parts. The engine is one piece and shows a small sink on one side. Other than that, detail is pretty decent. The radiator comes separately and is also nicely rendered and detailed on both sides.
The transmission is made up of an auxiliary transfer case, located under one of the intermediate crossmembers, plus three transmission shafts linked respectively to the differentials and the engine. It is important to position the transfer case correctly to align the axles. The exhaust pipe is very thin and includes the silencer in the piece. It will be quite difficult not to break it when removing it from the sprue.
Despite the flaws they have, the wheels show good detail in the rim and tire treads have no seam lines.
As a whole, the chassis is well detailed and only the obvious front tow shackles are missing. The tires are not bad and are usable in the kit if the sinks can be filled. IBG have recently produced resin replacements for the wheels
Cab
The floor is one piece molded with the engine cover and seat bases. The front panel is separated and detailed with the dashboard, a thin piece that shows well-defined gadgets. The levers, however, are a bit thick and need replacement. On the negative side is the lack of pedals and the shapes of the seats, square in the backrests instead of rounded like the real ones. The steering column and wheel are separate parts. The column piece has a thick and unconvincing square in the middle to reproduce the triangular support of the column.
The cab sides and roof are separate pieces. Cab assembly also includes the front fenders, which in turn are molded with the step plates. All parts except the fenders and roof show ejector marks that should be filled before gluing. The windows are acetate pieces fitted into fine recesses molded in the frames.
The front face shows the radiator cover and a well-textured grille. Added detail includes the bumper and headlights. The latter are really tiny and lack the brackets. The windshield wipers are missing on the windows.
The cab sides have closed doors and detail is poor on the hinges and handles. The mirrors are separate pieces attached to their brackets. The mudguards are quite acceptable in thickness but lack the supports and the front position lights. The right mudguard includes the plate with the vehicle number printed on a decal.
The back cab side is thin and shows good detail in the stamping on the lower surfaces and in the mouldings above them. The roof lacks an opening for the passenger hatch and this piece is glued directly onto the surface. The gap is covered by a textured canvas.
Alignment of the cab sides correctly is important for the final look of the model. The easiest way seems to first glue the fenders to the floor and then add the rear face, the front face and finally the roof.
The cab is overall decent despite the fact that it lacks some pieces in the front part and the interior can still be improved.
Cargo tray
Between the cab and the tray there is a ladder-shaped piece attached to the chassis that represents the spare wheel and the fuel tank support. The tank is fine but it has a very evident sinking on the middle of the top side.
The floor and sides of the box are separated. None of them show detail in the wooden planking but the side fittings are sharply rendered. The sides of the box are trimmed if the awning is used. The parts have engraved lines on the inner faces to make this easier.
The bottom of the box is detailed with separate mudguards and spare boxes. The first ones are somewhat thick and the second look too big.
In the upper part we can install the tarp frame, made up of five thin rods plus three transverse arches. These pieces are very delicate and extreme care must be taken when removing them from the sprues. Alternatively we have a really bad tarp molded in one piece with completely flat sides and no texture in the canvas.
Decals
The sheet is printed by Techmod. It includes tactical and unit markings, numbers, RAF cockades and Allied stars with and without circle. The items have a glossy and fine appearance. They show good registration and color saturation without excess carrier.
Instructions
They come in a folded 8-page brochure printed in black and white containing a numbered plan of the plastic parts, a table with paint codes from Gunze, Model Master, Humbrol and Vallejo, 12 construction stages and two pages of profiles. The exploded views are clear and each stage includes an image of the finished subassembly, which is quite handy for parts placement.
IBG included in this box up to six possible paint finishes with and without camouflage. The vehicles belong to Polish units of the British Army in Europe and one of them to a Polish RAF squadron.
Conclusion
All in all, I think this Bedford is a start for this scale. In general it is not a disposable kit, the engine and chassis seem well reproduced, the decals have the presumable quality in Techmod and the instructions are well designed seeking maximum clarity in assembly. With some skill and experience you can mend or add what is missing in the kit.
However, one is convinced that IBG have not taken out all the potential this vehicle could have. Among the neglected aspects are the absence of some very obvious parts in the truck’s cabin, the tarp piece and especially the disappointing blemishes on certain parts, which say a lot about the lack of quality control in some manufacturers.
Another drawback of the moulding is that IBG included too many tiny pieces into a single sprue common to all Bedford variants, and lack of space seems to have brought about undesireable short gates. It is easy to break a brittle piece and there are a handful of these in the kit.
In general, assembly does not look difficult except in areas where alignment of parts must be careful, such as in the cab, or when manipulating tiny parts. For these reasons I would not recommend this kit to beginners.◊
Publicado – Published: 2 / 2024
©www.jmodels.net

Debe estar conectado para enviar un comentario.