
De un vistazo – Quick look
MATERIAL Y PIEZAS
MEDIA & PARTS:
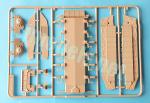
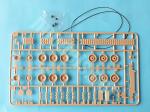
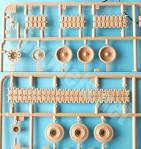
- Plástico inyectado (108 piezas), metal (1 pieza), hilo trenzado (1 tramo), rodamientos (4 piezas). Incluye 1 figura (4 piezas).
- Injected plastic (108 parts), metal (1 parts), thread (1 length), polycaps (4 parts). One figure included (4 parts).
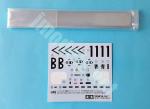
CALCAS – DECALS:
- Periscopios de la torre y cúpula, insignias de unidad, marcas de carro, chevrones y marcas del frontal de la torre. Bien impresas.
- Turret and cupola periscopes, unit and tank markings, chevrons and markings on the turret front. Well printed.
OPCIONES – OPTIONS:
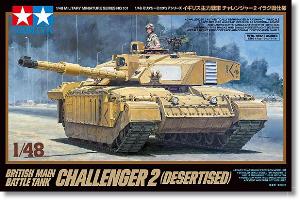
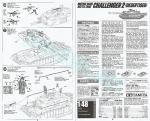
- Challenger 2. Royal Scots Dragoons Guards (Carabiniers and Greys). 7th Armoured Brigade. Irak, abril de 2003.
INSTRUCCIONES – INSTRUCTIONS:
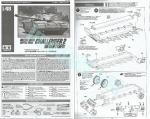
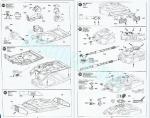
- Folleto doblado de 10 páginas impresas en blanco y negro. Contiene 22 pasos de montaje y una lista de pinturas del fabricante. Una hoja separada impresa en blanco y negro muestra una breve referencia histórica sobre el vehículo y perfiles para pintar y colocar las calcas. Claras.
- 10-page folded brochure printed in black and white. It shows 22 construction steps and a list of Tamiya paints. A separate sheet printed in black and white contains a short historical reference about the vehicle and profiles to paint and set the decals. Clear.
LO MEJOR – THE BEST:
- Muy buen detalle general. Fácil montaje.
- Very nice overall detail. Easy assembly.
LO PEOR – THE WORST:
- Marcas en las cadenas.
- Pin marks on tracks.
VALORACIÓN – CONCLUSION:
- Tiene un equilibrio muy bien conseguido entre sencillez de montaje y detalle sobresaliente que la hacen apta a modelistas de muy variada destreza. Muy recomendable.
- The kit has a balance between ease of assembly and outstanding detail that make it suitable for modellers with very different skill levels. Highly recommendable.

La maqueta
Con el tiempo Tamiya va reproduciendo su largo catálogo de vehículos en la escala 1/35 en un tamaño menor. A estas alturas parece ya evidente que la casa japonesa entendió muy bien el enfoque que debía darle a la serie de vehículos militares en esta escala, y siempre ofrece novedades con un despiece ajustado unido a un detalle excelente. La sencillez de montaje facilita, además, que estas maquetas resulten apropiadas para cualquier modelista.
Tal es el caso de este Challenger 2, que Tamiya nos ha traído en la configuración que fue empleada durante la Operación Telic en 2003. Podemos apreciar en la maqueta el blindaje ERA (Explosive Reactive Armor) añadido en los lados y el frontal del vehículo, los faldones protectores bajo las placas laterales, los depósitos de combustible adicionales en la parte posterior al estilo de los carros soviéticos y los denominados paneles de identificación en combate situados en los lados de la torre. Estos dispositivos con forma de persianas intentaban impedir las pérdidas por fuego amigo creando una marca identificativa térmica nítida y de color más claro cuando el carro era apuntado con infrarrojos. Además, los paneles iban pintados de blanco para ayudar a su reconocimiento visual, aunque esto no siempre era posible debido a las características geográficas y el clima de Irak.
La caja contiene cinco bastidores de piezas, dos de ellos repetidos para el tren de rodaje, un tramo de hilo trenzado, una barra metálica para simular el peso del vehículo y cuatro rodamientos. El plástico está muy bien moldeado y solo muestra marcas de eyector en la cara internas de las cadenas. Aunque tedioso, creo que merece la pena eliminarlas para mejorar el resultado final de esta sobresaliente maqueta.
El detalle general es excelente y destaca en varias zonas, como la cubierta del motor, el tren de rodaje o los elementos añadidos sobre la torre (armamento y cúpula).
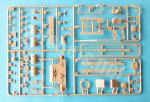
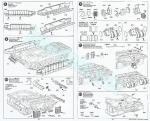
Casco
El casco tiene como base un fondo moldeado con los brazos de suspensión de las ruedas y la parte inferior de la plancha frontal. El lado trasero está separado, pero los lados del casco no están reproducidos en realidad porque Tamiya los ha sustituido por dos piezas colocadas transversalmente que posteriormente servirán para asentar la cubierta del casco y pegar el blindaje lateral. Esto se llama economía de piezas y eficiencia.
Antes de colocar el tren de rodaje, hay que pegar la barra metálica sobre el interior del suelo. La pieza está sujeta por dos topes en sus extremos. También hay que añadir dos piezas que simulan parte de la caja de engranajes de las ruedas tensoras y dos más para los diferenciales de las tractoras.
La cara posterior del casco viene muy bien detallada. Las luces traseras están moldeadas en la pieza, pero hay un puñado de elementos separados que representan el extremo trasero de los guardabarros añadidos a los lados, la cámara de visión trasera, los enganches de remolque y los contenedores de agua y su soporte. Los depósitos de combustible adicionales muestran un detalle excelente y están fabricados con los soportes y las correas de sujeción muy bien definidas. Bajo ellos aparece una especie de barra con soportes cuya función ignoro.
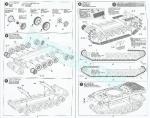
Tren de rodaje y cadenas
Cada lado del tren de rodaje se compone de una rueda tractora, una tensora y cinco ruedas de apoyo, todas ellas compuestas de dos mitades. Las ruedas tractoras, además, llevan un rodamiento entre ambas mitades que permite girarlas para hacer coincidir los dientes con las cadenas. El detalle de las caras externas es excelente, destacando el de las tractoras. Las bandas de caucho están bien marcadas.
Como novedad (al menos para mí), la penúltima rueda de carretera de cada lado contiene un pequeño vástago que va introducido en su correspondiente tramo de cadena. De esta forma, es mucho más sencillo alinear cada oruga. Tamiya está realmente en todo.
Las cadenas tienen en cada lado un tramo superior, tres inferiores y cinco eslabones sueltos para adaptarlos a las ruedas tractoras y tensoras. Del tramo superior sólo tenemos la sección trasera ya que el resto es invisible al cubrirlo el blindaje lateral. Este tramo va apoyado en uno de los vástagos transversales del casco. Los eslabones están bien definidos y limpios de rebabas aunque no de marcas, como he señalado.
Superestructura
La cubierta superior del casco es toda de una pieza y está moldeada con los guardabarros frontales y la plancha anterior del glacis. El detalle realmente saca todo el partido a lo que el plástico puede dar. La cubierta del motor presenta varias rejillas de ventilación con bisagras y cajas de respeto a los lados detalladas con cierres bien definidos. La zona central incluye el hueco de la torre, que muestra un rebaje alrededor y varios accesos, entre otros las tapas de los depósitos de combustible. La zona delantera muestra la escotilla de acceso del conductor, detallada con el asa y la bisagra, además del periscopio, cuyo cristal es una calca.
Instalada la cubierta sobre el casco, se procede a pegar el blindaje ERA lateral, que viene unido a los faldones. Los faldones están texturizados de forma muy realista y son finos. El blindaje ERA presenta placas de factura excelente, con buena definición en los pernos de sujeción y la separación entre placas. El montaje en el casco se hace muy sencillo al ir pegados sobre los vástagos transversales sobresalientes del casco. Para finalizar propiamente el casco del carro, solo queda añadir el blindaje reactivo del glacis, todo él de una pieza.
Siguiendo mi descripción por el detalle de la superestructura representado en piezas separadas, hay que mencionar los faros delanteros, que llevan las lentes aparte, y los extintores. La zona central tiene dos cables de arrastre hechos de hilo trenzado con ojales de plástico. En la parte posterior tenemos los escapes con salidas separadas huecas. Los escapes aparecen alojados dentro de dispositivos de forma cuadrada que ayudaban a disminuir la signatura térmica del vehículo. Finalmente, sobre la cubierta del motor está el trinquete para sujetar el tubo del cañón durante el transporte del vehículo.
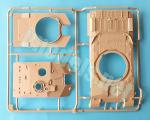
Torre
Está despiezada en dos laterales, una plancha trasera, la cubierta y la base. Tamiya ha salvado el difícil perfil de la torre moldeando vástagos de cierta altura en la base para unir el techo, lo que permite dejar el hueco suficiente para añadir los lados y la parte trasera. Estas tres piezas solo contienen los paneles de identificación en combate descritos arriba. Si algo se puede criticar de las piezas que componen la torre es la ausencia de textura en las planchas que les da un aspecto demasiado plano y suave, aunque esto acaso pueda remediarse con masilla diluida.
Antes de unir la base y el techo hay que montar el mantelete del cañón junto con la mira y el sistema de adquisición de blancos TOGS-2, repartido en varias piezas. El mantelete cuenta también con la mira auxiliar del artillero, con tapa separada y la ametralladora coaxial. El mantelete va unido a dos muñones provistos de rodamientos que permiten alzar o deprimir el cañón.
El tubo del cañón vienen en una pieza que muestra el protector térmico, el extractor de humos y la cubierta del sistema de retroceso de manera excelente. La boca del tubo es una pieza separada que no viene estriada, pero esto ya parece pedir demasiado en esta escala.
Bajo el techo podemos añadir una pequeña base para pegar la figura del comandante si vamos a emplearla. El techo está muy bien representado con el periscopio principal del comandante, los visores de la cúpula, que llevan el anillo externo superpuesto en una pieza aparte, y la tapa de la escotilla, detallada por dentro. Por delante de la cúpula hay que pegar otro periscopio adicional.
La escotilla del cargador viene de una pieza y sólo puede colocarse cerrada. La pieza muestra la base para colocar la ametralladora, representada de una pieza con el afuste, mientras que la caja de munición es independiente. Creo que Tamiya ha capturado bien el perfil del arma y le ha dado buenas hechuras.
La zona posterior del techo de la torre muestra dos bases de antenas, mientras que las planchas frontales cuentan con lanzadores de humos que vienen divididos en dos piezas.
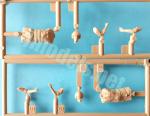
Figura
No todas las cajas de Tamiya en esta escala cuentan con figuras, por eso es una suerte que la marca haya decidido incluir una aquí para redondear esta maqueta de gran nivel.
El comandante está despiezado en torso, cabeza y brazos. Viste un uniforme provisto de chaleco ECBA (Enhanced Combat Body Armour, Armadura Corporal de Combate Mejorada), casco y gafas protectoras. Al casco sólo le falta el micrófono y el cable, pero quien lo desee puede añadirlos sin excesiva dificultad. La pose es relajada y los rasgos faciales me parecen convincentes para esta escala.
Calcas
La hoja contiene calcas para los cristales de los periscopios de la torre y cúpula, insignias de unidad, marcas de carro, chevrones y marcas identificativas situadas en el frontal de la torre. Los motivos están bien reproducidos.
Instrucciones
Están impresas en un folleto doblado de diez páginas realizado en blanco y negro. Contiene 22 pasos de montaje y una lista de pinturas del fabricante. Una hoja separada impresa también en blanco y negro muestra una breve referencia histórica sobre el vehículo y perfiles para pintar y colocar las calcas. Tanto los pasos de montaje como las indicaciones que guían la pintura y la posición de las calcas son muy claros.
La única opción de pintura nos muestra un carro de color arena con marcas blancas en los paneles de identificación y en la parte frontal de la torre.
Valoración
Sin duda esta es una magnífica reproducción de un Challeger 2 “vestido” para el desierto y Tamiya sigue dando en el clavo en el diseño de sus maquetas en esta escala. La maqueta posee un acertado equilibrio entre detalle y facilidad de montaje que da opciones a modelistas de muy diferente grado de experiencia.
Creo que los seguidores de los vehículos militares contemporáneos están de enhorabuena y sin duda disfrutarán cada momento que le dediquen a esta maqueta.◊

The kit
Over time, Tamiya is transferring their long catalogue of 1/35 vehicles to a smaller size. At this point it seems evident that the Japanese company understood very well the approach they should give to the series of military vehicles in this scale, and always offers new releases with a tight parts count combined with excellent detail. Ease of assembly also makes these kits suitable for any modeller.
Such is the case with this Challenger 2, which Tamiya have produced in the configuration it showed during Operation Telic in 2003. A close inspection will recognise the ERA armor (Explosive Reactive Armor) added to the sides and the front of the vehicle, the protective skirts under the side armor, the additional fuel tanks at the rear in the style of Soviet tanks and the so-called combat identification panels located on the turret sides. These louvered panels attempted to prevent losses from friendly fire by creating a clear, lighter-colored thermal signature when the tank was targeted with infrared beams. Additionally, the panels were painted white to aid visual recognition, but this was not always possible due to the geographical characteristics and climate in Iraq.
The box contains five frames of parts, two of them repeated for the undercarriage, a section of braided wire, a metal bar to simulate the weight of the vehicle and four bearings. Plastic is very well molded and only shows ejector pin marks on the inside of the tracks. Although tedious, I think it is worth cleaning them to improve the final result in this outstanding kit.
Overall detail is excellent throughout and stands out in several areas, such as the engine deck, the running gear or the pieces added on the turret (cupola and armament).
Hull
The hull bottom is molded with the suspension arms and the lower part of the front plate. The rear plate is separated, but the sides are not actually rendered because Tamiya have replaced them with two pieces placed transversely that will later be used to attach the hull deck and glue the side armor. This is what I call economy of parts and efficiency.
Before adding the running gear, the metal bar is glued to the inside of the floor. The piece is held by two brackets. We also add two pieces rendering the idler wheels final drive and two more for the sprockets differentials.
The rear hull side is very well detailed. The taillights are molded on the piece, but there are a handful of separate parts representing the rear end of the fenders, the rearview camera, the tow hitches, the water containers and their rack. The additional fuel tanks show excellent detail and are provided with nice sharp brackets and straps. Below them there is a piece rendering a kind of “towel rail” with a role that I ignore.
Running gear and tracks
Each side of the running gear consists of a sprocket, an idler and five road wheels, all of which are made up of two halves. The drive wheels also have a bearing between both halves that allows to match the teeth with the tracks. Detail on the external sides is again excellent, especially on the sprockets. The rubber bands, where applicable, are well marked.
As a novelty (at least for me), the penultimate road wheel on each side contains a small strut to be inserted into the corresponding track length. This simple system allows a much quicker and better build of the tracks. Tamiya are really in every detail.
The tracks have only an upper length on each side, three lower sections and five loose links to adapt them to the sprocket and idler. The upper lenghth is only rendered in the rear section. The rest is invisible as it is covered by the side armor. The track length is glued on the rear transverse rods in the hull. The links are well defined and free from flash although not from pin marks, as noted.
Superstructure
The upper hull is all one piece with the front fenders and the front glacis plate. Detail really takes advantage of what plastic can give. The engine deck features several hinged grilles and side tool boxes detailed with well-defined latches. The central area includes a gap for the turret ring, which shows a recess around it, several inspection hatches and the fuel filler caps. The front area shows the driver’s hatch, detailed with the handle and hinge, as well as the periscope rendered with a decal.
Once the hull is finished, construction goes on with the side armor, which is attached to the canvas skirts. The skirts are realistically textured and thin. The ERA armor shows good definition in the fastening bolts and the separation between modules. Attaching the side armor is very simple by using the two protruding struts of the hull. To properly finish the hull, you only add the one-piece reactive armor on the glacis.
Moving on to the detail molded as separate pieces and attached to the superstructure, we have the headlights, which have separate lenses, and the fire extinguishers at the front of the vehicle. The central area has two towing cables rendered in braided wire with plastic eyelets. At the back we have the exhausts with separate hollow tailpipes. The exhausts appear inside square-shaped ducts that helped reduce the thermal signature. Finally, on the engine cover we find the gun traveling lock.
Turret
It is broken up into two sides, a back plate, the roof and the base. Tamiya have overcome the difficult shape of the turret by molding longer-than-usual attaching rods on the base to add the roof, leaving enough space for the sides and rear plates. These three pieces only contain the combat identification panels described above. If there is anything that can be criticized about the turret, it is the flat look of the plates but this can be remedied with diluted putty.
Before joining the base and the roof, the gun mantlet is assembled together with the TOGS-2 sight / target acquisition system, divided into several pieces. The mantlet also has the gunner’s auxiliary sight, with a separate cover, and the coaxial machine gun. The mantlet is attached to two trunnions fitted with bearings that allow the barrel to be raised or depressed.
The gun barrel comes in one piece and is provided with the thermal jacket, the fume extractor and recoil boot. The muzzle is a separate piece that is not rifled, but this is clearly to ask too much to the scale.
Under the roof we can add a small base to attach the commander figure if we wish to use it. The roof is very well rendered and features the commander’s main periscope, the cupola visors, which have the external ring in a separate piece, and the hatch cover, detailed on the inside. In front of the cupola another additional periscope is attached. The only building choice is just for an open or closed commander’s hatch.
The loader’s hatch comes in a piece that can only be attached closed. The piece shows the base to install the machine gun, molded in one piece with the mount, while the ammo box is separate. I think Tamiya have captured the profile of the weapon quite well and the piece is really fine.
The rear turret roof shows two antenna bases, while the front turret plates are provided with smoke launchers that come in two pieces.
Figure
We are lucky that Tamiya have included a figure to round off this fine release because this is not always the case in all their 1/48 kits.
The commander is molded with separate torso, head and arms. He wears a uniform with an ECBA (Enhanced Combat Body Armor) vest, helmet and protective glasses. The helmet is only missing the microphone and the lead, but I think you can add them without difficulty. The pose is relaxed and I find the facial features convincing for this scale.
Decals
The sheet contains decals for the periscope glasses in the turret and cupola, unit markings, tank numbers, chevrons and identifying marks located on the turret front. All the items are well printed.
Instructions
They come in a 10-page folded leaflet printed in black and white. It shows 22 assembly sections and a list of Tamiya paints. A separate sheet also in black and white shows a brief historical reference about the tank and profiles for painting and applying decals. Both the assembly steps and the instructions for painting and setting the decals are very clear.
The only paint option depicts the sand-colored tank with white markings on the identification panels and the turret front that we can see in the artbox.
Conclusion
Without a doubt this is a magnificent rendition of a Challeger 2 “dressed” for a desert environment. Tamiya continue to hit the nail on the head in each kit they release in this series. This one in particular has a successful balance between detail and ease of assembly that gives options to modellers of very different levels of experience.
I think that fans of contemporary military vehicles are in luck and will enjoy every moment they dedicate to this kit.◊
Publicado – Published: 9 / 2023
©www.jmodels.net

Debe estar conectado para enviar un comentario.