
De un vistazo – Quick look
MATERIAL Y PIEZAS
MEDIA & PARTS:
- Plástico inyectado (131 piezas), vinilo (2 tramos), hilo trenzado (1 tramo). Incluye dos figuras (16 piezas).
- Injected plastic (131 parts), vinyl (2 lengths), braided thread (1 length). Two figures included (16 parts).
CALCAS – DECALS:
- Marcas tácticas, de unidad, matrículas y estrellas norteamericanas. En registro con buena saturación de color.
- Tactical, unit makings and US stars. In register with good color saturation.
OPCIONES – OPTIONS:
- 1st Armored Division. North Africa.
- 21st Indian Division. North Africa.
- 3rd Division. Europe.
- 7th Armored Division. Europe.
- 50th Division. Europe.
- 27th Brigade. Europe.
- 7th Brigade. Burma.
INSTRUCCIONES – INSTRUCTIONS:
- Folleto doblado impreso en vertical en blanco y negro. Contiene un sumario histórico sobre el vehículo, 12 capítulos de montaje y perfiles. Las referencias de pintura son genéricas. Muy claras.
- Folded leaflet printed in black and white. Contains a historical summary on the vehicle, 12 construction chapters and profiles. Paint references are generic. Very clear.
LO MEJOR – THE BEST:
- Fácil de montar. Incluye complementos.
- Easy build. Complements included.
LO PEOR – THE WORST:
- Piezas demasiado gruesas. Cadenas. Errores en el tren de rodaje. Figuras.
- Thick hull parts. Tracks. Mistakes in the running gear. Figures.
VALORACIÓN – CONCLUSION:
- Tiene ciertos detalle válidos, pero necesita muchas modificaciones que no salen rentables al modelista medio o avanzado. Sin embargo, puede ser un buen banco de pruebas para los novatos.
- An oldie with still some nice detail but needs so much improvement that it is not profitable for the medium / advanced modeller. However, it can be a good building and painting testbed for novices.

La maqueta
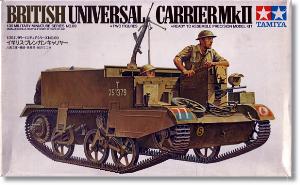
No soy de los nostálgicos del plástico (ni de nada), sobre todo para no perder el tiempo añorando lo que no volverá jamás. Con todo, hoy he decidido traer a la sarta de revisiones que voy publicando este clásico Universal Carrier de Tamiya, que va a cumplir 50 años sin que el fabricante le haya dado la importancia que merece como vehículo icónico de la Segunda Guerra Mundial.
Esta edición ya no figura siquiera en el catálogo de Tamiya porque realmente no hace falta. Las reediciones de 1994 y 2001, ambas disponibles en el mercado con la denominación British Universal Carrier Mk. II European Campaign (35175), y British Universal Carrier Mk. II Forced Reconnaissance (35249), no son más que enjuagues de la misma maqueta y las mismas figuras originales, con el añadido de nuevas versiones y figuras algo mejores que las primeras. Tras muchos años sin otra cosa de plástico para poder hacer un Carrier en condiciones, afortunadamente Riich Models nos trajo un molde bastante bueno y bien detallado del vehículo en varias versiones. La desventaja es que no parece muy adecuado para los modelistas con menos experiencia.
Hay que reconocer que en su momento (1976) esta maqueta debía ser el último grito y aún hoy conserva algo de lo que fue en su aparente fácil montaje y en el buen ajuste de las piezas. También es igualmente cierto que, salvo que se busque por otro motivo particular, la maqueta no está a la altura de lo esperable hoy. Ha quedado ya desfasada en muchos detalles y especialmente en ciertos errores que Tamiya cometió en su diseño y que nunca se ha molestado en corregir, tal vez ante la ausencia de competencia.
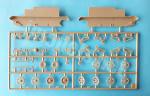
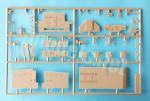
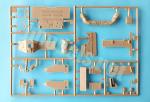
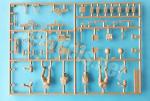
La caja nos entrega cuatro bastidores de piezas color beige, las cadenas de vinilo sueltas, la hoja de calcas, un tramo de hilo trenzado y las instrucciones. Salvo las calcas y las instrucciones, lo demás viene en bolsas grapadas al estilo de Tamiya.
El plástico está bien moldeado y las piezas no presentan deformaciones ni apenas rebabas. Como producto de su tiempo, hay líneas de molde que eliminar en algunas piezas. Algunas planchas del casco tienen varias marcas de eyector grandes y de escasa profundidad, lo que no las hará demasiado difíciles de tapar. Lo primero que se aprecia en las piezas es que el tamaño de los detalles no guarda uniformidad. Así, por ejemplo, el remachado parece muy pequeño, mientras que alguna plancha del casco es muy gruesa. A pesar de eso, hay detalles correctamente conseguidos que se describirán en su lugar.
La maqueta intenta representar un Universal Carrier Mk.II. La distinción entre los modelos Mk. I y II no es en ocasiones tan sencilla. Lo más fácil es fijarse en los faros, dos sobre los guardabarros en los primeros Mk. I y uno solo sobre la plancha del puesto de comandante en el Mk. II. Los soportes de los fusiles eran de madera en el Mk. I y metálicos en el II, mientras que la larga caja de almacenamiento en la parte trasera del casco del Mk.II estaba dentro del compartimiento de popa del Mk.I, que la tenía más pequeña. Estas son algunos de los cambios más evidentes.
Tren de rodaje
Esta compuesto a cada lado por un conjunto de ruedas dobles con rodillo de retorno y otro de una rueda sin rodillo, además de la rueda tractora y la tensora. Las ruedas de carretera poseen la banda de rodadura bien marcada aunque hay que eliminar las finas líneas de molde en cada una. El amortiguador y su muelle están bien detallados, pero los brazos de la horquilla que sujeta la rueda son gruesos y tienen forma cuadrada en lugar de redondeada. Los brazos de la suspensión no están nada mal comparados con fotos del vehículo real y son aceptables. Las ruedas van encajadas en medio de las dos mitades de cada carretón. El de ruedas dobles deja un hueco en su parte inferior que debe rellenarse con masilla.
La rueda tensora es igual a las de carretera pero con el buje mínimamente detallado. Sin embargo, la rueda tractora presenta uno de los problemas de esta maqueta porque Tamiya la fabricó para que los dientes encajasen fácilmente con las cadenas. Los dientes son muy grandes, muy separados y en menor número que los de la rueda tractora real. El buje es bastante aceptable y muy parecido al real.
Las tractoras van pegadas a los tambores de freno, y estos están situados en los extremos del eje trasero. El eje está moldeado con el diferencial, dividido en dos mitades. Antes de pegar el diferencial al panel inferior trasero del casco, hay que añadir los tubos de escape, que están divididos en tres tramos. Los más largos van pegados por debajo del casco entre dos acanaladuras remachadas. Les siguen los silenciadores, que parecen un poco grandes, y el extremo de salida situado por encima del eje trasero.
Las cadenas de vinilo son de una pieza y tampoco se parecen nada a las reales por ninguno de los lados. Además, los eslabones están muy separados y resulta difícil que no se note la unión de los extremos al intentar pegarlos. Para lograr una representación lo más realista posible es imprescindible sustituir tanto las ruedas tractoras como las cadenas.
Casco y detalle externo
El casco cuenta con un suelo con escaso detalle y dos lados unidos a las planchas laterales del habitáculo y los guardabarros. Las caras internas muestran varias marcas de eyector, mientras que las externas están detalladas con un remachado fino pero demasiado pequeño. Los guardabarros son algo gruesos pero pueden afinarse para darles más realismo. El lado trasero es de una pieza y tiene la plancha horizontal separada con dos enganches. La parte inferior está detallada con un pico, una pala y una palanca, además del gancho de remolque.
Sobre la plancha horizontal hay un contenedor detallado con cierres no muy definidos y una bolsa donde se guardaba la red de camuflaje del vehículo. La bolsa está texturizada pero el detalle parece un poco blando. Sobre el contenedor está colocado la cubierta impermeable enrollada y ceñida con tres correas. La pieza es un poco gruesa y la textura algo blanda también.
La plancha del glacis cuenta con dos enganches dobles, una rueda de repuesto con su soporte y dos bitas para enrollar el cable de arrastre, simulado con hilo trenzado y provisto de ojales de plástico. Si las demás planchas del habitáculo pueden ser pasables, la plancha frontal tiene un grosor excesivo e irreal. El hueco para la ametralladora Bren aparece abierto, por contra las miras del ametrallador y conductor están cerradas. El mecanismo de cierre están bien reproducido en la cara interna. El detalle externo es pasable y muestra también el cableado de los faros. Los faros muestra los pequeños soportes separados. El de conducción nocturna tiene el frontal separado sin detalle en la lente. El faro estándar, mucho más pequeño que en el Mk. I, no está mal. Su pareja aparece sobre un soporte extrañamente encajado en el contenedor de agua sobre el guardabarros derecho.
Los guardabarros están detallados con dos contenedores (combustible y agua) mínimamente detallados y gruesos. Tamiya también incluyó los faldones laterales de las ruedas tensoras y los estribos. Los faldones son finos y muestran la plancha estampada con dos líneas paralelas típicas del Carrier Mk. II con el estribo delantero incluido. Las piezas van simplemente pegadas al borde de los guardabarros y carecen de la evidente fila de tornillos del filo superior. El estribo trasero esté separado y unido al borde del casco.
Interior
La plancha intermedia tiene marcas de eyector en el lado trasero y marcas en relieve para situar los respaldos de los asientos. La parte superior muestra las tres aberturas de ventilación del motor. La parte anterior del vehículo contiene las bases de los asientos. El del conductos lleva dos pequeños brazos que lo elevan lo justo para situar la caja de raciones debajo. La zona derecha muestra el contenedor de baterías con la tapa bien detallada en relieve.
El puesto de conducción carece de pedales y sólo tiene una palanca nada parecida a la real mientras que el volante y la columna de dirección separada no están nada mal representados. Lo mismo ocurre con el panel de instrumentos, uno de cuyos lados también está separado. Los instrumentos están reproducidos en fino relieve y son salvables. En la esquina exterior tenemos un espejo retrovisor de una pieza.
El lado derecho delantero contiene los dos pequeños extintores y la base del afuste de la ametralladora. Tamiya incluyó tres ametralladoras Bren en la caja edición junto con dos bípodes, uno abierto y el otro plegado. El detalle del armamento es bastante bueno y definido, aunque las piezas parecen un poco grandes para la escala.
La cubierta del motor divide el espacio tras el puesto de conducción. Está formada por dos piezas unidas mediante cilindros intermedios que dejan el espacio suficiente para pegar los lados, que incluyen el carenado de las tomas de aire situadas en la plancha delantera perpendicular y una tapa donde se ha moldeado la rejilla de ventilación del motor. La rejilla no sólo es incorrecta, sino que tiene una horrible marca de eyector en su centro que la desfigura. Sobre esta cubierta hay un extintor y lo que parece una barra de soporte del armamento. A uno de los lados de este soporte tenemos un estante para situar dos rifles Lee-Enfield de dotación. Ambas piezas no están del todo mal y se parecen a las reales, aunque pueden reemplazarse por algo con más finura en el detalle.
Los lados de los compartimentos traseros llevan contenedores idénticos con tapas detalladas con molduras. El compartimento derecho contiene el equipo de radio, cuya pieza es algo gruesa pero los detalles en relieve de los dispositivos están bien reproducidos, una ametralladora Bren en un soporte y detrás la caja de respeto con repuestos para este arma. El compartimento izquierdo aloja un asiento adicional y la base de la antena de radio, que hay que fabricar de plástico estirado, según las instrucciones.
Un soporte pegado a la derecha de la cubierta del motor permite montar el mástil con el afuste de la ametralladora Bren. Esta pieza es idéntica a la ya descrita arriba pero lleva un bípode abierto.
Tamiya incluyó varios accesorios (latas, contenedores y bolsas de munición, una mochila, una pistola con su funda, una cantimplora) que están identificados en las instrucciones pero no se indica dónde situarlas.
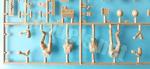
Figuras
Ambas están vestidas con el uniforme empleado en el Norte de África. Si se va a emplear la figura, el conductor hay que situarlo dentro del vehículo antes de pegar el volante y el panel delantero, ya que luego resulta imposible. Este detalle viene reflejado en las instrucciones.
El conductor está despiezado en dos mitades desde la cintura con brazos separados. El casco también viene aparte. Los detalles del uniforme presentan cierta definición pero la expresión facial es anodina. Su compañero aparece de pie apoyado sobre el frontal del vehículo. Su despiece y atuendo es idéntico, pero su cara es más seria que bragueta de fraile.
Como decía arriba, estas figuras han sido complementadas por otras con distinto atuendo y algo mejores en las ediciones posteriores de la maqueta. Estas no merecen la pena, pero aún pueden servir como banco de pruebas para los más noveles.
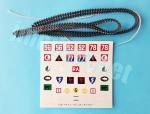
Calcas
La hoja muestra marcas tácticas, de unidad, matrículas y estrellas norteamericanas. Los motivos están impresos con buen registro y saturación de color.
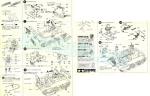
Instrucciones
Se presentan en un folleto plegado impreso en blanco y negro. Contiene un resumen histórico sobre el vehículo, 12 capítulos de construcción y perfiles. Las referencias de pintura son genéricas y la razón tal vez sea que Tamiya aún no había creado sus gamas de pintura cuando apareció la maqueta por primera vez. Como es habitual, las vistas explosionadas son muy claras, con útiles vistas laterales detalladas del montaje y la pintura.
Solo se puede construir un vehículo camuflado de caja con una amplia gama de marcas divisionales y tácticas de diferentes escuadrones y teatros de operaciones (Norte de África, Europa y Asia), pero desafortunadamente las figuras solo son apropiadas para un escenario norteafricano.
Valoración
Con estas viejas maquetas a veces se desvía el tiro de formas opuestas. Bien se las juzga desde la inútil nostalgia y se les da una aureola de clasicismo que a nadie importa ya, o bien se les hace una larga lista de defectos y se las desecha por inapropiadas para los tiempos que corren. Creo que hay que intentar ver las cosas como realmente son y dejar aparte los prejuicios, que no hacen sino estorbar la mirada y, más grave aún, la comprensión de las cosas. En los dos casos contrapuestos, y en términos de revisiones, viene a ser el no querer ver lo que tiene uno delante de las narices.
Está claro que Tamiya buscó ante todo un montaje sencillo trufado con algunos buenos detalles en ciertas piezas. Con todo, la maqueta se resiente de sus años y se ha quedado bastante atrás respecto a los tiempos que corren. Los problemas principales son más obvios en el tren de rodaje, la plancha frontal y el detalle que hay que sustituir o mejorar en el interior del vehículo.
No recomiendo esta maqueta a los modelistas de nivel medio en adelante porque necesita tantas modificaciones, que a la postre sale más rentable hacer la de Riich Model en cualquiera de sus versiones y el resultado será siempre mucho mejor. Sin embargo, puede ser muy bien aprovechada por los novatos debido a su sencillo montaje y a su precio asequible.♦


The kit
I am not of the nostalgic plastic (or anything) kind, especially not to waste time longing for what will never return. All in all, today I have decided to bring to my reviews this classic Tamiya Universal Carrier, which is going to turn 50 years old without the manufacturer having given it the importance it deserves as an iconic vehicle of the Second World War.
This box is no longer included in Tamiya’s catalogue because the company has two other reissues from 1994 and 2001 still on the market. These are labelled British Universal Carrier Mk. II European Campaign (kit 35175), and British Universal Carrier Mk. II Forced Reconnaissance (kit 35249). These are basically the same kit with the original figures included here plus the addition of three new figures that look a bit better. After decades without anything else in plastic to build a decent Universal Carrier, Riich Models released a fairly good new-tool kit some years ago. Their original box (a Mk. I) was soon followed by other versions including figures in some boxes. The downside of the new tooling is that it is not suitable for the inexperienced modeller.
Back in 1976 the kit I review here was surely the latest trend and one can feel it still has some of the old flavour in the presumable ease of assembly and good fitting of parts. It is also true that unless you have a particular interest in the kit, this leaves much to be desired as regards detail and finesse, being clearly outdated and having some issues that Tamiya didn’t bother to fix perhaps due to the lack of a competitor kit.
The box arrives with four frames of beige pieces, two lengths of vinyl tracks, the decal sheet, a length of braided thread and the instructions. Except for the decals and instructions, the rest comes in Tamiya-style stapled bags.
Plastic is well molded and pieces have no blemishes or flash. As a product of the time, there are seam lines to clean up on some pieces. Some plates on the crew compartment have several large shallow ejector pin marks but don’t seem too difficult to fill. The first thing you notice about the pieces is that the size of details is not consistent. So, for example, rivets look too small, while some of the hull plates are very thick. Despite that, there are some nice details that will be described below.
The kit attempts to render a Universal Carrier Mk. II. Seeing the difference between both marks is confusing some times but the most evident distinguishing feature is in the headlights. The Mk. I had two large ones on the fenders and there was only one on the left side of the Mk. II, usually of the blackout type. Other differences include the rifle racks, which were made of wood in the Mk. I and metallic in the Mk. II, while the rear long storage bin of the Mk. II was smaller and placed inside the compartment in the Mk. I. There were many other changes and these mentioned are just a hint.
Running gear
Each side comprises a twin wheel bogie with a return roller and a single wheel bogie, in addition to the sprocket and idler wheels. Road wheels have well-marked rubber bands with thin seam lines to clean up. Shock absorbers and springs are well detailed, but the fork arms that hold the wheel are thick and square-shaped rather than rounded. The suspension arms are not bad compared to photos of the real vehicle and look acceptable. Wheels are fitted in between the bogie halves. Twin wheel bogies leave a gap to fill at the bottom.
Idlers are identical to road wheels but they have a simple hub. However, drive sprockets are wrong and involve one of the issues of the kit as the teeth are very large, widely spaced and fewer in number than those of the actual drive wheel. The hub is quite acceptable and very similar to the real one.
The sprockets are attached to the brake drums, and these are placed on the rear axle tips. The axle is molded with the differential, divided into two halves. Before gluing the differential to the lower rear hull panel, we must add the exhaust pipes, each one molded in three sections. The longest ones are glued under the hull between two riveted grooves. Then the mufflers, which seem a little large, are attached and finally the tail pipe above the rear axle.
The vinyl tracks are one piece and do not look the part. As the sprocket teeth, the links are widely spaced and it seems a bit difficult to match the track ends without the join being noticed. Both the sprockets and the tracks should be replaced if you want to really improve appearance.
Hull and external detail
The hull has a floor with little detail and two sides attached to the side plates of the crew compartment and the fenders. The inner faces show several ejector pin marks, while the outer faces are detailed with fine but undersized rivets. The fenders are somewhat thick but can be thinned for a more realistic look. The rear side is one piece and has a separate horizontal plate with two lifing eyes. The lower plate is detailed with a pickaxe, shovel and crowbar, plus the tow hook.
The horizontal plate shows a detailed container with not very defined locks and a bag to keep the vehicle’s camouflage net. The bag is textured but detail seems a little soft. The waterproof cover is placed on the container, rolled up and tightened with three straps. The piece is a little thick and the texture is somewhat soft as well.
The glacis plate has two double hitches, a spare wheel with the bracket and two bitts for winding the tow cable, simulated with braided thread and provided with plastic eyelets. If the other panels in the crew compartment can be passable, the front panel is clearly too thick and unrealistic. The gap for the Bren machine gun is open, while the machine gunner and driver’s sights are closed. The closing levers are well molded on the internal side. External detail is just passable and also includes the headlight wiring. The headlights show small separate brackets. The blackout lamp has a separate front without detail on the lens. The standard headlights, much smaller than those in the Mk. I, are not bad but that on the right fender is strangely set on the water can.
The fenders are detailed with two containers (fuel and water) minimally detailed and thick. Tamiya also included the mud shield and the steps. The shields are thin and show the stamped plate with two parallel lines typical of the Carrier Mk. II with the front step included in the pieces. The pieces are simply glued to the edge of the fenders and lack the obvious row of screws on the upper edge. The rear step is separated and attached to the hull edge.
Interior
The middle plate has ejector marks on the rear side and raised lines for attaching the seat backs. The top shows the three engine ventilation gaps. The front part of the vehicle contains the seat bases. The driver’s seat is provided with two small supports that raise it just enough to place the ration box underneath. The gunner’s position shows the battery container with raised detail on the lid.
The driver’s side lacks the pedals and only has a lever that is nothing like the real thing, while the steering wheel and the separate steering column are not badly rendered. The same goes for the instrument panel, with a side molded apart. The switches and dials show raised detail and are just fine. In the hull corner we have a one-piece rearview mirror.
The front right side contains two small fire extinguishers and the base of the machine gun mount. Tamiya included three Bren machine guns in the kit along with two bipods, one unfolded and the other folded. Detail on the weapons is quite good and sharp, although the pieces seem a little large for the scale.
The engine cover divides the space behind the driving position. The cover is made up of two pieces joined by middle cylinders that leave enough space to glue the sides, which include the fairing of the air intakes located on the perpendicular front plate and a cover with the engine vent molded on. The vent is not only incorrect, but it has a large ejector pin mark in the middle that spoils it. The cover is detailed with a fire extinguisher and what seems to be a handle bar. Next to the bar is a rack to place two Lee-Enfield rifles. Both pieces are not bad and roughly look like the real thing, although they can be replaced with something with more finesse in detail.
The rear compartment sides have identical bins with lids detailed with stamped molding. The right compartment contains the radio set. The thick piece includes two radios with raised detail for the switches, which are nicely rendered. There is also a Bren machine gun on a rack and behind it a box to keep spare parts for the weapon. The left compartment houses an additional seat and two aerial bases with the antennas made of stretched plastic. They are provided by the modeller as per instructions.
A bracket attached to the right of the engine cover allows to add the mounting post for the Bren machine gun. This piece is identical to the one already described above but has an unfolded bipod.
Tamiya included several accessories (cans, ammunition containers and bags, a backpack, a pistol with its holster, a canteen) that are identified in the instructions, which do not show where to place them.
Figures
Both figures are dressed in the uniform used by British and Commonwealth troops in North Africa. If you wish to use the driver figure, it must be placed inside the vehicle before gluing the steering wheel and the front panel, since it is impossible to do it after both pieces are fitted. This detail is shown in the instructions.
The driver is broken up into two halves from the waist with arms molded apart. The helmet also comes separately. Detail on the uniform have some definition but the facial expression is bland. His companion appears leaning on the front of the vehicle. His appearance and uniform are identical, but his face is as angry as hell.
As said above, these figures have been complemented by others with different uniforms and somewhat better detail in later reboxes of the kit. The figures can be discarded, but beginners may still find them useful as a test bed for painting.
Decals
The sheet shows tactical and unit markings, numbers and North American stars. Decals are printed with good register and color saturation.
Instructions
They come in a folded leaflet printed in black and white. It contains a historical summary on the vehicle, 12 construction chapters and profiles. Paint references are generic and the reason maybe that Tamiya had not launched their paint ranges yet when the kit was first released. As usual, exploded views are very clear with hepful side detail views on assembly and painting.
You can only build one camouflaged vehicle from the box with a wide range of divisional and tactical markings from different squadrons and theatres of operation (North Africa, Europe and Asia), but unluckily the figures are only appropiate for a North African setting.
Conclusion
Reviewers are often biased with old kits such as this one. These oldies are either judged from nostalgia and seen with an aura of classicism that no one cares about anymore, or they are severely punished with a long list of defects and just discarded as inappropriate for current times. I think one should try to see things as they really are leaving prejudices aside, which only hinder the view and the understanding of things. In fact, all this comes down to denying what is right in front of one’s nose.
It is clear that Tamiya sought above all a simple assembly but still there is some good detail in certain parts. However, the kit suffers from its age and has fallen far behind compared to current offers. The main issues are most obvious in the running gear, the front panel and the detail that needs to be replaced or improved inside the vehicle.
Honestly, this kit cannot be recommended to standard and advanced modellers because it needs so many improvements that in the end it is more practical to build the Riich Model kit in any version and the result will always be much better. However, it can suit novices due to its simple assembly and affordable price.◊
Publicado – Published: 10 / 2023
©www.jmodels.net

Debe estar conectado para enviar un comentario.