
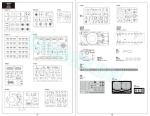
De un vistazo – Quick look
MATERIAL Y PIEZAS
MEDIA & PARTS:
- Plástico inyectado (412 piezas), plástico transparente (10 piezas), fotograbado (10 piezas), rodamientos de plástico (10 piezas), hilo trenzado (1 tramo), cadenas de plástico (2 tramos).
- Injected plastic (412 parts), clear plastic (10 parts), photoetched (10 parts), plastic polycaps (10 parts), thread (1 length), plastic tracks (2 lengths).
CALCAS – DECALS:
- Impresas por Cartograf. Insignias alemanas y griegas, matrículas, numerales y marcas de unidad. Apariencia fina y brillante. Sin demasiado soporte. Bien impresas.
- Printed by Cartograf. German and Greek crosses, registers, numbers and unit badges. Thin and glossy appearance. No excess of carrier film. Well printed.
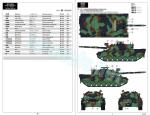
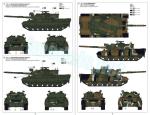
OPCIONES – OPTIONS:
- Leopard 1 A3. 304th Panzer Battalion. 2nd Squadron. Mid-1980s.
- Leopard 1 A3. 301st Panzer Battalion. 4th Squadron. 1980s.
- Leopard 1 A4. 293rd Panzer Battalion. 4th Squadron. 1980s.
- Leopard 1 A4 (GR). Hellenic Army.
INSTRUCCIONES – INSTRUCTIONS:
- Folleto de 18 páginas impreso en blanco y negro. Contiene una introducción histórica sobre el vehículo en varios idiomas, 23 pasos de construcción y un plano numerado de piezas. Una hoja separada de tamaño A4 impresa a color en papel satinado muestra perfiles y una lista de colores con equivalencias en pinturas de Vallejo. Claras y bien impresas.
- 18-page booklet printed in black and white. It contains a historical introduction to the vehicle, 23 assembly chapters and a numbered parts plan. A separate A4 sheet printed in color on satin paper shows profiles and a list of colours with matches in Vallejo paints. Clear and well printed.
LO MEJOR – THE BEST:
- Muy buen detalle general. Múltiples opciones de montaje. Variedad en los acabados de pintura.
- Outstanding overall detail. Multiple assembly choices. Varied paint finishes.
LO PEOR – THE WORST:
- Marcas en las cadenas. Detalles concretos un tanto simplificados. Despiece inconveniente en determinadas piezas.
- Pin marks on tracks. Some specific details are a bit simplified. Unuseful part breakdown in specific cases.
VALORACIÓN – CONCLUSION:
- Acaso la maqueta más próxima al Leopard 1 real por el momento. Posee un excelente detalle, es más fácil de montar de lo aparente y tiene tantas alternativas de montaje, que necesita de un estudio previo a conciencia. También posee algunos errores y simplificaciones, pero las ventajas compensan de sobra.
• Maybe the nearest kit to the real Leopard 1 so far. It has an excellent detail, should be easier to build than it looks and includes so many alternatives that it makes necessary a thorough study before assembly. Mistakes and omissions leave a bit of a bad taste in your mouth, but advantages more than compensate for them.

La maqueta
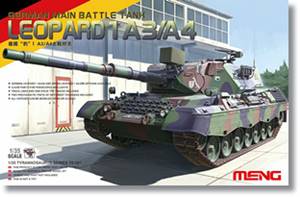
Muchas han sido las marcas que han producido maquetas de la primera versión del Leopard en esta escala desde los años 70. Hace una década Meng Model se puso al final de esta larga cola con la maqueta del Leopard 1 A3/A4, primera de una serie de tres cuyas secuelas fueron un Leopard 1 A5 y un C2 Mexas canadiense.
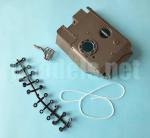
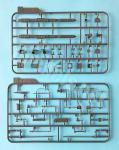
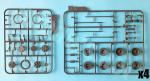
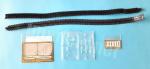
La caja viene bien repleta porque contiene 19 bastidores de piezas (6 de ellos con eslabones sueltos de las cadenas), un bastidor transparente, un bastidor de rodamientos de plástico, dos tramos de cadenas de plástico flexible, dos planchas de fotograbado, un tramo de hilo trenzado, las mitades del casco y la parte superior de la torre separados, las calcas y las instrucciones.
El moldeado de las piezas es muy notable por su limpieza y buena factura. En el lado menos bueno hay que anotar muy pocas marcas de eyector en el lado interno de las cadenas de plástico que, dependiendo cómo se coloquen, se pueden disimular con cierta sencillez, ya que no son demasiado evidentes. Así mismo los eslabones sueltos muestran dos pequeñas marcas leves situadas justo en el centro del lado interno cada eslabón que no afectan al detalle. Eliminarlas no debe ser difícil, aunque sí tedioso. Para los que no están dispuestos a pasar una, puede ser mejor quitarlas antes de separar las piezas del bastidor. Las tapas de las escotillas de la torre también tienen marcas, pero en este caso no son evidentes porque están formadas por dos piezas superpuestas y quedan situadas en el lado interior de ambas.
Esta edición permite elegir entre las variantes A3 y A4, por ello hay múltiples alternativas de montaje que no sólo dependen de las diferencias entre estos modelos, sino también de si elegimos hacer un carro del Bundeswehr o del ejército griego. Por este motivo conviene estudiar bien las instrucciones y seleccionar desde el inicio el modelo y nacionalidad de nuestra maqueta. Así mismo, podemos escoger el tipo de cadenas, de tramos o eslabones, lo que abre las opciones a los modelistas de menos destreza o a los que simplemente busquen más sencillez que detalle durante el montaje.
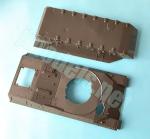
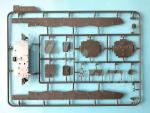
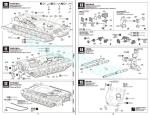
Parte inferior del casco
Está moldeada de una pieza, excepto la plancha trasera separada. Los lados están detallados con las placas de fijación de los brazos de suspensión. Sin embargo, la plancha inferior del suelo apenas tiene detalle.
La plancha trasera contiene diversos elementos, en general muy realistas comparados con fotos del carro, tales como la caja de estiba, dos eslabones de repuestos con sus enganches, los ojales de izado y de arrastre junto con el enganche trasero, el cerrojo de transporte para el cañón, más una escotilla trasera blindada. Los ojales de izado carecen de la pequeña línea de soldadura en la base. Los catadióptricos y los faros están perfectamente moldeados sobre la plancha trasera y estos últimos muestran los protectores bien ahuecados. El único detalle que Meng ha simplificado es el asa de la caja de respeto, que debería rehacerse para conseguir más realismo.
En un momento posterior del montaje se añaden los guardabarros traseros, que Meng ha tenido la buena idea de proporcionar en piezas dobles para poder mostrarlos desplegados o recogidos. Las piezas tienen muy buena factura, salvo que los faldones plegados no están ahuecados a los lados, y pueden apreciarse incluso los diminutos ojales de enganche abiertos.
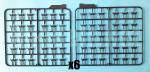
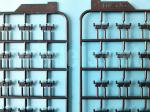
Suspensión, tren de rodaje y cadenas
Meng ha diseñado la suspensión con la opción de hacerla articulable. Para ello, los brazos de la suspensión están unidos a las barras de torsión que se introducen en los agujeros del casco. Los lados llevan la amortiguación y la cubierta del diferencial de la rueda tractora separadas más los ejes del primer y tercer rodillo de retorno, mientras que los otros dos ejes están moldeados sobre el casco. La rueda tensora lleva su propio brazo unido a la amortiguación.
Tanto las ruedas de apoyo como las tensoras son dobles con un rodamiento de plástico intermedio que permite girarlas. El detalle central en las tensoras está muy bien conseguido, salvo en la línea alrededor del cubo, que Meng ha grabado con demasiada anchura y profundidad.
Las tractoras tienen la misma disposición, pero aquí tenemos la alternativa de emplear el modelo inicial, distinguible por el menor número de tornillos en el cubo de la rueda, o bien el posterior. En ambos casos el detalle es bastante bueno, si acaso los radios son un punto más delgado de lo que debieran. Los rodillos de retorno vienen todos por separado.
Como he dicho arriba, las cadenas poseen doble opción. Las de plástico aparentemente se pueden unir con pegamento al uso y las marcas que he mencionado podrían disimularse sin mucho esfuerzo al ser muy pocas. Los tramos muestran buena flexibilidad y no deberían, en principio, causar problemas para adaptarlas. Los eslabones sueltos, 84 por lado según las instrucciones, están bien reproducidos e incluyen los dientes de guía y los conectores laterales bien definidos. Las marcas internas no son graves, pero sí numerosas, aunque esto no debería desanimar al modelista si piensa que en realidad no va a ser necesario limpiar todos los eslabones, puesto que los faldones laterales impedirán que se vean una buena parte de ellos.
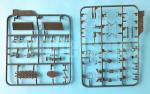
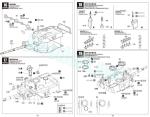
Superestructura
La mitad superior del casco está moldeada con finos guardabarros delanteros, las rejillas de ventilación del motor tras la torre, las tapas de las tomas de combustible y el hueco de la toma de ventilación posterior. La toma de entrada del radiador tiene una rejilla de fotograbado más una pieza de plástico situada por debajo, que hay que pegar desde dentro del casco, ambas con doble opción para el modelo alemán o griego. La mitad del casco incluye los diminutos lavafaros de los periscopios del conductor, que deben eliminarse o no según el modelo.
La parte anterior está detallada con los ganchos de remolque, dos ojales de izado a los que les falta el cordón de soldadura, el soporte de los crampones de las cadenas, el claxon, los faros, provistos de lentes transparentes y los retrovisores. La escotilla del conductor tiene la tapa separada y los periscopios representados con lentes transparentes y los protectores de fotograbado.
La cubierta del motor cuenta un par de perfiles de fotograbado y un juego de herramientas estibadas en sus soportes. Las instrucciones no muestran muy claramente cómo doblar los fotograbados, pero al ver las piezas, se hace evidente. El cable de arrastre es de hilo trenzado complementado con ojales de plástico.
Los lados cuentan con abundantes piezas para reproducir unas herramientas bien definidas unidas a sus soportes, las cubiertas de los depósitos de combustible y los paneles que cubren los escapes, con la rejilla poco convincente, aunque no mala.
Los faldones laterales son de una pieza cada uno. Muestran los estribos detallados y una estupenda reproducción de las superficies irregulares, los cierres de los pestillos entre placas y los perfiles metálicos de la zona superior. El encaje del perfil anterior con el respectivo guardabarro delantero será problemático debido a la inusual forma redondeada hacia afuera que tiene la unión de ambos.
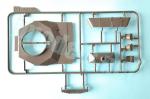
Torre
Está despiezada en dos mitades más la plancha trasera. La escotilla de municionamiento viene moldeada cerrada en el lado izquierdo y sobre el techo aparecen los huecos de las escotillas abiertos.
Los lados cuentan con varias asas, que los más puristas sustituirán por piezas de metal, los lanzadores de fumígeros, moldeados sueltos con la base aparte, y sus barandillas protectoras. Los tubos deben orientarse adecuadamente ya que la bocas no están alineadas en el Leopard 1. Las instrucciones se equivocan al cambiar de lado los soportes y su ubicación es justo la contraria de la que aparece en ellas.
Varios dispositivos instalados sobre el techo tienen alternativas según la variante o la nacionalidad, por ello el modelista debe tener claro qué elementos debe o no añadir a su maqueta antes del montaje. Por ejemplo, la tapa de la escotilla del cargador es única para el modelo griego y hay dos soportes de antenas diferentes más dos miras ópticas, TRP (Leopard 1A3) o PERI R12 con guardas protectoras (Leopard 1A4). También la cúpula del artillero es doble, pero no la del comandante, cuyos periscopios son transparentes y se pegan por dentro. Las tapas de ambas escotillas están formadas por varias piezas y pueden ponerse abiertas. Ambas escotillas cuentan con base para acomodar el afuste de la ametralladora, pero sólo la del comandante lo tiene. La ametralladora MG3 tiene la caja de munición separada y la pieza posee una factura bastante correcta.
Sobre el techo de la torre también tenemos varios periscopios transparentes con guardas de fotograbado, además de los contenedores de los accesorios de limpieza del cañón estibados en la parte trasera.
El cañón está despiezado en mitades con la boca separada y estriada en su interior. La funda térmica está bien representada y las abrazaderas correctamente perfiladas. El problema de las piezas son las líneas de unión y su perfil irregular que hará un poco complicado sellarlas, por eso parece pertinente reemplazarlo por otro de aluminio, aunque las piezas son bastante aceptables si se desea emplearlas de todas formas. La base del cañón está formada por cinco piezas, dos de ellas rodamientos para poder mover el arma. La pieza va pegada sobre la mitad inferior de la torre y posteriormente al mantelete.
El mantelete muestra las aberturas de la ametralladora coaxial y la mira del artillero, aunque no parecen muy convincentes por tener escasa profundidad. La cubierta flexible viene aparte y aparece muy bien texturizada. Hay además un par de asas, la mira PZB 200 y el foco. La mira está dividida en mitades con la lente y su tapa separadas. El protector está bien representado en una pieza de gran finura y la tapa puede ponerse abierta o cerrada. El foco se compone de siete piezas incluyendo el soporte, tiene la lente transparente y la opción de mostrarlo abierto o cerrado.
Calcas
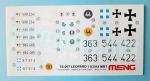
La hoja está impresa por Cartograf. Muestra insignias alemanas y griegas, matrículas, numerales y marcas de unidad. Los motivos tienen apariencia fina y brillante, carecen de demasiado soporte y están bien impresos.
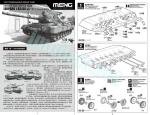
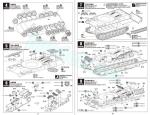
Instrucciones
Vienen en un folleto de 18 páginas impreso en blanco y negro que contiene una introducción histórica sobre el vehículo en varios idiomas, 23 pasos de construcción y un plano numerado de piezas. Una hoja separada de tamaño A4 impresa en color sobre papel satinado muestra perfiles y una lista de colores con equivalencias en pinturas de Vallejo. Las vistas explosionadas son claras e identifican las partes del vehículo que se montan en cada paso. Esto último resulta útil especialmente en los dispositivos instalados en la torre. Hay algunos traspiés menores, como el cambio de lado de los lanzadores fumígeros que el modelista debe poner atención para evitar.
Los acabados de pintura permiten pintar un carro alemán y otro griego con camuflaje y dos alemanes sin él, por lo que la variedad para elegir parece suficiente.
Valoración
Está claro que esta edición se lleva por delante todas las antiguas maquetas anteriores del Leopard 1, siendo inmensamente superior a todas ellas en detalle y calidad. Aunque a primera vista no lo parece, un estudio más detenido de la maqueta y sus instrucciones nos indica que Meng ha conseguido que el montaje sea muy asequible para modelistas del común, y así la edición proporciona los fotograbados más imprescindibles y opciones en las cadenas, en ambos casos de parecida calidad, con la posibilidad añadida de mostrar su articulación sobre superficies irregulares.
Ninguna maqueta es perfecta y esta tiene algunos errores que se podrían haber evitado sin dificultad, por ejemplo haciendo el cañón y la mira PZB 200 de una pieza o haber mejorado la unión de los guardabarros con los faldones laterales. Otros detalles más específicos en realidad sólo importarán a los muy versados en este carro que normalmente tienen recursos para mejorarlos.
Tal y como está diseñada y debido a sus múltiples opciones a cada paso, me parece imprescindible un buen estudio previo de las instrucciones, la selección del modelo concreto que se pretenda terminar, buenas referencias gráficas y tener una idea clara de cómo y dónde se pretende mostrar la maqueta terminada. Todo ello ahorrará dudas al modelista haciendo del montaje un proceso mucho más ágil si se atiene a un plan de montaje previo.
Los acabados de pintura parecen suficientes en su variedad y en este sentido creo que Meng ha acertado con los que propone.
Resulta un tanto extraño, o al menos a mí me lo parece, que Meng no haya intentado hacer aún maquetas del Leopard 1A1 y 1A2 recogiendo la experiencia previa (buena y mala) de sus dos ediciones anteriores (1A3/A4 y 1A5). Sería una buena piedra de toque para la marca y mostraría sus ganas de evolucionar y mejorar aún más sus productos. El tiempo lo dirá si las veremos.◊


The kit
Many brands have released kits of the Leopard 1 in this scale since the 1970s. A decade ago Meng Model was at the end of this long queue with their new-tool Leopard 1 A3/A4 offer, the first of a series of three that also included a Leopard 1 A5 and a Canadian C2 Mexas.
The box is well packed, containing 19 sprues of parts (six of them for the loose track links), a clear sprue, a sprue of poly caps, two lengths of flexible plastic tracks, two sheets of etched brass, a length of thread, the hull halves and the turret top moulded separately, the decals and the instructions.
The standard of moulding is excellent and parts come clean and finely rendered. On the downside, there are a few ejector marks on the inner side of the plastic tracks which can be hidden somehow once they are installed as they are not too evident. The loose links also show two small shallow marks on the inner side of each link, which do not affect detail. Cleaning them up should not be difficult, but it willl surely be tedious. For those who can easily bear the brunt, the marks may be easier to remove before cutting the pieces from the sprues. The turret hatch covers also have marks, but they will not be evident since are located on the inner sides of the two-piece cover.
This box allows you to choose between the A3 and A4 variants, so there are multiple assembly alternatives that not only depend on the differences between these two models, but also on whether we choose to make a Bundeswehr or Greek army tank. For this reason, a careful study of the instructions seems a must from the beginning. In the same way, we have a choice for flexible plastic or individual links for the tracks, which opens up options for less skilled modellers or those who simply look for more ease than detail during assembly.
Lower hull
It is moulded in one piece, except for the separate rear plate. The sides are detailed with the suspension arm fittings. However, the lower floor plate has little external detail.
The rear plate contains several items, generally very realistic compared to pictures of the actual tank, such as a stowage box, two spare links with their clips, the lifting eyes and tow hooks, the rear tow hitch, the gun travel lock, plus an armoured rear hatch. The lifting eyes lack the small weld lines on the base. The reflectors and the headlights are perfectly moulded on the rear plate with the latter showing hollowed out guards. The only detail that Meng have simplified is the spare box handle, which should be redone for more realism.
At a later stage of the assembly the rear mudflaps are added, which Meng had the good idea to provide them in double pieces so that they can be shown folded or not. The pieces are very well made and even the tiny open hook eyelets can be seen, but the folded flaps are not hollowed out on the sides.
Suspension, running gear and tracks
Meng designed the suspension with the option of making it workable. For this, the suspension arms are attached to torsion bars inserted into holes in the hull sides. These have the separate bumper springs and differential covers for the sprockets plus the axles for the first and third return rollers, while the other two axles are moulded on the hull. The idlers have their own arms attached to the bumpers.
Both the road wheels and idlers are two-piece with a poly cap between the pieces to allow them to turn. Detail on the idlers hub is quite nice, except for the line around the hub, which is too wide and deep.
The sprockets have the same breakup, but we have the alternative of using the early model, distinguishable by the fewer bolts on the wheel hub, or the later one. In both cases detail is quite good, if anything the spokes are a bit thinner than they should be. The return rollers all come separately.
As said above, the tracks have a double option. The plastic tracks can apparently be joined with ordinary glue and the marks I mentioned could be hidden without much effort as they are very few. The lengths are quite flexible and at first sight should not cause any problems to fit the running gear. The loose links, 84 per side according to the instructions, are well reproduced and include the teeth and well-defined side connectors. The internal marks are not serious, but they are plenty. The modeller should not let this put him off as it will not really be necessary to clean every single link. The side skirts will hide a good number when installed.
Superstructure
The upper hull half includes thin front fenders, the engine vents behind the turret, the fuel filler caps and a gap to attach the rear vent. The radiator inlet has an etched grille plus a plastic piece below that is glued from inside the hull, both the piece and the grille have a double choice for the German or Greek variant. The hull half includes the tiny washers for the driver’s periscopes, which need to be removed depending on the version you choose to build.
The front is detailed with tow hooks, two lifting eyes with the weld missing, a rack for the grousers, a horn, the headlights provided with clear lenses and the mirrors. The driver’s hatch has a separate cover and periscopes with clear lenses and etched guards.
The engine cover has a pair of photo-etched pieces and a nice set of tools stowed in their racks. The instructions don’t show very clearly how to fold the photo-etched parts, but when you inspect the pieces, this becomes obvious. The tow cable is the usual a length of thread supplemented with plastic eyelets.
The sides have plenty of parts to reproduce nicely rendered tools moulded with their clips, the fuel filler caps and the exhaust vents with not very convincing louvres, though they are not a shame either.
The side skirts are provided in one piece each. They feature detailed foot holds and a superb rendition of the dimpled surfaces, the latches between the plates and the metal fittings. The fitting of the skirt front with the fender will surely be troublesome due to the unusual outwardly rounded shape of the join between the two pieces.
Turret
It is broken down in two halves plus the rear plate. The munition hatch is moulded closed on the left side and the roof shows the gaps for the open commander’s and gunner’s hatches.
The sides have several handles, which the nitpicking modeller will replace with metal pieces, the grenade dischargers, moulded separately with the base apart, and a thin guard. Each launcher is diiferently positioned as they are not aligned on the Leopard 1. The instructions are wrong and show the reverse location for each launcher.
Several gadgets installed on the turret roof have alternatives depending on the variant or nationality, so the modeller should know which ones are suitable for the version he is building. For example, the loader’s hatch cover is unique to the Greek choice and there are two different antenna bases plus two optical sights, TRP (Leopard 1A3) or PERI R12 with guards (Leopard 1A4). The gunner’s cupola is also a double choice, but not the commander’s, which has the clear periscopes attached from the inside. The covers of both hatches are made of several pieces and can be shown opened. Both hatches have a base to install the machine gun pintle mount, but only the commander’s has one. The MG3 machine gun is really nice and has a separate ammo box.
The turret roof is also detailed with several clear periscopes with etched covers, as well as the containers for the gun cleaning devices stowed in the rear.
The gun is broken down in halves with the muzzle separated and rifled inside. The thermal cover is well reproduced and the clamps are sharply moulded. The issue with the gun are the seam lines and their irregular profile which will make filling them a bit difficult, so the modeller could consider getting a replacement for the gun although the parts are quite acceptable if you want to use them anyway. The gun base is made up of five pieces, two of them are poly caps that allow the gun to be raised or lowered. The piece is glued on the lower turret half and then to the mantlet.
The mantlet shows the coaxial machine gun and the gunner’s sight openings, although they do not look very convincing due to their shallow depth. The flexible cover comes separately and looks very well textured. There are also a pair of handles, the PZB 200 sight and the searchlight. The sight is divided into halves with the lens and the cap apart. The cage guard is nicely represented in a very thin piece and the cap can be attached open or closed. The searchlight is made up of seven pieces including the base and has a clear lens and alternatives for open or closed shutters.
Decals
The sheet is printed by Cartograf. It shows German and Greek crosses, registers, tank numbers and unit badges. The decals have a thin and glossy appearance, lack too much carrier and are in register.
Instructions
They come in an 18-page booklet printed in black and white containing a historical introduction to the vehicle in several languages, 23 construction steps and a numbered parts plan. A separate A4-sized sheet printed in colour on glossy paper shows profiles and a list of colours with matches in Vallejo paints. The exploded views are clear and identify the parts of the vehicle assembled in each step. The is especially useful in the devices installed on the turret and mantlet. As mentioned, there is a mistake in the position of the grenade launchers that the modeller should take care to avoid.
Paint finishes cater for one German and one Greek tank with camouflage and two German vehicles without it, so the variety to choose from seems sufficient.
Conclusion
It is clear that this release wipes out the old Leopard 1 kits we have known before as it is immensely superior to all of them in detail and quality. Although it may not seem so at first sight, a closer look at the kit and the instructions tells us that Meng managed to make assembly quite suitable to the average modeller, and so the box includes the most essential photo-etched pieces and track options, both of similar quality, with a further choice of showing the running gear crossing uneven surfaces.
No kit is perfect and this one has some mistakes that could have been easily avoided, for example by making the PZB 200 gun and sight in one piece or by improving the join of the front mudguards with the side skirts. Other more specific details will really only matter to those very acquainted with this tank who normally have the resources to improve them. As the kit is designed and due to its multiple options in each step, I think it is essential to study the instructions thorougly, the selection of the specific model you intend to finish, good graphic references and to have a clear idea of how and where the finished model is going to be displayed. All this will save the modeller hesitation and confusion, making assembly a much more agile process if he follows a careful assembly plan.
Paint finishes look varied enough, with the depicted tanks showing at least three possible schemes. I think Meng have made a sensible selection in this sense.
It seems a bit strange, or at least it seems to me, that Meng have not yet released any kits of the Leopard 1A1 and 1A2, gathering the previous experience (both good and bad) from their two previous boxes (1A3/A4 and 1A5). It would be a good touchstone for the brand and would show their wish to evolve and improve their products. Time will tell if we see them.◊
Publicado – Published: 9 / 2024
©www.jmodels.net

Debe estar conectado para enviar un comentario.