
De un vistazo – Quick look
MATERIAL Y PIEZAS
MEDIA & PARTS:
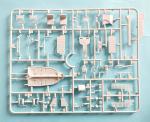
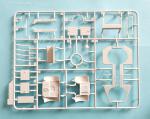
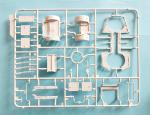
- Plástico inyectado (97 piezas), plástico transparente (6 piezas), vinilo (5 piezas).
- Injected plastic (97 parts), clear plastic (6 parts), vinyl (5 parts).
CALCAS – DECALS:
- Matrículas, marcas tácticas, rótulos, estrellas norteamericanas y estarcido de especificaciones técnicas. Acabado fino y brillante. Buena nitidez y mínimo exceso de soporte.
- Registration plates, tactical markings, US stars and technical specifications stencil. Thin and glossy finish. Good sharpness and minimal surplus carrier film.
OPCIONES – OPTIONS:
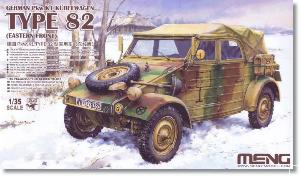
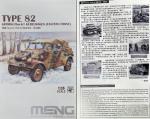
- Kübelwagen Type 82. Wehrmacht. 7th Panzer Division. Communications Unit. Kursk (Russia), 1943.
- Kübelwagen Type 82. Wehrmacht. 12th SS Panzer Division “Hitlerjugend”. France, 1944.
- Kübelwagen Type 82. Vehicle captured and used by U.S. Forces. Italy, 1943.
INSTRUCCIONES – INSTRUCTIONS:
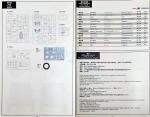
- Libreto de 24 páginas impreso en color. Contiene una introducción histórica en varios idiomas, un plano de piezas numerado, una tabla de colores con equivalencias de pinturas de Meng/AK Interactive y Acrysion, 22 capítulos de montaje y 3 páginas de perfiles.
- 24-page booklet printed in color. It shows a historical introduction to the vehicle in several languages, a numbered parts plan, a color chart with Meng/AK Interactive and Acrysion paint matches, 22 assembly chapters and 3 pages of profiles.
LO MEJOR – THE BEST:
- Sencillez de montaje. Buen detalle en general con algunas objeciones (ver texto).
- Ease of assembly. Overall nicely detailed with some exceptions (see text).
LO PEOR – THE WORST:
- Toldo no opcional. Las puertas no pueden colocarse abiertas sin modificaciones.
- The canvas is not optional. The doors can’t be showed open without modifications.
VALORACIÓN – CONCLUSION:
- Es una buena alternativa a otras maquetas en esta escala para construirla de caja. Si se desean cambios en las puertas y toldo, necesita modificaciones.
- It is a good alternative to other 1/35 kits if built out of the box. Any change in the doors or canvas will need modifications.

La maqueta
No hay marca importante dedicada a los vehículos militares que no tenga en su catálogo al menos un Kubelwagen. Meng Model se ha unido a ellas con cuatro maquetas de este vehículo en la escala 1/35 lanzadas en los últimos meses. Esta caja es la segunda edición, que ofrece versiones situadas en suelo europeo, en contraste con la primera, dedicada al modelo empleado en el Norte de África.
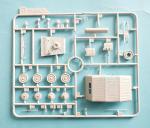
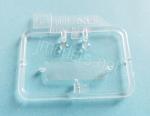
En la caja encontramos el libreto de instrucciones, la hoja de calcas, una bolsa con cinco neumáticos de vinilo, dos bastidores transparentes y tres bastidores no transparentes, uno de ellos diferente al de la edición anterior que incluye el toldo y algunas piezas distintas.
Las piezas de plástico están muy bien moldeadas, sin defectos ni rebabas y con mínimas marcas de eyector difícilmente visibles bajo los guardabarros delanteros y en el interior del toldo. Algunas piezas transparentes presentan cilindros de salida del eyector sencillos de limpiar.
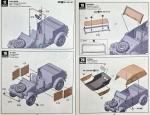
La secuencia del montaje no indican que este deba tener problemas a primera vista, ya que se desenvuelve con claridad a partir del suelo de la carrocería y la base del vehículo, como en tantas otras maquetas. Los acabados de pintura ofrecen vehículos alemanes con y sin camuflaje, más otro pintado con la librea estándar de sus captores norteamericanos para añadir diferencia.
La maqueta parece reproducir un Kubelwagen fabricado hacia mediados de 1943, como se aprecia en varios detalles, entre ellos el tercer travesaño del toldo así como la placa de matrícula cuadrada y la luz Notek traseras situadas sobre la tapa del motor. Otras características son también de ese año, pero algo anteriores, como el tablero de instrumentos cuadrado. Sin embargo, Meng ha dejado elementos de versiones anteriores, tales como las esquinas superiores del parabrisas redondeadas (se cambiaron por otras cuadradas en 1943) o los indicadores de giro, también suprimidos en dicho año. Extrañamente, incluso aparece el catadióptrico trasero del modelo anterior a 1941, que no estaba integrado en la carrocería. La maqueta también ofrece la opción de montar dos tipos de faros: un modelo más grande, anterior a febrero de 1943, con la ranura de la lente de conducción nocturna más corta y ancha, o bien otro modelo posterior más pequeño con la ranura más larga y estrecha.
Revisión
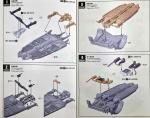
La plancha del suelo de la carrocería está moldeada de una pieza. Muestra en su cara superior las marcas para situar posteriormente el entramado de madera del suelo, la cubierta de la transmisión y las bases para alojar las culatas de las armas de los tripulantes. La cara opuesta lleva un estampado nítido en las planchas y el hueco de la transmisión. El montaje de los elementos inferiores se articula en torno a la parte anterior y posterior del vehículo, ambas separadas del suelo y moldeadas con los guardabarros. La pieza trasera incluye el suelo del compartimento del motor y la delantera el suelo interno del capó.
Primeramente se añade el eje trasero, unido a la caja de cambios y complementado con un travesaño y dos soportes laterales adicionales. Una vez pegada la pieza de los guardabarros traseros, se coloca el motor y sus respectivos escapes, moldeados con los conductos de salida del motor y los silenciadores. Tanto el motor como la caja de cambios están reproducidos sólo en sus mitades inferiores. El eje delantero va unido a la pieza de los guardabarros delanteros y tiene la barra estabilizadora por separado.
Una vez unidos los compartimentos y guardabarros delanteros y traseros al suelo, sólo queda colocar la plancha protectora de la transmisión así como la placa de deslizamiento. Ambas presentan un detalle bien definido en las molduras. El motor también tiene su propia placa de protección, aunque las instrucciones posponen su montaje hasta el capítulo 15.
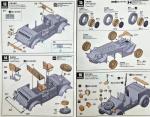
Las ruedas tienen las llantas separadas en dos piezas, salvo la de repuesto. Las caras externas tienen un detalle bastante bueno y diferente en el tren delantero y trasero, como es lo correcto. Las piezas internas contienen los tambores de freno. Los neumáticos son de vinilo con la banda de rodadura bien detallada y sin marcas ni rebabas, ya que la inyección de estas piezas se ha hecho por el borde interior y no por fuera, como es lo acostumbrado. Cada neumático va montado a presión en la llanta.
La siguiente etapa de construcción del modelo consiste en añadir el entramado de madera del suelo, las palancas, los pedales y la columna de la dirección, quedando para más tarde pegar el volante. Salvo la columna, que parece más conveniente pegarla antes que el capó, las demás piezas pueden sumarse tras montar la carrocería.
Para apoyar los paneles laterales de la carrocería hay que armar primero el compartimento del motor, cuyos lados están separados. Los paneles y molduras internos muestran una reproducción excelente, salvo en el cierre de la tapa, un tanto simple, y la leve marca de eyector en su cara interior. El suelo del compartimento está cerrado y vacío, como cabe esperar. En la parte externa, los lados de las tapas de los compartimentos traseros están integrados en una sola pieza que muestra con nitidez las salidas de ventilación del motor. La tapa del compartimento superior es parecida a la del motor.
Los paneles laterales de la carrocería muestran buena nitidez en las molduras internas y externas y también en los huecos para acoplar el gato. Las marcas de eyector situadas en la cara interna de los estribos no deben preocuparnos porque están tapadas por dos perfiles separados provistos de ranuras para pegarlos. Si queremos instalar los contenedores de combustible opcionales, hay que abrir los agujeros de los bastidores de soporte en la parte lateral trasera. Con los lados ya instalados, podemos añadir el capó, provisto en su lado interno del depósito de combustible y en el externo de la moldura para sujetar la rueda de repuestos con radios cortos, que son correctos para la datación de este modelo. La pieza también contiene el panel frontal con el hueco de la placa de matrícula. En la pieza se ven los huecos para instalar el tapón de la toma de combustible, al que se le ha intentado reproducir su pequeña cadena, y las abrazaderas para sujetar el parabrisas.
Las puertas son piezas separadas que muestran buen detalle en las bisagras y molduras de ambos lados, pero las manijas no poseen la definición que pueden darle piezas de fotograbado. El modelista encontrará problemas para colocar las puertas abiertas porque en realidad la maqueta sólo está diseñada para llevar el toldo abierto y las ventanillas cerradas. No hay piezas alternativas para poner el toldo plegado y además los cristales laterales están unidos en una pieza. Por ello, sería necesario separarlos para abrir cualquiera de las puertas.
Los elementos internos del habitáculo, además de los que he mencionado más arriba, incluyen el salpicadero unido a su panel de soporte y la barra de asidero inferior. Los escasos instrumentos están bien definidos en relieve. Los asientos delanteros tienen los soportes aparte y el trasero está moldeado con su bastidor. El tejido de respaldos y asientos no está texturizado, lo que les resta un tanto de realismo. La barra de asidero situada tras los asientos delanteros es fina y contiene las abrazaderas de los fusiles. Las armas están bien moldeadas, aunque la guarda del gatillo parece algo grande.
El marco del parabrisas contiene las palomillas de sujeción en las esquinas inferiores y tiene los limpiaparabrisas moldeados en la pieza. Estos elementos, junto con las manijas de las puertas, hubiesen quedado mejor definidos por separado. El cristal es bastante fino y transparente. Las ventanillas laterales son de una pieza a cada banda, como ya he mencionado. El grosor es algo mayor que el del parabrisas y van unidas al toldo. La ventanilla trasera es la pieza transparente más gruesa y se engasta en el toldo desde dentro. El toldo es de una pieza. A mi juicio, las superficies externas están bien reproducidas y muestran con acierto la tensión del tejido y las marcas de las varillas del bastidor, que la maqueta no trae.
Dejando aparte los elementos de la parte delantera ya referidos, el detalle aparte incluye los ganchos de remolque provistos de una fina barra entre ellos a modo de paragolpes, el claxon, el faro Notek, los indicadores de giro unidos a los retrovisores y la pala, con opción de colocarla con sus abrazaderas o dejar la abrazadera principal sin la herramienta.
Los contenedores de combustible están despiezados en mitades con las asas aparte y los soportes moldeados en las piezas. La parte trasera cuenta así mismo con un faldón separado al que está unido el catadióptrico de un modelo muy anterior a 1943, el paragolpes sin el soporte intermedio propio de un vehículo de 1943, la luz trasera, la placa de matrícula y las luces de convoy.
La hoja de calcas proporciona matrículas y marcas tácticas alemanas, rótulos, estrellas norteamericanas y un estarcido con especificaciones técnicas. Todas ellas poseen un aspecto fino y brillante, con buena nitidez y mínimo exceso de soporte.
El libreto de instrucciones tiene 24 páginas impresas en color. Contiene una introducción histórica en varios idiomas, un plano de piezas numerado, una tabla de colores con equivalencias de pinturas de Meng/AK Interactive y Acrysion, 22 capítulos de montaje sencillos de seguir y tres páginas de perfiles que nos muestran dos vehículos alemanes pintados en camuflaje tricolor y gris respectivamente, más un Kubelwagen norteamericano capturado, con prominentes estrellas blancas a los cuatro lados y rótulos pintados por sus nuevos dueños.
Valoración
Creo que es indiscutible que la nueva maqueta de Meng está bien diseñada para que se pueda montar con facilidad y su detalle es, en general, bastante correcto, salvando algunos elementos menores incongruentes con la versión de un vehículo fabricado hacia mediados de 1943. En este sentido, el producto me parece asequible para un amplio abanico de aficionados a este vehículo militar.
Construido de caja, es decir, con las puertas cerradas, ventanillas y toldo, este Kubelwagen no le dará quebraderos de cabeza al modelista. Si se buscan otras posibilidades, dejando a un lado el toldo o no, hay que realizar modificaciones a lo nos ofrece la maqueta o buscar piezas alternativas.◊


The kit
There isn’t a major brand dedicated to military vehicles without at least one Kubelwagen in its catalog. Meng Model have joined the group with four 1/35 scale kits of this vehicle released in recent months. This box is the second edition, offering versions set in European fronts, in contrast to the first, which focused on the model used in North Africa.
Inside the box, we find the instruction booklet, the decal sheet, a bag with five vinyl tires, two clear sprues, and three non-transparent sprues, one of which is different from the previous kit and includes the canvas and some other parts.
Plastic parts are well molded, without blemishes or flash, and with minimal ejector marks that are barely visible under the front fenders and inside the cab. Some of the clear parts have ejector pips that are easy to clean up. The assembly sequence doesn’t suggest any problems at first glance, as it unfolds clearly from the body floor and the base of the vehicle, just like in so many other kits. Paint finishes include German vehicles with and without camouflage, plus another painted in the standard green livery of their American captors for added variety.
The kit seems to render a Kübelwagen manufactured around mid-1943, as evidenced by several details, including the third roof crossbar, the square license plate, and the rear Notek light located on the engine cover. Other features are also from that year, but slightly earlier, such as the square instrument panel. However, Meng have retained elements from earlier versions, such as the rounded upper corners of the windshield (changed to square ones in 1943) and the turn indicators, also removed that year. Strangely, even a rear reflector from the pre-1941 model is included. The kit also offers the option of using two types of headlights: a larger model, from before February 1943, with a shorter and wider night-driving lens slot, or a smaller, later model with a longer and narrower slot.
Review
The body’s floor plate is molded in one piece. The upper surface shows markings for the subsequent placement of the wooden floorboards, the transmission cover, and the rifle butt brackets. The opposite side has a clear stamping on the plates and the transmission recess. The assembly of the lower components is articulated around the front and rear sections of the vehicle, both separated from the floor and molded with the fenders. The rear section includes the engine compartment floor, and the front section is molded with the inner hood floor.
First, the rear axle is added, a piece molded with the gearbox and complemented with a crossmember and two additional side supports. Once the rear fender section is glued in place, the engine and the exhausts are attached. These are molded with the engine outlet pipes and mufflers. Both the engine and gearbox are reproduced only in their lower halves. The front axle is attached to the front fender section and has a separate sway bar.
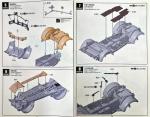
Once the front and rear compartments / fenders are attached to the floor, assembly continues with the attachment of the transmission cover and the skid plate. Both feature well-defined detail in the moldings. The engine also has its own skid plate, although the instructions postpone the assembly until chapter 15. The wheels have rims separated into two pieces, except for the spare. The outer sides have quite good detail and are different on the front and rear axles, as is correct. The inner pieces contain the brake drums. The tires are vinyl with a well-detailed tread pattern and no marks or flash, since these parts have been injection-molded from the inner edge and not from the outside, as is the usual procedure. Each tire is press-fit onto the rim.
The next construction stage involves adding the wooden floor slats, levers, pedals, and steering column, leaving the steering wheel for a later stage. Except for the column, which seems more convenient to glue before the hood, the other parts can be added after assembling the body.
To align the side body panels, the engine compartment, which features separate sides, should be built first. The internal panels and moldings are nicely reproduced, except for the somewhat simple lid latch and the shallow ejector mark on the inner side. The compartment floor is closed and empty, as one can expect. The sides of the rear compartment lids are provided in a single piece that shows defined engine’s ventilation grilles. The upper compartment cover is similar to the engine cover.
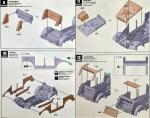
The side body panels show good detail in both the internal and external moldings, as well as in the jack holes on the rocker panels. The ejector pin marks on the inner face of the those panels are not a concern, as they are covered by two separate pieces with slots for gluing. If you wish to install the optional jerrycans, you need to drill the holes for the frames on the rear side. With the sides installed, you can add the hood, which includes the fuel tank on the inner side and the spare wheel mount showing short spokes, which is correct for this version. The part also includes the front panel with the number plate recess. The holes for installing the fuel spout as well as the windshield clips are visible on the part. The filler cap even has the small chain rendered in plastic.
The doors are separate pieces showing good detail in the hinges and moldings on both sides, but the handles lack the definition that only photo-etched parts can provide. The modeler will find difficulties positioning the doors open because the kit is only designed to have the canvas unfolded and the windows closed. There are no alternative parts for folding the canvas, and the side windows are a single unit. Therefore, they would need to be separated to open either door.
The interior elements of the cabin, in addition to those mentioned above, include the dashboard attached to the panel and the lower bar. The few instruments are raised and well-defined. The front seats have separate bases, and the rear seat is molded with the frame. The fabric of the backs and seats is not textured, which is a bit disappointing. The bar behind the front seats is thin and contains the rifle brackets. The weapons included are well-molded, although the trigger guard seems a bit large.
The windshield frame has the retaining clips in the lower corners and the windshield wipers molded on the piece. These wipers, along with the door handles, would have been better defined separately. The glass is quite thin and transparent. The side windows are one-piece on each side, as mentioned. They are slightly thicker than the windshield and are attached to the roof. The rear window is the thickest clear piece and is fitted into the tarp from the inside. The tarp is a single piece. In my opinion, the external surfaces are well reproduced and accurately show the fabric tension and the raised detail of the frame crossbars. Unfortunately the frame is not provided with the kit.
Aside from the front elements already mentioned, additional detail includes the tow hooks with a thin crossbar between them, the horn, the Notek headlight, the turn indicators attached to the mirrors, and the shovel, which has the choice for the clamp without the tool.
The jerrycans come in halves with the handles separate and the support frame molded with the pieces. The rear also features a separate lower panel including the reflector used well before 1943, the crossbar without the medium holder typical of a 1943 vehicle, the taillight, the license plate, and the convoy lights.
The decal sheet provides German number plates and tactical markings, American stars, and a stencil with technical specifications. All have a fine, glossy appearance, with good sharpness and minimal excess carrier.
The instruction booklet has 24 pages printed in color. It contains a historical introduction in several languages, a numbered parts diagram, a color chart with paint matches from Meng/AK Interactive and Acrysion, 22 easy-to-follow assembly chapters, and three pages of profiles showing two German vehicles painted in tricolor and gray camouflage respectively, plus a captured Kubelwagen, with prominent white stars on all four sides and signs painted by its new owners.
Conclusion
Meng’s new Kubelwagen kit is well-designed for easy assembly, and detail is generally quite good, with the exception of a few minor elements that seem inconsistent with a vehicle manufactured around mid-1943. In this respect, I find the kit suitable for a wide range of enthusiasts of this military car.
Built straight from the box, that is, with the doors, windows, and canvas closed, this Kübelwagen won’t pose any problems for the modeler. If you’re looking for other options, such as folding the canvas or pose the doors and windows open, you’ll need to modify the kit or find alternative parts.◊
Publicado – Published: 12 / 2025
©www.jmodels.net

Debe estar conectado para enviar un comentario.