
De un vistazo – Quick look
MATERIAL Y PIEZAS
MEDIA & PARTS:
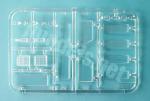
- Plástico inyectado (95 piezas), plástico transparente (17 piezas).
- Injected plastic (95 parts), clear plastic (17 parts).
CALCAS – DECALS:
- Impresas por Zanchetti. Dos juegos de matrículas, marcas de la IFOR y sanitarias. Impresión fina y brillante con motivos saturados de color y sin excedente de soporte.
- Printed by Zanchetti. Two sets of number plates, IFOR and Red Cross markings. Thin and glossy finish with saturated colors and no excess of carrier film.
OPCIONES – OPTIONS:
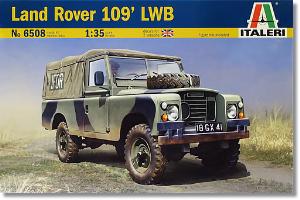
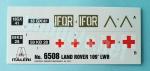
- Land Rover 109’ LWB. British Royal Army. IFOR Mission. Bosnia, 1993.
- Land Rover 109’ LWB. British Royal Army. Field ambulance, 1984.
INSTRUCCIONES – INSTRUCTIONS:
- Folleto doblado de 10 páginas impreso en blanco y negro. Contiene un breve sumario histórico sobre el vehículo, un plano numerado de piezas, 14 capítulos de montaje y perfiles. Los colores llevan referencias en Federal Standard y acrílicos de Model Master e Italeri.
- 10-page folded brochure printed in black and white. It shows a historical summary about the vehicle, a numbered parts plan, 14 assembly chapters and profiles. Color reference is given in Federal Standard codes, Model Master and Italeri acrylics.
LO MEJOR – THE BEST:
- Montaje sencillo.
- Easy build.
LO PEOR – THE WORST:
- Marcas de eyector. Ausencia de motor. Sin variedad en las terminaciones de pintura.
- Pin marks. Lack of engine. Lack of variety in paint finishes.
VALORACIÓN – CONCLUSION:
- La disfrutará más y le sacará mayor partido el modelista básico y medio que desee hacerla de caja o con mejoras. El detalle general no es lo refinado que piden los tiempos, pero tiene un montaje sin complicaciones y esto solo puede ser ya un incentivo para quienes no quieran ofuscarse con un despiece interminable.
- Basic and standard modellers can enjoy it both out of the box or using aftermarkets. General detail does not have the refinement of modern releases, but the kit has an straightforward assembly and this alone is an incentive for those not wishing to be overwhelmed by an unending parts breakup.

La maqueta
Junto con el clásico de Tamiya, el Land Rover de Italeri, que no se ha prodigado tanto como uno imagina, ha sido durante décadas la maqueta más asequible para hacer este vehículo en la escala 1/35. Ambas ediciones representan modelos de la serie III de 109 pulgadas (2,77 m) de batalla (distancia entre ejes). En los últimos años han aparecido otros modelos en la misma escala, como el Land Rover 88 serie IIA de AK Interactive (revisión Land Rover 88 Series IIA Rover 8 AK35012), o el FV18001 británico de Gecko Models, ambos de batalla corta y que reproducen modelos anteriores a finales de los años 70, momento en el que Land Rover inició la producción de la serie III.
El molde es original de la casa italiana y ha sido reeditado por Testors y por Revell. Italeri lo ha sacado sobre todo en versiones del ejército británico (ambulancia, S.A.S.), aunque después puso a la venta una edición con dos vehículos civiles y otro de la Guardia Civil española.
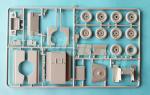
La caja trae cuatro bastidores de piezas, un bastidor transparente, las calcas y las instrucciones. Aunque las piezas están por lo general bien producidas y limpias, al molde se le conocen los años por la gran cantidad de marcas de eyector en muchas piezas. Una observación detenida nos hace ver el vaso medio lleno porque no son grandes ni profundas ni tampoco todas evidentes, por eso creo que el esfuerzo de eliminarlas no se dilatará hasta el aburrimiento.
El montaje no parece ofrecer especiales dificultades en principio, salvando lo que podamos encontrar al construir los elementos de la carrocería, más que nada porque se trata de un molde de otra época. La única alternativa de montaje es poder mostrar la puerta trasera de la caja en posición abierta. La supresión del toldo no está indicada en las instrucciones pero es una opción obvia.
Esta edición de Italeri ofrece menos alternativas de pintura que las maquetas de Revell y contiene dos vehículos en camuflaje del mismo color verdinegro con distintas marcas y matrículas. De caja, no hay mucho donde elegir desde luego.
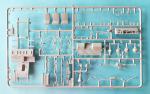
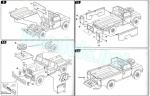
Chasis
El bastidor del chasis está representado casi en su totalidad con la excepción de algunos travesaños, por ejemplo el último, como suele ser habitual en muchas maquetas, y alguno más bajo la caja de cambios. La pieza tiene algunas marcas sólo en el lado inferior y está moldeada con la mitad inferior del motor, que resulta bastante birriosa por su escaso detalle, el suelo de la cabina con la base de los asientos, además de un panel irreal en el lugar que debería ocupar el hueco del motor.
En los primeros pasos del ensamblaje se añaden la mitad inferior de la caja de cambios, las ballestas delanteras unidas a los extremos de los ejes delanteros y el diferencial. Esta pieza está separada en mitades y va pegada entre los ejes moldeados con las ballestas. Los amortiguadores delanteros vienen aparte. El despiece es un tanto extraño, pero así lo hizo Italeri. De estas piezas, las mejores son las ballestas por su nitidez en las láminas y bridas.
Posteriormente se pega el árbol de la transmisión, bien definido en las juntas cardan y la caja de cambios auxiliar, y el largo tubo de escape unido a los silenciadores. Estas piezas deben introducirse en medio de un travesaño antes de unirlo al chasis. El inicio del tubo de escape va pegado al panel delantero donde falta el motor.
El montaje del diferencial y las ballestas traseras tiene idéntico detalle, despiece y montaje que el delantero, aunque en este caso los ejes y ballestas son más largos y el diferencial es ligeramente mayor. Las ballestas están unidas a los amortiguadores, cuyos extremos van pegados al bastidor.
El chasis se completa con la adición del travesaño posterior, los tambores de freno delanteros, la fina barra estabilizadora y la amortiguación lateral, compuesta de una fina barra con su amortiguador.
La maqueta dispone de un depósito de combustible con su tubo de llenado situado en la parte trasera. Estas piezas no se emplean en esta edición porque corresponden al modelo con el tapón situado en la parte trasera de la carrocería, como en la primera edición de esta maqueta. Sin embargo, la maqueta no tiene depósito alternativo aunque dispone del tapón de llenado en el lado izquierdo de la aleta delantera.
En conjunto, el montaje de todos estos elementos es básico y no parece necesitar mucho tiempo en limpiar o modificar piezas.
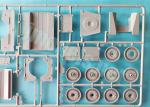
Ruedas
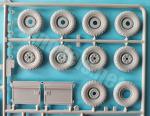
Las ruedas son de plástico y están divididas en mitades. Aunque no pueden competir con otras de resina, tienen buen aspecto en las llantas, salvo que Italeri les puso seis tuercas en lugar de las cinco reales, un detalle que “canta” a simple vista. Los neumáticos están detallados con la banda de rodadura sólo en los hombros. Los flancos muestran los datos y el nombre del fabricante a tamaño diminuto. La parte central de la banda de rodadura no está detallada. La rueda de repuesto es igual, excepto que carece de la llanta externa. Cada unidad va introducida en los ejes atravesando incluso la cara externa de la llanta. El tramo sobresaliente del eje dispone de un pequeño disco central con tuercas de sujeción.
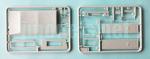
Carrocería y cabina
La construcción de la maqueta continúa en la parte delantera añadiendo los guardabarros unidos en una pieza con el hueco interno del motor situado sobre la parte delantera del chasis. El frontal del morro contiene los característicos “mofletes” del vehículo detallados con la rejilla y el nombre del fabricante. Los pilotos e intermitentes no están mal, pero no son piezas transparentes. Los faros, sin embargo, sí tienen las lentes de este material. También hay una placa redonda que marca la categoría del vehículo al pasar puentes y que es usual en casi todos los vehículos del ejército británico.
El paragolpes delantero es de una pieza e incluye la placa de matrícula, que debe eliminarse en la versión ambulancia. En esta versión la placa de matrícula está situada en la parte derecha del paragolpes, como se ve en la página de perfiles, aunque el montaje la obvia sin mencionar que se trata de la pieza 55 del bastidor D.
Posteriormente se añaden las aletas del morro unidas a los estribos y el capó motor. A la aleta izquierda hay que taladrarle un agujero para instalar el tapón de combustible, como he mencionado. El capó muestra las bisagras con nitidez y está moldeado con el rebaje para pegar la rueda de repuesto. Obviamente, sin motor no hay nada que mostrar debajo.
Las puertas vienen en piezas separadas y limpias de marcas. Muestran tanto las bisagras como los pestillos por ambas caras, pero están mejor conseguidos por fuera, y tienen los retrovisores aparte. Los marcos separados se pegan sobre una pestaña en el borde superior y poseen leves marcas en la cara interna. Los cristales son muy gruesos y van encajados por dentro en los marcos.
El panel cortafuegos del motor es de una pieza y se instala sobre el chasis mediante una pequeña lengüeta. Las tres marcas de eyector del lado posterior posiblemente quedarán cubiertas por la caja de cambios y el salpicadero, por lo tanto no hay que ocuparse de ellas a primera vista. El borde superior de la pieza muestra los tapas cerradas del sistema de ventilación del habitáculo y las bisagras mal definidas de las bisagras del parabrisas.
El marco del parabrisas está moldeado con unos limpiaparabrisas mediocres que ganarán mucho si se reemplazan por fotograbados. El lado trasero tiene algunas marcas que limpiar. Una vista detallada en las instrucciones nos señala que hay que pegarlo sobre el panel del motor en posición inclinada, pero no se indica exactamente cuánta inclinación, por ello es sensato dejarla aparte hasta poder colocar el toldo, si se usa, y colocar la pieza correctamente. Los cristales son un tanto gruesos, pero con el vehículo cubierto este detalle resaltará menos.
La parte delantera del habitáculo contiene el salpicadero, los pedales, las distintas palancas, el volante y su soporte moldeado con las pequeñas palancas de los indicadores. El salpicadero no está mal, pero no tiene al menos unas calcas para los instrumentos. Los pedales de embrague y freno, unidos en una pieza, parece tener un tamaño excesivo incluso para un Land Rover.
Los tres asientos son piezas separadas, el central con una anchura algo menor. No tienen marcas, pero tampoco textura o detalle alguno en las superficies.
Caja trasera
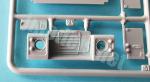
Está compuesta de un panel delantero, el suelo, las aletas de la carrocería y tres piezas en la parte trasera. El panel delantero dispone de lengüetas para situar la pieza del suelo. Esta muestra los resaltes laterales de la carrocería con dos cajas de respeto cerradas y un panel remachado. El suelo muestra los finos tirantes de refuerzo con nitidez y no afectados por marcas como los lados, que tienen cuatro, una en cada extremo.
Las aletas de la carrocería no tienen marcas visibles y sus bordes externos presentan una hilera de tuercas bien reproducida, mientras que en la parte trasera tenemos dos paneles que tapan el hueco de la carrocería que contienen luces iguales a las de la parte frontal más los catadióptricos. El lado izquierdo lleva la placa de matrícula aparte y la pequeña luz por encima de ella moldeada en la pieza. La puerta trasera viene limpia y detallada por fuera con un pico y una pala pasables. Puede colocarse abierta y opcionalmente podemos usar dos varillas de soporte. El travesaño posterior lleva dos paragolpes más el gancho de remolque.
Toldo
Lo forman cuatro piezas a las que se les ha dado cierta textura irregular simulando el tejido. El techo tiene el borde del bastidor fino y bien definido. Los lados poseen rebajes para los cristales, que en esta maqueta no se emplean, y por fuera una pequeña ventanilla de tela cerrada. El lado posterior muestra nitidez en el marco de la ventanilla y algunos cordones de cierre. El cristal es grueso, como el resto de piezas de este tipo en la maqueta.
Calcas
Están impresas por Zanchetti. La hoja contiene dos juegos de matrículas, marcas de la IFOR y sanitarias. La impresión es fina y brillante con motivos saturados de color y sin excedente de soporte.
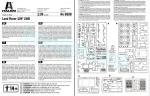
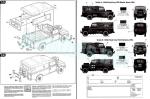
Instrucciones
Se presentan en un folleto doblado de diez páginas impreso en blanco y negro que muestra un breve sumario histórico sobre el vehículo, un plano numerado de piezas, catorce capítulos de montaje y perfiles. Los colores se refieren al código Federal Standard y a la gama de acrílicos de Model Master e Italeri.
La cara trasera de la caja lleva impresas las dos versiones de pintura en color y los colores necesarios para pintar la maqueta en la gama de pinturas acrílicas del fabricante.
Valoración
En el modelismo de hace 40 años esta maqueta sería una pieza sin duda destacable. Para los tiempos que corren se ha quedado un tanto desfasada por detalles como la falta del motor, las numerosas marcas internas, las piezas transparentes gruesas y sin las luces auxiliares o el error en las llantas, por citar únicamente algunas carencias. Por ello, posiblemente a los modelistas de nivel más avanzado no les va a convencer esta maqueta.
Sin embargo, creo que este Land Rover continúa teniendo su público entre los aficionados menos peritos o con una experiencia media, que pueden ver el vaso medio lleno y convivir con una tuerca de más o un depósito de combustible de menos a cambio de un montaje sencillo y sin una miríada de piezas que colocar a un precio asequible. Y desde luego la maqueta tiene también posibilidades para refinarla con algunos extras o hacer otras terminaciones de pintura además de las que trae esta edición, que no ofrecen alternativas sino en las calcas.
Recuerdo haberme encontrado en Roma con un talludo conserje de un bloque de pisos que tenía esta misma maqueta tras el cristal de su pequeño cubículo. Fue un momentazo, como se dice ahora. Seguramente era de los de ese público al que me refería antes.◊

The kit
Along with the Tamiya kit, Italeri’s Land Rover, which hasn’t been as widely reboxed as one might imagine, has been the most available offer in the 1/35 scale for decades. Both kits represent 109’ (2.77 m) wheelbase Series III vehicles. In recent years, other kits in the same scale have been released, such as AK Interactive Land Rover 88 Series IIA (review Land Rover 88 Series IIA Rover 8 AK35012), or Gecko Models FV18001, both short-wheelbase models manufactured before the late 1970s, when Land Rover began production of the Series III.
The tooling is original from the Italian company and has also been reboxed by Testors and Revell. Italeri released it mostly in British Army versions (ambulance, S.A.S.), although one of the latest boxings included two civilian vehicles and one from the Spanish Guardia Civil.
The kit comes with four sprues of parts, a clear sprue, the decals, and the instructions. Although parts have a good standard of moulding and are clean, the tool shows its age due to the large number of pin marks on many parts. On close inspection we can see these are small, shallow and will be hidden for the most part, so I think the effort to remove them won’t be tiresome.
Assembly doesn’t seem to show special difficulties, except for what we might find when building the body elements, mainly because this is a kit from a different modelling age. The only assembly choice is to pose the tailgate in the open position. Building the vehicle without the canvas roof is not shown as an option in the instructions, but obviously it is. Italeri offers fewer paint finishes than Revell reboxes and this boxing contains two vehicles in the same green-black camouflage with different decals and license plates. From the box the box, there’s certainly not much to choose from.
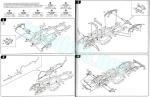
Chassis
The chassis frame is almost completely moulded in a piece, with the exception of a few cross members, such as the last one, as is common in many kits, and a few others under the gearbox and engine. The piece has some marks only on the underside and is moulded with the lower engine half, which is rather bad due to the soft detail, the cab floor with the seat bases, and an unrealistic panel in the place where the engine compartment should be.
In the first steps of assembly, the lower gearbox half, the front leaf springs attached to the ends of the front axles, and the differential are added. This part is separated into halves and glued between the axles moulded with the leaf springs. The front shock absorbers are separate pieces. Parts breakup is unusual, but that’s how Italeri did it. Of these parts, the leaf springs are the best, showing nice leafs, eyes and clips. The driveshaft, which has sharp joints, and the auxiliary gearbox are then glued together, along with the long exhaust moulded with the mufflers. These parts are then inserted through a cross member before joining it to the chassis. The exhaust is glued to the front panel where the engine is missing.
The assembly of the differential and rear leaf springs has the same detail, parts breakup and assembly process as the front one, though in this case the axles and leaf springs are longer and the differential is slightly larger. The leaf springs are moulded with the shock absorbers and these in turn are attached to the frame.
The chassis construction finishes with the addition of the rear cross member, the front brake drums, the thin stabilizer bar, and a thin bar with the steering damper.
The sprues include a fuel tank with a hose that are not applicable to this kit because they belong to the Land Rover produced with the cap on the rear quarter panel, as in the first release of the kit. However, there is no alternative side tank though it does include a filler cap on the left front fender panel.
Overall, assembly of all these elements is basic and doesn’t seem to need much time to clean up or modify parts out of the box.
Wheels
The wheels are made of plastic and divided into halves. Although they can’t compete with resin counterparts, they look good on the rims, but Italeri fitted them with six nuts instead of the standard five, a very noticeable detail at first glance. The tires are only detailed with the tread pattern on the shoulders. The sidewalls have the manufacturer’s information and name in raised detail. The spare wheel is the same, but without the outer rim. Each wheel is inserted into the axles, which have the hubcaps provided with a separate disc.
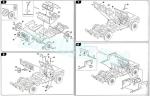
Body and cab
Construction of the kit goes on with the front body, adding the fenders, moulded as a single piece with the internal engine bay. The front piece shows the vehicle’s characteristic «cheeks,» detailed with the grille and the manufacturer’s name. The signal lamps are not bad, but they are not provided as clear pieces. The headlamps, however, have clear lenses. There is also a separate bridge plate, which is common on many British Army vehicles.
The front bumper is a single piece and includes the license plate, which is removed if we wish to build the ambulance version. In this version, the license plate is placed on the right side of the bumper, as seen on the profile page of the instructions. Assembly steps on the leaflet simply ignore it without mentioning that it is part 55 of frame D.
The front wing panels including the running boards and the hood are then added. You need to drill a hole on the left fender to install the fuel filler cap, as mentioned. The hood shows sharp hinges and the moulding to install the spare wheel. Obviously, without the engine, there’s nothing to show underneath.
The doors come in separate, clean pieces. They show the hinges and the latches, but are better rendered on the outside. The rearview mirrors are separate pieces. The window frames are moulded apart and are attached onto the top edge of the doors. The pieces have small pin marks on the inner side. The clear parts for the windows are very thick and fit into the frames from the inside.
The engine bulkhead is a single piece attached on the frame with a small tab. The three marks on the cab side will likely be hidden by the gearbox and dashboard, so they shouldn’t be noticed at first glance. The top edge of the piece shows closed vent flaps and poorly defined windshield hinges.
The windshield frame is moulded with poor wipers that could be enhanced with photo-etched parts. The rear side has some marks that need to be cleaned. A detailed view in the instructions tells us to glue it to the bulkhead at an angle, but it doesn’t specify exactly how much tilt you need, so it’s sensible to leave the part aside until you can install the canvas, if used, and attach the part correctly. The glass is somewhat thick, but this detail will be less evident with canvas cover.
The front cab is detailed with the dashboard, pedals, several levers, the steering wheel, and the steering column shroud provided with small levers. The dashboard isn’t bad but one misses at least some decals for the gauges. The clutch and brake pedals, provided as one piece, seem too large even for a Land Rover.
The three seats are separate pieces, the center one being a bit narrower. They have no pin marks, but they don’t have any texture or detail on the surfaces either.
Cargo bed
It consists of a front panel, the floor, the body fenders, and three rear pieces. The front panel has a tab to be attached to the floor piece. This shows the sides detailed with two closed spare boxes and a riveted panel. The floor clearly shows thin raised strips without marks. The sides, however, have four, one on each corner.
The body fenders have no visible marks and feature a well-reproduced row of nuts. The rear side have two panels containing brake lamps and indicators identical to those on the front as well as reflectors. The left side has a separate license plate and the small light above it moulded in place. The tailgate is clean and detailed on the outside with a pick and shovel. The piece can be posed open and two supporting rods can be optionally used. The rear crossmember has two separate bumpers plus a pintle hook.
Canvas
It consists of four pieces showing some rough texture simulating fabric. The roof has a thin, well-defined frame edge. The sides have recesses for the windows, which are not used in this kit, and on the outside there is a small, closed fabric window. The back side has a sharp window frame and some raised cords. The clear panel is thick, like the rest of pieces of this kind in the kit.
Decals
The sheet is printed by Zanchetti and shows two sets of plates, IFOR and Red Cross markings. The items have a thin and glossy finish with saturated colors and no excess of carrier film.
Instructions
They come in a 10-page folded leaflet printed in black and white showing a historical summary about the vehicle, a numbered parts plan, 14 assembly chapters and a page of profiles. Color reference is given in Federal Standard codes, Model Master and Italeri acrylics.
The back side of the box shows profiles in color of two vehicles with the colors needed to paint the kit in the Italeri acrylic range.
Conclusion
In the modeling world of 40 years ago, this kit would undoubtedly have been a remarkable piece. In these times, it has become somewhat outdated due to details such as the missing engine, plenty of pin marks, thick clear parts, the lack of front and tail signal lamps, and the mistake in the rims, to name just a few shortcomings. Therefore, advanced modelers may not be convinced by this release.
However, I think this Land Rover still has a market among less experienced and average modelers, who can live with an extra nut or a missing fuel tank in exchange for simple assembly without a myriad of parts to attach at an affordable price. And of course, the kit also has the potential to be refined with some extras or other paint finishes beyond those included in this box, which offer no alternatives except in the decals.
I met an apartment building janitor in Rome who had this same kit behind the glass of his small office. It was a moment of wonder. He was probably part of the market I have mentioned.◊
Publicado – Published: 5 / 2025
©www.jmodels.net

Debe estar conectado para enviar un comentario.