
De un vistazo – Quick look
MATERIAL Y PIEZAS
MEDIA & PARTS:
- Plástico inyectado (235 piezas), plástico transparente (26 piezas), fotograbado (53 piezas), vinilo (5 piezas).
- Injected plastic (235 parts), clear plastic (26 parts), photo-etched (53 parts), vinyl (5 parts).
CALCAS – DECALS:
- Impresas por Cartograf. Marcas de la ONU, banderas británicas, matrículas y emblemas de unidad. Aspecto brillante y fino, sin exceso de soporte.
- Printed by Cartograf. UN markings, number plates, British flags and unit badges. Thin and glossy appearance, with too much carrier film.
OPCIONES – OPTIONS:
- Land Rover 88. Ejército Británico. 16º/5º de Lanceros. Adén (Yemen), 1965.
- Land Rover 88. Ejército Británico. 16º/5º de Lanceros. Adén (Yemen), 1965.
- Land Rover 88. Marines Reales. 45º Comando. Adén (Yemen), 1967.
- Land Rover 88. Base RAF Masirah (Omán), 1969.
- Land Rover 88. Ejército Británico del Rhin (BAOR). Nürburgring (Alemania Occidental), 1972.
- Land Rover 88. Batallón finlandés de la UNEF. Desierto del Sinaí, 1973.
- Land Rover 88. Mlicia armada de las Fuerzas Libanesas, década 1970-1980.
- Land Rover 88. British Army. 16th/5th Lancers. Aden (Yemen), 1965.
- Land Rover 88. British Army. 16th/5th Lancers. Aden (Yemen), 1965.
- Land Rover 88. Royal Marines. 45 Commando. Aden (Yemen), 1967.
- Land Rover 88. RAF Masirah (Oman), 1969.
- Land Rover 88. British Army of the Rhine (BAOR). Nürburgring (West Germany), 1972.
- Land Rover 88. UNEF Finnish Battalion. Sinai Desert, 1973.
- Land Rover 88. Lebanese Forces armed militia. Lebanon, 1970s-1980s.
INSTRUCCIONES – INSTRUCTIONS:
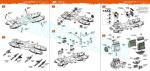
- Folleto A4 de 40 páginas impresas a color sobre papel satinado. Contiene un plano numerado de piezas, una lista de colores con equivalencias en pinturas de AK Interactive, 46 secuencias de montaje y 7 páginas de perfiles. Claras, útiles y muy bien impresas.
- A4 40-page booklet printed in color on satin paper. It shows a numbered parts plan, a list of colors with AK Interative paint matches, 46 construction chapters and 7 pages of profiles. Clear, helpful and very well printed.
LO MEJOR – THE BEST:
- Buen detalle general. Motor. Opciones de montaje. Instrucciones.
- Nicely detailed overall. Motor. Assembly choices. Instructions.
LO PEOR – THE WORST:
- Marcas de eyector en las llantas (ver texto).
- Pin marks on wheel hubs (see text).
VALORACIÓN – CONCLUSION:
- Faltaba este Land Rover Series de batalla corta en la escala y AK lo ha reproducido con solvencia, acompañándolo de una destacables calcas e instrucciones. Para modelistas de nivel medio en adelante.
- A nice kit of a Land Rover Series we didn’t have before in 1/35 scale that AK has provided with a nice set of decals and a useful and well printed instructions booklet. For modellers with average skills and above.

La maqueta
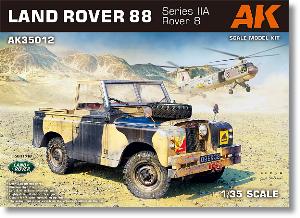
AK Interactive mantiene su línea de todoterrenos livianos con este popular Land Rover 88 del que tenemos tres versiones hasta ahora. Una de ellas representa el modelo con techo rígido (Land Rover 88 Station Wagon), la segunda es un vehículo civil grúa (Land Rover 88 Crane-Tow Truck) y la tercera es el modelo que plasma esta maqueta con techo de lona (Rover 8). Todos los modelos pertenecen a la denominada Serie IIA.
La caja contiene 8 bastidores de piezas, dos de ellos repetidos, un bastidor transparente, una plancha de fotograbados, el toldo de la maqueta separado y protegido en una cajita de cartón, 5 ruedas de vinilo, las calcas y las instrucciones. Las piezas de plástico están envueltas en las ahora habituales bolsas con cierre adhesivo.
El moldeado de las piezas es bastante bueno y no tienen imperfecciones. Muchas de ellas muestran nódulos de eyector y las marcas están localizadas en lugares no evidentes. Sobre las caras interiores de las llantas hay marcas positivas que impiden pegar las ruedas a los tambores de freno. Desgraciadamente, están situadas justamente sobre el rebaje de unión con el tambor y deben limpiarse con cuidado de no dañar el detalle adyacente. También hay marcas del mismo tipo en las caras internas de las mitades de los ejes de la transmisión, pero estas no deben suponer problema para retirarlas.
Las opciones de montaje permiten colocar el volante y el escape a la derecha o izquierda, colocar un enganche de remolque en el paragolpes delantero, añadir un perfil sobre el borde de la caja de carga, mostrar los bancos de la caja en posición plegada o desplegada y el capó abierto o cerrado. El toldo también es opcional, así como colocar las puertas abiertas, aunque esto último no aparece como tal en las instrucciones.
Las opciones de pintura permiten seleccionar entre varios vehículos con y sin camuflaje, todos ellos militares. Los patrones de camuflaje no son en principio difíciles de realizar para un modelista de mediana experiencia.
La maqueta representa la Serie IIA de Land Rover fabricado de 1961 a 1971. La denominación “88” se refiere a la batalla del vehículo medida en pulgadas (88 pulgadas, 2.235 mm, o 2,23 m de distancia entre ejes). Este es, por tanto, el modelo con chasis más corto y carrocería de dos puertas. La Serie IIA tenía tres motorizaciones y una caja de cambios de cuatro marchas. Un cambio muy evidente en esta serie fue el traslado de los faros de los lados de la parrilla a las aletas delanteras a partir de 1969, por ello la maqueta refleja un vehículo fabricado antes de esa fecha.
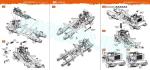
Chasis y suspensión
El montaje se inicia de la manera habitual por el bastidor del chasis, que viene en una pieza sin los paragolpes. A continuación hay que añadir los amortiguadores y las ballestas, que son piezas con detalle nítido y perfilado en las bridas y abrazaderas. Los ejes están divididos en mitades e incluyen los diferenciales. Como he dicho, las piezas deben limpiarse de marcas que impiden su unión en las caras internas. Los extremos de los ejes están detallados con los tambores y discos de frenos en piezas finamente reproducidas.
Los paragolpes delantero y trasero están separados. El primero tiene un gancho de remolque auxiliar, mientras que el de atrás posee dos refuerzos a los lados con un gancho y varios ojales separados.
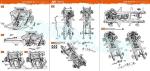
Motor y transmisión
La construcción del motor, la dirección y la transmisión comprenden 25 secuencias del montaje total de la maqueta, lo que da idea de los múltiples elementos que los componen. Es importante seguir los pasos de las instrucciones si no se tiene mucha experiencia para realizar montajes alternativos a los que aparecen señalados, sobre todo porque hay varias piezas de la dirección que interfieren en el montaje del motor de no seguir el orden correcto.
Lo primero que hay que situar del motor es la batería y el filtro de aire y el soporte de ambos. La batería tiene la tapa separada y el filtro viene en mitades con la parte superior aparte, detallada con un fotograbado y la correa de sujeción. El tubo corrugado del filtro y la boca de conexión al motor se añaden una vez montado el motor en el bastidor. Posteriormente se añade el radiador, que muestra un detalle muy nítido en la malla delantera y en las molduras de la pieza superior.
El motor es de por sí una pequeña maqueta. El despiece básico consiste en un bloque en mitades, la tapa de balancines, la cara frontal y el cárter. También separados hay varios componentes más, como los colectores de escape, el generador, el filtro de aceite y otras, así como las correas del ventilador y el propio ventilador, representado en un fotograbado al que hay que doblar las aspas.
La caja de cambios y la auxiliar tienen 14 piezas, además de algunas otras añadidas por fuera, entre ellas el árbol de la transmisión de una pieza. Unida la caja de cambios al motor y al árbol, el conjunto se instala sobre el bastidor y el eje se une al diferencial trasero. La sección delantera del eje también es de una pieza y conecta el motor con la caja de cambios auxiliar. El escape está reproducido en un tubo largo provisto de abrazaderas con dos tipos de silenciadores separados diferentes, dependiendo de si el vehículo lleva el volante a la derecha o izquierda.
Aunque exhaustivo por el número de piezas, el montaje no es complicado hasta este punto si hemos seguido las instrucciones. En adelante hay que añadir piezas de la dirección, como la barra estabilizadora y diferentes bielas y amortiguadores. La tarea es delicada porque las piezas son pequeñas o frágiles y varia de ellas deben instalarse con cierta precisión en lugares muy concretos situados por debajo del bastidor con el motor instalado.
El montaje de la base del todoterreno termina añadiendo los soportes de los depósitos de combustible a los lados del bastidor. Los depósitos muestra la cara superior separada y muy buena textura en el estampado moldeado en los lados.
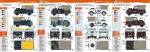
Ruedas
Las llantas son de una pieza. En la cara externa la reproducción del buje es muy buena, pero la interna tiene marcas de eyector, que ya mencioné al inicio.
Los neumáticos, pese a ser de goma, material que no suele gustar a muchos, están muy bien realizados y carecen de rebabas o marcas. La banda de rodadura es muy realista y las piezas llevan incluso los datos del fabricante en relieve sobre los flancos.
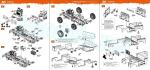
Carrocería
La carrocería se ensambla a partir de una pieza que abarca el suelo de la carlinga, moldeada con las bases de los asientos, y el suelo de la caja de carga. Las bases de los asientos están detalladas en la parte frontal con un perfil remachado y con un panel entre la carlinga y la parte posterior. Los lados de la carrocería van pegados a los laterales del suelo, así como el panel cortafuegos, detallado en la parte delantera con molduras, parte del sistema de fluido de los limpiaparabrisas, dos paneles de ventilación y algunos pequeños depósitos colocados sobre el panel según la posición del volante a derecha o izquierda. Esta operación requiere suprimir un par de paneles que son las cubiertas de los pedales y resulta más cómodo realizarla antes de pegar el cortafuegos a la carrocería.
La parte delantera de la carrocería tiene dos piezas simétricas en forma de L que forman las aletas delanteras, complementadas con dos paneles frontales. Estos llevan dos huecos idénticos para insertar los indicadores de giro y las luces de posición representadas en una sola pieza transparente. Sobre las aletas solo hay que añadir los retrovisores. La plancha frontal va dispuesta entre las aletas. Los faros y las lentes transparentes están separados, al igual que la parrilla de fotograbado. La parrilla lleva el logotipo de la marca también en un fotograbado. Para terminar la parte delantera hay que situar la placa de matrícula sobre el paragolpes, que tiene dos piezas alternativas.
El capó es fino y su cara inferior está detallada con dos refuerzos. La parte superior muestra las bisagras y la placa para colocar la rueda de repuesto. La llanta lleva dos diminutos pasadores de sujeción. Para colocar el capó abierto es necesario emplear una fina varilla de dos piezas de fotograbado que tal vez sea conveniente colocar al final del montaje.
Cabina y caja de carga
El parabrisas lo forman el marco, dos piezas transparentes para los cristales, los motores de los limpiaparabrisas, las escobillas de plástico, sujetas al marco por pequeños fotograbados, y las bisagras del marco con pestillos de plegado en la cara interna.
El habitáculo contiene el salpicadero con doble opción para situar el volante y los pedales. Los indicadores de la parte central son de calca. Tanto los pedales como las palancas vienen en piezas separadas. El volante es fino y la columna de dirección va pegada directamente sobre una pequeña placa de fotograbado. Los tres asientos delanteros muestran los respaldos separados y un panel trasero. Las superficies son lisas sin textura.
Las puertas y las ventanillas laterales son de una pieza cada una. Las bisagras, cerraduras y perfiles internos están decentemente reproducidos, pero hay una ligera marca de eyector en la cara interna.
La caja de carga lleva dos finos perfiles de plástico detallados con remaches de fotograbado sobre los bordes externos solo aplicables si no se emplea el toldo. Los indicadores transparentes traseros son iguales a los delanteros y dos piezas simulan la caja que los contiene. También hay varias piezas pequeñas, dos reflectantes, la placa de matrícula y el logotipo del fabricante situados en la parte exterior trasera de la carrocería.
Los bancos traseros tienen los respaldos y bases separados. Una correa de fotograbado permite instalarlos también plegados. Las superficies carecen de textura.
La puerta trasera tiene perfiles, remaches y las bisagras bien definidos por ambos lados. Las herramientas estibadas por fuera están bien representadas y las abrazaderas son de fotograbado. Las instrucciones no indican que la puerta pueda pegarse bajada.
El toldo está reproducido en una pieza fina con la lona texturizada de forma realista. La cara interna posee varias marcas leves de eyector sobre la zona de carga y muy probablemente no serán visibles. La lona trasera aparece enrollada y separada, con un fotograbado que simula la correa.
Calcas
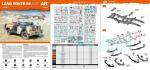
La hoja ha sido impresa por Cartograf. Contiene marcas de la ONU, banderas británicas, matrículas y emblemas de unidad. Las calcas muestran un aspecto brillante, fino y carecen de exceso de soporte. Ya que Cartograf es un fabricante de referencia, no deben dar problemas.
Instrucciones
Están impresas en un folleto de tamaño A4 con 40 páginas a color sobre papel satinado. Contiene un plano numerado de piezas, una lista de colores con equivalencias en pinturas de AK Interactive (Real Colors, acrílicos y Xtreme Metal), 46 secuencias de montaje y 7 páginas de perfiles. El folleto está muy bien editado, los pasos de construcción de la maqueta son precisos y se complementan con llamadas al lector sobre ciertos detalles y opciones. Las diversas vistas generales del montaje son también muy útiles por su claridad.
La selección de terminaciones ofrece diferencia y distintos niveles de dificultad, sin llegar a suponer un reto en ningún caso. Hay cinco vehículos británicos, uno de las Naciones Unidas y otro libanés situados casi todos en diferentes escenarios de Oriente Medio durante la década de los 60 y 70 del siglo pasado.
Valoración
Si no me equivoco, este es el único Land Rover Series de batalla corta hasta ahora, al menos en esta escala. Creo que AK ha acertado eligiendo un modelo que extrañamente ha sido pasado por alto por otras marcas durante mucho tiempo.
La maqueta está muy bien detallada, destacando especialmente la reproducción del motor, y cuenta con suficientes opciones de montaje. La construcción del modelo no me parece a priori especialmente difícil, salvo en el montaje delicado que tiene la dirección. Seguir fielmente los pasos de montaje es lo más indicado en este caso.
A la variedad en los acabados de pintura y las calcas de Cartograf se unen unas instrucciones bien impresas y cuyas secuencias de montaje no dejan detalle sin evidencia gráfica.
Para los aficionados a los vehículos ligeros en general y también a este famoso vehículo británico, que los hay, la aparición de las tres maquetas de AK son una buena noticia.◊


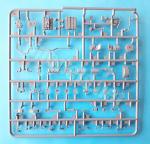


*NOTA: La galería fotográfica no incluye los bastidores E de la maqueta marcados en la primera imagen.
*NOTE: The picture gallery does not show frames E highlighted in red in the first picture.

The kit
AK Interactive continues their line of light softskins with this Land Rover 88 which they have released in three boxings. One of them represents the model with a hard top (Land Rover 88 Station Wagon), the second is a civil crane vehicle (Land Rover 88 Crane-Tow Truck) and the third is the kit with canvas roof I deal with in this review (Rover 8 ). All the kits belong to Land Rover Series IIA.
The box contains 8 sprues of pieces, two of them doubled, a clear sprue, a photo-etched fret, a one-piece canvas roof protected in a cardboard box, 5 rubber wheels, the decals and the instructions. Plastic parts are wrapped in the now common self-sealing bags.
Moulding is quite good and has no blemishes or flash. Many parts show ejector nodules and pin marks are not evident. The wheel hubs show positive marks on the inside faces that prevent the join with the brake drums. Unfortunately, they are located just on the recess connecting the drums and need a careful cleanup so as not to damage adjacent detail. There are also a few similar marks on the inner faces of the transmission shaft halves, but these should not pose any trouble to remove them.
Assembly options allow you to place the steering wheel and exhaust on the right or left side, place a tow hitch on the front bumper, add a profile on the edge of the cargo tray, display the rear benches in the folded or unfolded position and show the bonnet open or closed. The canvas roof is also optional, as is placing the doors open, although this does not appear as such in the instructions. Before starting assembly, it is advisable to choose the driving position, since part of the assembly is conditioned by it.
Paint options allow you to choose from several vehicles with and without camouflage, all of them military. At first sight, camouflage patterns are not difficult to paint for an average modeller.
The kit represents the Land Rover Series IIA manufactured from 1961 to 1971. The name “88” refers to the wheelbase of the vehicle measured in inches (88 inches, 2,235 mm, or 2.23 m wheelbase). This is, therefore, the model with a shorter chassis and two-door body. The Series IIA had three different engines and a four-speed manual gearbox. A very obvious detail in this series was the change of the headlights from the grille sides to the front wings starting in 1969, so the kit renders a vehicle manufactured before that date.
Chassis and suspension
Assembly begins in the usual way with the chassis frame, which comes in one piece without the bumpers. Next we add the shock absorbers and the leaf springs, which are pieces with clear and sharp detail on the clips and shackles. The axles are divided into halves and include the differentials. As said, the pieces need to be cleaned up to attach the halves. The tips of the axles are detailed with the brake drums and discs in fine pieces.
The front and rear bumpers are separate. The first has an optional tow hitch, while the rear one has a pintle hook and two rope eyes.
Engine and transmission
Construction of the engine, steering and transmission comprise 25 sequences of the total assembly, which gives an idea of the multiple elements in each step. It is important to follow the instructions because there are several parts that can hinder engine attachment unless the correct order is followed.
The first thing to place on the engine is the battery and the air filter and a base for both. The battery has a separate lid and the filter comes in halves with the top separated and detailed with a photo-etched part and a strap. The corrugated filter hose and the clamp are added once the engine is attached to the frame. Next is the radiator, which shows a nice sharp detail in the front mesh and in the mouldings on the upper piece.
The engine itself is a small kit. Basic breakdown consists of a block in halves, the rocker cover, the front face and the crankcase. Also separated are several other pieces, such as the exhaust manifolds, the generator, the oil filter and other parts, as well as the fan belts with the fan provided in a photo-etched part that needs some bending in the blades.
The gearbox and transfer box have 14 pieces plus a few others added on the outside including the one-piece driveshaft. Once the gearbox is attached to the engine, the shaft is connected to the rear differential. The front section of the axle is also one piece and links the engine to the auxiliary gearbox. The exhaust is a long piece fitted with clamps and a selection for two different types of separate mufflers, depending on whether the vehicle is left or right-hand drive.
Though busy due to the number of parts, assembly is not complicated up to this point if we have followed the instructions. The next step is building the steering system, comprising parts such as the sway bar and different connecting links and shock absorbers. Assembly is delicate because the parts are small or brittle and some of them need precision in specific spots below the frame with the engine in place.
The first assembly stages are finished by adding the fuel tank brackets to the frame. The tanks show the upper side apart and nicely stamped sides.
Wheels
The wheels are one piece. The outer hub sides show nice detail but the insides have positive pin marks, as mentioned at the beginning.
The tires, despite being made of rubber, something that is not many modellers’ cup of tea, are quite good and have no blemishes or the usual seam lines. The tread is very sharp and the pieces even have the manufacturer’s data on the sidewalls.
Body
The body is assembled from a piece comprising the cab floor, molded with the seat bases, and the cargo bed. The seat bases are detailed at the front with a riveted plate and a bulkhead attached between the cab and the bed. The body sides are then glued to the cab floor floor. The firewall is detailed with mouldings, the windshield washer pipes, two vents and some small pieces attached according to the steering wheel position. To attach the pieces the pedal covers molded on the firewall are to be removed. It seems easier to do this before attaching the firewall to the body.
The body front has two symmetrical L-shaped pieces for the wings with two front sides apart. These have two holes to insert the turn indicators and position lights represented in a single clear piece. The mirrors are then added to the fenders. The front plate between the wings includes separate headlights and clear lenses as well as a photo-etched grille. The grill also bears the brand’s logo in an engraved photo-etched part. Finally, you also have two alternative pieces for the number plate.
The bonnet is thin and detailed with underside mouldings. The top side shows defined hinges and the baseplate for the spare wheel. The wheel hub has two tiny clamps. To place the bonnet open you use a thin two-piece photo-etched rod that is best attached at the end of assembly.
Cab and cargo bed
The windshield is made up of a frame, two clear pieces for the windows, the windshield wiper motors, two plastic wipers, attached to the frame by small photo-etched pins, and the frame hinges with folding latches on the inner side.
The cabin contains the dashboard with a double option to attach the steering wheel and pedals. The gauges are decals. Both the pedals and levers come in separate pieces. The steering wheel looks quite thin and the steering column is glued on the dashboard with the help of a small photo-etched plate. The three front seats feature separate backrests and rear panels. Surfaces are smooth without texture.
The doors and side windows are one piece each. The hinges, locks and internal mouldings are decently reproduced, but there is a shallow ejector mark on the internal side.
The cargo bed has two thin plastic profiles detailed with photo-etched rivets on the external edges only applicable if the canvas is not used. The rear clear indicators are the same as the front ones. Detail on the rear body side comprises two reflectors, a license plate and again the manufacturer’s logo located on the rear body side.
The rear benches have separate backrests and bases. A photo-etched strap is used to install them folded if you wish. Surfaces on the seats are smooth.
The tailgate has well-defined mouldings, rivets and hinges on both sides. The tools stowed on the outside are nicely represented and the clamps are photo-etched. Instructions do not indicate that the gate can be posed down.
The one-piece roof is thin with the canvas realistically textured. The internal side has a few shallow pin marks but most likely they will not be visible. The rear side is rolled up and separated, with a photo-etched part for the strap.
Decals
The sheet is printed by Cartograf. It shows UN markings, British flags, number plates and unit markings. Decals show a glossy, thin appearance and lack excess carrier film. Cartograf is a reference manufacturer, so they should give good results.
Instructions
They come in an A4 40-page booklet printed in color on satin paper. It contains a numbered parts diagram, a list of colors with matches in AK Interactive paints (Real Colors, acrylics and Xtreme Metal), 46 assembly sequences and 7 pages of profiles. The booklet is well edited and construction stages are clear, with useful callouts and views of the model to help with parts positioning.
Paint finishes are varied and have different levels of difficulty, without posing a challenge in any case. There are five British vehicles, one from the United Nations and another Lebanese, most of them located in the Middle East during the 60s and 70s.
Conclusion
If I’m not mistaken, this is the only short wheelbase Land Rover Series so far, at least in this scale. I think AK has made the right choice by selecting a model that has been overlooked by other brands for a long time.
The kit is very well detailed, with a special mention to the excellent engine, and has some assembly choices. Construction does not seem particularly difficult, except for the brittle assembly of the steering system, but this should not be hard if instructions are duly followed.
Variety in paint finishes and Cartograf decals are coupled with a well-designed instruction booklet which leaves no detail without graphic evidence.
The release of the new AK Land Rover 88 is good news for softskins fans and especially for followers of this popular British roadrunner.◊
Publicado – Published: 5 / 2024
©www.jmodels.net


Debe estar conectado para enviar un comentario.