
De un vistazo – Quick look
MATERIAL Y PIEZAS
MEDIA & PARTS:
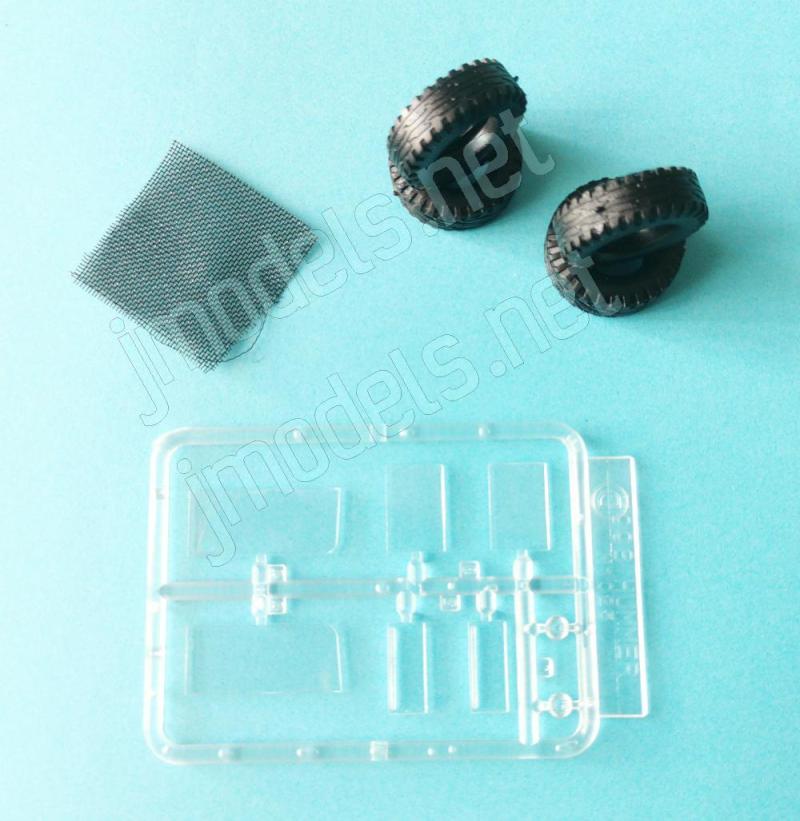
- Plástico inyectado (168 piezas), plástico transparente (8 piezas), vinilo (4 piezas), malla de plástico (1 pieza).
- Injected plastic (168 parts), clear plastic (8 parts), vinyl (4 parts), plastic mesh (1 part).
CALCAS – DECALS:
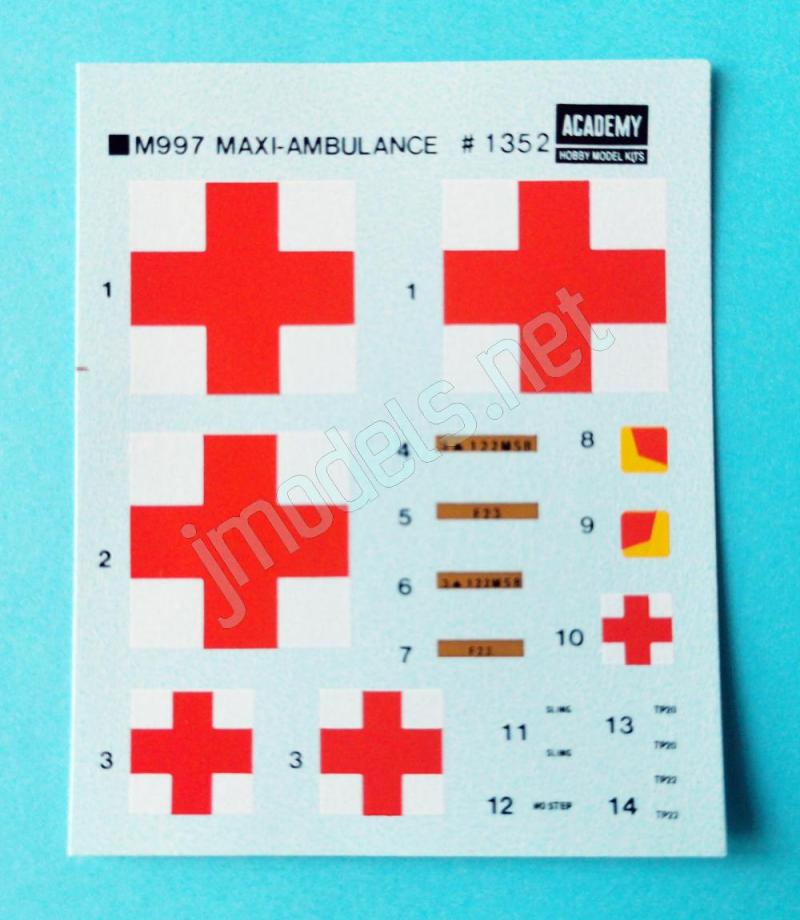
- Insignias sanitarias, números de registro y algunos estarcidos. Finas y brillantes. Buena saturación de color y mínimo soporte excedente.
- Sanitary markings, registers and some stencils. Thin and glossy finish. Good color saturation and minimal excess carrier film.
OPCIONES – OPTIONS:
- M997 Ambulance. US Army.
INSTRUCCIONES – INSTRUCTIONS:
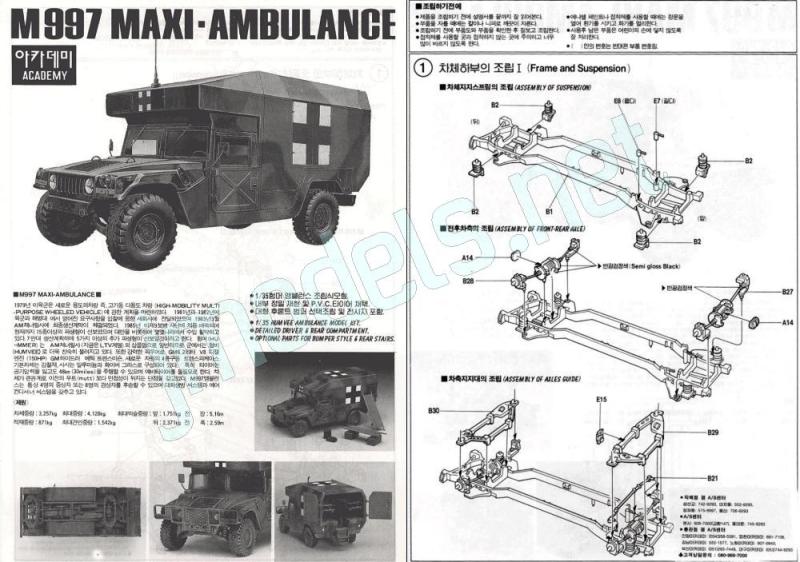
- Dos folletos impresos en blanco y negro. El primero contiene las secuencias de montaje 1 a 10. El segundo muestra la secuencia de montaje 11, perfiles y un plano numerado de piezas.
- Two leaflets printed in black and white. The first contains assembly chapters 1-10. The second shows assembly chapter 11, profiles and a numbered parts plan.
LO MEJOR – THE BEST:
- Aparente sencillez y alternativas de montaje.
- Apparently easy to build. Assembly options.
LO PEOR – THE WORST:
- Marcas de eyector internas. Motor, amortiguadores y cabina simplificados.
- Ejector pin marks on the interior. Simplified engine, coil springs and cabin.
VALORACIÓN – CONCLUSION:
- Hay mejores maquetas de un Humvee, pero casi ninguna de la versión sanitaria. El montaje está al alcance de la mayoría, pero el detalle es muy mejorable en varios lugares. Con todo, se le puede sacar partido si se quiere hacer exclusivamente este modelo.
- There are better Humvee kits out there, but almost none of a sanitary version. Assembly is within the reach of most modelers, but detail should be improved in several areas. However, it can be quite useful if you specifically want to build this model.

La maqueta
Es la tercera vez que Academy lanza este M997, cuya primera edición es de 1993. Obviamente, la maqueta es una variante del M1025 Armored Carrier (referencia 1350) que la casa coreana lleva sacando en múltiples modelos desde hace décadas (M966 TOW Carrier, M998 Cargo/Troop Carrier y M998 I.E.D. Gun Truck). Sin embargo, la maqueta del M1151 Enhanced Armament Carrier (referencia 13415) es un molde completamente diferente, más moderno y mejor.
La caja entrega cuatro bastidores más otro transparente, cuatro ruedas de vinilo, una pieza de malla de plástico, la hoja de calcas y las instrucciones. Las piezas presentan un moldeado correcto, sin deformaciones ni rebabas. Hay marcas de eyector negativas concentradas en general sobre las superficies internas, por eso hay que eliminarlas si se quiere mostrar el interior del vehículo. Como el molde es compartido, encontraremos catorce piezas que no emplearemos durante la construcción del modelo, entre ellas una ametralladora de calibre 50 de buenas hechuras, perfecta para la caja de sobras.
Para el modelista medio, el montaje no debe ser dificultoso, ya que sigue una secuencia habitual, que comienza por el chasis y termina con la caja trasera más la colocación de las ruedas. Hay varias alternativas durante el proceso, como la posibilidad de colocar las puertas de la cabina y traseras abiertas, simular las ventanillas cerradas o parcialmente abiertas y dos tipos de antenas, por ejemplo.
No ocurre lo mismo con la pintura si decidimos seguir las instrucciones, ya que únicamente proponen un vehículo pintado en camuflaje OTAN de tres colores. Con todo, incluso este patrón y colores podrían servir para situar el vehículo en un ambiente desértico.
Reseña
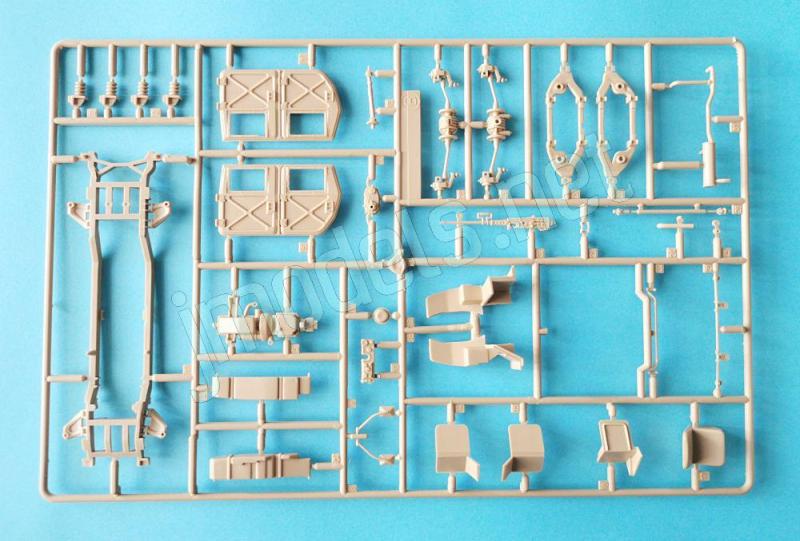
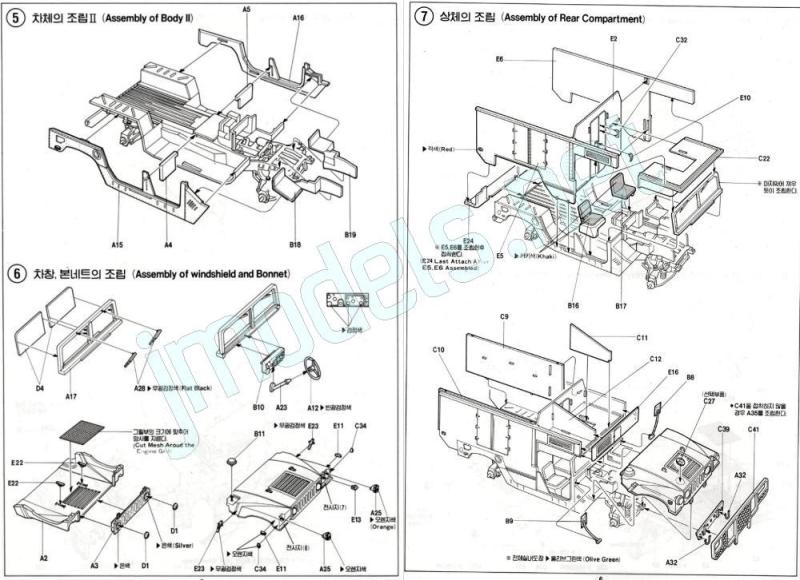
El bastidor está integrado en una sola pieza con los brazos inferiores de la suspensión. Estos muestran pequeñas marcas de eyector en sus superficies, pero no serán visibles al añadir las ruedas. Los amortiguadores separados son bastante malos y la forma helicoidal de los muelles está representada como simples círculos gruesos paralelos alrededor de un eje.
Los ejes son idénticos y unidos a los diferenciales, que tienen un pieza separada en la parte delantera. Los palieres son un tanto finos, pero no corren riesgo de romperse porque van sujetos al colocar las piezas de los brazos de suspensión superiores más las barra estabilizadoras en ambos ejes.
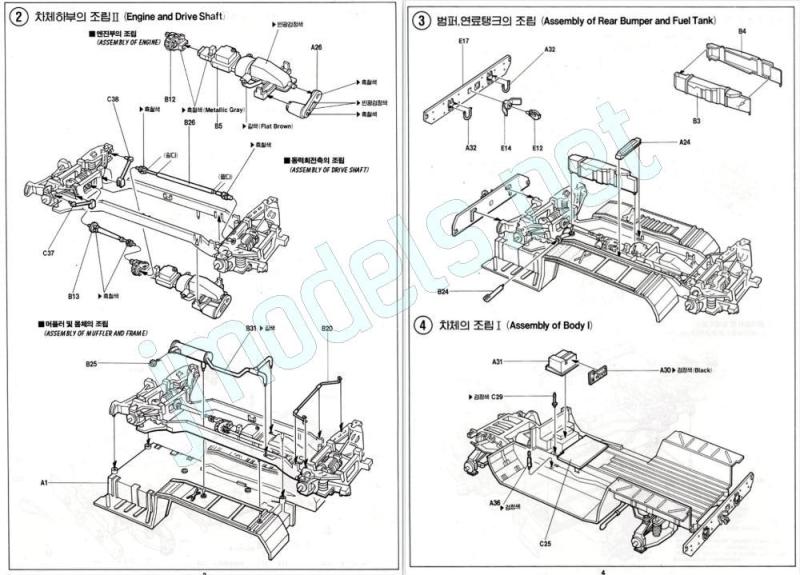
El motor está unido a la caja de cambios en una pieza anodina que los representa en sus mitades inferiores. La caja de transferencia viene separada y también tenemos dos ejes de transmisión de diferente longitud. Una vez pegado el motor al chasis, se puede añadir el tubo de escape unido al silenciador. El extremo viene en una pieza achatada y abierta que se pega tras unir el chasis a la carrocería. Junto a la transmisión hay que sumar un elemento que desconozco, una especie de cubierta protectora o similar. En los extremos delantero y trasero del bastidor hay dos planchas remachadas que llevan un par de grilletes aparte. La posterior lleva además el gancho de remolque.
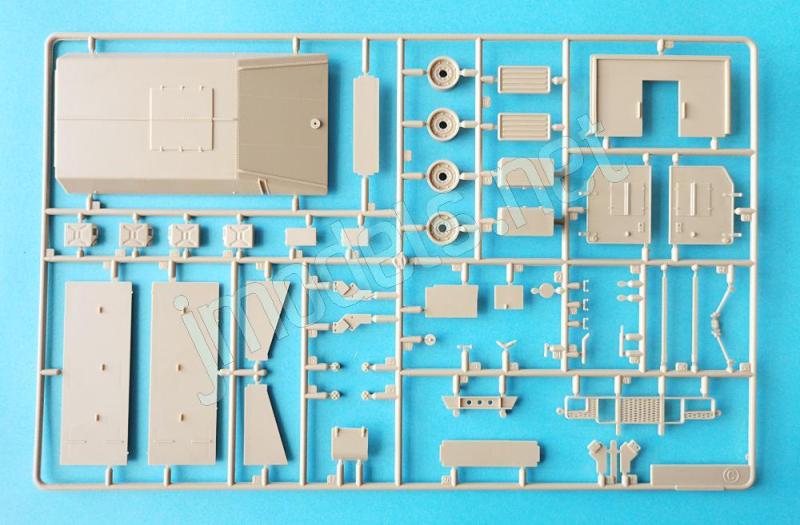
Las ruedas tienen las llantas y los neumáticos de vinilo por separado. El detalle de las llantas es bastante correcto y nítido. Los neumáticos muestran buen detalle en la banda de rodadura, con alguna mínimo punto de inyección del molde que puede disimularse con sencillez, pero carecen de marcas identificativas en los flancos. La decisión es de cada modelista, pero seguramente algunos decidirán reemplazar estas ruedas. Alternativas hay bastantes, desde luego.
El suelo de la carrocería está moldeado de una pieza con la parte posterior y carece de la zona delantera correspondiente al motor. Las molduras internas del suelo y los guardabarros son simples, pero nítidas y se ven marcas en los lados del suelo junto a las puertas, pero algunas serán tapadas al pegar los asientos. Los bordes inferiores laterales de la carrocería se extienden desde la parte posterior hasta la cabina. Las piezas muestran un remachado muy fino y el lado derecho contiene la abertura de la toma de combustible con el tapón in situ.
La cabina tiene un aspecto un tanto pobre, aunque cuenta con lo esencial. Hay dos palancas, los asientos unidos a las bases y sin textura, una consola central con los instrumentos separados en una pieza, el salpicadero, que se pega bajo el parabrisas, y el volante con su columna aparte. Los pedales apenas están simulados de mala manera. El parabrisas incluye los cristales y los limpiadores separados. Los retrovisores muestran un mínimo rechupe en los cristales. Las puertas de cada lado vienen unidas en una pieza y hay que separarlas, permitiendo así poder colocarlas abiertas. El detalle externo es bueno en las molduras y bisagras, pero muy poco afinado en los cierres. Por dentro es casi nulo y tan solo destacan las marcas de eyector. Los cristales podemos pegarlos cerrados o bajados con piezas alternativas en cada caso.
El capó y las molduras de los guardabarros están integrados en una pieza asentada sobre dos paneles laterales internos que debemos pegar a la parte delantera de la carrocería. La rejilla central está bien definida y es hueca, aunque no se puede colocar abierta. El detalle interno incluye una malla de plástico que cubre las ranuras de la rejilla y dos enganches de izado pegados desde dentro del capó. Sobre la pieza del capó tenemos la cubierta de la toma de aire del motor y otra pieza redonda opcional en el lado derecho frontal.
La parrilla lleva las lentes de los faros en piezas transparentes, pero todas las demás luces e indicadores no lo son aunque vienen exentas. Como opción, se puede añadir una rejilla protectora por delante de la parrilla. Esta pieza es fina y muestra gran definición en las placas horadadas.
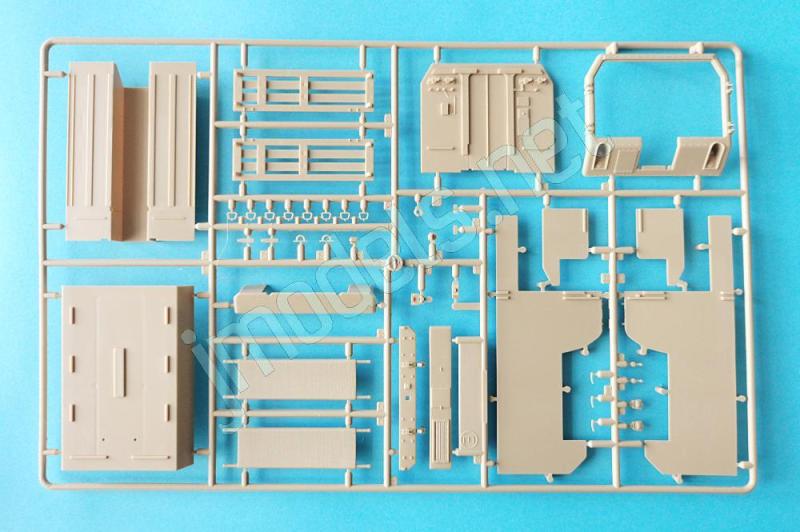
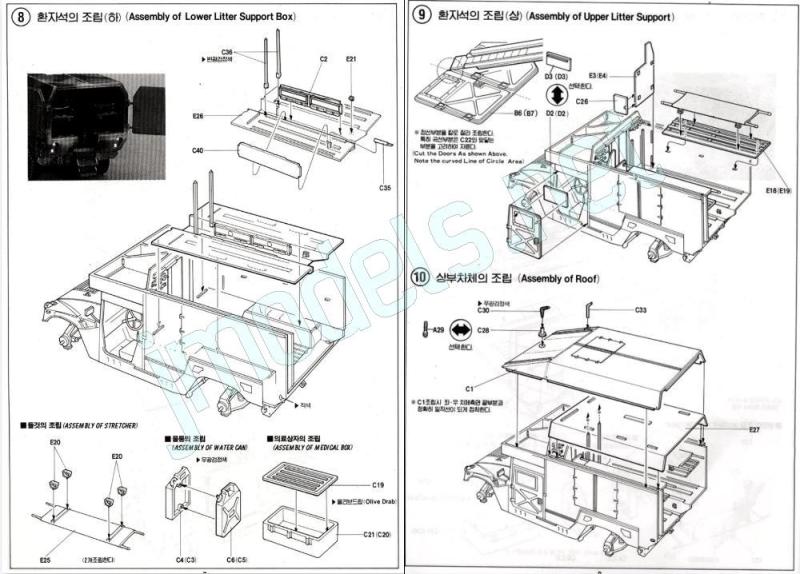
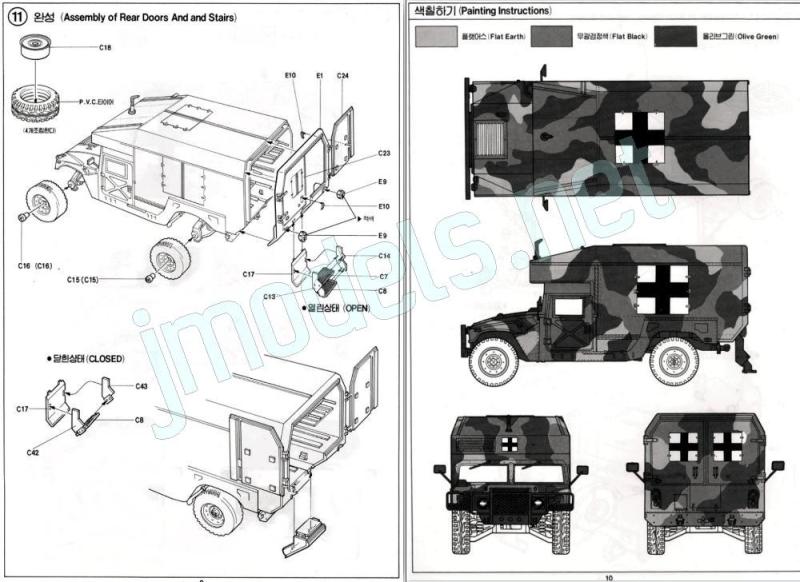
La caja de transporte parece un tanto laboriosa de montar por el número de piezas más que nada. Todas las superficies internas muestran multitud de marcas de eyector. El montaje consta de dos laterales que muestran puertas de acceso cerradas; un panel entre ambas que separa la cabina y tiene algunos instrumentos en el lado anterior más puertas de acceso con tiradores en el posterior; el techo de la cabina, que va pegado al parabrisas y tiene un panel separado donde se aprecia una rejilla de ventilación similar a las dos de las piezas laterales; y el panel trasero, formado por un marco y dos puertas separadas. La parte inferior del marco lleva las luces traseras y una escalerilla con la alternativa de mostrarla plegada o no.
En el interior de la caja tenemos dos paneles que limitan un pequeño espacio interno; un suelo superpuesto al de la caja con dos soportes del techo; dos armazones laterales y dos camillas para colocarlas sobre ellos. También hay un par de latas de combustible y dos cajas de respeto que podemos colocar a voluntad.
Todo esto va coronado por un techo doble. La pieza interna cubre el habitáculo sanitario y el externo se prolonga además hasta la cabina. Sobre el techo exterior hay un tubo separado que parece una salida de refrigeración y dos bases de antenas opcionales. La superficie muestra las molduras bien definidas y un acceso cenital cerrado.
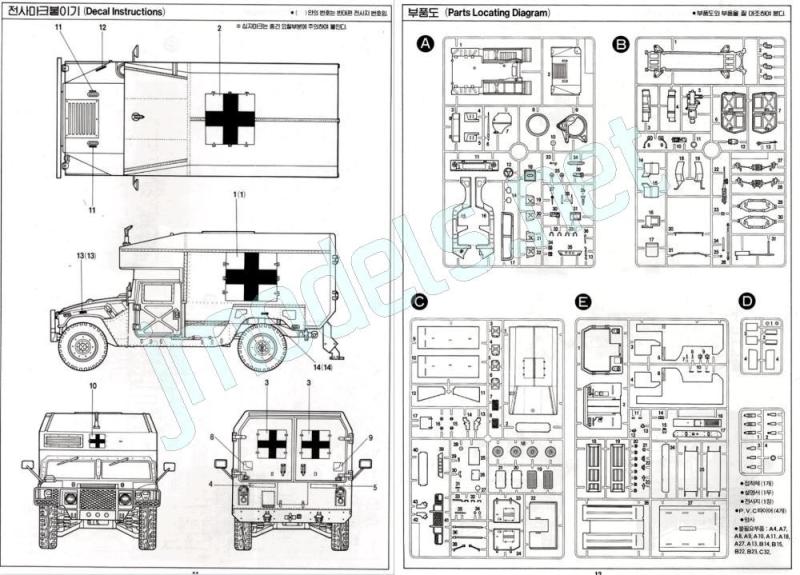
La hoja de calcas no es extensa. Sólo contiene insignias sanitarias, números de registro y algunos estarcidos. Sin embargo, los motivos se ven bien impresos, con un acabado fino y brillante, buena saturación de color y mínimo soporte excedente.
Como en otras maquetas, Academy no acaba de hacer las instrucciones de una vez, sino que las proporciona en dos folletos de hojas plegadas. En este caso, el primero contiene los pasos de construcción 1 a 10, mientras que el segundo muestra el paso 11 y último, perfiles y un plano numerado de piezas. La única opción para pintar este M997 no identificado es el conocido camuflaje OTAN de tres colores.
Valoración
Ciertamente a la maqueta se le van notando los años, por eso cojea en varios puntos como la cabina, amortiguadores o motor si se la compara con el Humvee posterior de Tamiya o los vehículos de la familia lanzados por Bronco Models o ICM más recientemente. Sin embargo, es la única maqueta con la que poder montar un Humvee sanitario, junto al viejo M998 de ESCI/ERTL, por el momento.
El montaje no aparenta dificultades para un modelista de nivel incluso modesto, aunque si se quiere mostrar alguna zona interna, hay que remangarse con las marcas de eyector. En general, me parece que la maqueta tiene un detalle correcto sin aspavientos que permite sacarle partido con la ayuda de distintas alternativas elegibles durante la construcción.◊


The kit
This is the third time Academy has released this M997, the first edition of which dates back to 1993. Obviously, the kit is a variant of the M1025 Armored Carrier (reference 1350), which the Korean company has been producing in multiple models for decades (M966 TOW Carrier, M998 Cargo/Troop Carrier, and M998 IED Gun Truck). However, the M1151 Enhanced Armament Carrier (reference 13415) is a completely different, more modern, and improved mold.
The box contains four sprues plus one clear sprue, four vinyl wheels, a plastic mesh piece, the decal sheet, and instructions. Parts are well-molded, with no blemishes or flash. There are ejector pin marks, generally concentrated on the internal surfaces, so these must be cleaned up if you want to display the vehicle’s interior. Since the tool is shared by different kits, we’ll find fourteen parts that we won’t use during the model’s construction, including a well-made .50 caliber machine gun, perfect for the spare parts box.
For the average modeler, assembly shouldn’t be difficult, as it follows a standard sequence, starting with the chassis and ending with the rear cargo tray and the wheels. There are several options during the process, such as the possibility of leaving the cab and rear doors open, simulating closed or partially open windows, and two types of antennas, for example.
The same cannot be said for the paint job if we decide to follow the instructions, as they only suggest a vehicle painted in three-color NATO camouflage. However, even this pattern and colors could be used to set the vehicle in a desert environment.
Review
The frame is integrated as a single piece with the lower control arms. These show small ejector pin marks on their surfaces, but these won’t be visible once the wheels are added. The separate shock absorbers are quite bad, and the coil springs are represented as simple, thick, parallel circles around an axis.
The axles are identical and connected to the differentials, which have a separate piece at the front. The drive shafts are rather thin, but they are safely installed when the upper control arms and sway bars are attached to both axles.
The engine is attached to the gearbox in a rather dull piece that represents their lower halves. The transfer case comes separately, and there are also two drive shafts of different lengths. Once the engine is glued to the frame, the exhaust pipe molded with the muffler can be added. The tail pipe comes as a flattened, open piece that is glued after the frame is attached to the body. Along with the transmission, there’s an unfamiliar element (for me), some kind of protective cover or similar. At the front and rear frame are two riveted plates, each with a separate pair of shackles. The rear plate also has a pintle hook.
The wheels have separate rims and vinyl tires. The rim detail is quite accurate and sharp. The tires show good tread pattern, with a few minor injection points from the mold that can be easily hidden, but they lack identifying markings on the sidewalls. The decision is up to each modeler, but some will surely choose to replace these wheels. There are certainly plenty of alternatives.
The body floor is molded as a single piece with the rear section and lacks the front engine compartment. The internal floor and fender moldings are simple but sharp, and marks are visible on the floor sides next to the doors, though some will be hidden when the seats are attached. The body rocker panels extend from the rear to the cab. Parts show very fine riveting and the right side contains the fuel filler opening with the cap molded in place.
The cabin looks rather basic, though it includes the essentials. There are two levers, the seats molded with their bases and without any texture, a center console with the instruments separated into a single piece, the dashboard, which is glued under the windshield, and the steering wheel with a separate column. The pedals are poorly simulated. The windshield has separate windows and wipers. The rear view mirrors show minimal sinks easy to fill. The doors on each side come as one piece and need to be cut. This way you can pose them open. External detail is good on the moldings and hinges, but the latches are not sharply molded. Inside detail is almost nonexistent and only the ejector marks stand out. The windows can be glued closed or lowered using alternative pieces for each position.
The hood and fender moldings are integrated into a single piece that sits on two internal side panels glued to the front of the body. The central grille is well-defined and hollow, although it cannot be positioned open. The interior detail include a plastic mesh covering the grille slots and two lifting hooks attached from inside the hood. On the hood piece is the engine air intake cover and an optional round piece on the front right side.
The grille has the headlight lenses in clear pieces, but all other lights and indicators are not clear despite they are provided as single parts. A protective brush guard can be added in front of the grille as an option. This piece is thin and shows great definition in the perforated plates.
The cargo tray will take up a bit more time to assemble, mainly due to the number of parts. All internal surfaces show lots of ejector marks. Assembly consists of two side panels molded with closed doors; a panel between them separating the cab and showing some instruments on the front side plus doors with handles on the rear; the cab roof, which is attached to the windshield and has a separate panel with a sharp ventilation grille similar to the two on the side panels; and the rear panel, made up of a frame and two separate doors. The lower frame has two separate tail lights and a ladder with the option of building it folded or not.
Inside the tray, we find two panels that define a small internal space; a floor overlaid on top of the tray with two roof supports; two side frames and two stretchers to place on them. There are also a couple of jerrycans and two spare crates that can be placed as desired.
All of this is topped by a double roof. The inner piece covers the medical bay, and the outer one extends into the cab. On the outer roof, there’s a separate tube that appears to be a cooling vent and two optional antenna bases. The surface shows well-defined moldings and a closed roof hatch.
The decal sheet isn’t extensive. It only contains sanitary markings, registration numbers, and a few stencils. However, the items are well printed, with a fine, glossy finish, good color saturation, and minimal excess carrier.
As with other kits, Academy doesn’t provide the instructions all at once, but rather in two folded leaflets. In this case, the first manual contains construction steps 1 through 10, while the second shows the 11th and final step, profiles, and a numbered parts diagram. The only option for painting this unidentified M997 is the familiar three-color NATO camouflage.
Conclusion
The model kit is certainly showing its age, which is the reason why it’s lacking in several areas, such as the cab, shock absorbers, and engine, when compared to Tamiya’s Humvee or the more recent vehicles in the family released by Bronco Models or ICM. However, it’s currently the only kit available for building a Humvee ambulance, along with the older ESCI/ERTL M998.
Assembly doesn’t appear difficult even for a modestly skilled modeler, although if you want to show anything of the interior, you’ll have to roll up your sleeves to deal with the ejector marks. Overall, I think the kit has a decent level of detail, allowing you to get the most out of it with the help of various options available during construction.◊
Publicado – Published: 5 / 2026
©www.jmodels.net


Debe estar conectado para enviar un comentario.