
De un vistazo – Quick look
MATERIAL Y PIEZAS
MEDIA & PARTS:
- Plástico inyectado (107 piezas). Incluye una figura de conductor.
- Injected molded styrene (107 parts). One driver figure included.
CALCAS – DECALS:
- Hoja pequeña con matrículas impresas en blanco y negro. Buen registro. Sin exceso de soporte.
- Small sheet containing two sets of number plates printed in black and white. In register. Not too much carrier film.
OPCIONES – OPTIONS:
- Dos vehículos con matrículas diferentes pintados del mismo color (según las instrucciones «camuflaje europeo», marrón oscuro tierra).
- Two vehicles with different number plates and painted in overall earth dark brown («European camouflage» according to the instructions).
INSTRUCCIONES – INSTRUCTIONS:
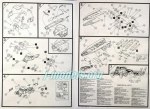
- Folleto doblado de dos hojas en tamaño A4 impreso a doble cara en blanco y negro. Contiene resumen histórico multilingüe, seis pasos generales de montaje y uno de colocación de calcas. No muy claras (ver texto).
- Double folded A4 sheet printed in black and white on both sides. Includes historical summary, six main assembly steps plus one for the decals. Not very clear (see text).
LO MEJOR – THE BEST:
- Tema. Pese a las instrucciones, no es complicada de montar de caja.
- Topic. Despite the instructions, not too difficult to build out of the box.
LO PEOR – THE WORST:
- Molde muy antiguo (1961). Ausencia de piezas transparentes. Detalles sobreescalados.
- Old tooling (1961). Lack of clear parts. Overscaled details.
VALORACIÓN – CONCLUSION:
- Para nostálgicos, aficionados a Airfix y detallistas.
- For nostalgic modelers, Airfix fans and «microdetailers».

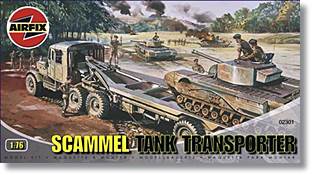
Según Scalemates esta maqueta ha conocido hasta el presente sus buenas diez ediciones, más otras dos realizadas en los EE.UU. por Airfix America y MPC. Efectivamente, el dato se puede comprobar en una de las piezas del remolque que reza Airfix Products Ltd 1961. Estamos, pues ante una maqueta histórica más que vieja.
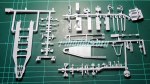
La caja contiene las instrucciones y cinco bastidores (en realidad es solo uno, pero cortado) con 107 piezas en total, entre ellas la figura de un conductor. El plástico es de dureza media, tendiendo a blando y de suficiente flexibilidad. Se deja trabajar sin dificultad. Para una maqueta con más de cincuenta años a las espaldas, el molde aparece limpio de rebabas groseras, con aspecto cuidado y múltiples marcas de eyector, generalmente en lugares no visibles una vez montado el modelo, aunque no todas. Considerando la tecnología de los años sesenta, las piezas muestran buen aspecto, si bien las más pequeñas están sobredimensionadas y otras parecen más cortas o pequeñas de lo que deberían.
El montaje de la cabeza tractora comprende cuatro pasos generales en las instrucciones, comenzando por el interior de la cabina, cuyo suelo está fabricado de una pieza con los asientos de los tripulantes moldeados en ella y sin detalle alguno. Las únicas piezas separadas en el interior son un pequeño panel de instrumentos y el volante, claramente demasiado grande para la escala. Podemos incluir la figura del conductor, una pequeña figura sentada sin demasiado detalle en su uniforme, con brazos en reposo y tocado con boina. Esta figura es la misma de otras maquetas del fabricante de la misma época y escala. Para montar la cabina, de formas irregulares con lados en ángulo, tenemos el frontal, los dos laterales con puertas cerradas, dos piezas para la parte trasera (una de ellas simula un toldo abierto hacia los lados) y el techo completo. Aunque todas estas piezas cuentan con resaltes para su correcta alineación, es necesario hacer comprobaciones y ajustes para que todo el bloque quede bien cerrado. Resulta decepcionante la ausencia de piezas transparentes para los cristales, nada nuevo en estas maquetas de vehículos británicos de Airfix por desgracia.
El bastidor del vehículo está hecho de una pieza a la que hay que añadir la transmisión, dos amortiguadores traseros algo burdos y los faros delanteros. El bastidor requiere un buen lijado especialmente en los laterales para suavizar y corregir mínimas imperfecciones creadas al secarse el plástico. El montaje de estas piezas también necesita comprobaciones previas, ya que las instrucciones no muestran claramente el lugar donde van situadas.
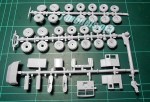
Las ruedas vienen en mitades. El ajuste es bueno, pero una vez pegadas requieren una buena dosis de lija suave para eliminar líneas de molde de las bandas de rodaje. Si hemos seguido la numeración de las instrucciones, encontraremos siete pares de ruedas de dos tamaños distintos. Las cuatro ruedas más grandes corresponden a los dos ejes traseros de la cabeza tractora y todas las demás al eje delantero del tractor y a la plataforma de transporte. Inevitablemente la maqueta no quedará bien alineada horizontalmente, detalle que quizá pueda disimularse al conectar el remolque con la cabeza, ya que aquel posee una pequeña elevación en su extremo delantero. Por si fuese poco, contrastando las ruedas de la maqueta con fotos del vehículo real, se puede observar a simple vista que las ruedas delanteras eran claramente más grandes que el resto.
El montaje del tractor Pioneer se completa con un depósito de combustible compuesto de dos mitades, un cajón de respeto cuyas piezas son gruesas y demasiado grandes, pero que pueden replicarse en plástico más fino, y los guardabarros delanteros que necesitan lija para eliminar líneas de molde visibles. En la zona trasera hay una representación convincente, para la escala y molde, del soporte circular de enganche de la plataforma que se puede hacer girar.
El montaje del remolque ocupa los dos últimos pasos de las instrucciones. Tras haber montado la suspensión y el tren de rodaje trasero, cosa que se hace más complicada de lo que debiera por culpa de nuevo de las imprecisas instrucciones, se pasa a construir las rampas traseras, que son abatibles, el enganche delantero al tractor y otros elementos situados bajo la plataforma, como las pequeñas cajas de poleas que permitían abatir las rampas, o los gatos de fijación al suelo. También aparece el gran cajón de madera inferior que (imagino) serviría para contener herramientas y otros útiles necesarios en las operaciones de recuperación.
Las diminutas calcas están impresas en una pequeña hoja que contiene tan sólo matrículas blancas y negras para dos vehículos pintados en el mismo color. Pese al tamaño, están bien impresas y no les sobra casi nada de su película de soporte.
Las instrucciones consisten en dos hojas de tamaño A4 con las cuatro páginas impresas. No hay diagrama para localizar las piezas por lo cual el modelista debe moverse por los bastidores buscando las piezas, numeradas a tamaño muy pequeño. En ocasiones los pasos de montaje aparecen saturados de líneas discontinuas que no señalan adecuadamente la posición exacta de las piezas, por ello es recomendable hacer comprobaciones y contrastar con imágenes del vehículo real o incluso con otras que circulan por internet de las maquetas a escala 1/35 de IBG o Thunder Models. Esperemos que Airfix se acuerde alguna vez de actualizar al menos los diagramas, que son idénticos a los de ediciones mucho más antiguas. Los colores se muestran con números correspondientes a esmaltes de Humbrol con referencias a las zonas del vehículo que los llevan, sirva como ejemplo el color marrón oscuro tierra 26 que corresponde (según Airfix) a lo que llama camuflaje europeo.
A estas alturas me resultaría muy sorprendente que Airfix hiciese esta maqueta a una escala más corriente como 1/72. Quizá algún otro fabricante se anime a no mucho tardar porque el Scammel y todas las variantes del tractor Pioneer bien lo merecen. A día de hoy este molde, claramente desfasado, quizá pueda interesar a los nostálgicos del plástico de otros tiempos y a los modelistas de pequeña escala que gusten de hacer algo diferente y más detallado.◊


According to the Scalemates website this kit has already had no less than ten editions so far, plus another two which were released in the US by Airfix America and MPC respectively. More than just an old kit, this is a truly historical one.
The box contains the instructions and five sprues (in fact it’s only one but cut into five smaller sections) with a total of 107 parts, among them there is also a driver figure. Plastic is medium hard, a bit on the soft side and flexible and can be worked easily. For a kit with more than fifty years on its back, the tooling is quite clean of flash, carefully moulded and has a handful of ejector marks here and there, most of them (but not all) invisible once the model is built. Considering the technology used in the 1960s, parts are not chunky although the smallest ones are oversized and others are shorter or smaller than they should be.
Assembly of the Pioneer tractor comprises four main steps in the instructions starting with the interior of the cabin. The floor is made in one part with the crew seats molded on and without detail. The only separate parts for the interior are a tiny dashboard and the steering wheel, which is clearly too big for the scale. We can also include the driver, a small sitting figure without much detail, with arms at rest and wearing a beret. This same figure is also included in other different Airfix boxes from the same time and scale. To build the tractor unit we find the front side, two side walls with doors molded closed, two parts for the back side (one of them showing a kind of open canvas) and one part for the roof. Although the parts are provided with guides, alignment must be carefully checked to get a good fit. A crucial downside is the absence of clear parts for the windscreen, unfortunately nothing new in Airfix 1/76 kits.
The chassis frame comes in one part with the addition of the transmission, two crude shock absorbers and the front headlights. The chassis will need a thorough cleanup of its sides to smooth minimal flaws. All these parts also need to be checked before gluing as the instructions do not show their location clearly.
The wheels come in halves. Fitting is OK, but once glued the treads need some deal of sanding to clean mold seams. If we have built them as per instructions, we will finally get seven pairs of wheels in two sizes. The four bigger ones correspond to the rear undercarriage of the tractor and the rest are for the tractor front and the trailer. In fact, the real vehicle had them the other way round, with a pair of bigger wheels at the front and the smaller ones for the trailer and the tractor rear undercarriage. This can be seen with just a naked eye in WWII pics. Inevitably our model will suffer from an incorrect horizontal alignment because of this. The only hope is perhaps that the higher front section of the trailer will hide this.
The Pioneer tractor assembly is completed with a fuel tank consisting of two halves, an open container box on the right side whose parts are thick and too large, but can be replicated in thinner plastic, and front fenders that need sanding to remove visible mold lines. In the rear area there is a convincing representation, for the scale and mold, of the circular mounting bracket of the platform that can be rotated.
The trailer assembly takes up the last two steps of the instructions. After having mounted the suspension and the rear undercarriage, which is made more complicated than it should be because of (again) the inaccurate instructions, we build the rear loading ramps, which are folding, the front trailer hitch and other elements placed under the platform, such as the small pulley boxes that allowed to lower the ramps, or the fixing jacks. There is also a large wooden box that (I imagine) would serve to contain tools and other necessary elements in recovery operations.
Decals are printed on a tiny sheet which only has two different black and white number plates for two vehicles painted alike. Despite their size, they are well printed without too much carrier film.
Instructions are printed in a double A4 sheet. There is no diagram to locate the parts in the sprues, so the modeler must check the sprues looking for the parts labeled with very small numbers. Sometimes the assembly steps are full of dashed lines that do not adequately show the exact position of parts, that is why it is advisable to check the parts location with pictures of the real vehicle or even with others that can be found on the Internet from the IBG and Thunder Models 1/35 Scammel kits. I don’t think we will see this kit upgraded soon but Airfix should at least change these old instructions which I bet they are still the same as the earliest editions. Paints correspond to Humbrol enamels and you are simply given a generic reference to the areas of the vehicle which are to be painted in that specific color. As an example, the dark brown earth 26 is (according to Airfix) the so-called European camouflage.
I would be very surprised that Airfix released this model at a more ordinary scale such as 1/72. Maybe some other manufacturer will do it in a few years, the Scammel as well as all the Pioneer variants well deserve it. In this day and age this kit is clearly outdated but may interest nostalgic modelers, Airfix fans and small-scale modellers who like to do something different and more detailed.◊
Publicado – Published: 4 / 2022
Publicado – Published: 11 / 2017
©www.jmodels.net


Debe estar conectado para enviar un comentario.