
De un vistazo – Quick look
MATERIAL Y PIEZAS
MEDIA & PARTS:
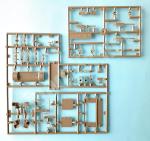
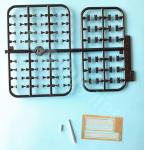
- Plástico inyectado (383 piezas), fotograbado (2 piezas), aluminio torneado (2 piezas), vinilo (2 piezas), rodamientos de plástico (4 piezas), hilo trenzado (1 tramo).
- Injected plastic (383 parts), photo-etched (2 parts), turned aluminium (2 parts), vinyl (2 parts), plastic polycaps (4 parts), thread (1 length).
CALCAS – DECALS:
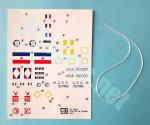
- Marcas británicas, de la Francia Libre, banderas yugoslavas, matrículas norteamericanas, insignias de unidad y marcas tácticas. Bien impresas, sin exceso de soporte.
- British and Free France markings, unit badges, Yugoslavian flags, registers and tactical markings. Well printed with no excess of carrier.
OPCIONES – OPTIONS:
- M3A3 (Stuart V). Free France. 2nd Armored Division. 1st Morocco Cavalry.
- M3A3 (Stuart V). 1st Chinese Provisional Tank Group. 1st Battalion. 3rd Company. Burma 1945.
- M3A3 (Stuart V). Yugoslavian Army. 1st Tank Brigade. July 1944.
- M3A3 (Stuart V). Free France. 5th Armored Division. 1944.
- M3A3 (Stuart V). British Army. 22nd Armored Brigade. 5th Royal Tank Regiment. June 1944.
- M3A3 (Stuart V). British Army. 7th Armored Division. 22nd Armored Brigade. June 1944.
- M3A3 (Stuart V). 1st Chinese Provisional Tank Group. 3rd Battalion. 3rd Company. Burma 1945.
INSTRUCCIONES – INSTRUCTIONS:
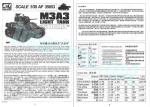
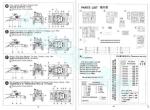
- Folleto de tamaño A4 de 12 páginas impresas en blanco y negro. Contiene una introducción histórica sobre el vehículo, un plano de piezas, una tabla de colores con correspondencias de pinturas de varios fabricantes, 17 pasos de montaje y 2 páginas de perfiles. Claras.
- 12-page A4 booklet printed in black and white. It shows a historical introduction about the vehicle, a parts plan, a color chart with matches in several paint ranges, 17 assembly chapters and 2 pages of profiles. Clear.
LO MEJOR – THE BEST:
- Excelente detalle externo. Opciones de montaje.
- Excellent external detail. Asembly choices.
LO PEOR – THE WORST:
- Cadenas (aunque usables). No le hubiera venido mal algo más en el interior.
- Tracks (though usable). Some extra internal detail would have been appreciated.
VALORACIÓN – CONCLUSION:
- Pese a los años es aún una opción muy válida y digna de ser considerada, especialmente si el interior no es lo más importante.
- Despite the years since it was released, it is still a valid choice and suitable to be considered especially if the interior is not an important asset.

La maqueta
Desde hace alrededor de un par de décadas AFV Club tiene en su catálogo tanto el modelo M3A3 como el M5A1 Stuart. En todo este tiempo no han aparecido nuevas variantes de este carro y en el caso de esta maqueta solo hay una reedición limitada con versiones francesas (referencia AF35S20).
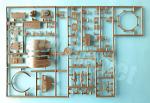
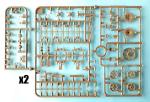
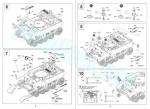
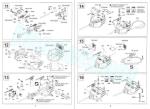
La caja nos ofrece, además del folleto de instrucciones y la hoja de calcas, siete bastidores de piezas más la mitad inferior del casco en una pieza separada, una plancha de fotograbados, un cañón de aluminio torneado, cuatro rodamientos de plástico, un tramo de hilo trenzado y dos tramos de cadenas de vinilo.
Las piezas presentan un buen moldeado, carecen de rebabas o marcas visibles y muy pocas tienen cilindros del expulsor. Aprecio incluso menos marcas de eyector que en otras maquetas de la marca china. Por el contrario, sí hay tenues líneas de molde en las ruedas del tren de rodaje, pero se pueden eliminar con un lijado suave.
Hay varias opciones de montaje en la maqueta. Los vehículos británicos y el yugoslavo llevan garras adicionales para las cadenas (conocidas como grousers en inglés) estibadas en el casco, lanzadores de granadas fumígeras en la torre y una base para la antena de radio distinta al de los carros franceses y chinos. Igualmente, los perfiles de las instrucciones muestran algunos vehículos concretos con una caja de respeto añadida en la parte trasera del casco con rejillas de ventilación adicionales. La ametralladora de la torre puede llevar como opción la caja de munición y un soporte más elevado, imagino que para ser usada como arma antiaérea. A juzgar por la presencia de las garras estibadas a los lados de la torre y la caja de respeto en la parte posterior, la maqueta representa un M3A3 de producción estándar, sin la mirilla y tronera lateral en la torre que aún llevaba la versión inicial.
El M3A3, o Stuart V para los británicos, fue la última modificación del carro original, antes de la aparición del M5, que ya estaba incluso en desarrollo. El modelo recibió cambios en el motor, las planchas de blindaje inclinadas, soldadas en lugar de remachadas, y especialmente en la torre, con un nuevo compartimento trasero para alojar la radio SCR-508, también empleada en el M5 y en el M4 Sherman, por ejemplo. Con el nuevo M5 en producción y entrega, los M3A3 fueron cedidos a Gran Bretaña, China y la Francia Libre, como reflejan las opciones de acabado de la maqueta.
Parte inferior del casco, tren de rodaje y cadenas
La parte inferior del casco se incluye como una sola pieza separada sin los lados frontal y trasero. El detalle externo del fondo del casco es bastante bueno, a diferencia de otras maquetas que lo obvian o simplifican. Aquí podemos apreciar varios accesos y líneas de remaches de gran definición, así como refuerzos transversales. Los lados incluyen los ejes de los rodillos de retorno, las cubiertas de los diferenciales de las ruedas tractoras así como los ajustes atornillados de la suspensión y la rueda tensora.
La plancha delantera inferior del casco muestra las cubiertas de los diferenciales y está detallada con ganchos de remolque y el estribo delantero. La plancha trasera tiene las compuertas de acceso al motor separadas, moldeadas con las bisagras bien reproducidas y las asas aparte. Los ganchos de remolque son idénticos a los delanteros. Dada la ausencia de interior, es una lástima que a AFV Club no se le haya ocurrido proporcionar el motor, aunque fuese por separado, que permitiría poder mostrar el compartimento abierto.
El tren de rodaje y la suspensión tienen una factura excelente. Las ruedas tractoras llevan los característicos dientes huecos y la parte externa de la rueda coincide perfectamente en los radios y la corona de tuercas con fotos del vehículo real. Las tractoras están separadas en dos piezas con un rodamiento de plástico en medio que permite girarlas. Las tensoras, sin embargo, son de una pieza y muestran muy buen detalle tanto en las bandas de caucho como en los radios y huecos de la rueda. El sistema de suspensión de las ruedas tensoras se compone de varias piezas donde los brazos horizontales presentan un correcto estampado longitudinal.
Los carretones o rodillos de apoyo están compuestos de dobles resortes y patines para las cadenas en la parte superior del mecanismo, más los brazos de la suspensión separados en dos mitades que sujetan las ruedas en medio. Las ruedas son de una pieza con un excelente detalle por ambas caras y tienen las bandas de caucho bien definidas, aunque hay que limpiar ligeras líneas de molde, como he señalado más arriba. Los rodillos de retorno vienen separados.
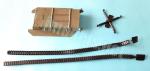
Las cadenas son del tipo T16E1 representadas en dos tramos de vinilo flexible. El detalle externo de ls zapatas de caucho y los dientes es nítido y solo hay tres ligeras marcas que limpiar en la cara interna, pero se pueden disimular con facilidad. La maqueta incluye un bastidor con 24 eslabones de plástico con sus conectores separados para construir los eslabones de repuesto situados en el casco.
Parte superior del casco
Está moldeada en una pieza sin la plancha frontal del glacis. La pieza parece tener la anchura y la inclinación de las planchas laterales correctas. Además del anillo de la torre, la pieza muestra huecos para la rejilla de ventilación del motor situada tras ella y las escotillas del conductor y del artillero, cuyas tapas vienen separadas y muy bien detalladas con sus respectivos periscopios.
La plancha del glacis cuenta con los característicos filetes remachados tanto por debajo de la ametralladora como en el borde inferior. El detalle en la zona delantera de la maqueta es profuso. Los guardabarros están separados en piezas de finura aceptable. Además tenemos los faros con sus protectores separados, la sirena, una buena ametralladora calibre 30 moldeada en una pieza con su montaje aparte más dos pequeños visores blindados y algunas asas y enganches. Para completar esta zona, podemos incluir dos tramos de garras para las cadenas, cuyas piezas y soportes se han de montar por separado. Las instrucciones no indican expresamente el número de garras por tramo, aunque se ven correctamente representadas en el montaje, con siete unidades en el tramo largo y cuatro en el menor.
En la cubierta del casco tenemos la cubierta del ventilador entre las escotillas de los ocupantes delanteros y diversas herramientas de gran definición (martillo, pala, hacha, llave de ajuste de las cadenas, manivela de arranque, etc). La cubierta del motor muestra varias asas y enganches en piezas muy finas, la toma de aire del motor, que es de plástico pero tiene la malla finamente reproducida y algunas tapas blindadas de acceso al radiador y al depósito de combustible.
La parte trasera del casco tiene algunos eslabones de repuesto estibados en las esquinas, los faros y varias asas. La salida del motor es opcional dependiendo del carro concreto que pretendamos representar de acuerdo con las instrucciones. Las rejillas en ambas alternativas son de fotograbado y la elección básicamente consiste en incluir o no la caja de respeto trasera situada sobre la salida del motor. Las versiones británicas y la yugoslava cuentan con unos recipientes a los lados que podrían ser extintores.
Finalmente, también tenemos un cable de remolque formado por un tramo de hilo trenzado con ojales de plástico. Las instrucciones no indican dónde situarlo, pero tiene fácil solución con tan solo comparar con imágenes reales del carro.
Torre
La estructura básica está separada en ocho piezas que comprenden los dos lados, la plancha trasera, el mantelete, la parte delantera y trasera del techo, y las dos escotillas superiores. La base de la torre tiene un anillo blindado y biselado de refuerzo, más otro situado bajo la torre que hay que engastar sobre el casco.
Según las instrucciones, parece conveniente montar el cañón antes de pegar el mantelete a la torre. El arma y su afuste están muy bien reproducidos comprendiendo varias piezas para el bloque, el cierre, las guardas de retroceso, el tubo, formado por dos piezas de aluminio torneado, una buena ametralladora coaxial de una pieza y el periscopio del artillero. Tanto el mantelete como la plancha frontal de la torre están exentos y el primero cuenta con la abertura del periscopio y la tronera de la ametralladora.
El interior de la torre está parcialmente detallado con algunas pequeñas piezas en los lados, pero la que más destaca es la radio situada en el compartimento trasero y bien detallada en el frontal. Los lados llevan los soportes de las garras moldeados en ambos lados. De ellas hay que colocar 11 por tramo, aunque este extremo tampoco aparece en las instrucciones. Las versiones británicas y yugoslava llevan además dos lanzadores de fumígeros en cada lado compuestos por dos soportes, una base y dos tubos huecos.
El techo de la torre está detallado con los periscopios del comandante y artillero, el extractor de humos/filtro de aire y varias asas para las tapas de las escotillas, que pueden colocarse abiertas. En la parte posterior hay dos bases opcionales con sendas antenas de distinto tipo según el carro específico que pretendamos representar. En el caso de los vehículos chinos y franceses hay que añadir además la antena de plástico estirado. La ametralladora, de nuevo una excelente calibre 30, tiene la cuna y la caja de munición separada y su soporte puede colocarse elevado o bajado.
Calcas
La hoja aparenta tener buena impresión. Muestra marcas británicas, de la Francia Libre, banderas yugoslavas, matrículas norteamericanas, insignias de unidad y marcas tácticas. Los motivos parecen finos y carecen de exceso de película.
Instrucciones
AFV Club nos proporciona su habitual folleto de tamaño A4 que en esta ocasión tiene 12 páginas impresas en blanco y negro. Contiene una introducción histórica sobre el vehículo, un plano de piezas, una tabla de colores con correspondencias de pinturas de Gunze Sangyo, Humbrol, Revell y Life Color, 17 pasos de montaje y dos páginas de perfiles. Las secuencias de construcción son claras.
Las terminaciones de pintura ofrecen varios carros empleados en muy diferentes escenarios durante la Segunda Guerra Mundial, lo que supone un cierto aliciente por mucho que las libreas muestren el ubicuo Olive Drab.
Valoración
La maqueta es una buena representación, siquiera sea exteriormente, del M3A3 y no debe tener dificultades especiales para el modelista medio, salvo que el montaje del casco y la torre dicte lo contrario. El detalle general me parece excelente y las opciones de montaje atinadas.
Lo menos bueno incluye tanto las cadenas de vinilo, aunque se pueden usar en la maqueta al estar limpias y correctamente reproducidas teniendo en cuenta su material, y el casi nulo interior que apenas favorece mostrarlo salvo si se disimula con figuras, al menos en el casco.
Ahora que parece que el Stuart va a estar en el candelero por un tiempo gracias a las recientes maquetas de Tamiya y MiniArt, esta es una alternativa muy válida y digna de considerar, especialmente por los modelistas a los que no les importe perder el detalle interno, que sospecho son la gran mayoría.◊


The kit
For around a couple of decades AFV Club have had both the M3A3 and the M5A1 Stuart kits in their catalogue. No new variants of this tank have been released by the manufacturer in all this time and in the case of this kit there is only a limited reissue with French versions (reference AF35S20).
The box contains, in addition to the instructions and the decal sheet, seven sprues of parts plus the lower hull half in a separate piece, a photo-etched fret, a turned aluminum barrel, four plastic polycaps, a length of thread and two lengths of vinyl tracks.
Parts are well molded with no flash or visible ejector marks and only a few of them contain ejector pips. Pin marks are even less numerous than in other kits from the Chinese brand. On the other hand, there are slight seam lines on the road wheels, but they can be easily removed with light sanding.
There are several assembly options in the kit. The British and Yugoslavian choices have grousers stowed on the glacis plate, smoke grenade launchers in the turret and a base for the radio antenna different from that of the French and Chinese tanks. Likewise, the instruction profiles show some specific vehicles with an additional sponson behind the hull rear fitted with additional engine outlets. The turret machine-gun can be built with the ammo box fitted and also fitted raised or lowered as an option. Judging from the grousers stored, the lack of pistol ports on the turret sides and the stowage box at the hull rear, the kit represents a standard production M3A3.
The M3A3, or Stuart V for the British army, was the last modification of the original tank before the appearance of the M5, which was already in development. The variant received changes such as a new engine, sloped hull armor plates, welded instead of riveted, and especially a new turret, with a rear compartment to house the SCR-508 radio, also used in the M5 and M4 Sherman, for example. With the new M5 in production and delivery, many M3A3s were sent under Lend-Lease to Great Britain, China and the Free French, as shown in the finishing options in this kit.
Lower hull, running gear and tracks
The lower hull comes as a single piece without the front and rear sides. External detail on the bottom side is quite good, differently to other kits which omit or simplify it. Here we can see several well-defined accesses and rivet lines as well as transversed reinforcement angles. The sides include the return roller axles, the drive wheel differential covers and the suspension and idler wheel bolt-on fittings.
The front lower hull plate shows the differential bulges and is detailed with tow hooks with separate clevises and the front foot step. The rear plate has separate engine access doors, moulded with nice hinges, and separate handles. The tow hooks are identical to the front ones. Given the lack of an interior, it is a shame that AFV Club did not think of providing the engine, even if separately, which would allow the compartment to be shown.
The running gear and suspension are really nice. The sprocket wheels have the characteristic hollow teeth and the outer side of the wheel matches perfectly in the spokes and the crown of nuts with pictures of the real vehicle. The sprockets are separated into two pieces with a plastic polycap in the middle that allows them to turn. The idlers, however, are one piece and show very good detail on the rubber bands, spokes and wheel gaps. The trailer idler wheel assembly is made up of several pieces with the arms showing a correct longitudinal stamped detail.
The bogies consist of double volute springs and track skids at the top, plus the suspension arms separated into two halves that hold the wheels in between. The wheels are one piece with excellent detail on both sides and well defined rubber treads, although slight seam lines need to be cleaned up, as noted above. The return rollers are separate pieces.
The tracks are the T16E1 type provided in two lengths of flexible vinyl. External detail on the rubber pads and teeth are sharp and there are only three slight marks to clean up on the internal side, but I think these can be easily cleaned up and hidden. The kit includes a black sprue with 24 plastic links with separate connectors to build the spare track links stowed on the hull rear.
Upper hull
It is moulded in one piece without the front glacis plate. The piece seems to have the correct width and slope on the side plates. In addition to the turret ring, the piece shows gaps for the engine air intake behind the turret and the driver’s and gunner’s hatches, which have separate covers detailed with nice periscopes.
The glacis plate has the characteristic riveted raised fillets both below the machine-gun and on the lower edge. Detail on the front plate is profuse. The mudguards are separated showing acceptable thickness. In addition we have the headlights with separate brackets, the horn, a nice .30 calibre machine-gun in one piece with separate ball mount as well as two small plug visors, some handles and lifting eyes. There are also two lengths of grousers which need to be built separately. The instructions do not show the number of grousers in each length, although they are correctly represented in the corresponding assembly step, with seven grousers in the long length and four in the shorter.
On the hull deck we have the fume extractor cover between the front crew hatches and several fine engineer tools (hammer, shovel, axe, chain adjustment wrench, starter crank, etc.). The engine deck shows various handles and eyes in very small pieces, the engine air intake, which is provided in plastic but has finely reproduced mesh, and some armoured filler caps for the radiator and fuel tank.
The hull rear has some spare links stowed in the corners, the headlights and some handles. The rear sponson to protect the air cleaners is optional depending on the specific tank we intend to represent from the instructions. The mesh in both alternatives are photo-etched pieces, the choice basically consisting of including or not the rear stowage box on the engine outlet. The British and Yugoslavian tanks show a couple of fire extinguishers on the sponson sides.
Finally, we also have a tow cable made of a length of thread with plastic eyelets. The instructions do not show where to place it, but this is easy to find out by just checking real images of the tank.
Turret
The basic turret structure is separated into eight pieces comprising the two sides, the rear plate, the mantlet, the front and rear roof plates, and the two upper hatches. The base of the turret has a bevelled armoured protecting ring, plus the rotating gear ring under the turret that is fitted onto the hull.
According to the instructions, it seems advisable to build the gun before gluing the mantlet to the front turret plate. The gun and the mount are excellent, comprising several parts for the block, breech, recoil guards, the barrel, made of two pieces of turned aluminium, a nice one-piece coaxial machine gun and the gunner’s periscope. Both the mantlet and the front plate are separate and the former is molded with the periscope and machine-gun openings. The only drawback I see is that the gun cannot be raised or lowered with the shield.
The interior of the turret is partially detailed with some small pieces on the sides, but the most remarkable is the radio, finely detailed on the front and located inside the rear turret bustle. The sides include raised racks for the grousers on both sides. There are 11 of these per side, although this is not shown in the instructions either. The British and Yugoslavian tanks also have two smoke dischargers on each side, consisting of two mounts, a base and two hollow tubes.
The turret roof is detailed with the commander’s and gunner’s periscopes, the air filter and some handles for the hatch covers, which can be positioned open. At the rear are two optional antenna bases depending on the specific tank we wish to build. In the case of the Chinese and French vehicles, a stretched plastic aerial must also be added. The AA machine-gun, again an excellent .30 calibre, has a separate cradle and ammo box and can be positioned raised or lowered inside the elevator bracket. Though the turret is quite well represented, one misses the spotlight on it.
Decals
The sheet looks well printed. It shows British and Free French markings, Yugoslav flags, American registrations, unit badges and tactical markings. The decals seem thin without too much carrier film.
Instructions
AFV Club provide their usual A4-sized booklet, which this time has 12 pages printed in black and white. It contains a historical introduction to the vehicle, a parts plan, a colour chart with paint matches from Gunze Sangyo, Humbrol, Revell and Life Color, 17 assembly steps and two pages of profiles. Construction chapters are clear.
Paint finishes show various vehicles used in very different war theatres during World War II, which is a certain incentive even though the liveries show the ubiquitous Olive Drab.
Conclusion
This kit is a good representation, even if only externally, of an M3A3 and should not pose any special difficulties for the average modeller, unless hull and turret assembly say the opposite. Overall detail is excellent and assembly options are well thought out.
The less good aspects include both the vinyl tracks, although they can be used in the kit as they are clean and correctly rendered for the media, and the almost empty interior with only the use of figures to hide the void gaps at least in the hull hatches.
Now that it seems that building a Stuart is going to be trendy again thanks to the recent Tamiya and MiniArt releases, this is a very valid alternative and worthy of consideration, especially for those modellers who do not mind losing the internal detail, which I suspect are the great majority.◊
Publicado – Published: 8 / 2024
©www.jmodels.net

Debe estar conectado para enviar un comentario.