
De un vistazo – Quick look
MATERIAL Y PIEZAS
MEDIA & PARTS:
- Plástico inyectado (162 piezas), plástico transparente (25 piezas).
- Injected plastic (162 parts), clear plastic (25 parts).
CALCAS – DECALS:
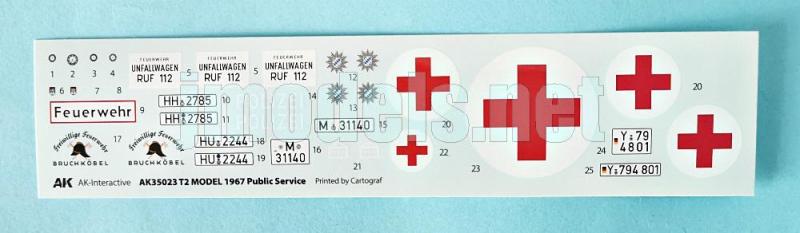
- Impresas por Cartograf. Instrumentos del salpicadero, marcas de la Cruz Roja, bomberos y militares, matrículas. Aspecto fino y muy brillante, buena saturación de color y registro. Sin exceso de soporte.
- Printed by Cartograf. Dashboard gadgets, Red Cross, firefighting service and military unit markings, number plates. Thin and very glossy finish, with good registration, sharpness and colour density. No excess carrier.
OPCIONES – OPTIONS:
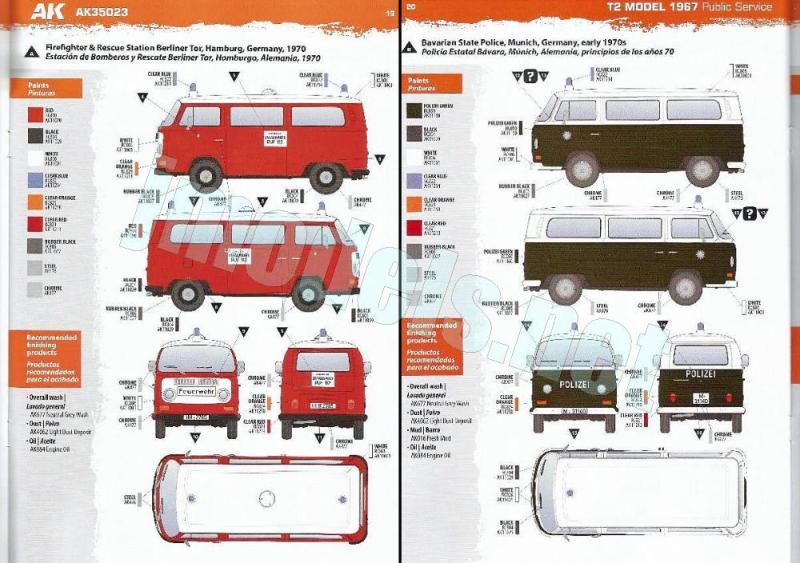
- Volkswagen T2. Estación de Bomberos y Rescate Berliner Tor. Hamburgo (Alemania), 1970.
- Volkswagen T2. Policía Estatal Bávara. Munich (Alemania), principios de los años 70.
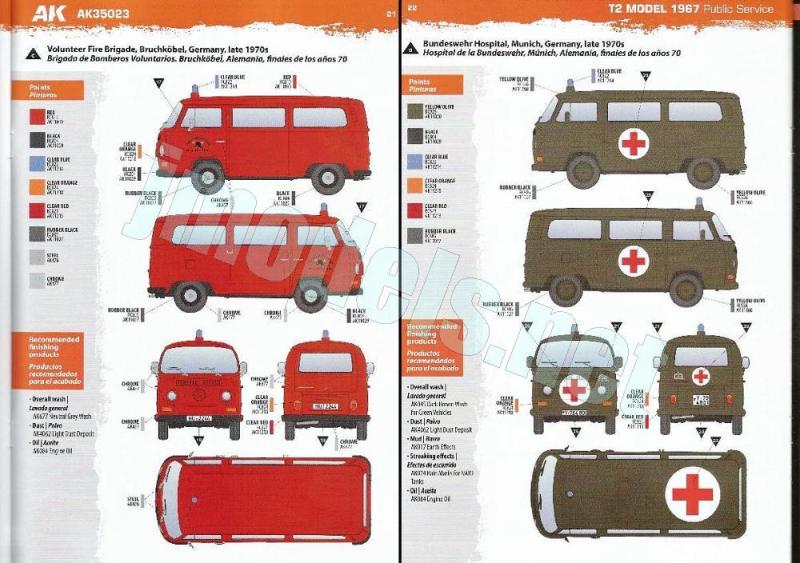
- Volkswagen T2. Brigada de Bomberos Voluntarios. Brücköbel (Alemania), finales de los años 70.
- Volkswagen T2. Hospital de la Bundeswehr. Munich (Alemania), finales de los años 70.
- Volkswagen T2. Firefighter & Rescue Station Berliner Tor. Hamburg (Germany), 1970.
- Volkswagen T2. Bavarian State Police. Munich (Germany, early 1970s.
- Volkswagen T2. Volunteer Fire Brigade. Brücköbel (Germany), late 1970s.
- Volkswagen T2. Bundeswehr Hospital. Munich (Alemania), late 1970s.
INSTRUCCIONES – INSTRUCTIONS:
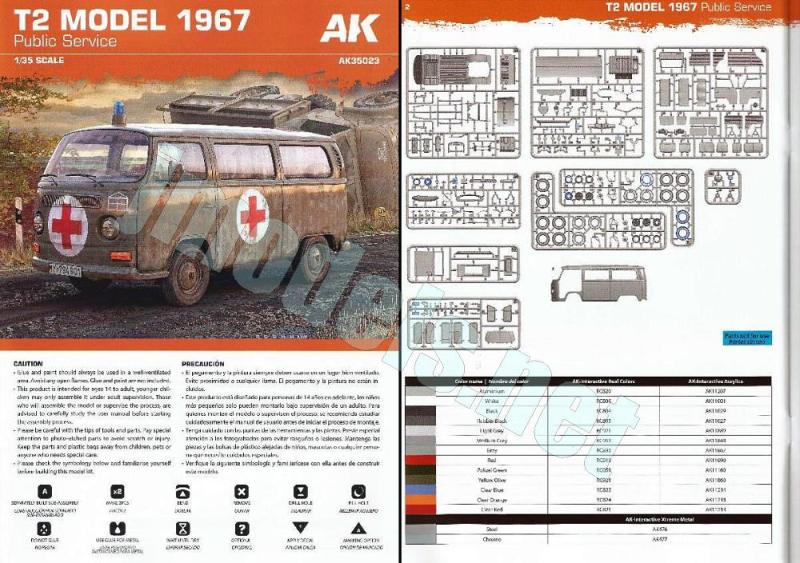
- Libreto de 24 páginas en formato A4 impreso en color. Contiene un diagrama de piezas sin numerar, una tabla de colores con equivalencias en pinturas de AK Interactive, 37 secuencias de montaje, plantillas y 4 páginas de perfiles.
- 24-page booklet in A4 format printed in color. It contains a parts diagram, a color chart with AK Interactive paint matches, 37 assembly chapters, templates and 4 pages of profiles.
LO MEJOR – THE BEST:
- Molde muy limpio. Notable detalle general. Permite colocar las puertas y paneles abiertos. Instrucciones.
- Very clean mold. Overall nicely detailed. Doors and access panels can be showed open.
LO PEOR – THE WORST:
- La configuración interna es idéntica en todas las versiones.
- The internal configuration is identical in all versions.
VALORACIÓN – CONCLUSION:
- Primera maqueta de plástico de la VW T2 en la escala 1/35. El limpio y excelente detalle en general y las opciones adecuadas de montaje la hacen recomendable para los seguidores de la escala y tema. La desventaja está en su uniforme configuración interna, no adaptada en todos los casos a los roles de todas las versiones.
- First plastic kit of the VW T2 in 1/35 scale. Its clean and excellent overall detail, along with suitable assembly choices, makes it recommendable for fans of the scale and topic. The drawback lies in its uniform internal configuration, which isn’t always suitable for the roles of all versions.

La maqueta
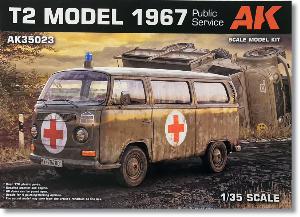
AK Interactive siempre busca nichos vírgenes o poco explorados por el modelismo. Este es el caso de la popular furgoneta Volkswagen T2, de la que no teníamos maquetas en una escala tan popular como 1/35. AK ha lanzado hasta el momento cinco cajas del nuevo molde con versiones mayoritariamente civiles. Nominalmente, las versiones retratan varias configuraciones del vehículo, como autobús, furgoneta comercial, vehículo civil, vehículo aeroportuario o de servicios públicos, pero en realidad el interior es el mismo para todas ellas, como veremos en la edición que describo aquí.
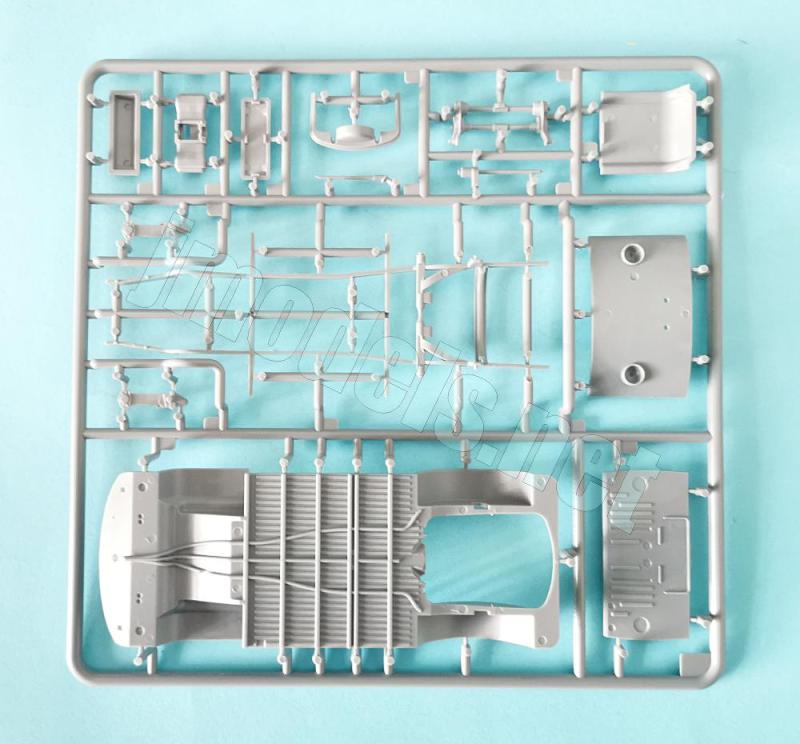
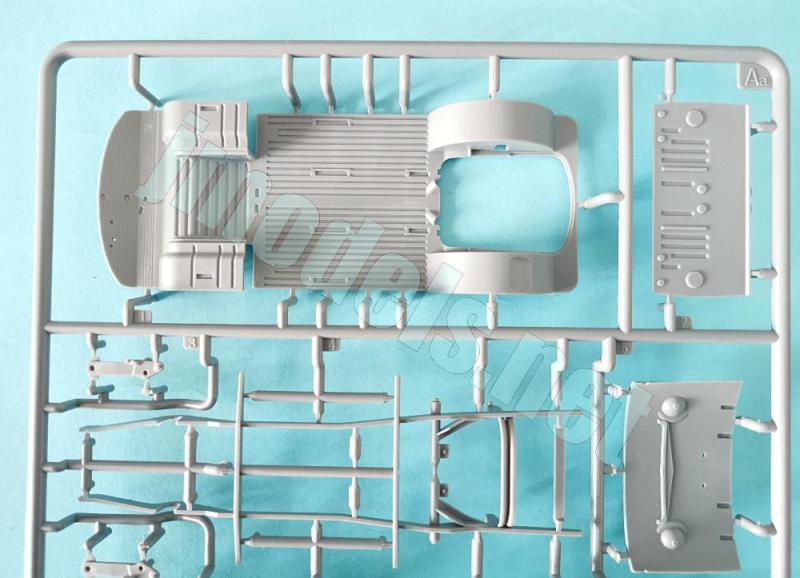
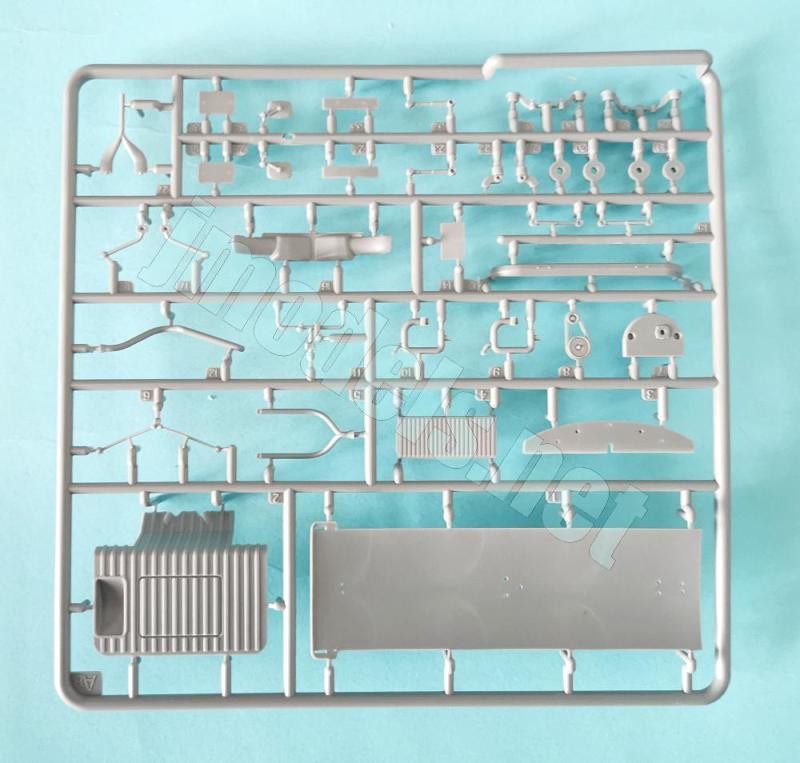
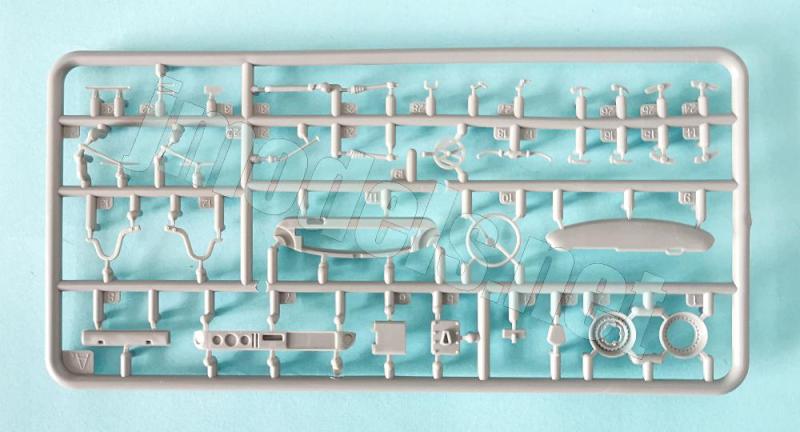
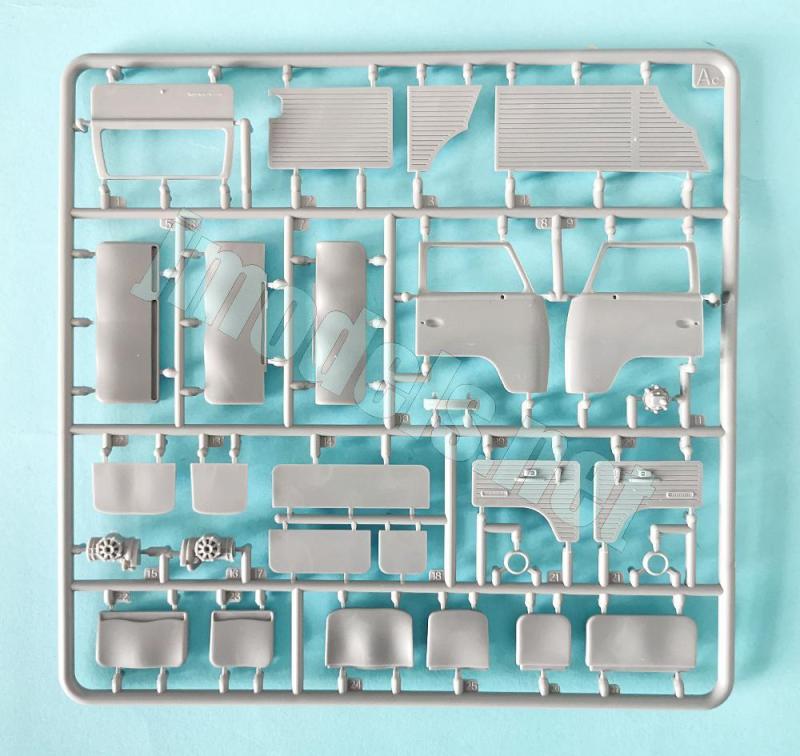
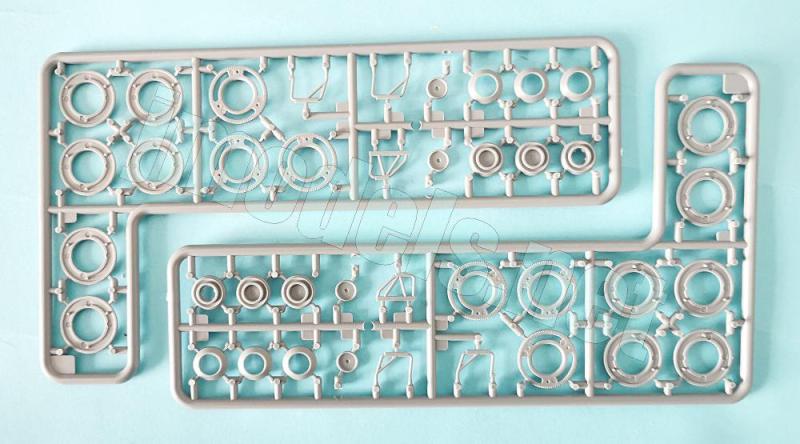
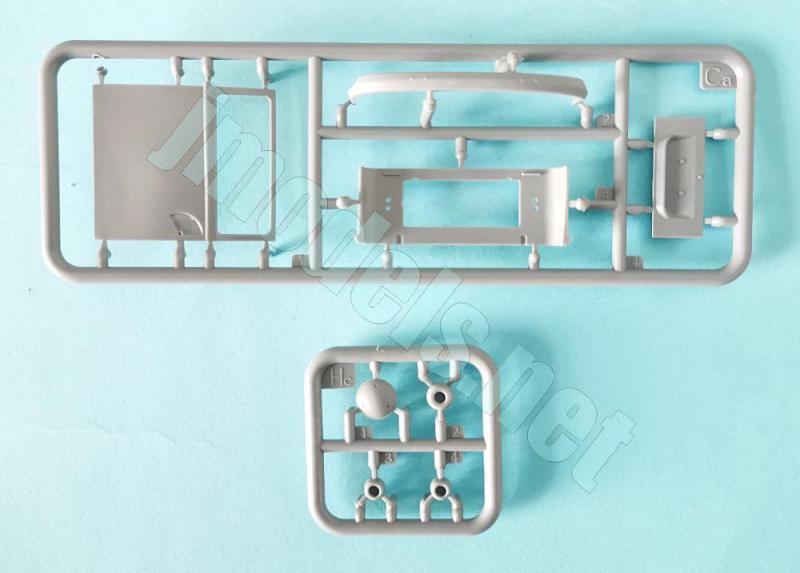
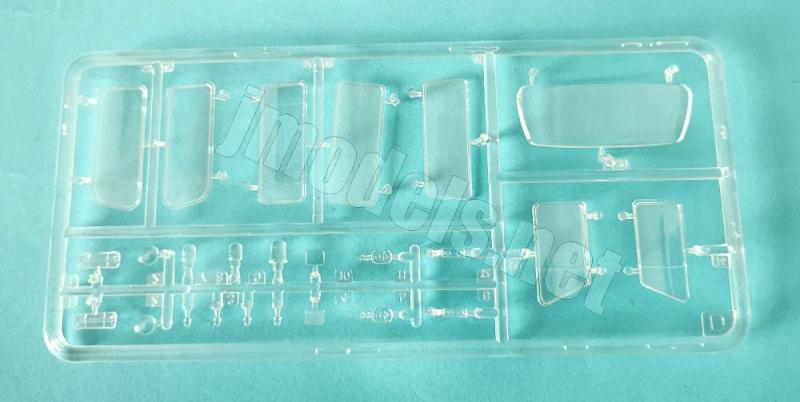
La caja trae nueve bastidores de piezas, uno de ellos doble, la carrocería separada, un bastidor transparente, la hoja de calcas y el manual de instrucciones. El moldeado de las piezas es muy bueno y carece de imperfecciones y no hay marcas de eyector de las que ocuparse porque no son visibles. La reproducción de los distintos paneles moldurados en el suelo, maletero y lados internos de la carrocería es igualmente notable. Las piezas transparentes, sin embargo, me parecen un tanto gruesas, especialmente el parabrisas.
Además de las puertas, se puede colocar abierto el panel de acceso al motor en la parte trasera y la placa de matrícula trasera tiene dos alternativas también. Otra opción es no emplear el logotipo frontal de Volkswagen en algunas versiones coincidentes con las que llevan una calca en dicho lugar, por eso sospecho que el motivo es en realidad no tener que adaptar las calcas sobre el logotipo. Por lo demás, el montaje no debe plantear dificultades al modelista de nivel medio.
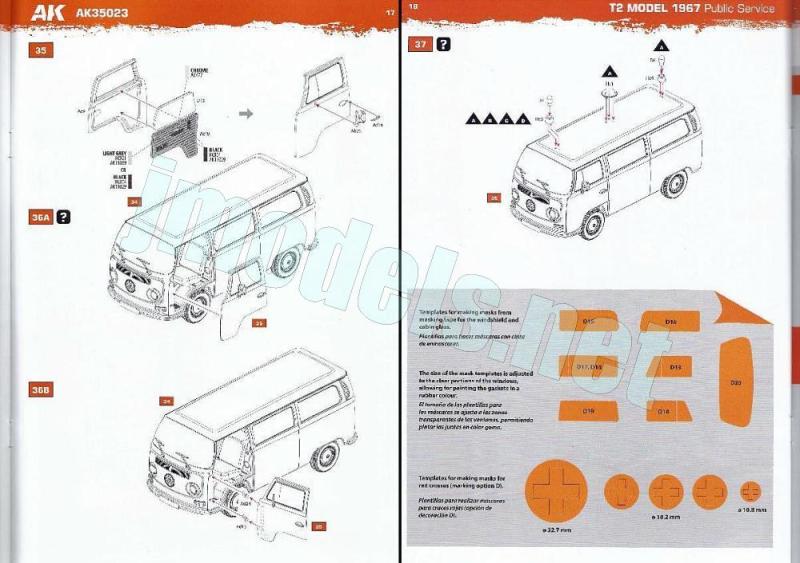
Como esta caja únicamente trae versiones de servicios públicos (bomberos, policía y ejército), no hay que esperar mucho colorido en los acabados de pintura. Al igual que en otras maquetas del fabricante, las instrucciones incluyen plantillas para cortar máscaras a medida para los cristales así como para pintar las cruces rojas del vehículo militar si es que no deseamos emplear las calcas. Es una ayuda muy útil y le cuesta poco al fabricante.
La maqueta reproduce una furgoneta Volkwagen Tipo 2 producida a partir de 1967, primero en Alemania y posteriormente en otros países (Méjico, Brasil, Australia, Argentina o Sudáfrica). Respecto al modelo anterior T1 de 1950 tenía cambios en la suspensión, el parabrisas (de doble cristal a sencillo), el motor algo más grande, además de actualizaciones en la batería y el sistema eléctrico. Las cifras de producción sólo en Alemania arrojaron un total de alredor de 2,4 millones de unidades.
Reseña
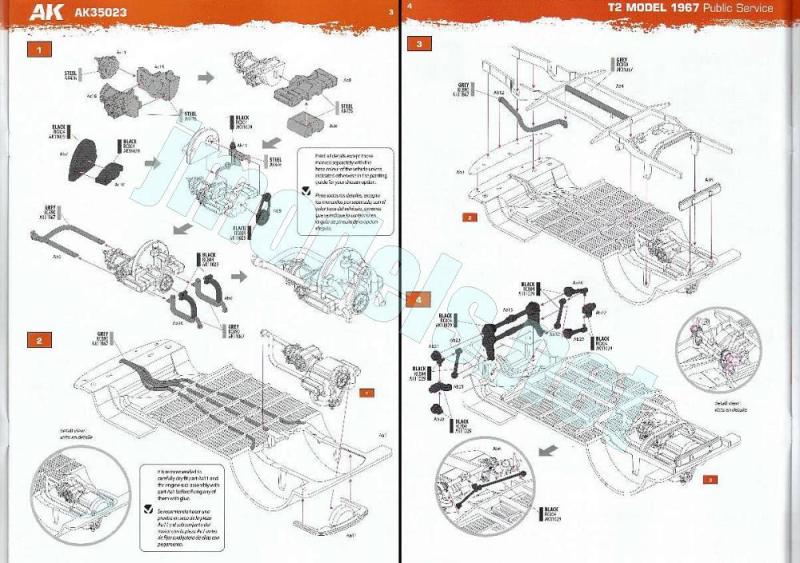
Al comienzo del montaje debemos construir el motor bóxer y sus conductos de ventilación para pegarlos en la parte trasera inferior del suelo de la carrocería. El bloque motor está integrado por dos piezas y la caja de cambios, situada por delante, por otras tres. Además de los conductos de ventilación separados, también se aprecian la carcasa del ventilador, el carburador y las correas.
Una vista detallada de las instrucciones nos ayuda a situar el motor correctamente en el hueco posterior del suelo, haciendo coincidir los conductos con los que están moldeados en dicha pieza y también con otra pieza de soporte que se añade en la parte trasera del suelo. El suelo está moldeado de una pieza e integra tanto los pasos de rueda de los guardabarros como las planchas molduradas por ambas caras.
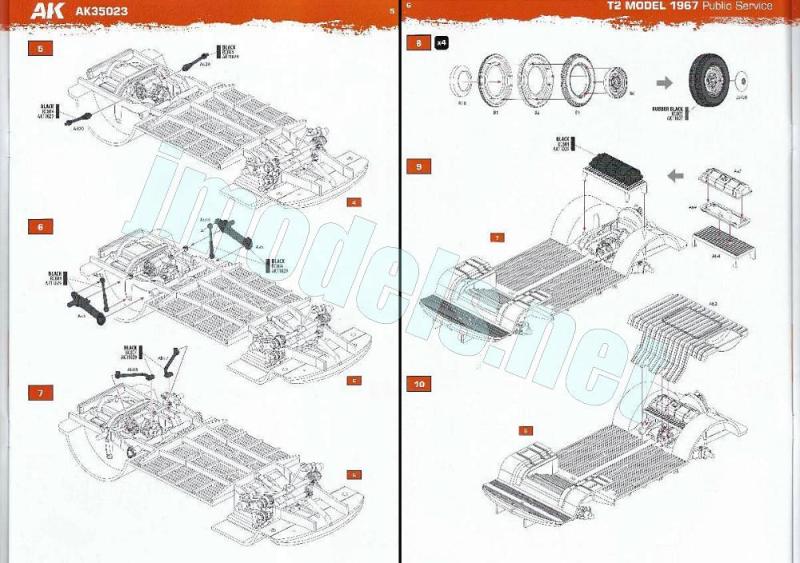
Los siguientes pasos de las instrucciones nos llevan a unir el bastidor del chasis al suelo y montar la transmisión. El bastidor es de una pieza y notablemente fino para lo que se suele ver en esta escala. El eje delantero lo forman dos barras paralelas con los semiejes separados, lo mismo que los brazos de la suspensión y los amortiguadores. También hay otros dos brazos de torsión finos por detras del eje. En cambio, el eje trasero lleva los dos semiejes separados, pero la suspensión sólo tiene un brazo por lado con su respectivo amortiguador. El eje delantero es algo más complejo de montar que el trasero, por eso tenemos otras dos vistas ampliadas en el manual para que todo asiente en su lugar.
Las ruedas están formadas por tres piezas en forma de rodajas para los neumáticos, las llantas y el tapacubos. Las secciones de los neumáticos se alinean mediante vástagos internos. La llanta externa está bien definida, pero carece de los característicos agujeros en su contorno, sin embargo el tapacubos incluye el logotipo del fabricante. Cada rueda va unida a su eje con una pieza que parece simular los tambores de freno.
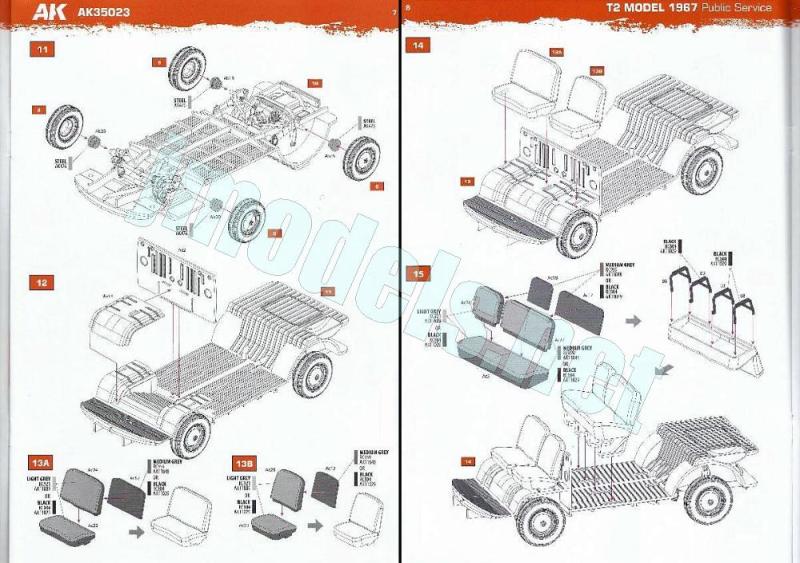
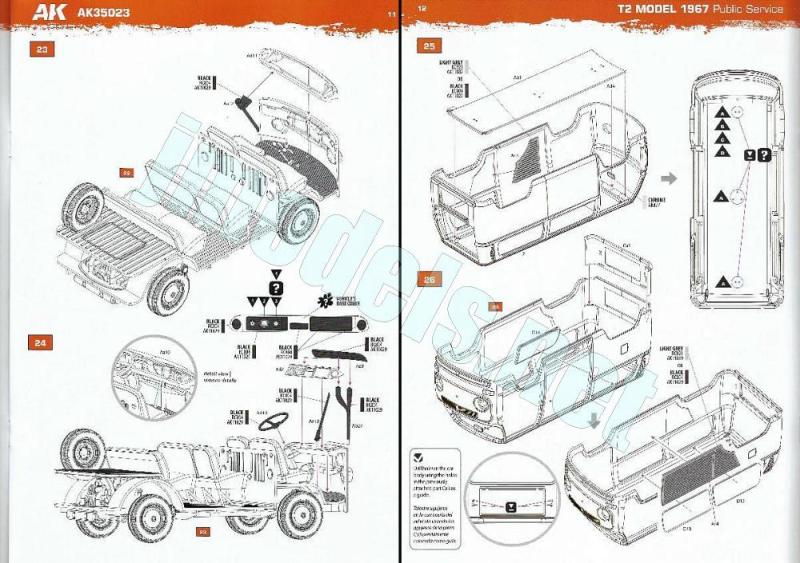
La tarea siguiente nos lleva al interior del vehículo, con la construcción de los paneles internos, asientos y depósito de combustible. La parte trasera del suelo interno lleva un panel moldurado reproducido con la tapa del acceso al motor grabada y el hueco de la rueda de repuesto, que es análoga a las demás pero con diferentes llantas y sin tapacubos. Antes de añadir esta pieza, hay que construir el depósito de combustible, formado por dos mitades y pegarlo a su soporte. En la parte delantera hay otros dos paneles, uno es el posterior de la carlinga, mientras que el otro representa parte del suelo.
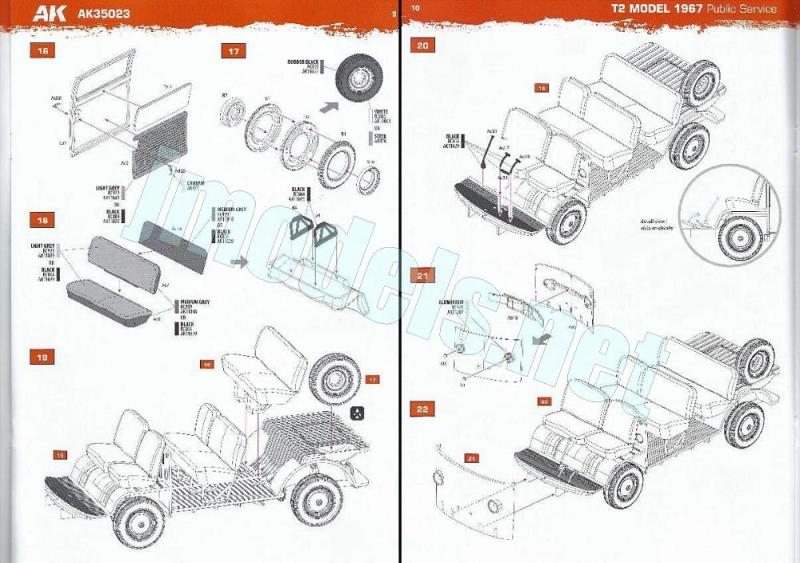
Los asientos tienen los respaldos separados. Salvo los de la cabina, los demás llevan los bastidores de anclaje aparte. Aunque las formas de las superficies son muy realistas, a mi juicio uno de los pocos defectos de esta maqueta, y en realidad de todas las de este molde, es que el habitáculo trasero tiene sólo una configuración con los mismos asientos en todas ellas, En este caso, por ejemplo, AK no ha provisto nada para el vehículo sanitario en forma de camillas u otros accesorios. En realidad el fabricante ha aplicado la configuración de autobús a todos los vehículos independientemente de su cometido.
La cabina se completa con la adición de los pedales, la palanca de marchas, el freno de mano, así como el salpicadero con su bastidor y soporte. El salpicadero tiene tres calcas para los indicadores centrales, con alternativa para simular a la derecha un reloj o bien un tacómetro, como en el vehículo real. Antes de añadir la carrocería se coloca el panel interno frontal y una pieza situada por detrás de este a la altura de los faros, cuyas bombillas transparentes no debemos olvidar.
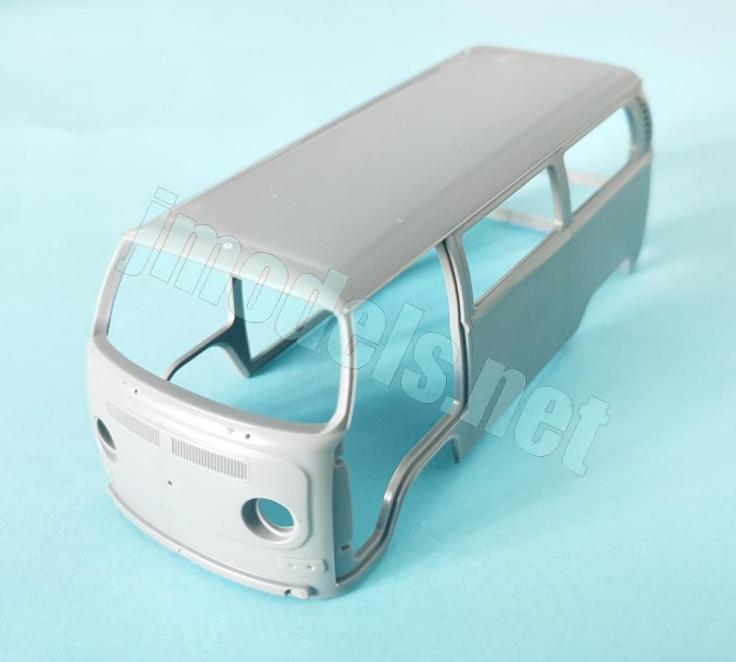
La carrocería es de una pieza, exenta y limpia de marcas. Su característica más notable es la buena reproducción de las rejillas de ventilación frontales. Primeramente se pega el doble techo interno. Esta pieza lleva marcados los puntos para taladrar la ubicación de las balizas giratorias y la toma central de ventilación que se emplean según la versión elegida. Las balizas son transparentes y sus bases son independientes. Tras el techo, se colocan el retrovisor, las ventanillas traseras, excepto la de la puerta corredera, y los paneles ranurados internos.
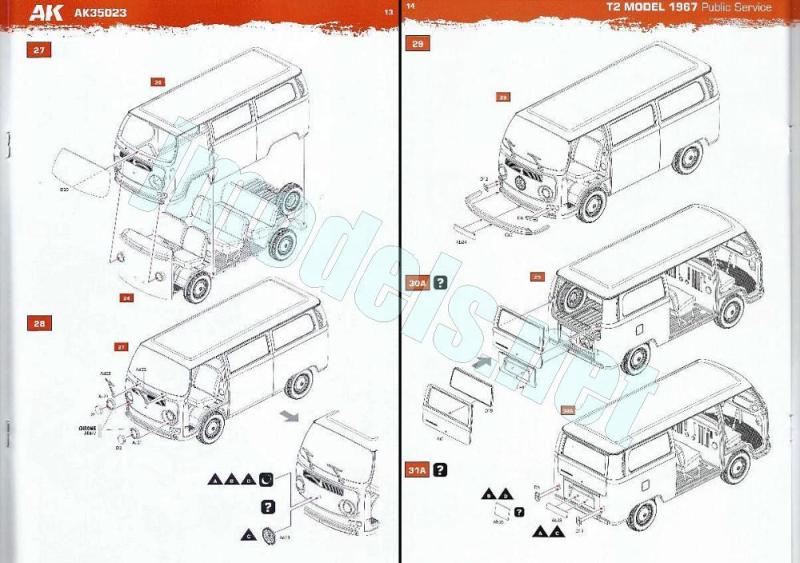
El modelo va tomando una forma reconocible cuando pegamos por fin la carrocería sobre el chasis. A primera vista, el único problema que podríamos tener al encajar ambos elementos lo ocasionaría el panel interno frontal, si es que lo hemos dejado inclinado al pegarlo.
El detalle externo se incia en la parte frontal, con la adición del parabrisas, los limpiaparabrisas, las lentes de los faros y sus embellecedores. El logotipo frontal del fabricante solamente se emplea en una de las versiones de pintura. El frontal se termina pegando los indicadores transparentes, el paragolpes y la placa de matrícula.
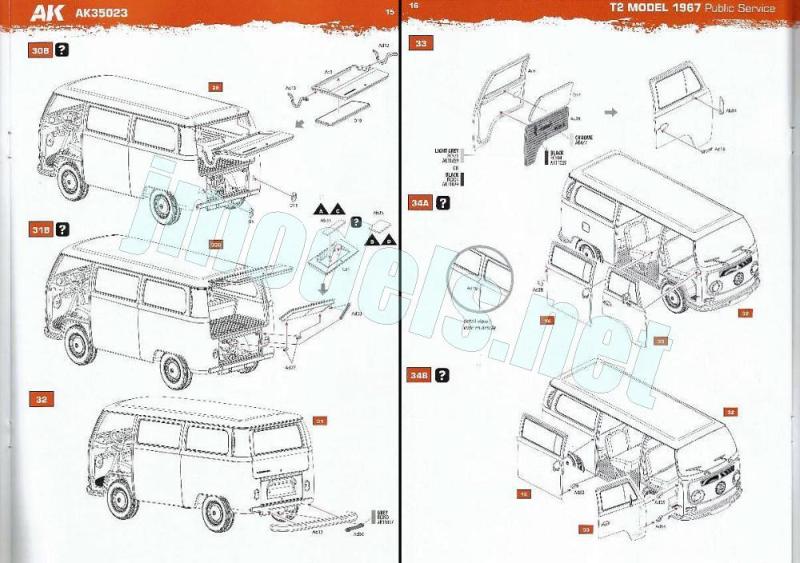
En la parte trasera también hay luces transparentes y dos tipos de placas de matrícula, cuadrada o rectangular, aplicables según la versión. La puerta trasera con su ventanilla y el panel de acceso al motor vienen separados, pudiendo mostrarse abiertos con sus soportes. Para terminar, se coloca el paragolpes y el tubo de salida del escape.
Las puertas delanteras y el portón deslizante lateral vienen separados con las ventanillas y paneles ranurados internos exentos. El detalle interno de las puertas muestra los tiradores y las manivelas de los elevalunas, estos últimos bien definidos. En la cara externa tenemos los retrovisores y manetas aparte. Las bisagras de las tres puertas son independientes para darles mayor definición y realismo si las dejamos abiertas.
De la calidad de las calcas da cuenta su fabricante, Cartograf. La hoja contiene los instrumentos del salpicadero, matrículas y marcas de la Cruz Roja, bomberos y militares. Su aspecto es fino y muy brillante, poseen buena saturación de color y registro. Carecen de exceso de soporte.
El libreto de instrucciones consta de 24 páginas en formato A4 impresas en color. Contiene un diagrama de piezas sin numerar, una tabla de colores con equivalencias en pinturas de AK Interactive, 37 capítulos de montaje, plantillas y cuatro páginas de perfiles.
Los capítulos de montaje son muy claros y están bien secuenciados, con vistas a mayor tamaño para ilustrar la posición de algunos elementos. Como dije al inicio, también se han incluido plantillas para las mascarillas del parabrisas y las ventanillas, así como de las cruces del vehículo ambulancia si queremos pintarlas.
Valoración
Esta es una excelente reproducción de la conocida VW T2 y es además la primera maqueta de plástico a esta escala, lo que no es poco. AK ha acertado en casi todo, menos en la configuración interna, que sólo permite montar la versión con asientos tipo autobús. Esta edición de vehículos de servicio público sería aún más interesante con un interior equipado con material de bomberos y sanitario, por escaso que fuese.
Con todo, es una pieza muy recomendable tanto a los seguidores de la escala como a los aficionados a los vehículos clásicos.◊

The kit
AK Interactive is always looking for virgin or little-explored niches in modeling. This is the case with the popular Volkswagen T2 van, a vehicle it wasn’t kitted in such a popular scale as 1/35. AK has released five boxes of their new tool so far, mostly with civilian versions. Nominally, the versions depict different configurations of the vehicle, such as bus, commercial van, civilian, airport or utility vehicle, but in fact, the interior is the same for all of them, as we will see in the kit I review here.
The box contains nine sprues of parts, one of them doubled, the separate body, a clear sprue, the decal sheet, and the instruction manual. The molding of parts is very good and free of blemishes. There are no pin marks to worry about because they are not visible. The reproduction of the stamped panels on the floor, trunk, and inner body sides is also remarkable. The clear parts, however, seem somewhat thick to me, especially the windshield.
In addition to the doors, the rear engine access panel can be left open, and the rear license plate also has two options. Another choice is to omit the front Volkswagen logo on some versions that have a decal in that place; therefore, I suspect the reason is actually to avoid having to adapt the decals over the logo. On a first inspection, assembly should pose no difficulties for the average modeler.
Since this kit only includes versions for public services (firefighting, police, and military), don’t expect colourful paint finishes. As with other kits from this manufacturer, the instructions include templates for cutting custom masks for the windows, as well as for painting the red crosses on the military vehicle if you don’t want to use the decals. It’s a very useful aid and costs the manufacturer very little.
The kit reproduces a Volkswagen Type 2 van produced from 1967 onwards, first in Germany and later in other countries (Mexico, Brazil, Australia, Argentina, and South Africa). Compared to the previous T1 model from 1950, it had changes to the suspension, the windshield (from double-pane to single-pane), a slightly larger engine, and updates to the battery and electrical system. Production figures in Germany alone totaled around 2.4 million units.
Review
Assembly starts with the boxer engine and its ventilation ducts to glue them to the lower rear of the body floor. The engine block consists of two pieces, and the gearbox comprises three. In addition to the separate ventilation ducts, we have a separate fan housing, carburetor, and belts.
A detailed view in the instructions helps us attach the engine correctly in the rear recess of the floor, aligning the ducts with those molded on the floor piece and also with another support piece added to the floor. The floor is molded as a single piece including both the wheel arches and the grooved panels on both sides.
The next steps in the instructions guide us to attach the chassis frame to the floor and install the transmission. The frame is a single piece, remarkably thin for what is usually seen in this scale. The front axle consists of two parallel bars with separate half-shafts, as are the suspension arms and shock absorbers. There are also two more thin torsion bars behind the axle. In contrast, the rear axle has two separate half-shafts, but the suspension only has one arm and a shock absorber per side. The front axle is somewhat more complex to build than the rear, which is the reason why we have two additional enlarged views in the manual to ensure everything fits correctly.
The wheels consist of three pieces for the tires, the rims, and the hubcaps. The tire slices are aligned using internal pins. The outer rim is well-defined but lacks the characteristic holes around it; however, the hubcap includes the manufacturer’s logo. Each wheel is attached to its axle with a piece that resembles a brake drum.
The next step takes us to build the interior, with the construction of the interior panels, seats, and fuel tank. The rear of the floor features a grooved panel with the engine access cover engraved and the spare tire insert. Before adding this piece, the fuel tank, made up of two halves, is built and glued to a rack. At the front, there are two more panels: one for the rear cab, while the other represents a section of the cab floor.
The seats have separate backrests. Except for those in the cab, the rest have separate frames. Although the surface shapes are very realistic, in my opinion, one of the few drawbacks of this kit, and indeed of all those released so far by AK, is that the passenger compartment only has one configuration with the same seats in all of them. In this case, for example, AK have not provided anything for the ambulance in the form of stretchers or other accessories. In other words, the manufacturer has applied the bus configuration to all the vehicles regardless of their intended use.
The cab is completed with the addition of the pedals, gearshift, handbrake, and dashboard with its frame and support. The dashboard has three decals for the central gauges, with the option to simulate a clock or a tachometer on the right, as in the real vehicle. Before adding the body piece, the front interior panel and a piece attached behind it are installed. The clear bulbs for the headlights are also added in this stage.
The body is a single, sharp piece without the usual marks we find in other kits. Its most notable feature is the accurate reproduction of the front vents. The double interior roof is attached first. This piece has small holes to install the beacons and the ventilation intake, which are applicable depending on the version. The beacons are clear pieces and have separate bases. After the roof, you add the rearview mirror, the rear windows, except for the sliding door, and the internal stamped panels.
The model begins to take on a recognizable shape once the body is finally fitted to the chassis. At first glance, the only potential problem when fitting the two assemblies would be caused by the front inner panel, if it was left at an angle when glued.
External detail at the front comprises the windshield, wipers, headlight lenses, and their rims. The manufacturer’s front logo is only used in one of the paint versions. The front is completed by attaching the clear indicators, bumper, and license plate.
At the rear, there are also clear taillights and two types of license plates, square or rectangular, depending on the version. The rear door with its window and the engine access panel come separately and can be displayed open with their supports. Finally, the bumper and exhaust pipe are attached.
The front doors and the sliding side door are also separate pieces with the windows and internal panels. The interior details in the doors show the handles and window cranks, these latter clearly defined though molded in the piece. On the exterior, we have the rearview mirrors and separate door handles. The hinges for each of the three doors are independent to give them greater definition and realism when left open.
The quality of the decals is evident from their manufacturer, Cartograf. The sheet contains dashboard instruments, license plates, and markings for the Red Cross, fire department, and police. They have a fine, glossy finish, good color saturation, and register. There is no excess carrier.
The instruction booklet consists of 24 A4 pages printed in color. It contains an unnumbered parts diagram, a color chart with equivalent AK Interactive paints, 37 assembly chapters, templates, and four pages of profiles.
The assembly chapters are very clear and well-sequenced, with larger images to illustrate the position of some elements. As mentioned at the beginning, templates for the windshield and window masks are also included, as well as templates for the ambulance crosses if you wish to paint them.
Conclusion
This is an excellent reproduction of the well-known VW T2 and is also the first plastic kit at this scale, which is no small feat. AK has hit the nail almost everywhere in this kit, except for the interior configuration, which only allows for the bus-style seating version. This box with public service vehicles would have been even more interesting with an interior equipped with some fire and medical equipment, however basic.
All in all, it’s a highly recommended kit for both scale enthusiasts and classic vehicle aficionados.◊
Publicado – Published: 8 / 2026
©www.jmodels.net

 jmodels.net
Debe estar conectado para enviar un comentario.