

EL AVIÓN – THE AIRCRAFT
El Raiden es uno de los aviones japoneses más conocidos del final de la Segunda Guerra Mundial, aunque su desarrollo estuvo plagado de dificultades y apareció demasiado tarde para tener más relevancia en el conflicto. No obstante el J2M3 Modelo 21, el modelo producido en mayor número, mostró su valía contra los B-29 que arrasaban Japón desde 1944 gracias a su excelente armamento, poderoso motor y un blindaje sin igual.
The Raiden was one of the best-known planes of the last part of WWII, although its development was full of difficulties and it appeared too late to have a great relevance in the conflict. However, the J2M3 Model 21, the most produced Raiden model, showed its value against the B-29 which devastated Japan from 1944 onwards thanks to an excellent armour, powerful armament and its improved Mitsubishi engine.
HISTORIA – HISTORY:
Mitsubishi J2M Raiden
LA MAQUETA – THE KIT
Aunque este modelo tiene ya bastantes años desde su lanzamiento por Hasegawa, la maqueta me pareció apropiada para reiniciar el modelismo de aviones con un modelo sencillo, que no presentase grandes dificultades de construcción. Las instrucciones muestran dos versiones del modelo: una, la que realicé, perteneciente al 352º Kokutai que pilotó el teniente Aoki en la base aeronaval de Omura en 1945, fácilmente distinguible por los rayos pintados a ambos lados del fuselaje, y otra del 302º Kokutai de la base de Atsugi en el mismo año. La única diferencia aparente entre ambas versiones, aparte de los numerales, era la forma de las palas de las hélices, por eso el modelo incluye dos piezas opcionales para las mismas.
Although this model was first released by Hasegawa in 1987, it seemed to me quite handy to restart the modelling of planes with a simple model. The instructions show two versions of the model: the first, the one I built belonging to 352nd Kokutai which was flown by Lt. Aoki at Omura Naval Air Base in 1945, clearly distinguishable by the lightnings painted on both sides of the fuselage, and the second to 302nd Kokutai at Atsugi Naval Air Base in the same year. The only visible difference between these two versions, apart from their tail codes, was the shape of the propeller blades, that is why the model includes two parts for them.
MONTAJE – ASSEMBLY
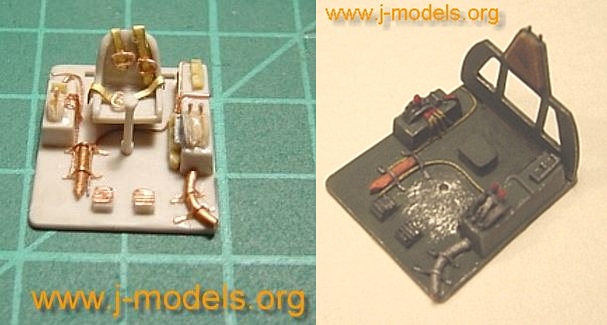
Como de costumbre con los aviones, comenzamos detallando el interior de la cabina del piloto. Con hilo de cobre de diferente grosor se simula el cableado y sus ajustes al suelo. También lo he usado para realizar el extintor de emergencia, las hebillas de los cinturones de seguridad, las palancas de mandos y para detallar los pedales del timón. Con trozos de plástico procedentes de la caja de piezas sobrantes se construyen algunos paneles e instrumentos. Los cinturones son restos de fotograbado. La carlinga se pintó con acrílicos Tamiya, excepto el pequeño extintor (naranja de Vallejo).
As usual with plane models, I started by detailing the cockpit interior. I used copper wire to build cables, the small fire-extinguisher, gears, belt buckles and to detail the rudder pedals. I also built some instrument panels with spare parts from other models. The seat belts are PE scrap. The cockpit was painted with Tamiya acrylics except the small fire-extinguisher (Vallejo acrylic paint).

El asiento del piloto y el panel de instrumentos (calca) terminados. El asiento del Raiden iba del mismo color de la carlinga, pero solía desgastarse fácilmente dejando ver el color plateado original.
The pilot’s seat and the instrument panel (decal) once finished. The Raiden seat was painted in forest green but it was usually weathered by use.

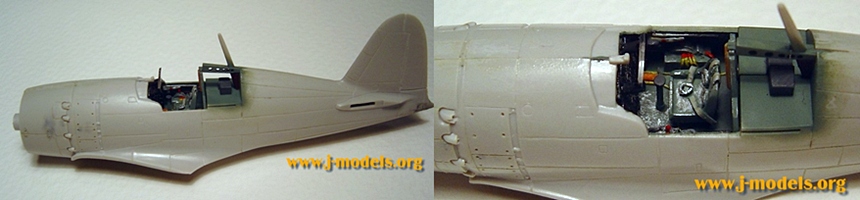
A la derecha puede verse el ventilador que refrigeraba el motor, que estaba situado detrás. Decidí rehacer la pieza completa. Corté las palas del ventilador y las reconstruí con restos de fotograbado. Es necesario lijar bien la pieza del ventilador y adelgazarla todo lo que se pueda antes de pegarla, ya que las palas no deben sobresalir del morro.
On the right you can see the fan that cooled the engine, which was placed behind it. I decided to rebuild the part completely. I cut off the fan blades and remade them with spare PE. It is necessary to sand the fan to make it much thinner before glueing it. The blades must not jut out the edge of the nose.
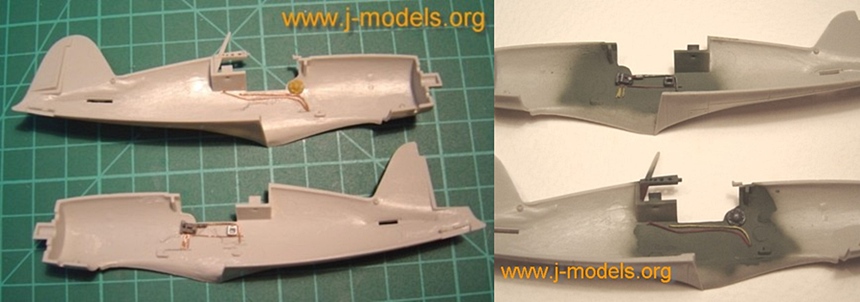
Los laterales de la carlinga se detallaron con cables y alguna pieza sobrante de otros modelos. En esta parte del avión no me basé en el referente real.
The cockpit sides were detailed with with wire and some spare parts from other kits. I did not base this section on a real Raiden.
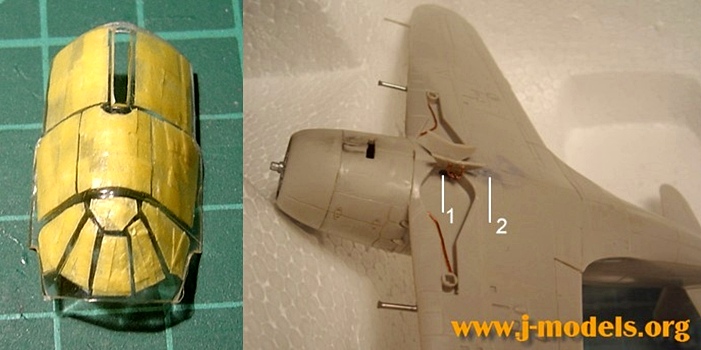
Tras pegar las alas y los alerones traseros, y antes de detallar los pozos del tren de aterrizaje, abrimos el pequeño compartimiento donde se alojaban los servos de apertura con un cutter afilado (1). Posteriormente pegamos las compuertas y les añadimos el mecanismo de cierre con hilo de cobre. Hay que tapar con masilla los agujeros donde va colocado el depósito auxiliar de combustible, que no voy a usar (2). Decidí eliminar los cañones del kit y hacerlos con aguja hipodérmica cortada con el minitaladro. Antes de pintar, sólo queda enmascarar el transparente que pinté aparte. También enmascaré el motor y la carlinga. El secreto de esta operación está en cortar tiras pequeñas y no demasiado anchas para adaptarlas a la superficie redondeada.
Before detailing the wheel wells, I opened the small compartment where they were hidden in flight with a sharp knife (1). Then I added the doors and made the opening gear with copper wire. As I was not going to use the drop tank, I filled the two holes with putty (2). I cut off the kit guns and rebuilt them cutting a needle with a minidrill. I masked the engine, the cockpit and the canopy which I painted apart. The secret of masking tape is in cutting tiny and thin stripes that you can stick down a rounded surface like this.
PINTURA – PAINTING
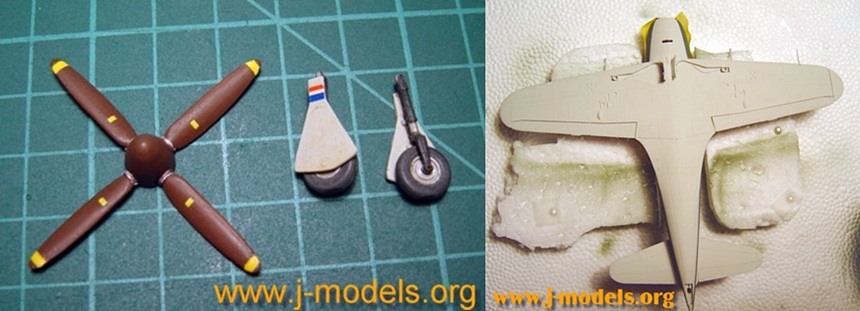
Terminé otros elementos como la hélice y el tren de aterrizaje con sus respectivas calcas. Éste último recibió un lavado en color buff para imitar la suciedad y el desgaste del rodamiento. Posteriormente barnicé todo con Marabú Mattlack. Comienzo pintando las superficies inferiores, que se han aerografiado con dos capas bien diluidas de Tamiya XF-2 blanco mate más unas gotas de gris medio XF-20.
I finished other elements such as the propeller and the landing gear with their decals. The landing gear was washed in buff colour to imitate dirt and wear. I varnished all these parts with Marabu Mattlack. The bottom surfaces was airbrushed with two thin layers of Tamiya XF-2 Flat white and some drops of Medium grey XF-20.

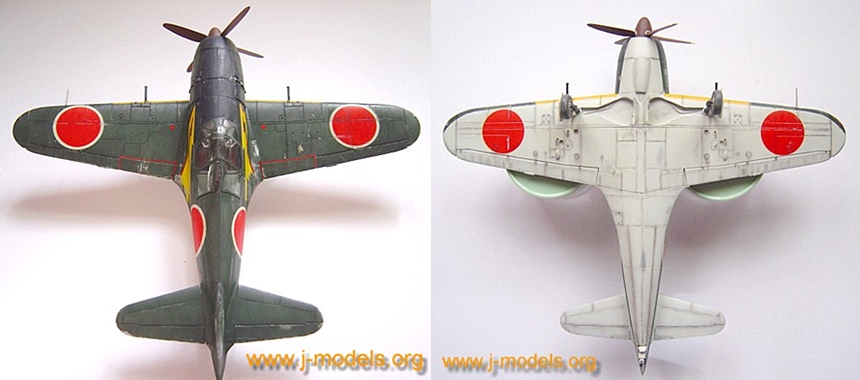
Las superficies superiores van pintadas de Tamiya XF-11 IJN Green aclarado con un poco de blanco XF-2 igualmente en dos finas capas. Posteriormente añadí el color del morro, hecho con una mezcla de XF-1 negro mate (60%) y XF-8 azul mate (40%). Al tono verde original, se le añade algo más de blanco y se aerografía en el centro de los paneles para contrastar las superficies mediante una subida de luz. También pinté la típica línea amarilla de los bordes de ataque añadiendo al amarillo mate XF-3 una gotita de naranja que preparé con una mezcla de rojo y amarillo de Tamiya.
Top surfaces were painted in Tamiya XF-11 IJN Green mixed with some drops of XF-2 flat white airbrushed in two thin layers too. After that, I painted the cowling in a mixture of XF-1 flat black (60%) and XF-8 flat blue (40%). The first green shade was whitened with a little more white paint. I airbrushed this color in the middle of panels in oder to get contrast by means of adding more light. I also painted the typical yellow line in the leading edges adding a little drop of orange (mixture of Tamiya red and yellow) to flat yellow XF-3.

A la izquierda, un detalle importante del aparato del Teniente Aoki en la zona inferior: el color verde superior continúa bajo los bordes de ataque y tiene el mismo ancho de las bandas amarillas. Posteriormente barnicé todo el modelo con barniz brillante de Humbrol y coloqué las calcas. Tras un nuevo barnizado en brillante, comencé el proceso de envejecido del modelo por la zona inferior. Usé pasteles para imitar los derrames de los depósitos y la suciedad en las líneas de paneles. La característica más personal del aparato de Aoki eran los rayos pintados a ambos lados del fuselaje. El grado de desgaste de la maqueta es cuestión de referencia histórica y de gusto del modelista. El punto exacto es difícil de saber. En este caso he preferido representar un avión aún no demasiado desgastado por el uso.
The left picture shows an important detail in Lt. Aoki’s Raiden: the top green colour continued in the bottom leading edges and it is as wide as the yellow stripe. After painting this detail, I varnished the model with Humbrol clear varnish and added the decals. I covered them with a new coat of the same varnish, and started the weathering process in the bottom side. I used pastels to imitate fuel spillage and dirt in the panel lines. The most personal feature in Aoki’s plane were the lightnings on both sides of the fuselage. The exact point in weathering a model is always difficult to know. It depends on both historical evidence and the modeler’s taste. In this case I preferred to show my Raiden model not too weathered.

AMBIENTACIÓN – THE SCENE
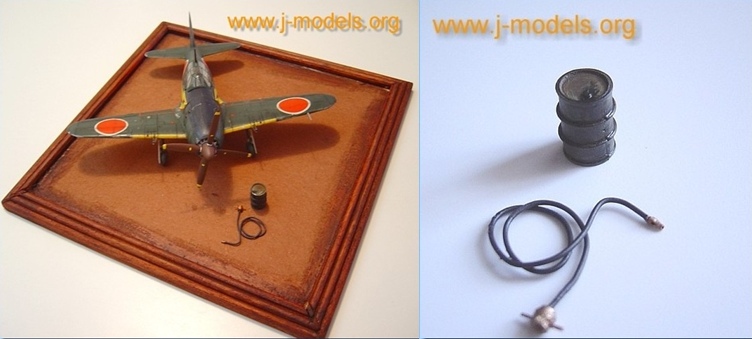
La peana es una simple tabla cuadrada a la que he añadido un marco encolado y tintado. La escena no tiene mayores pretensiones: los elementos principales son el modelo, el bidón y la pequeña manguera. En el espacio que queda delante del avión, irán algunas marcas de rodamiento en el suelo, que sugieren que un vehículo ha llevado el bidón allí. En esta base he intentado mantener los elementos que la integran al mínimo posible con lo que deseaba expresar.El bidón y la manguera fueron realizados y pintados antes que el terreno. La manguera es un cable de cobre de un grosor adecuado, la boca es una pequeña lámina también de cobre enrollada y el extremo que ajustaría en el camión de combustible lo hice con plástico y cobre. Los extremos llevan color dorado de Humbrol. El bidón, procedente de otra maqueta, está pintado con Humbrol 66 gris mate algo aclarado. Luego lo decoré con óleos a pincel seco de colores rojizos para imitar óxido y lavados de Humbrol 93 arena. Los bordes se detallan con una mina de grafito. El derrame que chorrea por la superficie se barnizó en brillante tras pintarlo de negro.
The base is just a framed and dyed square wood board. The scene is simple: the main elements are the model, the drum and hose. Some tyre treads will be visible on the ground in front of the model, they will suggest that a vehicle have take them there. I have tried to keep few elements in the scene in order to let the viewer imagine what it is happening. The drum and the hose were built and painted before the base. The latter is just a thick copper wire. I made the nozzle with a tiny copper sheet and the fuel intake with copper and plastic. They were painted in gold (Humbrol 16). The drum comes from another 1/72 model and was airbrushed in Humbrol 66 flat grey with a few drops of white. I drybrushed it with reddish oils to imitate rust and gave it several washes with Humbrol 93 desert sand. The top edges were detailed with a pencil lead. The oil spill was painted black and then I used clear varnish.

Materiales y herramientas para la confección de la escena. Pintura acrílica de Vallejo, cola, pasta de modelar, un sencillo trozo de cuerda de pita, pequeñas piedras, arena de playa (la sal puede ser un buen sustituto) y serrín tamizado. Usé un pincel plano del número 10 para las superficies mayores y otro del 6 para afinar los detalles. A escalas mayores, basta con el primero.
Tools and materials to build the scene. Vallejo acrylic paint, white glue, modelling paste, some string and sawdust, tiny stones and beach sand (salt can be a good alternative). I used a number 10 flat brush for base colours and a number 6 for details. The former is enough for bigger scales.

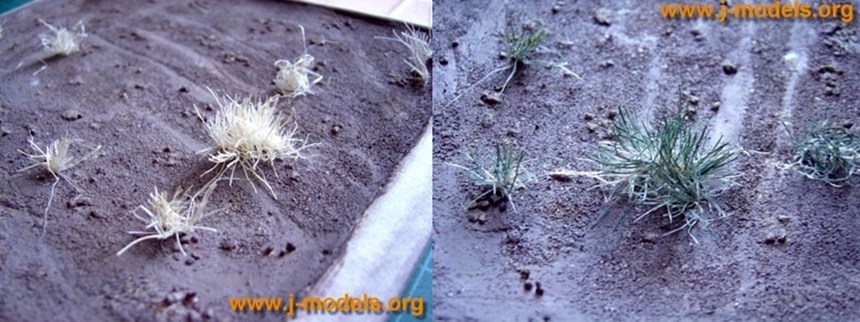
Comenzamos enmascarando el borde de la peana con cinta de carrocero. Luego damos una capa de cola a la base, y a continuación extendemos la masilla dándole el suficiente grosor. Como nuestra pista es básicamente plana, no hay que preocuparse si quedan algunas zonas ligeramente más hundidas que otras, esto incluso parecerá más real una vez pintado. Dejamos transcurrir al menos media hora para que la superficie de la masilla se haya endurecido un poco y añadimos elementos del relieve: marcas de ruedas (de un vehículo a la misma escala), pequeñas piedras y granos de arena esparcidos al azar y sin seguir un patrón determinado. Hay que recordar que las piedras deben estar algo hundidas en la masilla para que su aspecto parezca real, y que habría que usar al menos tres tamaños diferentes para evitar la monotonía a la vista. Todo ello lo pegamos con cola. También aprovechamos para marcar el lugar donde irá el modelo, hundiendo un poco las ruedas para realizar el conocido «efecto de peso». Dejamos transcurrir al menos 24 horas y el resultado es algo parecido a la imagen. Este es el resultado tras encolar, extender el serrín y retirar el sobrante. Para obtener algo más de relieve y romper la planitud de la superficie, he intentado evitar las zonas con marcas de ruedas. En algunas zonas lisas, el suelo simula haber estado encharcado. Podemos esperar otras 24 horas a que seque bien la cola.
First I masked the edge of the base. The I gave a hand of white glue and spread the paste. As the airstrip is basically flat, you should not worry if some areas are slightly uneven, this will seem more realistic once painted. Allow at least half an hour for the paste to start drying and now you can add more elements using white glue: tyre treads (from a wheeled vehicle at the same scale), small stones and sand grains scattered here and there with no defined pattern. Remember that stones and bigger materials should be a little sunk in the paste to look realistic and that at least three different sizes should also be used to avoid regularity when observed. I also marked the wheels of the model on the fresh paste to get the well-known ‘weigh effect’. After 24 hours, the result is something as the picture above. This is the result after glueing and spreading some sawdust. To get some extra raised zones and break the flatness of the surface, I avoided the treaded areas. The ground seems to have been covered with puddles in some flat spots. You can now wait 24 hours again till the white glue is dry.
Comenzamos el proceso de pintura con acrílicos. La manera más sencilla de hacerlo es comenzar cubriendo adecuadamente toda la base en un tono tierra más bien oscuro y luego ir aplicando tonos más claros del mismo color a pincel seco. Se puede terminar en un color claro ocre que aporte luz al relieve. A más tonos, más matices iremos introduciendo. Otra forma, que básicamente viene a ser lo mismo, es seleccionar más gamas de colores con base marrón y ocre amarillo, llegando incluso a un tono rojo cuero. Tras cubrir bien con el color base todo el terreno, que en mi caso tiene tendencia al rojo porque empecé con un siena tostado muy aclarado, usamos ya el pincel seco para los restantes colores. El pincel sólo debe tener lo justo de pintura para aportar matices, evitando dar pinceladas fuertes que formen manchas. También hay que insistir más en unas zonas que en otras por todo el conjunto, de modo que evitemos la regularidad. En cualquier caso, si nos pasamos con el color, basta con dar encima otro tono que lo matice.
No hay que obsesionarse por la referencia de color exacta ni por la marca. Es suficiente con usar acrílicos y agrupar colores por tonos, según el ambiente que queramos representar. Doy la referencia de colores para que pueda servir de ejemplo. Usé acrílicos de Vallejo de la serie Model Color progresivamente más claros, aunque el color base es de la serie Arte Deco sombra tostada 117. A continuación di algunas pasadas a las piedras con rojo cuero 818, que luego maticé con marrón beige 875. Luego vino el camuflaje pardo claro 825 para zonas del suelo al azar, y finalmente saqué algunas luces, especialmente en las piedras con ocre amarillo 913. Aunque este último color y el rojo cuero puedan parecer excesivos, hay que recordar que a pincel seco sólo aparecen veladuras en estos tonos que complementan perfectamente con el conjunto. Una vez seco, comprobé que el color general del suelo tendía ligeramente a rojizo en algunas zonas, por lo que decidí matizar un poco más con el beige de camuflaje alemán 821.
A continuación se añade la vegetación. Para una base sencilla no hay que complicarse la vida. Basta unos sencillos «matorrales» de cuerda de pita pegados con cola y luego cortados a diferente medida. La vegetación en general tiene tendencia a tener tonos de verde más oscuro por la parte inferior que por la superior. Algunas pequeñas ramas comienzan a secarse por el extremo. Usé un pincel plano del número 6 con la misma técnica que en el suelo. Primero la capa base de verde oscuro de Vallejo 920, tratando de cubrir al máximo las hebras, luego maticé la zona media de las plantas con verde claro de camuflaje 833 y por último añadí en la punta de algunas ramas el ocre amarillo. De nuevo, hay que hacerlo con variedad. Algunas plantas aparecen más secas (o verdes) que otras.
We start painting with acrylics. The easiest way to begin is to cover all the base with a rather dark earth shade and then drybrush clearer hues of the same colour. We can finish in an clear ochre shade which gives lights to the surface relief. Obviously, the more colours you use, the more hues you will get. Another way of doing this, that is basically the same, can be done by choosing shades of brownish and yellow ochre colours, even red leather will do. After covering all the surface with the base colour (in my base it has a reddish shade because I started with a clear burnt umber), we can go on drybrushing the rest of colours. The brush must only have a speck of paint to add hues, and we should avoid strong strokes that stain the base. Brush-strokes must also be uneven, adding more colour on some areas than on others to avoid regularity. In any case, if we make a mistake, we can always correct it using another shade to vary the tone.
We should not become obsessed by the exact colour reference or the paint make. Using acrylics and grouping the colours by shades according to the environment we want to represent is just enough. The following colour reference I include here is just a mere example. I used Vallejo Model Color acrylics, although the base was painted with Art Deco Series 117 burnt umber. Then I used Model Color red leather 818 for the little «stones» and retouched them with beige brown 875 to add some variety. After that, I drybrushed camouflage pale violet brown 825 on some areas at random, and finally I lighted all up, especially the «stones», with yellow ochre 913. Although this latter shade and the red leather can seem rather extreme colours, remember the drybrushing technique only adds colour veils which, seen as a whole, match quite well to the human eye. Once dry, I realized the general tone slightly tended towards a reddish earth in most areas, so I decided to add more variety with German beige camouflage 821.
Then we can add the vegetation. For a simple base such as this, the process must not be difficult. Some «scrub» made of white-glued string and cut to different sizes is enough. Again they must be grouped at random avoiding regularity. They can «grow» even under the model, but they should not hide the main view of the drum and hose. They are important but only as a background. Vegetation generally tends towards darker green shades in the lower parts than in the higher ones. The ends of some twigs are beginning to dry. I used a number 6 flat brush with the same technique as in the earth. First I drybrushed Vallejo 920 dark green on most threads, then I randomly added camouflage bright green 833 and finally yellow ochre 913 in the tips of some twigs. Variety is again important. Some srub is drier (or greener) but they do not look exactly same. The string natural colour helps to enhance the background.


Debe estar conectado para enviar un comentario.