
EL VEHÍCULO – THE VEHICLE
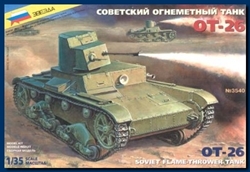
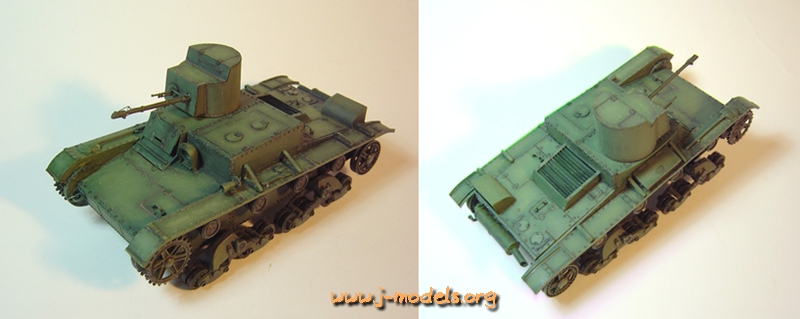
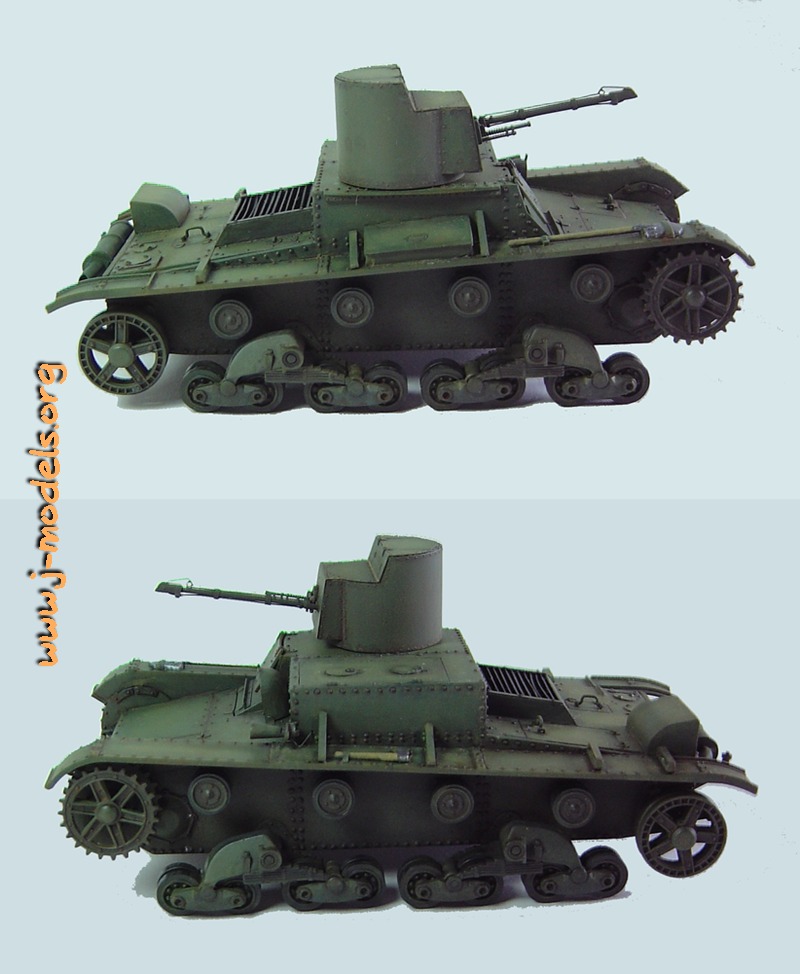
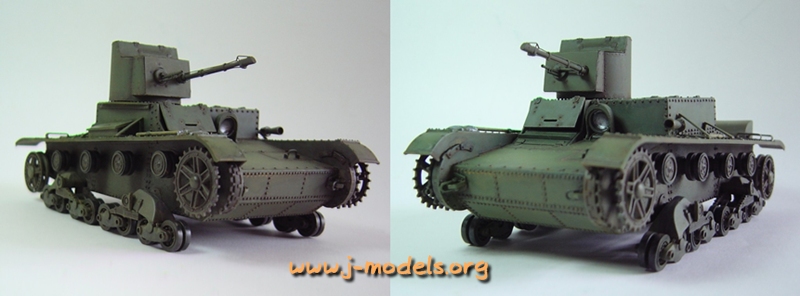
Creado a partir del carro británico Vickers E de los años 20, el carro ligero soviético T-26 se hizo famoso en toda Europa sobre todo a partir de la Guerra Civil Española. Fue fabricado hasta inicios de la Guerra Mundial en diversas variantes que diferían básicamente en la torreta y el armamento. El carro lanzallamas OT-26 (Ognemetnig Tank «carro lanzallamas») fue una derivación del T-26 Modelo 1931. Este carro poseía dos torretas armadas con ametralladoras DT de 7’62 mm., los carros de mando llevaban un cañón PS-1 de 37 mm., copia soviética del Hotchkiss francés, en lugar de una de las ametralladoras. Las modificaciones de este modelo básico para convertirlo en lanzallamas consistieron en la supresión de una de las torretas para dar cabida a un depósito interno de líquido inflamable y en la instalación en la segunda torreta de un lanzallamas manteniendo la ametralladora DT original que disparaba coaxialmente. El lanzallamas tenía capacidad para disparar hasta 70 ráfagas de 1 segundo a 35 metros. La ametralladora tenía 1.512 cartuchos de munición. La tripulación era de dos hombres. Existió también una versión de guerra química, llamada XT-26 con una configuración semejante. Aunque se fabricaron pocos ejemplares entre 1933 y 1934, algunos OT-26 tomaron parte en la guerra contra Finlandia, en Manchuria y en los primeros meses de la Segunda Guerra Mundial con escaso éxito. Sin duda el efecto de los carros lanzallamas sobre la infantería enemiga en el campo de batalla es más psicológico que real, ya que a menudo se convierten en presa fácil al ir escasamente armados y necesitar distancias de combate muy cortas para poder ser efectivos.
Designed from the British Vickers E tank of the 1920s, the Soviet T-26 light tank became famous in Europe especially at the time of the Spanish Civil War. Most Models and variants built in the 1930s were different in turret and armament. The OT-26 flamethrower tank (Ognemetnig Tank «flamethrower tank») was a version of the T-26 Model 1931. This tank sported twin turrets armed with 7.62 mm DT machine-guns (command tanks had one DT replaced by a 37 mm PS-1 gun, a Soviet copy of the French Hotchkiss gun). Modifications of this base configuration to make it a flamethrower tank were not very complicated: one of the turrets was replaced by an internal tank for flammable liquid, the second turret held the DT machine-gun and the flamethrower gun. This could fire about 70 1-second bursts up to 35 meters. The machine-gun ammunition supply consisted of 1,512 rounds.There was also a chemical tank (XT-26) with the same basic configuration. Although few tanks were built between 1933 and 1934, some of them fought in the war against Finland and in the first stages of WWII in Russia without much success. The effect of flamethrower tanks on enemy infantry in the battleground is more psychological than anything, they normally became an easy prey due to their lack of armament and armour. They also needed a close distance in combat to be effective.
HISTORIA – HISTORY:
T-26
LA MAQUETA – THE KIT
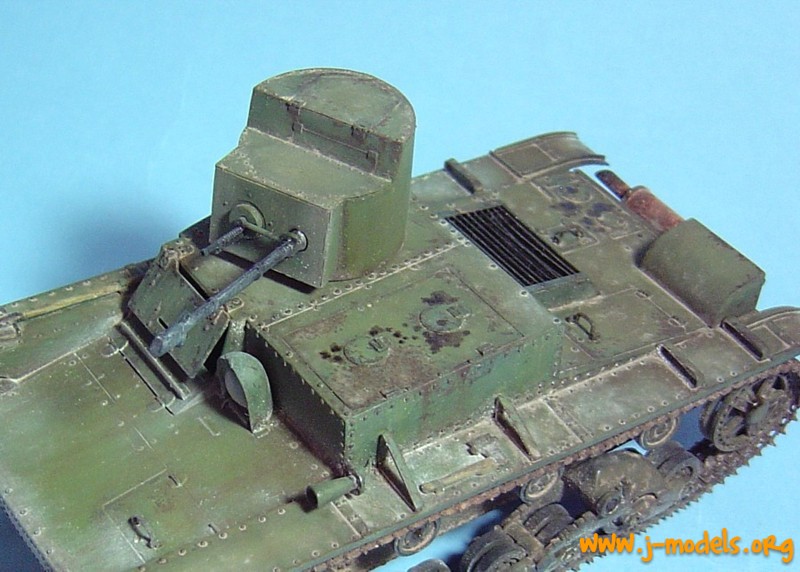
La desventaja más evidente es que Zvezda ha usado un modelo de T-26 Modelo 1933 para este carro que era una transformación del T-26A. Por ello, detalles como la ausencia de remachado en las planchas del carro o la rejilla del radiador son los errores más flagrantes que hay que subsanar si se quiere hacer una maqueta al menos similar al OT-26. En conjunto la maqueta no es mala, auque no está desde luego al nivel de otras más modernas. Además tiene pocos puntos débiles en el montaje, que no resulta complicado. Inicialmente me fue difícil saber la configuración exacta del lanzallamas, ya que en las fotos de época no se aprecia claramente la forma de la boca ni el dispositivo de disparo, por ello decidí en principio montarlo tal cual viene en la maqueta. Posteriormente, y tras haber dejado el carro aparcado durante mucho tiempo, conseguí mejor información y he podido al menos mejorarlo.
The most evident flaw in this kit is that Zvezda have used their T-26 Model 1933 for this flamethrower version which was based on the earlier T-26A. For this reason details such as the radiator grille or the lack of rivets on the hull are clear mistakes to be corrected if you want to build something at least similar to an OT-26. Overall the kit is not bad, but of course is not at today’s standards. There are minor weak points in assembly, which is by no means difficult. At first I was unable to get enough information about the exact shape and configuration of the flamethrower. Real photos were not helpful because the mouth and the shooting gear can’t be clearly seen. After a long time with the half-built model sleeping on a shelf, I got better information and could at least improve it.
MONTAJE – ASSEMBLY
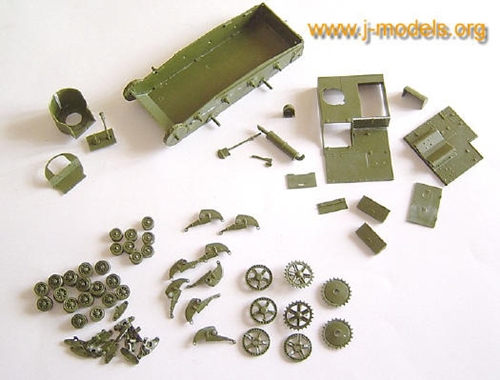
Este es el despiece básico de la maqueta a excepción de las cadenas de plástico. Lo peor del molde es que Zvezda aprovechó varias maquetas del T-26 para componer esta añadiendo únicamente el lanzallamas y el mantelete con la ametralladora DT. Por ello, hay que rectificar algunos errores y omisiones que iré comentando más abajo. Lo mejor es el tren de rodaje, que está aceptablemente detallado.
This is the basic breakup of the kit except for the length tracks. The worst thing is that Zvezda made a mishmash of different kits and versions to release this just changing the flamethrower and the mantlet with the DT machine-gun. Due to this, there are some mistakes and omissions that I will comment below. The best part is the suspension and the rubber rimmed road wheels.
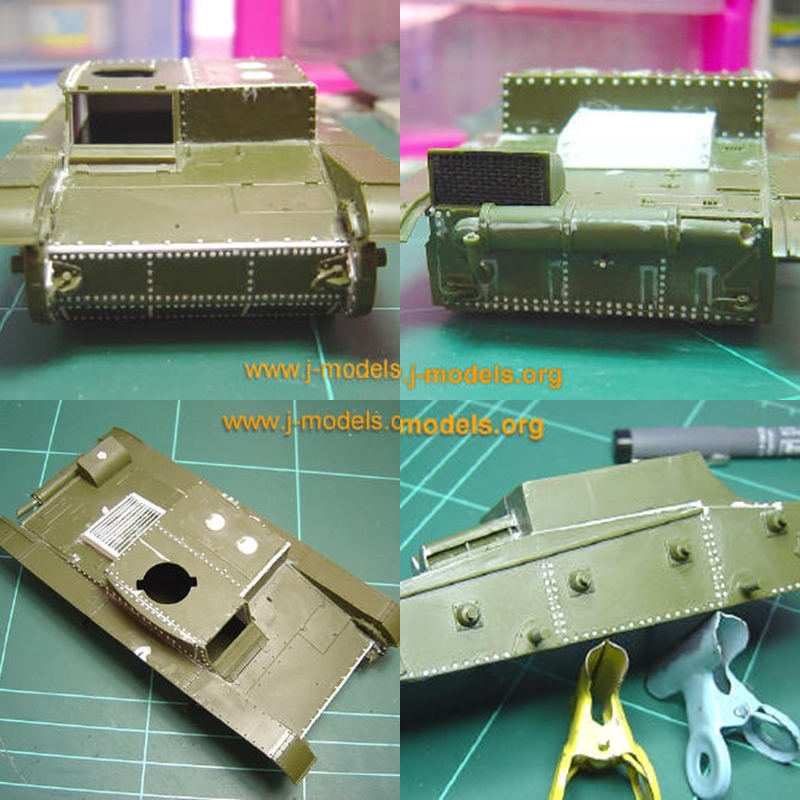 La primera tarea tras montar el chasis fue remachar casi todo el carro. Los primeros modelos del T-26 tenían las planchas del casco remachadas y no soldadas como los posteriores. Usé un sacabocados y los pegué uno a uno con pegamento de capilaridad. Así mismo en la parte posterior hay que tapar las ranuras para situar los enganches de las cadenas de arrastre que el OT-26 no tenía.
The first task consisted in adding the rivets almost all over the hull. The first T-26 models had rivetted instead of welded hulls as later variants. I used a punch and die and addded them one by one using Tamiya extra thin cement. In the rear hull the lines for the tow chain hooks have to be filled as the OT-26 didn’t carry them.
 La rejilla de ventilación del motor que viene en la maqueta es de un tipo posterior por ello hube de hacer la correcta en plástico. La rejilla trasera de ventilación fue sustituida por otra de plástico de la caja de sobras.
The later ‘butterfly’ armored cover over the intake grille included in the kit is one of the evident mistakes. I made a new early one with sheet plastic. The grille over the air exhaust vent was replaced by another one in plastic from the spare box.
 Para finalizar este largo montaje, primero cambié la tapa del depósito de combustible cuadrada (modelo posterior) por dos redondas como las de los primeros carros T-26.
To finish this long assembly, first I changed the fuel tank square hatch (late model) by two round ones which were carried by the first T-26 models.
 Luego detallé el cañón del lanzallamas dándole forma con cuidado (estaba ya pegado a la torre) y añadiendo remaches y cables del sistema de disparo. Lo último fue pegar las herramientas, el faro y la bocina.
Then I detailed the flamethrower gun as much as I could. I sanded it carefully (it was already glued to the turret) and added rivets, screws and wires. The last step was adding the tools, headlight and horn.
PINTURA – PAINTING
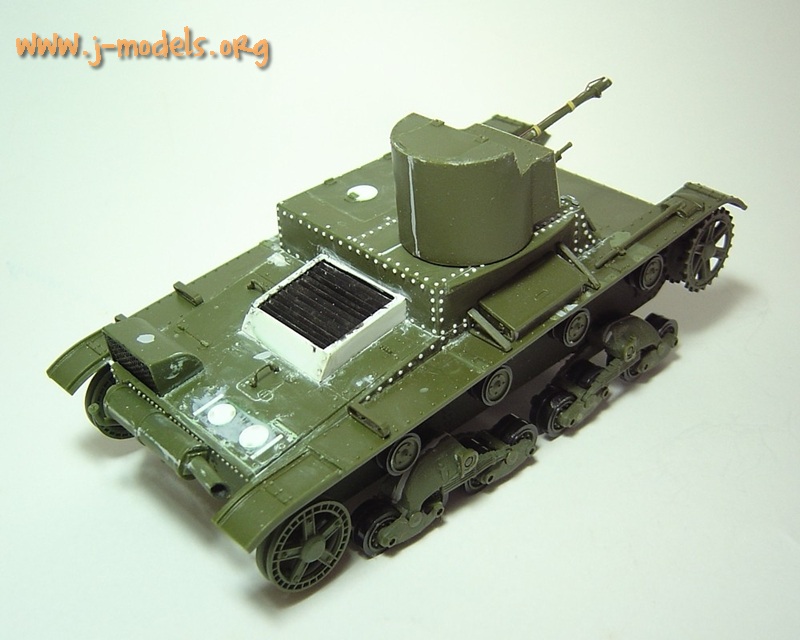
 El modelo tras terminar los filtros y lavados. Para la capa base empleé una combinación de XF-5 y XF-70 de Tamiya en proporción 2:1. Luego realicé dos subidas de luz por paneles añadiendo XF-60 a la mezcla.
The model after finishing the filters and washes. I used a mixture of Tamiya XF-5 and XF-70 (proportion 2:1). Then I lightened the different hatches, planks and fenders adding XF-60 to the base paint in two layers.
 Hubo tiempo de que secase la pintura base al estar los días lluviosos. Lo siguiente fue aplicar filtros de Humbrol, hasta cinco capas según zonas. La parte inferior con tonos más azulados y marrones oscuros, la superior con verdes y ocres. Para los lavados empleé la usual mezcla de óleos sombra natural y siena tostado.
There was time to let the base paint dry as the weather was rainy. In the next step I used Humbrol paints for the filters. I applied up to five layers. The running gear area was filtered in blue and dark brown colours, the rest of the model with greens and ochres. I used oils for washes, the usual mixture of raw umber and burnt sienna.
 Fase de óleos con disolvente de Humbrol. Colores más claros (amarillo, blanco, ocre claro) en el centro de los paneles superiores, colores más oscuros (verde oscuro, marrones, rojos) para las zonas externas. La parte inferior lleva más combinación de colores oscuros, incluso negro. Todo en poca cantidad, sin empastar, para que corra el óleo y se mezcle bien. Si uno se queda corto, siempre se puede insistir en alguna zona posteriormente.
Oil process with Humbrol thinner. Lighter colours (yellow, white, light ochre) in the middle of upper sections, darker ones (dark green, brown and red) for the outer sections of panels. The running gear had a mixture of darker shades, even black. All colours were given in small quantities so that oils can be mixed well. If you fall short in some areas you can always insist on them.
 ↑Tras óleos.
After oils.↓

 Dado que no tengo aún destreza para los desconchones, decidí centrarme preferentemente en la zona de los depósitos de combustible, intentando imitar la pintura saltada y oxidada en pequeños puntos, que hice con color rojizo de Vallejo y un pincel muy fino. Hice también algunos otros en algunas zonas prefiriendo siempre quedarme corto.
As I have no special skill for general chippings yet, I focused on the big fuel tank hatch, trying to show paint chips and old rusty dots, which I painted in Vallejo dark red and a thin brush. I made some other chips here and there always falling short.
 Antes de dar pigmentos de manera general, terminé definitivamente el montaje añadiendo las cadenas, el cristal del faro (acetato), pinté las herramientas y el armamento. Las cadenas de Friulmodel llevan una base de negro de Tamiya y lavados sucesivos en colores marrones de Vallejo. Las terminé con una capa de pigmento Track brown de Mig. Al tubo de escape y su silenciador, previamente pintados en marrón rojizo de Vallejo, les apliqué diversos tonos óxido de Mig Productions. Los efectos finales se hacen con un trozo de gomaespuma manchada en pigmento y con negro humo para el escape.
Before using pigments, I finished the assembly definetely building the tracks, the headlight lense (acetat), I painted the tools and the weapons. The Friulmodel tracks were first coated in Tamiya black, then I applied some washes in Vallejo brown and reddish colours. Finally I added a layer of Mig Track brown. The exhaust and silencer were primed in Vallejo red brown and later applied a few layers of rust pigments. Final effects were given with a piece of foam and black smoke pigment for the tip of the exhaust.

 En lugar de aplicar un preempolvado con color, decidí probar con una fina capa muy diluida de barniz mate. Los pigmentos de colores más atrevidos (African earth mezclado con rubbel dust o dry mud) se reservan para el tren de rodaje, los más neutros, como rubbel dust para la parte superior. Se atenúa la diferente tonalidad con varias capas de light dust, insistiendo más en algunas zonas. Las diversas capas se van aglutinando con fijador de pigmentos. Termino dando intensidad al polvo en algunas zonas. El toque final lo dan algunas manchas de grasa y combustible frescos de óleo color asfalto.
Instead of getting a matt surface with a dust colour, I decided to airbrush a thin layer of matt varnish. Redder and brighter colours (mixture of African earth and rubbel dust or dry mud) were applied to the running gear, the rest of the model had a few layers of more neutral colours, like rubbel dust. Different shades are toned down with a final layer of light dust. Different layers were mixed with pigment fixer. I finished this stage by applying more dust on some particular spots without fixer. Final touches were given with a few fuel and grease stains painted with bitumen oil paint.
 La escena, situada en Khalkin Gol en junio de 1939 y llamada eikō («gloria» en japonés, gracias a Juanjo en Yokohama por ayudarme con el tema), la planteé de esta manera tan sosa. La figura de la izquierda es el oficial de la inmemorial caja de Tamiya con una cabeza de Hornet, manos de Verlinden y un brazo modificado con masilla de dos componentes. La figura del abanderado es de Masterbox. A esta hube de hacerle cirugía mayor para modificar la posición del tronco. Igualmente lleva cabeza de Hornet y manos de Verlinden. Aquí el brazo está aún por modelar.
The scene, located in Khalkin Gol in June 1939 and called eikō (Japanese for «glory», thanks to Juanjo in Yokohama for helping me with the issue), was firstly planned this way. The figure on the left is the old Tamiya officer with a Hornet head, Verlinden hands and a new arm made with putty. The flag-bearer is a Masterbox figure. This needed heavy modification to correct the position of the trunk. It also has a Hornet head and Verlinden hands. Here the arm is still to be modelled.
 La siguiente idea, que me pareció definitiva, fue esta: más figuras para el contraataque victorioso. La única modificación de alguna importancia se la hice a la figura del tirador, al que alargué las mangas del uniforme tropical.
My next intention, which seemed to settle the question, was this: more figures for a victorious counterattack. The only modification was made to the shooter, I lengthened the sleeves of his tropical uniform.
 Finalmente, me decidí por esta única figura tras replantearme la escena.
Finally and on second thoughts, I decided to use this only figure.
 Cara y manos pintadas con acrílicos Vallejo. El color del casco sigue una lámina de un libro de Osprey sobre uniformes japoneses.
Face and hands painted with Vallejo acrylics. The helmet colour follows an illustration in an Ospery book about Japanese uniforms.
 Medio tronco terminado, a falta de retoques.
Half finished from waist above, just needing a few extra touches here and there.
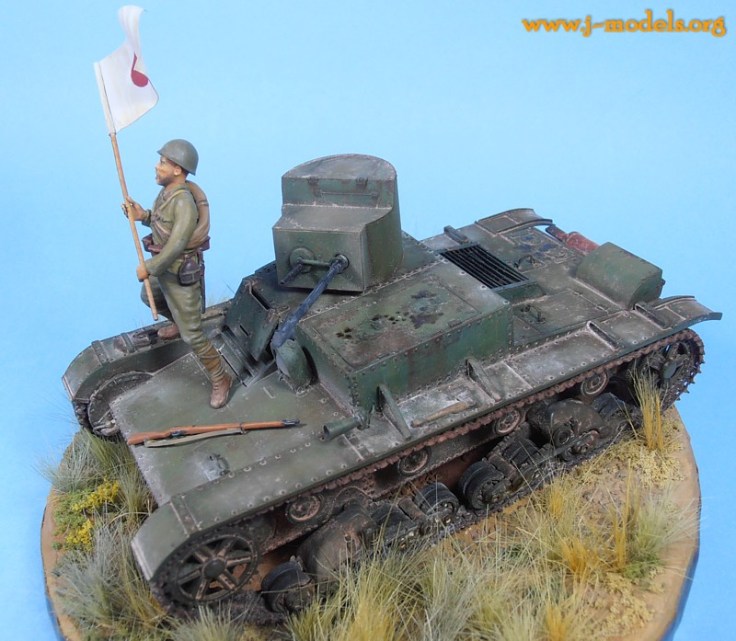
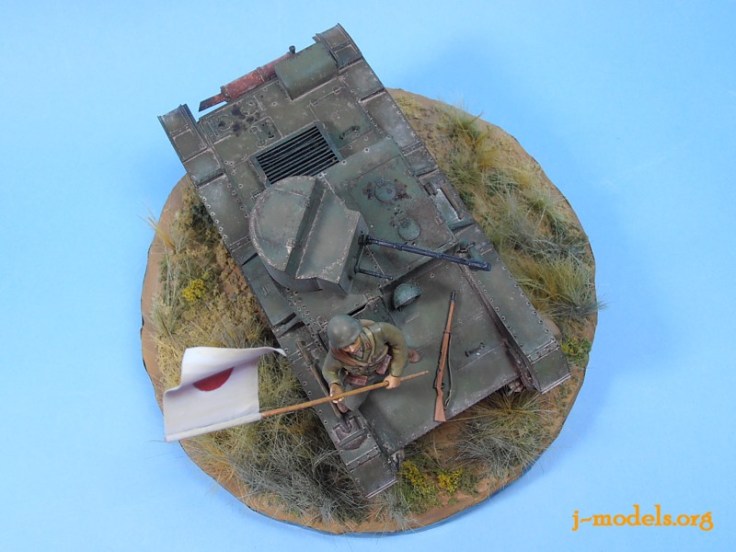
 Figura terminada.
Finished figure.
 Base terminada. Como colores base empleé diversos tonos terrosos de Tamiya (XF-52, XF-59 y XF-60), aplicando los más claros en la zona superior y más oscuros en la inferior para ayudar a dar más sensación de desnivel. Tras aplicar luces y sombras, procedí con el mismo criterio con aguadas de Vallejo en diversos tonos terrosos, rojizos y amarillentos. Toda la vegetación, compuesta de césped, hierbas, pequeños arbustos y flores, es de Woodland Scenics. La zona central que ocupará el carro se pintó también con colores de Tamiya y se simuló alguna vegetación con fibras naturales de estropajo.
Finished base. I used Tamiya earth colors (XF-52, XF-59 and XF-60) as a base coat, airbrushing the clear colors on the top area of the scene and the darker ones on the bottom, this way I tried to increase the unevenness of the terrain. After applying lights and shadows to these colors, I used Vallejo acrylics for washes with that same idea. All the vegetation, lawn, grass, small bushes and flowers is made by Woodland Scenics. The central area, where the model is set, was painted with darker shades to simulate shadows. Some vegetation was added with fibres from a grass scourer.
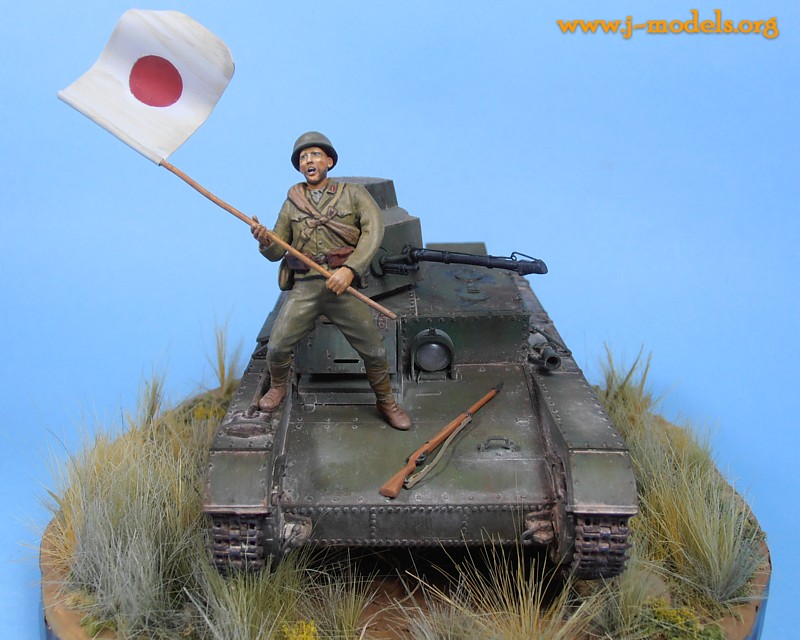
 Termino esta escena con la bandera, fabricada con lámina de estaño y cobre, que pinté con acrílicos de Tamiya y Vallejo. Al fusil Tipo 38 (Arisaka) le hice la correa porta fusil con cinta de Tamiya y dos minúsculos pasadores con hilo de cobre.
I finished this scene adding the flag, made with tin sheet and a copper wire. It was painted with Tamiya and Vallejo acrylics. The Type 38 (Arisaka) rifle was added a sling, made with Tamiya masking tape, and a couple of thin wire swivels to engage it.
ANAQUEL
Vehículos / AFVs


Debe estar conectado para enviar un comentario.