
De un vistazo – Quick look
MATERIAL Y PIEZAS
MEDIA & PARTS:
- Plástico inyectado. 68 piezas (incluidas 17 piezas transparentes).
- Injected moulded styrene. 68 parts (including 17 clear parts).
CALCAS – DECALS:
- Hoja con escarapelas, numerales y símbolos de unidad. Finas, colores correctos, muy brillantes.
- Sheet containing French markings, codes and unit symbols. Thin, fine colours but very shiny.
OPCIONES – OPTIONS:
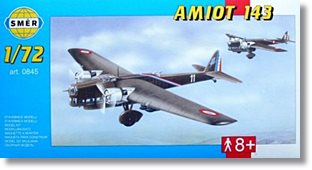
- Amiot 143 Nº 78, 3ª Escuadrilla GB II/35. Francia 1937-38.
- Amiot 143 Nº 12, 4ª Escuadrilla GB II/22. Chartres (Francia) 1937.
- Amiot 143 No. 78, 3rd Squadron GB II/35. France 1937-38.
- Amiot 134 no. 12, 4th Squadron GB II/22. Chartres (France) 1937.
INSTRUCCIONES – INSTRUCTIONS:
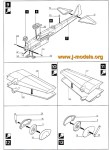
- Folleto doblado de 6 páginas. Incluye resumen histórico-técnico multilingüe, 15 pasos de montaje y guía de pintura y calcas. Colores de la gama de Humbrol.
- 6-page folded sheet showing historical and technical data in three languages, 15 assembly steps and painting and decaling guide. Colour reference in the Humbrol range.
LO MEJOR – THE BEST:
- Tema poco usual. Montaje de caja no demasiado complicado.
- Unusual topic. Not too difficult OOB assembly.
LO PEOR – THE WORST:
- Interior vacío. Remachado en relieve.
- Empty interior. Raised rivetted surfaces.
VALORACIÓN – CONCLUSION:
- Necesita trabajo, especialmente en el interior. Para modelistas con al menos cierta experiencia.
- You’ll need some work to get a very nice model out of this kit. Recommended to modellers with at least some experience.

Esta es una de esas maquetas que sólo se pueden montar de dos formas: directamente de caja sin preocuparse de nada más que de lo imprescindible para que quede correctamente montada y pintada, o poniéndose el traje de faena y entrando a saco. De la primera forma, sólo conseguiremos un modelo decente al que se le notarán los años, una caja de cerillas de colección vacía por dentro, pero no una maqueta sobresaliente. De la segunda, un modelo mucho más cercano al referente real, mejor detallado, le habremos sacado más partido quizá sólo para comprobar que, después de todo el trabajo, el avión (y eso no es culpa del fabricante) sigue siendo tan feo como al principio, sólo que mejor realizado. Obviamente no quiero desanimar a quien tenga cierto interés por esta maqueta, pero debe tener claro que si la adquiere, como otras, pensando en hacerla algún día, probablemente nunca la hará. Debe tener una motivación algo más especial, como, por ejemplo, la nostalgia de las maquetas de otros tiempos o mucha afición por los aviones de época poco comunes. De hecho, yo la conseguí de segunda mano, probablemente por los motivos que menciono.
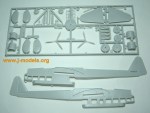
La maqueta se compone en realidad de dos bastidores (uno de ellos, el de las piezas transparentes). Las enormes alas vienen despiezadas en mitades, así como el fuselaje. Todas estas piezas no traen bastidor alguno debido a sus dimensiones. La edición de mi maqueta (como todas, procede de Heller) debe ser algo más reciente, pues no contiene la base transparente que llevaban las anteriores y la hoja de calcas da para dos versiones. El plástico es el típico del fabricante: más bien grueso, más bien duro y con algunas rebabas en los bordes de las alas que se pueden eliminar con facilidad. Por suerte no hay marcas de eyector visibles, sólo algunas muy ligeras en el interior también fáciles de rellenar. El panelado de todo el avión está hecho a base de remaches positivos que por mis escasas referencias, no puedo decir si son correctos o no. Del interior poco hay que señalar porque no existe. Según las instrucciones lo único que hay que hacer es pegar las ventanas por el lado de dentro de la barquilla (el término no es adecuado, pero es que la forma de estos aviones recuerda a la de un dirigible), montar la torreta dorsal y de proa, y cerrar el fuselaje. Para las torretas hay ametralladoras muy pobres y desde luego nada semejantes a las que llevaron al menos algunos modelos, que eran dobles con tambor de munición redondo. El transparente de la carlinga está fabricado en dos mitades, con lo cual hay que extremar las precauciones al pegarlo.
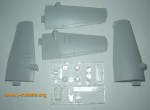
Una vez hemos dejado atrás el vacío de la nada interior, en el exterior encontramos dos gruesas alas con góndolas más que discutibles, pero creo que aprovechables. Al contrario que las mitades del fuselaje, las alas no llevan agujeros de alineación. Las uniones con el fuselaje a buen seguro darán problemas porque reflejan las hechuras de hace 30 años. Hay que introducirlas en el fuselaje y encajan con un poquito de holgura. El despiece de los motores es igualmente simple, cada capó viene en dos piezas que quizá haya que afinar por dentro para dar cabida al disco central donde se sujeta cada hélice. El disco tiene más diámetro del necesario ya que en fotos de época pueden apreciarse gran parte de los motores Mistral tras ellos, de modo que esta zona también tiene trabajo, aunque desde luego no es la peor de todas. Los estabilizadores vienen de una pieza y creo que su grosor es aceptable. También es una suerte que los Amiot no tuviesen pozos para el tren de aterrizaje, porque a saber lo que podríamos encontrarnos (o más bien lo contrario) en una maqueta como esta. El tren me parece también aceptable, sólo hay que tener la precaución de pegar los soportes correctamente alineados. Como complemento externo, se nos ofrecen cuatro bombas pendientes de sus soportes, muy simplificados, pero ahí están.
Las instrucciones consisten en un folleto doblado de 6 páginas. Muestran 15 pasos principales de montaje en diagramas bastante claros. La última hoja muestra una de las versiones de pintura, la otra aparece en el reverso de la caja. La primera muestra un aparato pintado de caqui y negro con motores en color aluminio, mientras la segunda nos ofrece una decoración monocroma en color chocolate con motores y góndolas en aluminio, típica del Armée de l’Air a finales de los años 30. Todos los colores aparecen en referencias de Humbrol. Para el interior no hay ninguno. Las calcas están muy bien impresas, con colores realmente buenos aunque demasiado brillantes.
No es esta una maqueta para principiantes, desde luego, y para sacarle partido ha de hacerse un trabajo realmente fino. Si se consigue esto último, no hay duda que la maqueta será un jalón curioso en cualquier vitrina, pues no pasa desapercibida.◊


This is one of those kit which you just have two ways to face: either straight from the box not worrying much about extra details but just trying to get a decent assembly and painting, or setting to work seriously on it, improving every detail you can. In the first way, you’ll probably get only a nice old model, much in the style of 30 years ago or so, a beautiful but empty collectable matchbox, but not an outstanding model. If you choose the second path, your model will be much alike the real referent, improved, better detailed but after all the work you will check how the model (and this is not the manufacturer’s fault) is almost as ugly as it was inside the box. I don’t want to let down those with a real interest in this kit. One thing is sure: if you get it just to build it some day, you won’t even start it. You need a further motivation, something special, for example a feeling of nostalgia for old kits or being really fond of unusual aircraft from the golden era of aviation. In fact, I got my second-hand kit for these two reasons, I suppose.
The kit comprises two sprues really, one of them has the clear parts. The big wings and fuselage come in loose halves inside the box, I think this is due to their size. My kit’s edition seems more recent than others I have seen, anyway all of them are reboxes of the original Heller kit dated back in the sixties. Other editions have a clear base stand and only one decal choice. Plastic is typical of the Czech brand, a bit on the thick and hard side. There is some flash only in the wing leading edges that can be easily trimmed and sanded. Luckily there are no ejector marks on visible spots, only some slight sink marks on the cockpit sides that won’t really give you a lot of trouble. Panel lines consist of rows and rows of raised rivets. Due to my poor references and pics about this bomber I can’t tell whether they are correct or not. There isn’t much to say about the large cockpit simply because there is nothing inside it, it’s just a hollow nutshell. According to the instructions, you just have to glue the windows inside, assemble the front and dorsal turrets and join the fuselage halves. Machine-guns are single mounts and look really poor. It seems at least some Amiot 143s carried double mounts in all their gun stations. Closing all this emptiness you have a clear canopy in two halves, so be careful when gluing them.
Wings have engine cowling fronts moulded on and unlike the fuselage sides, they don’t include location pins. I don’t think fitting is good here and you’ll need to fill and sand the edges endangering the rivetted surfaces. Engine cowlings come in two halves which seem a bit thick to hold the front engine disc where propellers are glued. This disc diameter also looks bigger than it should be. Some pics of the time show these discs were smaller and part of the Mistral engines were shown behind them, so this is another area to be refined and corrected. Horizontal tail surfaces are moulded as one part each, I think dimensions are OK and can be used straight from the sprue. Landing gear (struts and spatted wheels) also seem acceptable, you only have to be careful with alignment. It could be judicious to leave this assembly for the last moment, even after painting and weathering the kit. As a complement we have underwing bomb shackles and four bombs which at least look like the ones used in the 1930s.
Instructions consist of a leaflet folded in 6 pages. They show 15 main assembly steps in clear diagrams. The last page shows one of the painting choices, the other is on the back of the box. The first one is for an Amiot with khaki over black and engine cowlings in silver, while the second is for an overall chocolate brown Amiot again with silver cowlings and gondolas which was typical of the Armée de l’Air at the end of the 1930s. All paints are given in the Humbrol range, but there is no reference for the cockpit colour. Decals are well printed in nice colours but too shiny. They include big roundels, numerals and unit emblems for both versions.
This is not a kit for beginners and to get an outstanding model you need patience and some of your best modelling skills. If you achieve a great model, it will surely be one of the most amazing kits on your shelf.◊
Actualizado – Updated: 4 / 2022
Actualizado – Updated: 5 / 2017
Publicado – Published: 3 / 200
©www.jmodels.net


Debe estar conectado para enviar un comentario.