
De un vistazo – Quick look
MATERIAL Y PIEZAS
MEDIA & PARTS:
- Plástico inyectado (82 piezas), plástico transparente (12 piezas), fotograbado (41 piezas).
- Injected plastic (82 parts), clear plastic (12 parts), PE (41 parts).
CALCAS – DECALS:
- Impresas por Decograph. Estrellas soviéticas, numeral y algunos estarcidos. Finas y bien impresas.
- Printed by Decograph. Soviet stars, number and stencils. Thin and well printed.
OPCIONES – OPTIONS:
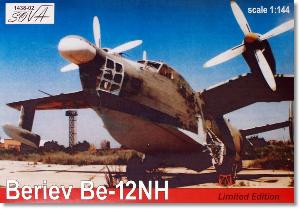
- Beriev Be-12NH. 96 amarillo. 1992.
- Beriev Be-12NH. Yellow 96. 1992.
INSTRUCCIONES – INSTRUCTIONS:
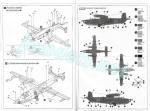
- Folleto A4 de 8 páginas impreso en blanco y negro. Contiene una breve referencia histórica, un plano numerado de piezas, 21 pasos de montaje y perfiles con referencias de pintura de esmaltes de Humbrol.
- 8-page A4 brochure printed in black and white. It shows a short historical reference, a numbered parts plan, 21 assembly steps and profiles with paint references from Humbrol enamels.
LO MEJOR – THE BEST:
- Bien detallada en general para la escala.
- Oveall nicely detailed for this scale.
LO PEOR – THE WORST:
- Fotograbados microscópicos difíciles de manipular. Instrucciones (ver texto).
- Microscopic PE pieces will be difficult to handle. Instructions (see text).
VALORACIÓN – CONCLUSION:
- La más accesible a la escala. El montaje no debe ser tan sencillo como aparenta. Indicada para modelistas con experiencia.
- This is the most accesible kit at the scale. Assembly must not be so easy as size points out. Suitable for experienced modellers.

La maqueta
Este gran hidroavión ruso está representado en maquetas a escala 1/72 y 1/144. En la escala más grande parece que la mejor es la de ModelSvit, mientras que en la pequeña, la más accesible es esta de Amodel. Hay varias alternativas tanto en plástico como en resina, pero estas dos son las más populares hoy. Desconocía el fabricante Sova, que ahora debe ser Sova-M, imagino, hasta que vi en la maqueta el logotipo y nombre de Amodel. Sin duda la compañía debe ser una filial de la marca ucraniana.
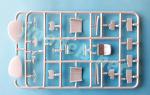
Esta maqueta multimedia ha conocido ya varias ediciones con otras versiones del avión, como el Be-12P (contraincendios), o el Be-12PS (SAR). En este caso la versión es de transporte, aunque esto no es seguro porque no he encontrado información de valor sobre el modelo. La caja trae cinco bastidores de piezas grises, un bastidor transparente, una plancha de fotograbados, la hoja de calcas y las instrucciones.
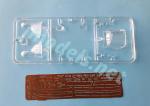
Las piezas están bien moldeadas en un plástico algo rígido. No hay imperfecciones aparte de algunos leves restos de plástico en los bordes de determinadas piezas. Algunas presentan un poco de grosor, pero en general muestran buena definición. Los paneles en las alas y el fuselaje aparecen bien grabados en tamaño y profundidad para esta escala. Las piezas transparentes son algo gruesas, tampoco mucho, y tienen cierta distorsión, hecho que no parece demasiado relevante a este tamaño. La maqueta está complementada con una plancha de fotograbados cuyas minúsculas piezas nos lo van a poner difícil al manipularlas y pegarlas.
Carlinga
Ya es algo que la maqueta posea una mínima carlinga porque no todas las maquetas a esta escala la tienen. A mí me gusta que la traigan, por mucho que no se vea. El interior consta de un suelo unido a un mamparo trasero, dos asientos con reposacabezas y un panel de instrumentos moldeado con la consola central. Naturalmente, el panel y la consola carecen de instrumentos.
Las instrucciones indican que la cubierta acristalada debe pegarse directamente sobre la carlinga. En un paso posterior el bloque se introduce en el fuselaje cuando está ya cerrado. Ante las dudas, y yo las tengo, habrá que hacer pruebas, pero lo cierto es que los lados internos del fuselaje vienen planos y no tienen relieve para pegar el suelo.
Fuselaje
Las mitades del fuselaje carecen del morro y muestran huecos para el tren de aterrizaje, varios paneles inferiores, el tren de aterrizaje auxiliar, además de las alas y cola. Antes de cerrar el fuselaje hay que incluir las ventanillas y los pozos de las ruedas, que vienen detallados por dentro con poca definición. También hay que pegar el soporte de la rueda de cola, que comento más abajo.
En la cara exterior el panelado es fino y convincente. El prominente morro acristalado está dividido en mitades con los paneles grabados en líneas muy finas. El largo sensor de cola está dividido en dos mitades huecas con la punta separada. Tanto en la parte superior del fuselaje, como en la zona ventral de cola hay que añadir numerosos fotograbados que simulan antenas, radares y otros dispositivos. Como decía, las piezas son diminutas y no será sencillo colocarlas. También hay una pequeña cúpula transparente en la zona dorsal y algunas piezas transparentes más en la ventral. Los lados del fuselaje está provistos de aletas alargadas de fotograbado, así como de un pequeño carenado en el lado diestro.
Alas, cola y motores
Las alas están separadas en dos mitades inferiores y una superior. El diedro me parece adecuado, grado arriba o abajo, para el tamaño y no creo que se note mucho cualquier diferencia en uno u otro sentido. Los paneles están bien grabados y, salvo alguna excepción que debe repasarse, muestra nitidez y solvencia en la separación de alerones y flaps. También están marcados multitud de accesos y registros en ambas caras.
Los bordes de ataque están detallados con sendas tubos Pitot que debe fabricar el modelista. Los flotadores están divididos en mitades con el soporte moldeado en uno de ellos. Los paneles, escasos, están bien grabados. Los flotadores tienen pequeños vástagos de unión y la posición bien señalada bajo las alas.
Las alas van pegadas sobre el hueco dorsal del fuselaje. No es improbable que haya desajustes que deban corregirse con lija y masilla.
Los estabilizadores están unidos al puro de cola en una sola pieza. El panelado es bueno, pero poco nítido en las aletas de los timones. Las aletas verticales y los timones vienen unidos en la misma pieza. Las líneas grabadas tienen menos nitidez que en las alas y el fuselaje, y también son más finas y tenues. Los vástagos para pegar las aletas a los estabilizadores son demasiado cortos y darán poca firmeza a la unión, por ello conviene sustituirlos.
Las góndolas de los motores están separadas en mitades con el carenado de cola aparte y bien perfilado. Entre las mitades hay que pagar un cilindro unido al borde de la toma, que es fino y está bien perfilado. Hay otras dos piezas aparte para asentar las góndolas sobre las alas. Una de ellas va pegada sobre el borde de ataque y la otra coincide con el borde de salida. De alguna manera estas piezas salvan el perfil curvo de las superficies de las alas, permitiendo colocar los motores con la elevación adecuada.
Las hélices y los bujes son finos y están bien perfilados. Los bujes van unidos a un tope trasero moldeado con un eje que a su vez hay que insertar en un cilindro para introducirlo en los motores.
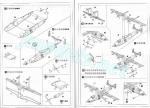
Tren de aterrizaje
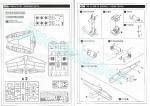
Si las otras fases del montaje no ofrecen problemas para seguirlas en las instrucciones, la construcción del tren de aterrizaje debe estudiarse bien porque las imágenes son demasiado pequeñas. Esencialmente me refiero al ensamblaje de retracción de las tapas, compuesto de varias piezas, incluidas algunas de fotograbado. Los actuadores de las patas son delicados al ser tan finos. Las patas son cortas y muestran cierto detalle en la amortiguación. Las ruedas vienen en mitades con los bujes externos bien perfilados, pero los internos no tienen los huecos para pegar las ruedas bien moldeados y dejan holgura.
El tren auxiliar dispone de dos piezas que simulan secciones de la pata con mala definición. Ambas van unidas a los lados internos del fuselaje en cuatro puntos. De manera insólita, la rueda de cola está reproducida sin un sector del neumático. Este viene moldeado en medio de la horquilla de la pata. Al pegar ambas piezas debe parecer que la rueda está insertada en la horquilla. La rueda me parece un poco grande y el neumático muy gordo.
Calcas
La hoja está impresa por Decograph e incluye estrellas soviéticas, un solo numeral y algunos estarcidos. Son finas y parecen bien impresas.
Instrucciones
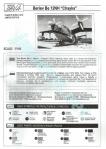
El folleto tiene tamaño A4 y consta de ocho páginas impresas en blanco y negro. Contiene una breve referencia histórica, un plano numerado de piezas, 21 pasos de montaje y perfiles con referencias de pintura de esmaltes de Humbrol. Como he indicado, el montaje del tren de aterrizaje debe estudiarse detenidamente y contrastarlo con referencias. Los perfiles no tienen mucha utilidad porque las ilustraciones no son nítidas para contrastar detalles del montaje aunque acaso pueden emplearse para pintar.
Valoración
Esta es una maqueta multimedia con todas las de la ley y su tamaño no debe confundirnos. Esto implica un cierto grado de destreza con este tipo de ediciones, especialmente a la hora de pegar todos y cada uno de las 41 piezas de fotograbado de tamaño microbio que tiene. No dudo que alguien lo haya intentado, lo que dudo es que lo haya conseguido. No quiero desanimar al modelista interesado en esta avión, pero tampoco obviar el hecho de que tendrá que trabajar algunas partes. Es más, si la única versión de las instrucciones no le convence, hay calcas en el mercado de reemplazo que podrían darle un toque diferente.◊


The kit
This large Russian seaplane is rendered both in 1/72 and 1/144 scale kits. On the largest scale it seems that the best offer is the ModelSvit kit, while on the small scale, the most available are Amodel kits. There are several alternatives in both plastic and resin, but these two are the most popular today. I did not know the manufacturer Sova, which I suppose now must be Sova-M, until I saw the Amodel logo on one of the sprues. Maybe the company is a branch of the Ukrainian brand.
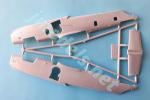
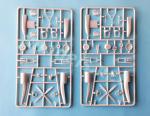
This multimedia kit has already known several releases with other versions of the seaplane, such as the Be-12P (firefighting), or the Be-12PS (SAR). This seems to be a transport variant, although this is not certain because I have not found much information about it. The box comes with five sprues of gray pieces, one clear sprue, a photo-etched fret, the decal sheet and the instructions.
The pieces are well molded in a rather stiff plastic. There are no blemishes other than some slight flash around the edges of some pieces. Some parts are a bit thick, but generally show good definition. The panels on the wings and fuselage look correctly engraved in size and depth for this scale. The clear pieces are also a bit thick, not too much either, and they show some distortion, a fact that does not seem too relevant at this size. The kit is provided with a photo-etched fret showing tiny pieces that will be difficult to handle and attach to the model.
Cockpit
It is already a nice asset that the kit at least has a minimal cockpit because it is not something we can take always for granted at this scale. I think 1/144 aircraft kits should always have it, even though it is not seen. The cocpit consists of a floor attached to a rear bulkhead, two seats with headrests, and an instrument panel molded with a center console. Of course, the panel and console are flat and empty.
The instructions indicate that the canopy should be glued right onto the cockpit. In a later step, the subassembly is inserted into the fuselage when this is already closed. A test-fit is necessary to check this, but the truth is that the internal fuselage sides are flat and have no raised lines to place the cockpit.
Fuselage
The fuselage halves are molded without the nose and show gaps for the landing gear, several ventral panels, the tailwheel well, in addition to the wings and tail. Before closing the fuselage, you need to include the windows and the main wheel wells, which show little definition inside. You also have to glue the tail wheel strut, but I will refer to it below.
On the outside, panel lines are thin and have a convincing apperance. The prominent glazed nose is divided in halves with the panels engraved with very thin lines. The long tail sensor is divided in two hollow halves with the tip apart. There is a good bunch of photo-etched parts to be added on the cockpit, nose, upper fuselage and fuselage cone. These render aerials, radars and other devices. As said, the pieces are tiny and it will not be easy to place them. There is also a small clear dome on the dorsal area and some more clear pieces on the ventral side. The fuselage sides are provided with long photo-etched fins, as well as a small fairing on the right fuselage half.
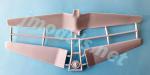
Wings, tail and engines
The wings are molded in two lower and one upper halves. The dihedral looks correct for the kit size, degree up or down, and I don’t think a small difference could be noticeable. Panels are mostly nicely engraved with just one or two exceptions that should be checked. Lines look sharp and clean on ailerons and flaps. Both sides show lots of accesses and registers.
The leading edges are detailed with a couple of Pitot tubes that the modeller is supposed to make. The floats come in halves with the support strut molded on one of them. The panels, sparse, are well engraved. The floats are attached to the wings by means of small pins and the holes are clearly molded on wing surfaces.
The wings are attached to the dorsal fuselage gap. Most probably there will be misalignments that need to be corrected with sandpaper and putty.
Stabilizers are molded with the tail cone in one piece. Panel lines are fine, but not very clear on the trim tabs. The vertical fins and the rudders come together in the same piece. The etched lines are less sharp and thinner than on the wings and fuselage. The pins to glue the fins to the stabilizers are too short and will not provide a good joint, so they should be replaced.
The engine nacelles are separated in halves with the tail fairing separate and nicely shaped. Between the halves you have to insert a cylinder attached to the intake rim, which is thin and correctly outlined. There are two other separate pieces to set the nacelles on the wings. One of them is attached to the leading edge and the other matches the trailing edge. Somehow these pieces avoid the rounded profile of wing surfaces, allowing the engines to be placed.
The propellers and hubs are thin and nicely shaped. The hubs are attached to a rear piece molded with an axle. This is inserted into a cylinder and then into the engine.
Undercarriage
While assembly steps are mostly clear on the instructions, the landing gear construction should be studied thoroughly because the images are too small. Essentially I am referring to the assembly of the wheel covers comprising several parts, including some photo-etched pieces. The folding arms are too thin and delicate. The legs are short and show the oleo struts. The wheels come in halves with nice outer hubs, but the holes to insert the wheels are badly opened on the other side.
The tail landing gear includes two pieces that simulate sections of the leg that show poor definition. Both are attached to the inner fuselage sides. In a rather unusual way, the tail wheel is molded without a sector of the tire. This is molded in the middle of the leg fork. When gluing both pieces together it should look like the wheel is inserted into the fork. The wheel seems a bit large and the tire is very thick.
Decals
The sheet is printed by Decograph and includes Soviet stars, a single number, and some stencils. They are thin and look well printed.
Instructions
The brochure consists of eight A4 pages printed in black and white. It contains a short historical summary about the seaplane, a numbered parts plan, 21 assembly steps and profiles with Humbrol enamel paint references. As noted, the landing gear assembly should be carefully studied and checked with references. The profiles are not very useful because illustrations are not clear to see assembly details, although I think they can be used for painting.
Conclusion
This is a multimedia kit and scale and size should not mislead us. Experience with short runs and some skiil are quite necessary, especially when it comes to gluing each and every one of the 41 microbe-sized PE pieces it has. Some may have tried to attach them all, but I am not sure if they succeeded. I don’t want to discourage the modeller interested in this aircraft, but some refinement work will be unavoidable. If the single decal version of the instructions does not look appealing, there are replacement decals on the market to give the kit a different touch.◊
Publicado – Published: 1 / 2023
©www.jmodels.net

Debe estar conectado para enviar un comentario.