

De un vistazo – Quick look
MATERIAL Y PIEZAS
MEDIA & PARTS:
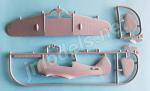
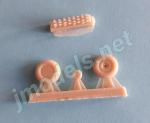
- Plástico inyectado (52 piezas), plástico transparente (4 piezas), resina (4 piezas).
- Injected plastic (52 parts), clear plastic (4 parts), resin (4 parts).
CALCAS – DECALS:
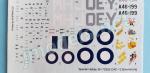
- Impresas por Aviprint. Insignias australianas, matrículas, códigos, emblemas personales y gran número de estarcidos. Bien impresas, acabado brillante.
- Printed by Aviprint. Australian roundels and tail markings, codes, nose arts and lots of stencils. Finely printed, gloss finish.
OPCIONES – OPTIONS:
- CA-13 Boomerang. A-46-199/QE-Y “Home James”. Escuadrilla N.º 4 de la RAAF. Nueva Guinea, julio 1944.
- CA-13 Boomerang. A6-154/ MH-J “Wanda Lust”. Escuadrilla N.º 83 de la RAAF. Gove, Territorio Septentrional (Australia), julio 1944.
- CA-13 Boomerang. A46-193/QE-H “Struth!”. Escuadrilla N.º 4 de la RAAF. Labuán (Malasia), septiembre 1944.
- CA-13 Boomerang. A46-194/QE-K “The Grim Reaper”. Escuadrilla N.º 4 de la RAAF. Labuán (Malasia), septiembre 1944.
- CA-13 Boomerang. A-46-199/QE-Y “Home James”. RAAF No. 4 Squadron. New Guinea, July 1944.
- CA-13 Boomerang. A6-154/ MH-J “Wanda Lust”. RAAF No. 83 Squadron. Gove, Northern Territory (Australia), July 1944.
- CA-13 Boomerang. A46-193/QE-H “Struth!”. RAAF No. 4 Squadron. Labuan (Malaysia), September 1944.
- CA-13 Boomerang. A46-194/QE-K “The Grim Reaper”. RAAF No. 4 Squadron. Labuan (Malaysia), September 1944.
INSTRUCCIONES – INSTRUCTIONS:
- Folleto sin grapar de 10 páginas impreso en blanco y negro y color. Contiene resumen histórico sobre el avión, una tabla de colores con equivalentes de Gunze Sangyo, plano numerado de piezas, 8 secuencias de montaje, 4 páginas de perfiles a color y una página de perfiles para colocar los estarcidos. Pueden seguirse sin dificultad aunque conviene estudiar especialmente el montaje de la carlinga.
- 10-page losse leaflet printed in black and white and color. It shows a historical summary about the aircraft, a table of colors with matches in Gunze Sangyo paints, 8 assembly chapters, 4 pages of color profiles and a page to help set the stencils. Easy to follow but cockpit assembly should be carefully studied.
LO MEJOR – THE BEST:
- Bien detallada en general. Piezas alternativas de resina fáciles de añadir.
- Nicely detailed overall. Alternative resin pieces easy to add.
LO PEOR – THE WORST:
- Cubierta de una pieza. Alguna omisión importante en la carlinga (ver texto).
- One-piece canopy. An important omission inside the cockpit (see text).
VALORACIÓN – CONCLUSION:
- Buena maqueta de un importante avión australiano, pese a algunas omisiones. Destinada a modelistas experimentados, requiere trabajo cuidadoso en la carlinga.
- Despite some omissions, this is a nice kit of an important Australian warplane. It needs expert hands and some careful work in the cockpit.

La maqueta
Recuerdo haber hecho el Boomerang de Airfix de niño. Aquella maqueta vino a topar conmigo en una tienda de Córdoba desaparecida hace muchos años (no, no era Los Guillermos, que murió hace escaso tiempo aún). De aquella maqueta en “blíster” a esta de Special Hobby (SH) va un trecho, y grande. El trecho de un mundo a otro.
La caja contiene un bastidor de piezas grises, que se ha mutilado para ajustarlo a las dimensiones de la caja, un bastidor transparente, 4 piezas de resina, las calcas y las instrucciones. Como es costumbre, todo está bien protegido en bolsas separadas.
Las piezas están bien moldeadas y no muestran imperfecciones. No hay marcas visibles, salvo acaso en la parte trasera de la carlinga. Ciertas piezas son delicadas por su finura y conviene manejarlas con tiento, especialmente al cortarlas del bastidor.
Carlinga
Está muy bien detallada, pero es delicada de montar. Requiere prestar mucha atención a las instrucciones. Los lados internos del fuselaje muestran fino detalle en relieve para simular la estructura interna. En ambos lados hay que pegar pequeños instrumentos.
El suelo muestra un moldeado blando, con una forma un tanto peculiar en la parte delantera. Está delimitado a los lados por sendas estructuras tubulares unidas en su extremos delantero al panel de instrumentos. El panel lleva los indicadores grabados y dos pequeñas consolas laterales separadas, que han de pegarse ligeramente oblicuas respecto al panel. De la mira reflectora sólo tenemos parte, ya que le faltan los visores acristalados. Los pedales vienen en una sola pieza, son finos, y van unidos a la estructura tubular lateral. Es recomendable pegarlos antes que el asiento y la palanca de control.
La zona central de la carlinga la completan un buen asiento, sin cinturones por desgracia, además de la palanca con el engranaje de mando que pasaba bajo el asiento y que acaba en el mamparo trasero. Este panel trasero está detallado con un blindaje redondeado que incluye el reposacabezas. Tras el panel no hay nada más, quedando el hueco del fuselaje vacío. No creo que la cubierta transparente logre taparlo completamente. Ya que SH no la ha incluido, parece razonable fabricar una pieza que haga esa función.
Desgraciadamente, la cubierta de la carlinga viene de una pieza y no puede ayudarnos a mostrar tan buen interior. La pieza está bien de grosor y muestra la estructura con un relieve adecuado a la escala. Sólo se echa en falta el retrovisor externo.
Fuselaje y motor
Como en cualquier maqueta de este tipo, las mitades del fuselaje carecen de puntos de unión. Las piezas incluyen el timón vertical, el capó y gran parte de las raíces alares. El panelado es correcto y se compone de líneas finas, algunas de ellas con un remachado excelente.
La cola contiene las luces de navegación y posición, y el morro lleva la toma de aire del carburados por separado, pero la pieza me parece algo más achatada que la real. El anillo externo del capó carece de la toma de refrigeración del aceite, muy visible en este avión.
El tubo de escape que trae la maqueta, bastante bueno por otro lado, debe sustituirse por otro de resina dotado de minúsculas aletas de refrigeración. Esta pieza realza el detalle exterior de la maqueta. La zona ventral está detallada con una pequeña pieza transparente, imagino que será un faro, que de acuerdo con las instrucciones debe taparse y pintarse encima.
El motor comprende dos coronas de cilindros aceptablemente detallados. La corona interior va unida a un panel que tapa el hueco del fuselaje. Los empujadores de las tapas de los cilindros deben ser fabricados por el modelista, que bien puede emplear finas varillas de plástico para simularlos. Por delante del motor tenemos la caja de engranajes, la hélice y el buje. La hélice viene de una pieza con palas finas y adecuadamente perfiladas.
Alas y empenaje
Las alas están repartidas en dos mitades superiores y una inferior. Los bordes de ataque de las mitades superiores necesitan un ligero repaso con lija, aunque las aberturas del armamento y las luces están bien hechas. A cambio falta el hueco de la cámara en el ala de babor.
El panelado está bien realizado, destacando los paneles remachados y los abultamientos del armamento en las superficies inferiores. La pieza inferior muestra las aberturas de los pozos y las salidas de las vainas abiertas. Las luces de posición y los actuadores de los flaps están bien representados sobre las alas. Las luces de aterrizaje vienen en piezas transparentes y hay también un tubo pitot separado. Los cañones Hispano, sin embargo, no me parecen muy bien definidos, pero son usables.
El abombado depósito ventral de contrachapado, que tanto afea la silueta de este avión, viene en una pieza lista para pegarla por detrás de los pozos. El contorno de los pozos queda abierto salvo en su parte trasera, donde SH ha incluido una pieza con cierto detalle para salvar el hueco. El modelista deberá decidir qué hacer con el resto.
El timón vertical está moldeado con el fuselaje. La estructura entelada está bien simulada y dispone de la luz de cola, como he dicho. Los estabilizadores son de una pieza y están provisto de lengüetas que ayudan a unirlos a la cola. Los paneles me parecen bien grabados, con superficies móviles correctamente definidas provistas de aletas marcadas.
Tren de aterrizaje
El principal está compuesto de dos patas, con tapas dobles cada una, y las ruedas. Las patas vienen de una pieza con la amortiguación pasable, pero las tapas no tienen detalle alguno. Las ruedas de la maqueta son bastante buenas, no obstante SH ha incluido un reemplazo de resina que las mejora especialmente en la banda de rodadura de los neumáticos.
Queda a la discreción del modelista el incluir también la rueda de cola de resina porque no trae la pata para unirla al fuselaje.
Calcas
Aviprint se ha encargado de imprimir esta hoja en la que ha incluido escarapelas y marcas de cola australianas, matrículas, códigos, emblemas personales y decenas de diminutos estarcidos que necesitarán de tiempo y paciencia para colocar hasta el último de ellos.
Los motivos parecen finos y muestran colores saturados. Los emblemas personales tienen la suficiente nitidez para hacerlos atractivos y únicos en cada avión. Será difícil elegir.
Instrucciones
Aparecen en un folleto sin grapar de 10 páginas impreso en blanco y negro, salvo la 4 páginas de perfiles para pintar la maqueta. Contienen una breve referencia histórica sobre el avión, una tabla de colores con equivalentes de Gunze Sangyo, 8 capítulos de armado, las mencionadas páginas de perfiles a color, además de una última que muestra la posición de los estarcidos.
Los pasos de montaje no tienen mayor dificultad, aunque los dedicados a la carlinga requieren atención especial. También me parecen acertadas las variadas versiones de pintura, que muestran aparatos con y sin camuflaje en los colores habituales de los aviones australianos presentes en el Pacífico.
Valoración
No creo que esta reedición sea más difícil de construir que otras de tirada limitada. Una vez cerrado el fuselaje, la secuencia es la habitual en cualquier avión. Es cierto que la carlinga se va a llevar cierto tiempo, pero no es nada que el modelista de cierta experiencia no pueda solventar con holgura. Y lo mismo se puede afirmar en lo referente a las omisiones que SH ha dejado por hacer. El detalle externo e interno es bastante bueno, si bien este último, por desgracia, va a quedar en su mayor parte tapado por una cubierta que no puede ponerse abierta.
Para los aficionados a los aviones no tan comunes esta parece una buena oportunidad para poner un Aussie en la vitrina. Atrás quedó para siempre aquel Boomerang de Airfix, que precisamente ahora han vuelto a poner en circulación con una edición para nostálgicos lloralástimas.◊


The kit
I remember building the Airfix Boomerang as a kid. We happened to meet each other in a store in Córdoba (Andalucía, Spain) that disappeared many years ago (no, it wasn’t Los Guillermos, which closed down not so long ago). It’s a long way from that blister kit to this one by Special Hobby (SH). The distance from one world to another.
The box contains a sprue of gray parts, which has been trimmed to fit the box, a clear sprue, 4 resin parts, the decals and the instructions. As usual, everything is well protected in separate bags.
The pieces are well molded and show no blemishes. There are no visible marks, except perhaps on the rear of the cockpit. Certain pieces are really thin and brittle and should be handled carefully, especially when taking them out from the sprue.
Cockpit
It comes well stuffed, but needs a careful build paying close attention to the instructions. The inner fuselage sides show thin raised detail to simulate the internal structure. On both sides you need to attach small instruments.
The floor shows a soft moulding, with a somewhat peculiar shape at the front. It is delimited on the sides by tubular structures attached to the instrument panel. The panel has engraved gadgets and two small separate side consoles, which must be glued obliquely to the panel. We only have part of the gunsight, since the glass visors are missing. The thin pedals come in one piece and are attached to the side tubular structure. It is advisable to add them before the seat and the control column.
The cockpit area is rounded off by a good seat, unfortunately without belts, in addition to the control stick and the control gear placed below under the seat and reaching the rear bulkhead. This rear panel is detailed with rounded armor plate including the headrest. Behind the panel there is nothing else, leaving an empty space in the fuselage. I don’t think the canopy will cover it completely. Since SH has not included it, the modeller should make a part to fill the gap.
Unfortunately, the canopy comes in one piece and that nice interior can’t be shown. The piece is thin and molded with a reasonably raised frame structure for the scale. Only the external rearview mirror is missing.
Fuselage and engine
As in any short-run kit, the fuselage halves have no alignment pins. The pieces include the vertical rudder, the cowling and most of the wing roots. Panels look correct and consists of thin engraved lines, some of them with excellent riveting.
The tail contains the navigation and position lights, and the nose has a separate piece for the carburetor air intake, but the piece seems a bit lower than the real one. The cowling outer ring lacks the oil cooling intake, which is quite evident on this aircraft.
The exhaust pipe included in the kit is quite good but must be replaced by a “porcupine-type” resin one provided with tiny cooling fins. This piece will enhance the final look of the model. The ventral area is detailed with a small clear piece, presumably a landing laight, which must be painted over according to the instructions.
The engine comprises two rows of cylinders that look acceptably detailed. The inner row is attached to a panel that fills the gap in the fuselage. The cylinder head tappets must be added by the modeller, who may well use thin plastic rods to build them. Ahead of the engine we have the gearbox, the propeller and the hub. The propeller comes in one piece with thin and suitably profiled blades.
Wings and empennage
The wings are divided in two upper and one lower halves. The leading edges of the upper halves need a light sanding, although the gun and light openings are well done. In exchange, the gap for the camera on the port wing is missing.
Panels are again nicely engraved, with a special mention to the riveted panels and the gun bulges on the lower surfaces. The lower piece shows open gaps for the wheel wells and the ammo chutes. Position lights and flap actuators are well represented on the wings. Landing lights come in clear pieces and there is also a separate pitot tube. The Hispano guns, however, don’t look very well defined to me, but they are still usable.
The bulging plywood ventral tank, which makes this plane look pregnant, comes in one piece ready to be attached behind the wells. The contour of the wells is open except at the back, where SH has included a piece with some detail to bridge the gap. The modeller must decide what to do with the rest.
The vertical rudder is molded with the fuselage. The fabric structure is correctly rendered and has the tail light, as I said. Stabilizers are one piece with tabs that help attach them to the tail. The panels look just fine, with well-defined moveable surfaces provided with engraved tabs.
Undercarriage
The main undercarriage comprises two legs, with double covers each, and the wheels. The legs come in one piece with passable oleo springs, but the covers are just flat with no detail. The kit wheels are again pretty good, however SH has included resin replacements that largely improve the tire tread.
It is up to the modeller to include the resin tail wheel as well, because it lacks the leg to attach it to the fuselage.
Decals
Aviprint was in charge of printing this sheet where they have included Australian roundels and tail markings, codes, nose arts and dozens of tiny stencils that will need time and patience to be set.
Decals look thin and have saturated colors. The nose arts are sharp enough to make them attractive and unique for each aircraft. It will be difficult to choose which one to use.
Instructions
They come in a 10-page unstapled booklet printed in black and white, except for the 4 pages of profiles to paint the model. They contain a brief historical reference about the aircraft, a color chart with Gunze Sangyo equivalents, 8 assembly chapters, the said pages of color profile, plus a final page showing the position of stencils.
Assembly steps are not difficult to follow, although those referring to the cockpit need special attention. Paint versions have been wisely chosen, including Boomerangs with and without camouflage in the usual RAAF colors in the Pacific.
Conclusion
I don’t think this rebox is more difficult to build than other short-runs. Once the fuselage is closed, the sequence is the usual in any aircraft. It is true that the cockpit will take some time, but it is nothing a modeller with some experience cannot do. The same can be said regarding the omissions that SH has left in the kit. External and internal detail is quite good, although the latter will be mostly hidden by the one-piece canopy.
For fans of not-so-common aircraft, this seems a good chance to put an Aussie on the shelf. Gone is forever that Airfix Boomerang, which they have recently reboxed again in a special edtion for nostalgic crybabies.◊
Publicado – Published: 8 / 2022
©www.jmodels.net


Debe estar conectado para enviar un comentario.