
De un vistazo – Quick look
MATERIAL Y PIEZAS
MEDIA & PARTS:
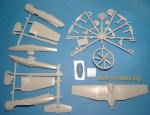
- Plástico inyectado (37 piezas), una carlinga vacuforme y una lámina de acetato con diales para el panel de instrumentos.
- Injected moulded styrene (37 parts), a vacform canopy and an acetate sheet with gadgets for the instrument panel.
CALCAS – DECALS:
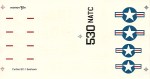
- Hoja con numerales y escarapelas. Muy buen registro y color. Bien impresas y finas.
- Sheet including code numbers and national markings. Fine colour and register. Thin and well-printed.
OPCIONES – OPTIONS:
- Naval Air Test Center, Río Patuxent, Maryland, 1946.
- VCS-15, USS Topeka, primavera 1947.
INSTRUCCIONES – INSTRUCTIONS:
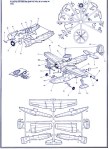
- Una hoja que muestra plano de piezas, obras de referencia, historia y especificaciones del aparato, planos a tres vistas y montaje.
- Sheet showing a parts breakdown, a short list of reference publications, history and specifications of the aircraft, three view drawings and two building views.
LO MEJOR – THE BEST:
- La mejor maqueta en plástico en la escala, construcción simple para este tipo de maqueta, calcas.
- Most accurate injection kit at the scale, straightforward construction for a short-run, decals.
LO PEOR – THE WORST:
- Interior muy básico, ausencia de versión con ruedas, previsible trabajo extra de lija y masilla.
- Basic interior, no parts for a wheeled version provided, some extra work with sand and putty required.
VALORACIÓN – CONCLUSION:
- No ofrecerá dificultades especiales al modelista experimentado en maquetas de edición limitada debido a lo básico de su montaje.
- No special troubles will be found by the experienced modeler in short-run kits due to the basic building.

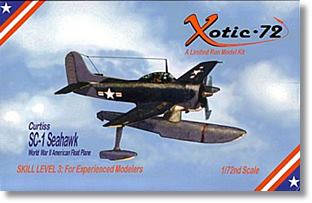
La primera edición a escala 1/72 del Curtiss Seahawk fue la ya extinta de Forma Plane allá por los años 70. Posteriormente apareció la primera de plástico, esta que comento, que Aviation USK comercializó durante algunos años hasta su desaparición. Las mejoras respecto a la anterior son básicamente dos: es en general más correcta e incluye ruedas para el transporte en tierra, aunque no hay tren de aterrizaje para la versión terrestre. La más reciente, aunque también con bastantes años a sus espaldas, es la de Antares luego editada con el sello Smêr, que sí tiene piezas para la versión de ruedas e incluye dos versiones más con flotador. Desgraciadamente, esta edición tiene errores bastante evidentes como el radar, la hélice y la forma de los estabilizadores, además de contar con un transparente de plástico muy grueso.
El Seahawk de Aviation USK fue una de las primeras maquetas de su colección Xotic-72. Hablar de grapas en estas ediciones es algo difícil, ya que el fabricante solía cortarlas para que encajasen en la endeble caja marca de la casa. Aunque las piezas son razonablemente finas y bien realizadas para este tipo de moldes, al tacto presentan cierta rugosidad que puede eliminarse con lija fina y un buen lavado. No hay rechupes en ninguna pieza, pero sí algunas marcas de eyector en el interior de la carlinga y las alas que tampoco serán difíciles de eliminar. Las líneas de paneles son finas, pero están grabadas muy débilmente en el plástico y quizá convendría repasar algunas con el scribber. El despiece es bastante básico, por un lado las piezas más pequeñas que corresponden al interior, hélice y flotadores, y por el otro las más grandes: fuselaje, alas, flotador central, estabilizadores y deriva. Como suele ser habitual, el interior es bastante parco. Hay un asiento, palanca de mando, el suelo con un par de pedalitos, un mamparo con reposacabezas y otro de forma semicircular y el panel de instrumentos. Éste lleva marcados algunos diales, pero la maqueta incluye también una laminita de acetato para ellos con lo que la pieza de plástico original podría ser reconstruida o sustituirse por otra fabricada a partir de restos de fotograbado. Los dos mamparos traseros (piezas 11 y 12) requieren un buen estudio del material gráfico del que dispongamos para el interior. Deduzco por las instrucciones que la pieza semicircular (número 11) simplemente cierra la carlinga por detrás, mientras la número 12 va directamente unida al asiento del piloto. El motor es algo burdo pero usable si se refina y detalla un poco para hacerlo parecer un Wright R-1820-62. También nos podría valer el de un P-47. La hélice es bastante correcta, aunque puede sustituirse por otra corregida de un P-47 o B-26. La pieza vacuforme de la carlinga es fina y los montantes están muy bien realizados. Mi pieza tiene un extraño color tintado que ignoro si será debido al tiempo.
Todos los flotadores vienen repartidos en dos piezas. Las alas llevan marcadas la posición de los dos flotadores, naturalmente sin ranuras o agujeros de encaje. A la hora de pegarlos hay que tener cuidado de no hacerlo perpendicularmente a la superficie de las alas, sino colocarlos algo inclinados hacia afuera. El flotador central incluye una pieza separada para el timón y el tren de rodaje para desplazar el aparato en tierra. Desgraciadamente no hay nada que podamos ponerle a nuestra maqueta bajo las alas, ni siquiera el típico radar APS-4 o bombas.
Las calcas son bastante buenas, aunque se echa en falta algún estencil en el flotador central, como el que marcaba el límite de aproximación a la hélice. Las dos versiones que figuran en la parte posterior de la caja son de posguerra (sólo Smêr incluye en el suyo una de 1945). La del Centro de Entrenamiento Naval aparece en un bonito esquema tricolor compuesto de azul marino, azul intermedio y blanco, la del USS Topeka es completamente azul marino. Las instrucciones son muy claras y el montaje no presenta problema alguno de interpretación, salvo la duda acerca del panel trasero de la carlinga. Para mí lo mejor son los buenos planos del avión que se han incluido y que serán muy útiles como referencia. En la parte negativa hay que señalar la ausencia de referencias para el color interior. Un Gunze H58 Interior Green podría ser correcto si no queremos andar haciendo mezclas.
Sin duda el Curtiss Seahawk es otra más de esas maquetas que pide una actualización desde hace años. Para los modelistas con experiencia en las ediciones limitadas, esta edición de Aviation USK no supondrá mayores quebraderos de cabeza dando por sentado que si se desea un mínimo nivel de detalle, habrá que reconstruir o mejorar algunas piezas, y que no perderemos de vista la lija y la masilla por mucho tiempo. A día de hoy, de las tres maquetas del avión de las que escribía al inicio, creo que esta es en conjunto la mejor para representar el aparato a 1/72.◊

The first 1/72 Curtiss Seahawk kit was made by the extinct Forma Plane back in the 1970s. The first plastic release appeared some years later, the one I review here, within Aviation USK Xotic-72 collection. The kit was in catalogue for some years until the Nebraska manufacturer stopped production some time ago. Compared to the vacform Forma Plane kit this has two basic improvements: overall it’s more accurate and includes wheels for the landplane version. The last kit in the series, but also with at least a decade behind, is the Antares edition, later reboxed by Smêr which does include wheels and two seaplane versions too. Unfortunately this edition has inaccuracies such as the radar size, the propeller and the horizontal stabilizers shape, not to mention a thick clear part.
It’s difficult to say something about sprues in an USK kit since they were usually trimmed to make them fit into the usual flimsy box. Although parts are reasonably thin and are correctly moulded for a short-run kit, they are rough to the touch but they can be smoothed with a light sanding and a thorough wash. There is no sink mark on the parts, but you find some ejector pins inside the fuselage halves and wings which don’t seem difficult to cope with. Panel lines are engraved, really thin and shallow. You could even consider retracing some of them with a scribber. Parts breakup is quite simple, on the one hand you have the smallest parts corresponding to the propeller, floats, the interior cockpit and engine, and on the other the biggest ones, fuselage and wing halves, main float, stabilizers and rudder. As usual the interior is poor. There is a seat, column, a floor with a couple of tiny pedals moulded on it, a bulkhead with headrest, another semicircular one, a seat and the instrument panel. This has a few dials engraved, but the kit also includes an acetate sheet for them so that you can make your own panel or replace the kit part by PE scrap. I recommend you checking your references for the interior before using both rear bulkheads (parts number 11 and 12). It seems to me from the instructions that the semicircular part (number 11) is there simply to close the rear cockpit, whereas part 12 is aimed to be glued to the pilot’s seat. The engine is a bit rough but still usable if you refine it and add some details to make it look like a Wright R-1820-62. Alternatively, you can also use a spare P-47 engine. The propeller is quite accurate, but here you also have the option of replacing it by a corrected one from a B-26 or P-47. The vacform canopy part is accurate but mine has gone a bit yellowish with time.
The floats come in two parts. The wings have slight marks to glue the wing floats but of course there aren’t slots or holes to fit them. Be careful when you do this, floats must not be perpendicular to the wing surface but inclined outboard. The central float has a separate part for the rudder and the beaching gear to carry the aircraft on land. Unfortunately, there is no undercarriage included, not even the common APS-4 radar or bombs.
Decals are fairly good, although one misses a few stancils, especially on the main float. Both versions on the back of the box belong to the post-war period (only Smêr has one for a 1945 Seahawk). The most attractive is the Naval Air Test Center version which shows a three-colour Navy scheme in sea blue, intermediate blue and white. The version from the USS Topeka is simply overall sea blue. The instructions are clear and building is quite straightforward except for the doubt I have mentioned about the cockpit rear bulkheads. The best section for me are the three view drawings which will be very useful to build the kit. On the negative side one has to mention the lack of paint reference for the interior cockpit. I think a Gunze H58 Interior Green could be accurate unless we want to try our own paint mix.
Unquestionably the Curtiss Seahawk is another kit in the long list of those badly needing an update. It won’t be a match for experienced modelers but of course some parts will surely need to be improved with sand and putty not being out of sight for long either. I think this kit is the best to build a 1/72 Seahawk today if you can still find it.◊
Actualizado – Updated: 4 / 2022
Actualizado – Updated: 5 / 2017
Publicado – Published: 2 / 2008
©www.jmodels.net


Debe estar conectado para enviar un comentario.