

De un vistazo – Quick look
MATERIAL Y PIEZAS
MEDIA & PARTS:
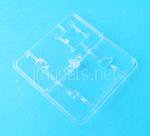
- Plástico inyectado (124 piezas), plástico transparente (5 piezas).
- Injected plastic (124 parts), clear plastic (5 parts).
CALCAS – DECALS:
- Escarapelas británicas de dos tipos, panel de instrumentos, insignias de unidad, matrículas, numerales, líneas de pisado de las alas y algunos estarcidos. Impresión fina y brillante, con buena nitidez, densidad de color y registro. Sin exceso de soporte.
- Two types of British roundels, instrument panel, unit badges, registers and numbres, wing walk lines and some strncils. Thin and glossy printed, with good sharpness, color density and register. No excess of carrier.
OPCIONES – OPTIONS:
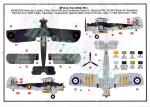
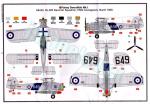
- Fairey Swordfish Mk.I. K8393. Fleet Air Arm. No. 824 Naval Air Squadron. HMS Eagle. Operation Judgement against Italian fleet at Taranto (Italy). 11/12th November, 1940.
- Fairey Swordfish Mk.I. K8449. No. 820 Naval Air Squadron. HMS Courageous. March 1939.
INSTRUCCIONES – INSTRUCTIONS:
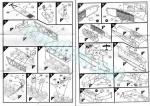
- Folleto A4 de 12 páginas impreso en blanco y negro y color. Contiene un sumario histórico sobre el avión, 73 pasos de montaje y 2 páginas de perfiles en color con referencias de pinturas esmaltes de Humbrol.
- 12-page A4 brochure printed in black and white and color. It shows a historical summary about the aircraft, 73 assembly steps and 2 pages of profiles in color with Humbrol enamel paints.
LO MEJOR – THE BEST:
- Interior más que decente. Sencillez de montaje y alternativas interesantes.
- More than decent interior. Ease of assembly with interesting alternatives.
LO PEOR – THE WORST:
- Armamento del fuselaje. Puesto del piloto escaso. Ausencia de diagrama de arriostrado.
- Fuselage armament. Sparse pilot’s cockpit. Lack of rigging diagram.
VALORACIÓN – CONCLUSION:
- Primera maqueta del nuevo molde de Airfix. Montaje sin aparentes dificultades y con opciones múltiples la hacen asequible a cualquier modelista, incluidos los menos duchos con los biplanos.
- First kit from the new Airfix tooling. Assembly is straightforward and offers multiple choices, making it accessible to any modeler, including those less experienced with biplanes.

La maqueta
El Swordfish debe ser de los pocos biplanos de la Segunda Guerra Mundial que ha sido bien tratado por las marcas de modelismo desde siempre. Sirva como prueba el anterior molde de Airfix, que data de 1958 nada menos. Otros moldes con predicamento en décadas posteriores han sido el de Matchbox, también reeditado con el sello de Revell; y el de Frog, copiado por Novo, Eastern Express y otras marcas del Este europeo.
Airfix le dio un giro, creo que histórico, a la forma de hacer y presentar sus maquetas con la llegada en 2012 de este primer Swordfish de nuevo cuño. No es extraño que muchos se sorprendieran con el lanzamiento. En años posteriores el fabricante ha ido confirmando, con mejor o peor suerte, este cambio de moldes antiguos por otros completamente actualizados. Esta maqueta lleva varias reediciones en diferentes formatos a estas alturas, una de ellas es una versión con flotadores que a día de hoy no se ha vuelto a reeditar.
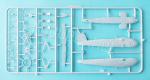
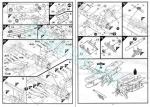
La caja contiene cinco bastidores, uno de ellos transparente, la hoja de calcas y las instrucciones. El moldeado de las piezas es bueno y no tiene deformaciones. Sólo hay marcas de eyector a los lados de la carlinga y en el suelo del fuselaje, aunque son muy tenues y no son evidentes al cerrar el fuselaje. Las piezas del motor tienen algunos nódulos de eyector sobre los cilindros que se pueden limpiar con sencillez.
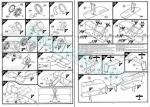
La maqueta permite montar el modelo con las alas plegadas, proceso indicado en las instrucciones con claridad, mediante dos plantillas para alinear ambos planos fácilmente. Otras alternativas de montaje nos dan a elegir el armamento subalar y la posición de los timones de la cola.
El modelo se puede terminar en dos libreas, una de ellas de preguerra y otra camuflada que representa uno de los aviones empleado en el raid contra la base italiana de Tarento en noviembre de 1940.
Reseña
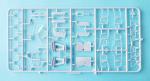
Los lados internos de la carlinga tienen el costillaje estructural moldeado en relieve. Presentan un par de marcas de eyector muy débiles a cada lado, pero no creo que se lleguen a ver tras añadir el interior de la carlinga. Estas piezas están detalladas con una ventanilla diferente a cada lado introducidas en sus huecos y también la ametralladora proel insertada a través del fuselaje. El arma está muy mal reproducida y realmente no sirve más que para que se vea su cañón sobre el fuselaje externo.
El suelo de la carlinga es común para los tres ocupantes con una pieza superpuesta en la parte anterior para situar el puesto de pilotaje, que queda elevado. Los lados del suelo están limitados por sendos bastidores tubulares finos. El de la derecha incluye tambores de munición para la ametralladora de popa.
El puesto del piloto sólo contiene un asiento, la palanca de control y el panel de instrumentos resuelto con una calca. La pieza del panel lleva dos soportes que habremos de colocar tras pegar la cubierta de la carlinga, que viene de una pieza con las aberturas de acceso de los tripulantes y algunos instrumentos junto al piloto. Para el observador únicamente hay un pequeño banco.
Por detrás de los puestos del observador y del piloto hay dos paneles diferentes. El situado entre el observador y el artillero/operador de radio lleva incluido el pequeño asiento de este tripulante. La radio está muy bien reproducida con los instrumentos en relieve. El montaje de la ametralladora Lewis consta de tres piezas que permiten elevarla o deprimirla. El arma puede colocarse alojada por debajo de un pequeño panel trasero que se añade al fuselaje tras pegar las mitades. La Lewis me parece diminuta para la escala y se debería reemplazar por algo mejor. La pieza incluye el tambor de munición y la empuñadura se aprecia con cierta nitidez. El parabrisas del piloto es fino y está bien reproducido.
El bastidor C incluye dos piezas (7 y 8) que representan un deposito de combustible del que las instrucciones no indican nada, porque los aviones de esta caja no lo llevaban. Este depósito extra estaba situado sobre el puesto de observador cuando el avión operaba con dos tripulantes.
El fuselaje consta de tres piezas, ya que el lado inferior viene por separado. Los lados me parecen bien grabados en la parte delantera y muestran un relieve de la estructura trasera convincente y nada exagerado para la escala. Algunos paneles están remachados con limpieza y nitidez. La pieza diestra muestra con claridad el carenado de la ametralladora proel y el refrigerador de aceite separado. Opcionalmente también podemos colocarle la manivela de arranque del motor. La mitad opuesta contiene los estribos de acceso. La pieza inferior posee el alojamiento del gancho de apontaje bien definido.
Las mitades del fuselaje se unen antes de añadirles la pieza inferior. Esta última está moldeada con las mitades de la sección central de los planos inferiores, cuyas mitades superiores se unen antes de pegar el fondo del fuselaje.
El motor no está mal a primera vista. Los cilindros están bien definidos, limpios de rebabas, y llevan los alzaválvulas definidos. El colector de escape va pegado tras el motor. El capó consta de un anillo frontal de una pieza y tres paneles laterales alineados sobre el anillo. Una vez formado el capó, se puede pegar la caja de engranajes de la hélice gracias a sus tres soportes. El anillo externo lleva la salida del tubo de escape, cuya tramo final viene aparte y horadado. La hélice y el buje están separados. Las palas me parecen bien perfiladas y son bastante finas.
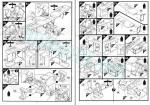
Una vez pegados los soportes centrales y laterales del fuselaje hay que decidir la posición de las alas, moldeadas en tres secciones a su vez separadas en mitades. El entelado está muy bien reproducido, mostrando a la vez suavidad y nitidez. Los alerones están grabados con acierto y las superficies están correctamente reproducidas. No me gusta tanto que estén moldeados solamente en la mitad inferior de las alas. Las luces de navegación están definidas y las de aterrizaje son piezas transparentes.
Una novedad en esta maqueta es la manera de ensamblar los soportes externos de las alas, que están moldeados en parejas unidos mediante una tira de plástico. Esta pieza se introduce en los huecos practicados en la cara inferior de los planos superiores. Al pegar la mitad superior del ala, los soportes aparecen en su lugar sin líneas o huecos que rellenar.
La sección central del plano superior lleva dos soportes en cada extremo más un larguero interno entre las mitades que va dispuesto de la misma forma entre las secciones externas del ala proporcionándoles rigidez. La secuencia de montaje de las alas es contraria a la habitual. En primer lugar se pega el plano superior, sostenido en los soportes del fuselaje y la parte central de los planos inferiores junto al fuselaje, y posteriormente se añaden los tramos externos inferiores a los centrales mediante lengüetas. Los finos puntales de control de los alerones vienen separados y se añaden a la vez que las alas inferiores.
El proceso para montar las alas plegadas es similar, pero en este caso contamos con la ayuda de dos plantillas que alinean la parte central de las alas y sus soportes en su posición correcta.
La deriva de cola está representada en una de las mitades del fuselaje. Su timón está separado y puede colocarse en posición no neutra. Las instrucciones nos indican los grados máximos de orientación hacia los lados para que parezcan realistas. La luz de cola está bien definida en el timón.
Los planos horizontales son de una pieza con los timones de profundidad separados y también posicionables de acuerdo con las instrucciones. Los soportes inferiores están unidos al extremo inferior del puro del fuselaje, donde también aparece el hueco para colocar la rueda de cola. También hay dos enganches para sujetar los extremos de las alas cuando se pliegan. Podemos colocarlos extendidos o no.
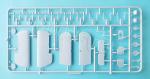
Los soportes del tren de aterrizaje comprenden dos piezas a cada lado, ambas bien perfiladas. Una de ellas muestra la cobertura de la amortiguación oleoneumática. Debido a su grosor, las ruedas están moldeadas en mitades simulando el peso. La llanta externa está correctamente detallada, incluso con la válvula de relleno.
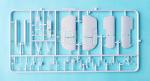
La carga subalar es variada y específica para cada versión de pintura. El Swordfish que voló sobre Tarento lleva un depósito auxiliar unido al fuselaje con un soporte ventral de tres piezas. Además, bajo las alas porta seis bombas bien representadas, aunque separadas en mitades, y una bengala, cada una de ellas con sus respectivos soportes de una pieza. Los bastidores contienen hasta ocho bengalas que podemos colocar igualmente.
El aparato del HMS Courageous transporta un torpedo en el mismo soporte del mencionado depósito auxiliar. El arma está dividida en mitades con la mitad de las aletas aparte y unidas a las hélices. Alternativamente, también podemos colocar el torpedo sobre su carro de transporte. Todo un detalle.
La hoja de calcas lleva impresas escarapelas británicas de dos tipos, el panel de instrumentos, insignias de unidad, matrículas, numerales, líneas de pisado de las alas y algunos estarcidos. Su aspecto es fino y brillante, poseen buena nitidez, densidad de color y registro. No hay exceso de soporte.
El folleto de instrucciones tiene un formato A4 y doce páginas impresas en blanco y negro y color. Contiene un sumario histórico sobre el avión, 73 pasos de montaje y dos páginas de perfiles en color con referencias de pinturas de Humbrol. La secuencia de montaje distingue con claridad los capítulos específicos para ensamblar las alas plegadas o desplegadas. Sin embargo, no hubiese estado mal que Airfix hubiese incluido un diagrama para arriostrar el modelo.
Las alternativas de acabado muestran un aparato en color aluminio, una librea naval corriente en la preguerra, del portaaviones HMS Courageous, y otro perteneciente al HMS Eagle empleado en el famoso ataque contra la base naval italiana de Tarento con camuflaje que parece corresponder al denominado “Shadow Shading scheme” empleado en los biplanos del Fleet Air Arm en los primeros años de la guerra. Este segundo avión estaba tripulado en Tarento por el Capitán de los Royal Marines Oliver Patch, que lideró la segunda oleada de bombardeo, tras la primera con torpederos, y recibió la Cruz al Servicio Distinguido.
Valoración
No estoy seguro, pero Airfix acaso fue la primera marca que ofreció la posibilidad de colocar las alas plegadas en un Swordfish en la escala 1/72, y esto ya es algo. Y lo es también el novedoso montaje de las alas, por eso esta maqueta muestra indicios de ser un hito en la larga carrera de este avión en la escala menor.
En el debe de la maqueta cabe señalar el birrioso armamento del fuselaje, que contrasta con las acertadas opciones del subalar, y el pobre puesto de pilotaje a diferencia del resto del interior, que me parece más que decente. Tampoco hubiera estado mal que las instrucciones llevasen un plano para arriostrar el modelo, que bien lo merece.
Hay que reconocer que Airfix se trabajó esta maqueta y le dio al montaje un diseño muy bien pensado. Tanto es así, que lo veo asequible incluso para quienes no tienen dilatada experiencia en los biplanos.◊


The kit
The Swordfish must be one of the few WWII biplanes that has consistently received attention from manufacturers. A clear example is the previous Airfix kit, dating back to 1958. Other popular kits in later decades are the Matchbox kit, also reissued by Revell, and the Frog kit, copied by Novo, Eastern Express, and other brands from East Europe.
Airfix took a significant, and I believe important, turn in the way they made and presented their kits with the arrival of this first brand-new Swordfish in 2012. It’s no wonder many were surprised by this release. In subsequent years, the brand has continued, with varying degrees of success, to replace older kits with completely updated ones. This kit has had several reissues in different formats to date, one of which is a version with floats that has not been reboxed since.
The box contains five sprues, one of them clear, the decal sheet, and the instructions. Parts are well molded and show no blemishes. There are ejector marks on the cockpit sides and on the fuselage lower piece, although these are very shallow and not noticeable when the fuselage is closed. The engine parts have some ejector nodules on the cylinders which can be easily cleaned.
The kit can be built with the wings folded, a process clearly explained in the instructions, using two jigs to easily align them. Other assembly options allow you to choose the underwing armament and the position of the tail control surfaces.
The model can be finished in two liveries: one pre-war and the other camouflaged, this representing one of the aircraft used in the raid against the Italian base of Taranto in November 1940.
Review
The inner cockpit sides show the raised structural ribbing. They have a couple of very faint marks on each side, but I don’t think they’ll be visible after adding the cockpit. These parts are detailed with a different window on each side fitted into recesses, and also the forward machine gun inserted through the fuselage. The weapon is very poorly reproduced and really serves no purpose other than to show the barrel on the outer fuselage.
The floor is common for all the crew, with an overlapping piece at the front to fit the raised pilot’s cockpit. The sides of the floor are detailed with separate thin tubular frames. The one on the right includes ammo drums for the rear machine gun.
The pilot’s cockpit only contains a seat, the control stick, and the instrument panel, which is represented by a decal. The panel piece has two rods attached after gluing the cockpit deck, which comes as one piece with crew access openings and some instruments next to the pilot. There is only a small stool for the observer.
Behind the observer and pilot positions are two different bulkheads. The one attached between the observer and the gunner/radio operator includes a small seat. The radio is very nice and has raised detail. The Lewis machine gun mount consists of three pieces that allow it to be raised or lowered. The weapon can be stowed under a small rear panel attached to the fuselage after gluing the two halves together. The Lewis gun seems tiny for the scale and should be replaced with something better. The piece includes the ammo drum, and the grip is fairly clear. The windshield is thin and well reproduced.
Sprue C includes two parts (7 and 8) representing a fuel tank, which the instructions don’t mention because the aircraft in this kit didn’t have one. This extra tank was placed on the observer’s station when the aircraft was operated with a crew of two.
The fuselage consists of three parts, as the lower section is separate. The sides are well engraved at the front and show a convincing raised rear structure. Some panels are riveted. The right piece shows the bow machine gun fairing and a separate oil cooler. Optionally, the engine starter crank can also be added. The opposite half contains the access steps. The lower piece has a defined arrester hook housing.
The fuselage halves are joined before the lower piece is attached. This is molded with the halves of the mid-wing section, the upper halves being attached before the fuselage lower piece.
The engine doesn’t look bad at first glance. The cylinders are well-defined, free from flash, and have clearly defined tappets. The exhaust manifold is glued behind the engine. The cowling consists of a one-piece front ring and three side panels aligned over the ring. Once the cowling is built, the propeller gearbox can be attached. The outer ring includes a length of the exhaust with a separate and hollowed tailpipe. The propeller and hub are fine. The blades look well-shaped and are quite thin.
Once the cabane and side fuselage struts are glued on, the modeler needs to decide the position of the wings. These are molded in three sections, each of them molded in halves. The fabric covering is very well reproduced, showing both smoothness and sharpness. The ailerons, molded on the lower wing half, are well engraved and the surfaces show the structural raised detail. The navigation lights are well-defined, and the landing lights are clear pieces.
A novel feature of this kit is the method of assembling the external wing struts, which are molded in pairs and joined by a plastic strip. This piece is inserted into recesses cut into the underside of the upper wing pieces. When the upper wing half is glued in place, the struts avoid any seams or gaps to fill.
The upper wing center section has two struts at each end, plus an internal spar between the halves, which is positioned similarly between the outer wing sections, providing rigidity. The wing assembly sequence is the reverse of the usual one we find in other kits. First, the upper wing is glued on the fuselage struts, along with the lower mid-wing piece next to the fuselage. Then, the lower outer wings are attached to the center sections using tabs. The thin aileron control struts are provided separately and are added at the same time as the lower wings.
The process for assembling the folded wings is similar, but we have the help of two jigs to align the center wing section and their struts in the correct position.
The tail fin is molded on one of the fuselage halves. The rudder is separate and can be positioned in a non-neutral position with the help of the instructions, which indicate the degrees of turning to make it look realistic. The taillight is clearly defined on the rudder.
The horizontal stabilizers are a single piece with separate elevators that can also be positioned according to the instructions. The lower struts are attached to the lower tail cone. The piece has the hole to glue the tailwheel. There are also two hooks to secure the folded wings. These can be positioned extended or retracted.
The landing gear struts comprise two well-defined pieces on each side. One of them is the oleo leg fairing. The wheels are weighted and molded in halves. The outer rims are accurately detailed, even including the valve.
The underwing load is varied and specific to each paint scheme. The Swordfish that flew over Taranto carries an auxiliary fuel tank attached to the fuselage with a three-piece ventral rack. It also carries six nice bombs, but separated into halves, and a flare under one of the wings, all of them with their own separate racks. There are up to eight flares in the sprues that can also be attached if you wish.
The HMS Courageous aircraft carries a torpedo on the same ventral rack. The weapon is divided into halves, with half of the fins detached and molded with the propellers. Alternatively, the torpedo can also be displayed on a trolley, which is a nice touch.
The decal sheet includes two types of British roundels, the instrument panel, unit insignia, registration numbers, wingtip lines, and some stencils. They have a fine, glossy finish, with good sharpness, color density, and registration. There is no excess carrier.
The instruction booklet is A4 format and has twelve pages printed in black, white and color. It contains a historical summary of the aircraft, 73 assembly steps, and two pages of color profiles with Humbrol paints. The assembly sequence clearly distinguishes the specific chapters for assembling the folded or unfolded wings. However, it would have been helpful if Airfix had included a diagram for rigging the model.
The alternative finishes show one aircraft in aluminum, a common pre-war naval livery, from the aircraft carrier HMS Courageous, and another belonging to HMS Eagle, used in the famous attack on the Italian naval base at Taranto, with camouflage that seems to correspond to the so-called «Shadow Shading» scheme used on Fleet Air Arm biplanes in the early years of the war. This second aircraft was piloted over Taranto by Royal Marines Captain Oliver Patch, who led the second wave, following the first with torpedo bombers, and was awarded the Distinguished Service Cross.
Conclusion
I’m not sure, but Airfix was perhaps the first brand to offer the choice of building a 1/72 Swordfish with the wings folded, and that’s something. Wing assembly is also innovative and may be one of the reasons why this kit is a kind of milestone in the long history of this aircraft in the smaller scale.
On the downside, the kit features a bad fuselage armament, which contrasts with the well-chosen underwing options, and a poor cockpit compared to the rest of the interior, which I find more than decent. It would have also been helpful if the instructions included a plan for rigging the model, which it certainly deserves.
It must be acknowledged that Airfix put a lot of work into this kit and gave the assembly a very well-thought-out design. I find it an easy build even for those without extensive experience with biplanes.◊
Publicado – Published: 5 / 2026
©www.jmodels.net


Debe estar conectado para enviar un comentario.