
De un vistazo – Quick look
MATERIAL Y PIEZAS
MEDIA & PARTS:
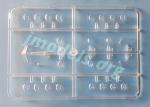
- Plástico inyectado (87 piezas), plástico transparente (13 piezas).
- Injected plastic (87 parts), clear plastic (13 parts).
CALCAS – DECALS:
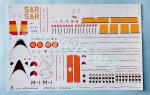
- Impresas por Cartograf. Acabado brillante, finas y saturadas de color. Sin exceso de soporte. La hoja incluye marcas españolas y holandesas, distintivos para el fuselaje, matrículas y estarcidos.
- Printed by Cartograf. Glossy finish, thin and color saturated. No excess of carrier film. The sheet includes Spanish and Dutch markings, codes, markings for the fuselage and stencils.
OPCIONES – OPTIONS:
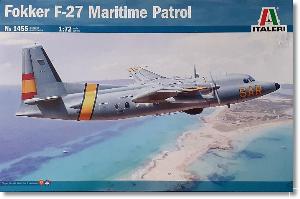
- Fokker F-27-200 Friendship MPA, D2-01. Fuerza Aérea Española. 802ª Escuadrilla. Base Aérea de Gando (Islas Canarias), 2013.
- Fokker F-27-200 Friendship MPA, D2-01. Fuerza Aérea Española. 802ª Escuadrilla. Base Aérea de Gando (Islas Canarias), Septiembre de 2005.
- Fokker F-27-200 Friendship MPA. Fuerza Aérea Neerlandesa. Aeropuerto Internacional de Hato (Antillas Occidentales Holandesas), 1995.
- Fokker F-27-200 Friendship MPA, D2-01. Spanish Air Force. 802nd Squadron. Gando Air Base (Canary Islands), 2013.
- Fokker F-27-200 Friendship MPA, D2-01. Spanish Air Force. 802nd Squadron. Gando Air Base (Canary Islands), September 2005.
- Fokker F-27-200 Friendship MPA. Dutch Air Force. Hato International Airport (Dutch Western Antilles), 1995.
INSTRUCCIONES – INSTRUCTIONS:
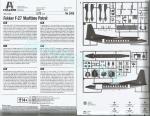
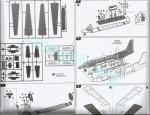
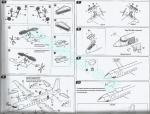
- Folleto doblado formando 10 páginas impreso en blanco y negro. Incluye sumario histórico, plano numerados de piezas, 12 secuencias de montaje y perfiles a color. Claras.
- 10-page folded brochure printed in black and white. It shows a historical summary, a numbered parts plan, 12 assembly chapters and profiles in color. Very clear.
LO MEJOR – THE BEST:
- Montaje sencillo. Calcas.
- Easy build. Decals.
LO PEOR – THE WORST:
- Pozos sin detalle. Detalle básico en fuselaje y alas.
- Wheel wells have no detail. Basic detail on fuselage and wings.
VALORACIÓN – CONCLUSION:
- Reedición con nuevas calcas y casi nuevas instrucciones de un buen molde de ESCI. Se le notan un poco los años, pero sigue en forma. Asequible de montar para los menos expertos.
- Rebox with new decals and almost new instructions of an old ESCI tool. It is a bit old but still in good shape. The kit is quite buildable for the less experienced.

La maqueta
Italeri ha hecho una nueva maqueta del Fokker F-27 que ya sacó con calcas de aviones civiles hace un tiempo. En esta oportunidad tenemos la versión militar en configuración SAR con versiones españolas y holandesas. El molde es el antiguo de ESCI, del que la extinguida compañía sacó varias maquetas en los años 90. La diferencia no sólo está en las calcas y las instrucciones, sino también en el hecho de que Italeri nos ofrece dos versiones conjuntas que ESCI editó por separado.
Esta nueva copia nos ofrece cuatro bastidores de piezas, un bastidor transparente, una extensa hoja de calcas y las instrucciones. Lo primero que hay que señalar es que al molde se le notan los años. Un ejemplo es el escaso número de piezas para un aparato de tamaño mediano. Una maqueta actual completamente nueva llevaría con seguridad muchas más y detalle adicional, sobre todo interno, incluso en esta escala pequeña. Con esto no quiero decir que el molde sea malo. La prueba es que Italeri ha decidido que aún puede sacarle partido.
El plástico es fino y las piezas están bien moldeadas. Además de las habituales líneas de molde, que no son difíciles de eliminar puesto que son muy finas, encontramos muy pocos restos de rebabas considerando los 30 años del molde, y las inevitables marcas de eyector propias de la tecnología de su tiempo. Las hay en el interior de la carlinga y el fuselaje, en las puertas y los mamparos internos. Al cerrar el fuselaje todas serán invisibles.
El despiece es básico en algunas zonas como las alas y las góndolas motoras, por ello el montaje no es nada complicado y no supone un reto para alguien con no demasiada experiencia. Italeri ha tirado del ahorro de costes y ha añadido algunos sensores en forma de aletas y antenas que ESCI no hizo, pero en lugar de hacerlo con piezas, nos proporciona plantillas en las instrucciones para que las haga el propio modelista.
La maqueta representa un Fokker F-27-200 MAR configurado como avión de patrulla marítima y rescate, con depósitos adicionales, un radomo en la panza Litton AN/APS-504 y ventanillas de burbuja para observación. Este modelo especializado realizó su primer vuelo en 1976 y no resultó un éxito comercial, pues se vendieron sólo 15 aviones a menos de una decena de países, a causa de la competencia del Lockheed P-3 Orión.
Carlinga e interior
El suelo interno interno del fuselaje es todo de una pieza, escalonada en la carlinga, que muestra las muescas de la posición de los asientos de pasaje en la versión civil. Para la versión militar ESCI diseñó un suelo superpuesto para colocar diferentes elementos de la cabina. El espacio interior está delimitado por dos mamparos, uno de ellos con puerta de acceso a la carlinga. Estas piezas tienen varias marcas que eliminar.
La carlinga tiene dos asientos con reposacabezas, dos mandos y un excelente panel de instrumentos con la consola central en la misma pieza que muestra los indicadores en relieve. Salvo por el panel de instrumentos, la cabina no tiene gran detalle, tan sólo el mínimo imprescindible que apenas podrá verse desde fuera.
La cabina de pasaje en esta versión tiene una zona delantera prevista con asientos dobles y una mesa. En la zona central encontramos una consola de instrumentos y dos asientos. La consola viene muy bien reproducida. La parte de cola contiene otros dos asientos y más instrumental. Todo el suelo va pegado a los lados del fuselaje mediante marcas en relieve para alinearlo correctamente. Como dije antes, los lados del fuselaje llevan marcas de eyector, pero tenues y fáciles de quitar.
Antes de cerrar el fuselaje hay que añadir peso adicional en el morro y las ventanas laterales, que van pegadas desde el interior en los huecos. Las ventanas tienen factura excelente y están moldeadas en “tiras” de a cuatro. Dos de ellas vienen sueltas para añadirlas hacia cola y otras son de burbuja. Las instrucciones señalan la omisión de una de estas en el lado derecho del fuselaje del aparato holandés.
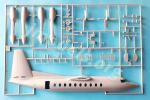
La cara externa del fuselaje muestra paneles bien grabados con líneas finas, sin embargo no hay registros ni accesos. Las puertas de cola vienen separadas y teóricamente pueden ponerse abiertas aunque las instrucciones no lo indican. La compuerta de carga también es una pieza aparte dotada con su puerta adicional separada. Las tomas de aire situadas a cola están separadas con el frontal en otra pieza. La posición de cada una no es simétrica, como bien señalan las instrucciones.
El parabrisas tiene los marcos bien señalados en una pieza sin excesivo grosor y muy transparente. El avión holandés ofrece como alternativa la adición de dos ventanillas laterales de observación alargadas, pero para instalarlas hay que cortar parte del fuselaje y seguramente también el parabrisas.
En lo relativo a los sensores de la versión marítima, ESCI sólo incluyó un par de aletas situadas sobre y debajo del fuselaje, además del radomo ventral. Parece que ni a la propia Italeri le ha convencido el ajuste del radomo al fuselaje, y así las instrucciones muestran que se deben eliminar las clavijas de unión y pegar la pieza directamente sobre la superficie. Como dije arriba, las antenas no incluidas las podemos fabricar con la plantilla que Italeri ha impreso en las instrucciones. Las antenas de alta frecuencia situadas tras el radomo vienen separadas y han de pegarse siguiendo las claras indicaciones de las instrucciones.
Alas y cola
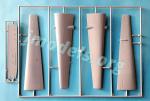
Las alas están moldeadas en mitades. Las líneas de paneles son finas y me parecen correctas para la escala, pero de nuevo echo de menos más detalle como los registros y accesos. Parte del carenado de las góndolas aparece en cada uno de los bordes. Antes de unir las mitades hay que abrir los agujeros donde se colocarán los depósitos auxiliares posteriormente.
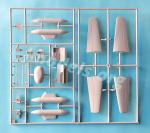
Las góndolas vienen en mitades sin detalle interno pero con marcas de eyector que no se apreciarán. Al unir las mitades hay que pegar también las patas del tren principal. Este es un detalle que nos vuelve a señalar el tiempo del molde original. Por fuera, cada góndola muestra líneas grabadas y tiene el frontal del motor y el escape separados.
Las hélices están unidas a los bujes. Las palas son un poco gruesas, grabadas con algunas líneas, y muestran igualmente algo de plástico sobrante, pero se puede eliminar con facilidad.
Los depósitos subalares constan de dos mitades moldeadas con los soportes. También aquí encontramos algunas líneas externas grabadas.
Los estabilizadores están divididos en mitades y presentan un buen panelado similar al de las alas.
Tren de aterrizaje
El tren delantero consiste en una pata unida a la rueda. La pieza muestra cierto detalle en el brazo de torsión, aunque personalmente la rueda no me convence mucho al venir con la pata. El pozo delantero no tiene detalle interno, pero las compuertas muestran líneas en relieve.
El tren principal ha de pegarse al unir las mitades de las góndolas, como he dicho. Cada pata tiene un brazo de plegado separado con algún detalle. Las ruedas viene en una pieza, pero superan con creces a la delantera en el detalle de las llantas por ambos lados. Las compuertas de los pozos están separadas y presentan igualmente detalle en las caras internas.
Calcas
La magnífica hoja, que tiene casi tamaño A4, está impresa por Cartograf, lo que es una garantía de calidad. Incluye marcas españolas y holandesas, distintivos para el fuselaje, matrículas y estarcidos. Los motivos poseen aspecto brillante y parecen finas y bien saturadas de color. No tiene exceso de soporte.
Instrucciones
Están impresas en un folleto doblado formando 10 páginas e impreso en blanco y negro. El folleto incluye un sumario histórico, un plano numerados de piezas, 12 secuencias de montaje y perfiles a color. Las vistas del montaje son muy claras e idénticas a las instrucciones de ESCI, pero Italeri las ha complementado con útiles indicaciones que ayudan a situar correctamente varias piezas y con plantillas a tamaño real para fabricar los sensores que ESCI omitió en su día. También los perfiles son diferentes y están impresos en color. Las referencias de pintura se muestran en códigos de acrílicos de Italeri y Federal Standard.
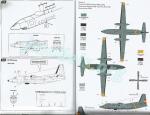
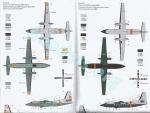
Las versiones de pintura muestran dos aviones españoles del SAR basados en Gando (Canarias) con diferente librea y otro avión holandés con alguna diferencia en el detalle de las ventanillas de cola. Ambas versiones venían en cajas diferentes cuando las editaba ESCI.
Valoración
Siempre es buena noticia ver de nuevo uno de aquellos buenos moldes de ESCI rescatado para los modelistas que no llegaron a conocerlos. Y no lo es menos el que volvamos a ver esta versión marítima del versátil Fokker F-27. Tras todo este tiempo, el molde sigue siendo muy superior al aún más antiguo de Airfix. Imagino que hasta que a este fabricante le dé por hacer uno nuevo, si llega el caso.
Pese a la antigüedad del molde, este anda aún en buena forma y nos ofrece hoy una calidad que en su momento podía competir bien con las tradicionales marcas japonesas, aunque hoy nos parezca que la maqueta anda justa de detalle y algo simple de piezas. Los tiempos cambian.
La sencillez de montaje es tal vez lo que el modelista hoy podrá agradecer más al tratarse de un avión de mayor tamaño que el habitual a esta escala, y este tipo de maquetas no suele estar al alcance de los que tienen menos habilidades o experiencia.◊


The kit
Italeri has made a new kit of the Fokker F-27 that they already released with civil decals a while ago. This time we have the SAR variant of three Spanish and Dutch aircraft. The tool is the old ESCI one, from which the extinct company made several kits back in the 90s. The difference is not only in the decals and instructions, but also in the fact that Italeri offer two versions that ESCI released separately.
This new rebox offers us four sprues of parts, a clear sprue, an extensive decal sheet and the instructions. The first thing to note is that the tool shows the years. An example is the low number of parts for a medium-sized aircraft. A completely new modern kit would certainly have many more pieces and additional detail, especially internal, even at this small scale. Do no get me wrong, the tool is not bad and the proof is that Italeri have decided that they can still take advantage of it.
Plastic is thin and pieces are well molded. In addition to the usual seam lines in any kit, which are not difficult to remove as they are very thin, we found very little flash on parts considering the 30 years of the kit, and the inevitable ejector marks typical of the technology of the time. They are inside the cockpit and fuselage, on the doors and internal bulkheads. After closing the fuselage they will be invisible.
Parts breakup is basic in some areas such as the wings and the engine nacelles, so assembly is not complicated at all and is not a challenge for someone with not much experience. Italeri have saved costs and added some sensors in the form of fins and antennas that ESCI did not include, but instead of doing it with plastic pieces in a new frame, they provide a template in the instructions to scratchbuild the parts.
The kit represents a Fokker F-27-200 MAR in a configuration of maritime patrol and rescue aircraft, with additional fuel tanks, a Litton AN/APS-504 belly radome and bubble windows. This specialized variant made its first flight in 1976 and was not a commercial success, as only 15 aircraft were sold to less than ten countries, the Lockheed P-3 Orion being the main competitor in the sales market.
Cockpit and interior
The internal fuselage floor is all in one piece, stepped in the cockpit and molded with raised lines to attach the passenger seats in the civil version. For the military version, ESCI designed an ovelapped floor to place different items in the cabin. The interior space is delimited by two bulkheads, one of them with an access cockpit door. These pieces have several marks to remove.
The cockpit has two seats with headrests, two controls and an excellent instrument panel with the central console in the same piece that shows raised gadgets. Except for the instrument panel, the cabin does not have great detail, just the essential items and they can hardly be seen from the outside.
The passenger cabin in this version has a forward area provided with double seats and a table. In the central area we find an large instrument console and two seats. The console comes nicely rendered. The rear area contains two other seats and more instruments. All the floor is glued to the fuselage sides with the help of raised lines to assist in alignment. As I said before, the fuselage sides show ejector marks, but they are shallow and easy to remove.
Before closing the fuselage, additional weight must be added to the nose and side windows, which are glued from the inside into the gaps. The windows are very good and are molded in clear «strips» of four. Two of them come loose to add to the tail and others are the bubble type. The instructions point out the omission of one of these in the Dutch aircraft.
The external fuselage shows well engraved panels with thin lines, however there are no registers or accesses. The tail doors come separate and can be showed open although the instructions don’t mention this. The cargo compartment door is also a separate piece with its own additional door molded apart. The air intakes located on the rear fuselage are separated pieces. The position of each one is not symmetrical, as the instructions indicate.
The windshield has nice raised frames in a very transparent piece that is not too thick. The Dutch plane offers as an alternative the addition of two side observation windows, but to install them you have to trim off part of the fuselage and probably the windshield too.
As regards the sensors of the maritime version, ESCI only included a pair of fins located above and below the fuselage, in addition to the ventral radome. It seems that even Italeri have not been convinced by the radome fit on the fuselage, and the instructions show that the connecting pins must be removed and the piece glued directly onto the surface. As I said above, the antennas not included can be scratch built with the template Italeri have included in the instructions. The high-frequency towel rail antennas located behind the radome are separate and must be attach following the clear callouts in the instructions.
Wings and tail
The wings are molded in halves. Panel lines are thin and look correct for scale, but again I miss more detail like registers and accesses. Wing edges are made with a section of the engine nacelles. Before joining the halves, you need to drill the holes to install the auxiliary tanks in a later step.
The nacelles come in halves with no internal detail but they have ejector marks that will not be seen. When joining the halves, the main undercarriage legs must also be attached. This is a detail that once again shows the age of the tool. On the outside, each nacelle shows etched lines and has a separate engine front and exhaust.
The propellers are molded with the hubs. The blades are a bit thick, etched with a few lines, and show some slight flash, but this can be easily removed.
The underwing tanks consist of two halves molded with the supports. There are also some external engraved lines.
Stabilizers are divided in halves and show nice panels similar to those on the wings.
Undercarriage
The nose gear consists of a leg molded with the wheel which looks a bit unrealistic. The piece shows some detail in the torsion arm. The front well has no internal detail, but the doors show raised lines.
The main undercarriage has to be glued when joining the nacelles halves, as said. Each leg has a separate folding arm showing some detail. The wheels come in one piece and look much better that their front counterpart with detailed rims on both sides. The well doors are separate and also show panels on the inside.
Decals
The excellent sheet, which is almost A4 in size, is printed by Cartograf, which means a guarantee of quality. The sheet includes Spanish and Dutch markings, fuselage markings, code numbers and stencils. The decals have a shiny appearance and look thin and colour saturated. They do not have too much carrier either.
Instructions
They are printed in black and white on a 10-page folded brochure. They include a historical summary, a numbered parts plan, 12 assembly sequences and color profiles. The exploded views are very clear and identical to ESCI instructions, but Italeri has supplemented them with useful information and views that help to correctly position several parts and with real-size templates to scratch the sensors that ESCI omitted. Also the profiles are different and printed in color. Paint references are shown in Italeri acrylics and Federal Standard codes.
The paint versions show two Spanish SAR aircraft based in Gando (Canary Islands) with different liveries and another Dutch aircraft with some difference in the windows located near the tail. As said, both versions came in different boxes when the tool belonged to ESCI.
Conclusion
It is always good news to see this tool coming back from the past, especially if it is a good one from ESCI rescued for modellers who may not know it. It is also nice that Italeri have not overlooked this martime patrol version of the versatile Fokker F-27. After all this time, the kit is still far superior to the even older Airfix one. I imagine that this will happen until the Airfix guys decide to make a new one, if that is the case.
Despite its age, the kit is still in good shape and today offers a quality that at the time could compete well with the traditional Japanese brands, even though we can think the kit is just short of pieces or simple in detail. Times change.
The ease of assembly is perhaps what today’s modeller will be most grateful for, as it is a large plane at this scale and this type of kits are not usually so easy to build for those with less skills or experience.◊
Publicado – Published: 11 / 2022
©www.jmodels.net


Debe estar conectado para enviar un comentario.