

De un vistazo – Quick look
MATERIAL Y PIEZAS
MEDIA & PARTS:
- Plástico inyectado (70 piezas), plástico transparente (3 piezas). Incluye una figura.
- Injected plastic (70 parts), clear plastic (3 parts). One figure included.
CALCAS – DECALS:
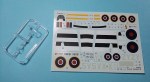
- Escarapelas británicas, panel de instrumentos, bandas de invasión, matrículas, insignias de unidad y de cola y algunos estarcidos. Bien impresas. Registro y colores adecuados. Sin exceso de soporte. Apariencia fina.
- British roundels, instrument panel, invasion stripes, codes, unit badges, tail markings and some stencils. Well printed. Good register and colours. No excess of carrier film. Apparently thin.
OPCIONES – OPTIONS:
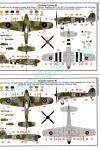
- Hawker Typhoon IB. RAF, 2ª Fuerza Aérea Táctica, Ala Nº 124, Escuadrilla Nº 247 (China-Birmania). Avión operado por el Jefe de Escuadrilla Basil Gerald “Stapme” Atapleton. Eindhoven (Países Bajos), diciembre de 1944.
- Hawker Typhoon IB. RAF, 2ª Fuerza Aérea Táctica, Ala Nº 143 (Real Fuerza Aérea Canadiense), Escuadrilla Nº 439 (Westmount). Avión operado por el Oficial de Vuelo A. H. Fraser. Eindhoven (Países Bajos), febrero de 1945.
- Hawker Typhoon IB. RAF, 2nd Tactical Air Force, No. 124 Wing, No. 247 (China-Burma) Squadron. Aircraft flown by Squadron Leader Basil Gerald “Stapme” Atapleton. Eindhoven (Netherlands), December 1944.
- Hawker Typhoon IB. RAF, 2nd Tactical Air Force, No. 143 Wing (Royal Canadian Air Force), No. 439 (Westmount) Squadron. Aircraft flown by Flight Officer A. H. Fraser. Eindhoven (Netherlands), February 1945.
INSTRUCCIONES – INSTRUCTIONS:
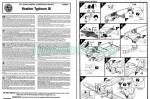
- Folleto A4 de ocho páginas. Incluye breve referencia sobre el avión en varios idiomas, 18 capítulos de montaje y dos páginas a color de perfiles. Pinturas esmaltes de Humbrol. Muy claras.
- 8-page A4 booklet. Includes a summary about the aircraft in several languages, 18 assembly steps and two pages showing profiles in colour. Paint reference from Humbrol enamels. Very clear.
LO MEJOR – THE BEST:
- Molde limpio y sin marcas evidentes. Opciones de montaje y armamento. Cubierta de la carlinga.
- Clean tooling without evident marks. Assembly and underwing armament. Canopy.
LO PEOR – THE WORST:
- Ausencia de faros. Ruedas en mitades. Panelado (para algunos). Montaje no tan sencillo.
- Lack of landing lights. Two-piece wheels. Panel lines (for some modellers). Assembly does not seem that easy.
VALORACIÓN – CONCLUSION:
- Bien detallada en general, las opciones de montaje que permiten mostrar el interior la avaloran. Sin embargo, el montaje no es tan fácil y alguna omisión clara no le permiten destacar más. No apta para primerizos.
- Nicely detailed overall with assembly options that allow to show the interior. However, an evident omission and a not-so-easy assembly of wings and fuselage does not make it a kit for first-time modellers.

En 2013 Airfix decidió darle un lavado de cara a su viejo Hawker Typhoon y nos trajo esta edición de nuevo cuño. La maqueta no difiere en exceso de otras que ya venía renovando por entonces.
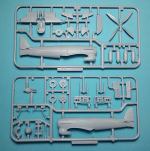
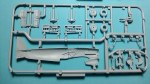
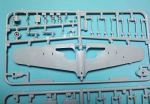
La caja contiene cuatro bastidores de piezas, un bastidor transparente, la hoja de calcas y las instrucciones. El tamaño de la edición y el despiece elegido obliga a tal número de bastidores. El de mayor cantidad de piezas llega a las 26, dato que indica lo mucho que se han introducido en tan breve espacio.
El material es fino y está bien moldeado. Su dureza es media con tendencia a blanda, como es norma de la casa. Con un plástico de esa cualidad, en ocasiones Airfix ha tenido que exagerar algunos detalles para darles definición. Este no es el caso de esta maqueta. Las piezas carecen de rebabas y no hay marcas visibles. Las de los lados internos del fuselaje quedan tapadas por el asiento y el panel de instrumentos. No merece la pena ni cubrirlas. Hay que extremar el cuidado al sacar algunas piezas quebradizas al haber sido moldeadas con vástagos muy cortos en los bastidores. Las líneas de paneles, que tantos escozores provocan en algunos lloralástimas, son finas y están bien trazadas. A algunos les pueden parecer demasiado profundas, eso va en gustos. A mí me valen.
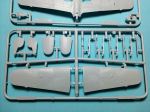
El fuselaje está dividido en dos mitades sin el timón. El detalle exterior me parece bueno, apreciándose líneas de buen trazo y algunos remaches negativos. Las clásicas bridas a cola de este avión se han simulado con varia fortuna, quedando mejor definidas en el costado derecho que en el izquierdo. Cada mitad muestra una ranura para pegar los escapes, finos y fabricados en hileras, parte de los encastres alares y la abertura del pozo trasero.
Los lados interiores muestran parte de la estructura y algunos instrumentos a los lados de la carlinga. Buscando la economía de piezas, Airfix ha hecho el suelo en una pieza grande con varias funciones. En su lado superior esta pieza muestra el parco suelo de la carlinga con huecos para insertar la palanca y los pedales (ambas piezas separadas) y por la parte inferior están los pozos, que muestran la estructura interna y algún cableado muy bien replicados. Por delante la pieza tiene una prolongación para instalar el radiador del refrigerante y el de aceite. Al cerrar el fuselaje estas piezas quedan dentro de la gran toma bajo el morro. La parte posterior de la toma posee una aleta fina separada que se puede poner abierta o cerrada. Por encima de este suelo, tanto el panel de instrumentos como el asiento van unidos a los lados del fuselaje. Se echan de menos la mira y el panel blindado prominente tras el asiento.
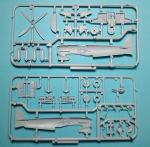
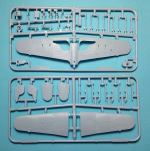
Las alas están divididas en una mitad inferior y dos superiores. El panelado de las superficies muestra líneas diferentes en las superficies móviles. En las caras superiores el carenado del armamento me parece bien copiado, mientras que en las inferiores hay salidas abiertas para los casquillos. La cara interna inferior posee guías para situar los pozos y un hueco para colocar la luz de aterrizaje bajo el fuselaje. Aunque las luces de navegación de las puntas están al menos marcadas, una ausencia importante y evidente son los faros de aterrizaje de las alas. Ni siquiera su posición está marcada.
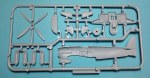
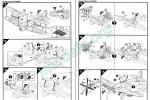
La maqueta permite mostrar el compartimiento de los cañones Hispano en ambas alas. Para ello, Airfix los ha moldeado junto con el compartimiento. Los cañones muestran buen detalle en el carenado externo y el compartimiento representa bien el armamento, la munición y algo de la estructura del ala. Obviamente, para mostrar este interior hay que hacer cirugía y cortar ciertos paneles en la mitad superior del ala y sustituirlos por una réplica abierta de la sección cortada. La apariencia es bastante realista y es una opción que a algunos les parecerá interesante realizar. Las instrucciones, además, son de gran ayuda en este sentido.
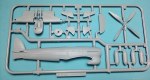
El empenaje es bastante sencillo, se compone de dos estabilizadores de buena factura y el timón separado. Esta pieza también muestra buen detalle sin exageraciones en la textura de la superficie entelada.
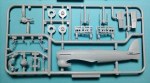
El tren de aterrizaje puede mostrarse también plegado, para lo cual hay dos tapas alternativas. Además de estas, tenemos otras dos divididas en dos piezas, dos patas con brazos hidráulicos y las ruedas, que están moldeadas con peso y divididas en mitades. El detalle de las ruedas es aceptable, pero el hecho de venir despiezadas les resta valor. El tren de cola es una pata con rueda, pero esta no tiene el neumático marcado y no será sencillo pintarlo.
Cerrados el fuselaje y las alas, resta colocar la hélice. En este caso es de cuatro palas en lugar de tres, que era más corriente. La hélice viene completa, es fina y está bien moldeada. El buje y los soportes traseros vienen por separado. Para unir la hélice al fuselaje sólo hay que introducir el cilindro situado tras ella en el hueco del morro.
Bajo las alas podemos montar dos bombas de 450 kg. con soportes carenados separados. Las bombas vienen en tres piezas, con aletas separadas y buen detalle en las espoletas. Como alternativa, podemos incluir ocho cohetes con sus respectivos raíles de lanzamiento separados también.
La cubierta de la carlinga está dividida en dos piezas transparentes. Muestran buen detalle en el marco y destacan por su finura. Realmente Airfix ha hecho un buen trabajo aquí.
La hoja de calcas está bien impresa. Muestra escarapelas británicas de dos tipos para las alas, bandas de invasión, líneas de no pisar, líneas para los bordes de ataque, diversas matrículas e insignias y algunos estarcidos. Aparentemente son finas y los colores saturados. No muestran exceso de soporte y los círculos parecen bien centrados.
Las instrucciones vienen en un folleto de tamaño A4 de ocho páginas. Incluyen una referencia sobre el avión en varios idiomas, 18 capítulos de montaje muy claros y dos páginas a color de perfiles. Las opciones de pintura son casi idénticas, distinguiéndose en las bandas de invasión, el color de los bujes y las marcas de las alas. Tratándose de Airfix, las pinturas sólo pueden ser de la gama esmalte de Humbrol.
Creo que este Typhoon es una maqueta notable, claramente mucho mejor que el antiguo de esta marca y que ofrece interesantes posibilidades de montaje para mostrar el interior y en el armamento. Por otro lado, la ausencia de algunos detalles importantes y su montaje un poco complejo en la carlinga, pozos y alas le restan un tanto de su valor y tampoco la hacen ideal para primerizos.◊

Back in 2013 Airfix retooled their old Hawker Typhoon and released this brand-new kit. The kit is not very differently engineered as others the manufacturer was renewing by then.
The box contains four grey sprues, a clear sprue, the decal sheet and the instructions. The box size and the parts breakup chosen makes that number of sprues necessary. The one with the highest part number has 26, which means there is a lot packed in such a small box.
Plastic is thin and well molded. It is medium hard but a bit on the soft side, as it is usual in the company. With such media, Airfix has sometimes overdone detail to get definition. This is not the case of this kit. Parts are flash free and there are no marks on visible spots. Those on the fuselage sides are hidden by the pilot´s seat and the instrument panel, so do not bother filling them. Care is needed when trimming delicate parts from the sprues as the gates have been molded too short. Panel lines, which are usually crybabies´ main concern, are thin and nicely engraved. I know they will be too deep for some, but they work for me.
The fuselage comes in halves and it is molded without the rudder. Exterior detail looks nice, showing engraved lines and some rivets. The strengthening fishplates on the tail are molded differently on either side, being better defined on the right fuselage side than on the left. Each half is provided with a slot to insert the one-piece exhausts, a section of the wing root and an opening for the tailwheel well.
The interior sides show a section of the cockpit structure and some instruments on both sides. Trying to keep a low parts count, Airfix has molded a big piece comprising the floor, the main gear wells and the radiators. The floor is provided with drilled holes to insert the stick and the pedals (both separate parts). The wells are almost under the floor and show a nice rendition of the raised structure and wiring. The oil and coolant radiators (also separate parts) are installed on the front protraction of the piece. Behind the big air intake there is a thin rear flap that can be posed open or closed. Above the floor, both the instrument panel as well as the seat are attached to the fuselage sides. The sight and the prominent armoured bulkhead behind the seat are missing.
Wings are molded in three pieces, one bottom half and two upper sides. Panel lines are a bit wider and deeper for the ailerons. On the upper halves the gun fairings are nicely replicated, while the bottom side shows openings for the spent ammo cases. The interior bottom side is provided with raised lines to attach and align the wells and it also has a round opening for the fuselage landing light that is a clear part. Though navigation lights are at least well engraved on the wingtips, the evident leading-edge landing lights are missing. You don´t even have a mere engraved line to indicate their position.
The kit allows you to show the gun bays open on both wings. The Hispano guns are molded with their bays in one piece, the barrels show correct fairings and the bays contain the gun, ammo chutes and a part of the internal wing structure. Obviously, to display the interior you must trim off a panel section of the upper wing and replace it by an open panel section that Airfix has included as a separate part. Everything looks quite realistic and this is a choice that some will think interesting to implement. Instructions are quite helpful and clear in the task.
The empennage is quite simple, comprising two nice stabilizers and a separate rudder. This piece is convincing and shows a good rendition of the fabric-covered surface.
The undercarriage can also be posed closed and two covers are provided for this. Besides, we also have two other covers in two pieces each, two legs molded with folding arms and the wheels, which are weighted and made in halves. Detail on wheels is acceptable though they are molded that way. The tailwheel is molded with the leg, but the tyre is not marked and will not be easy to paint.
Once the fuselage and wings are closed, there is only the propeller and canopy installation left. Though a three-bladed propeller was more common, this Typhoon sports a four-bladed one. The part is thin and looks fine. The spinner is a separate piece as are a set of discs and a cylinder that hold the propeller in position. The propeller is simply inserted into the big nose opening.
For the underwing armament, you can choose two 450kg bombs with separate faired racks. Bombs are made in three pieces, with separate fins and having nice detail on the fuses. Alternatively, you can include eight 60lb rockets with separate rails.
The two-piece canopy is quite thin and crystal clear and allows you to show the cockpit. The raised framing also looks fine. Unquestionably, Airfix has done a good job here. The other part included in the clear sprue is the fuselage landing light, as mentioned above.
The decal sheet is well printed. It shows British roundels with and without yellow outline for the wings, invasion stripes, no step lines, lines for the leading edges, codes, unit badges and some stencils. Decals are apparently thin and colours are saturated. They don´t have excess of film and roundels look on register.
The instructions are printed on an 8-page A4 booklet. They include a summary about the aircraft in several languages, 18 exploded steps and two colour pages with profiles. Paint choices are almost identical, with the aircraft being different in the spinners, invasion stripes and wing roundels. Being an Airfix kit, the only paints given belong to Humbrol enamels.
I think this Typhoon is a nice kit, but not outstanding. It is clearly much better than the older Airfix Typhoon, and overall detail as well as assembly options make it a good value for money. On the other hand, the lack of important details both inside the cockpit and the wings, together with a not-so-easy build of fuselage, wings and wells will lessen its value for some modellers. It is not the best kit for first-time beginners either.◊
Actualizado – Updated: 5 / 2022
Publicado – Published: 6 / 2020
©www.jmodels.net


Debe estar conectado para enviar un comentario.