
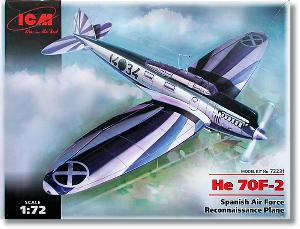
De un vistazo – Quick look
MATERIAL Y PIEZAS
MEDIA & PARTS:
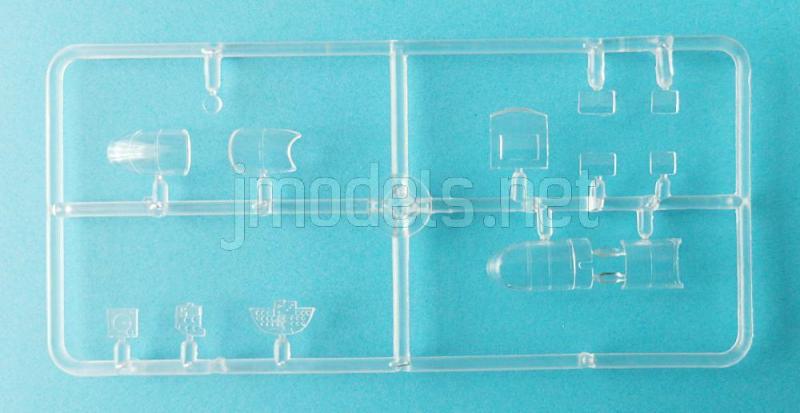
- Plástico inyectado (68 piezas), plástico transparente (10 piezas).
- Injected plastic (68 parts), clear plastic (10 parts).
CALCAS – DECALS:
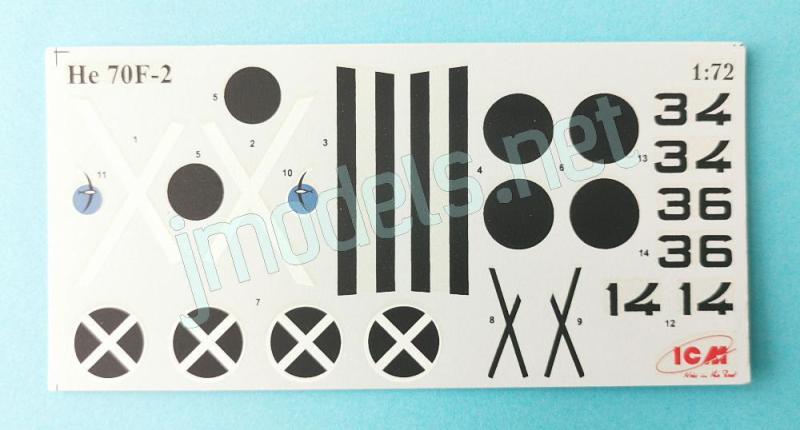
- Insignias nacionalistas españolas y numerales. Acabado brillante y fino. Buena saturación de color. Mínimo exceso de soporte.
- Spanish Natonalist insignia and aircraft numbers. Thin and glossy finish. Good color saturation. Minimal surplus carrier.
OPCIONES – OPTIONS:
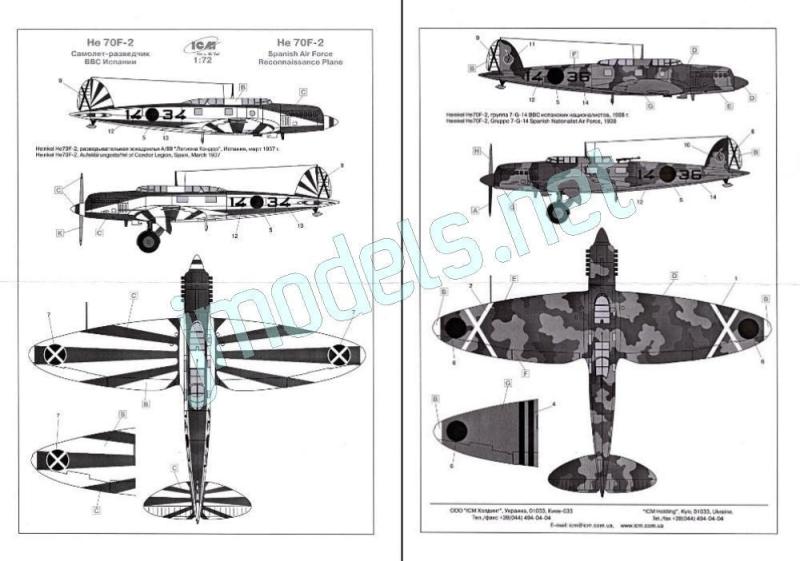
- Heinkel He 70F-2. Condor Legion. Aufklärungsstaffel. Spain. March, 1937.
- Heinkel He 70F-2. Grupo 7-G-14. Spanish Nationalist Air Force. 1938.
INSTRUCCIONES – INSTRUCTIONS:
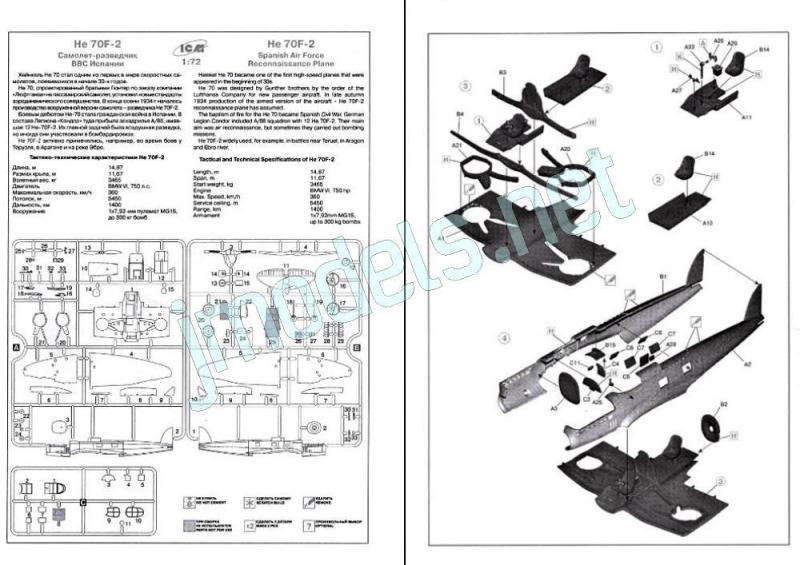
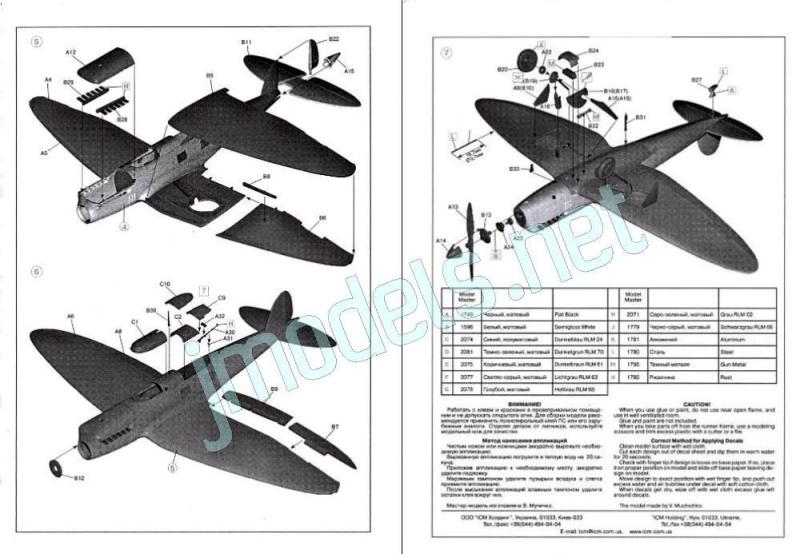
- Folleto de formato A5 de 4 páginas impreso en blanco y negro. Contiene un sumario histórico y técnico sobre el avión, un diagrama numerado de piezas, 7 capítulos de montaje más una tabla de colores con pinturas equivalentes de Model Master. Una hoja doblada de formato A4 impresa en blanco y negro muestra perfiles de dos aviones.
- 4-page A5 booklet printed in black and white. It contains a historical and technical summary about the aircraft, a numbered parts plan, 7 assembly chapters and a color chart with matches in Model Master paints. A folded A4 sheet printed in black and white shows profiles of two aircraft.
LO MEJOR – THE BEST:
- Carlinga bien provista, aunque con errores. Acabados de pintura variados y atractivos.
- Detailed cockpit even with some mistakes. Varied and attractive paint finishes.
LO PEOR – THE WORST:
- Diseño del montaje y despiece (carlinga, alas). Instrucciones mejorables.
- Assembly and parts breakdown (cockpit, wings). Instructions could be much better.
VALORACIÓN – CONCLUSION:
- Es un notable avance respecto a maquetas anteriores y la mejor de este avión por ahora, pero necesita trabajo por su despiece y modificaciones para hacer la variante militar que se ofrece en la caja. No adecuada para principiantes.
- It’s a significant improvement over previous kits and the best of this aircraft so far, but it requires work due to the parts breakdown and modifications to buld the military variant included in the box. Not suitable for beginners.

La maqueta
En resina, vacuforme o plástico, el Heinkel He 70 ha estado representado de alguna manera en la escala 1/72 desde hace muchos años. Matchbox lanzó a finales de los años 80 la maqueta de referencia en esta escala por mucho tiempo, que he revisado en este blog anteriormente (Heinkel He 70F-2 / He 70G-1 / He 170A). Después de las dos maquetas de Matchbox y de otra reedición de Revell en 2005, llegó por sospresa el molde nuevo de ICM. Esta marca también lanzó un F-2 con calcas alemanas (referencia 72232) y un G-1 civil con marcas de Lufthansa (referencia 72233). Revell la ha reeditado con versiones alemanas en un par de ocasiones, aunque su molde tiene algunas mejoras mínimas, como la inclusión de la antena de gonio, que las maquetas de iCM no traen.
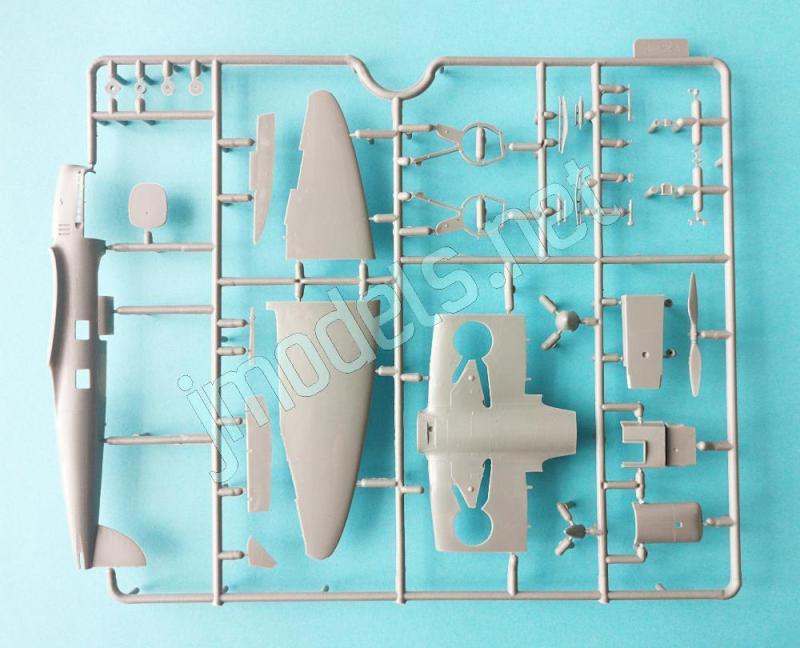
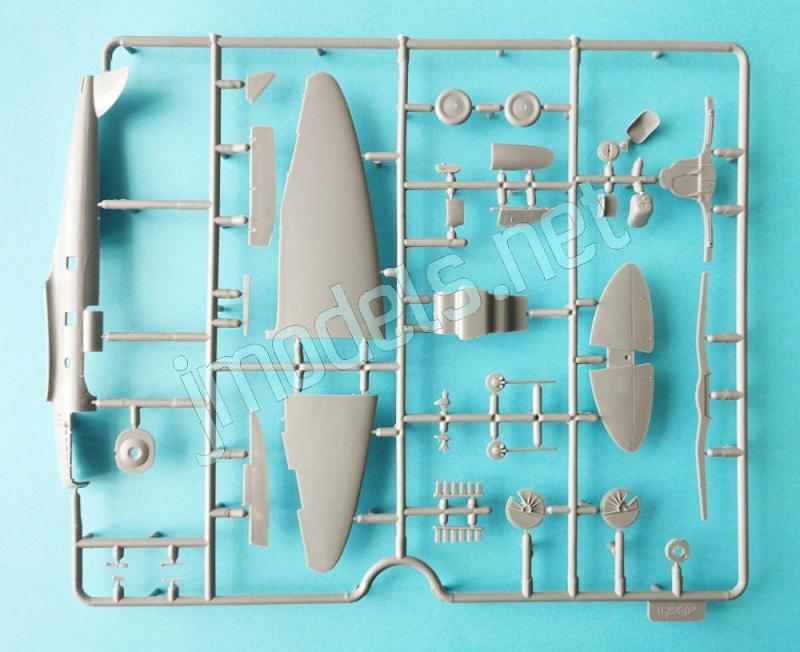
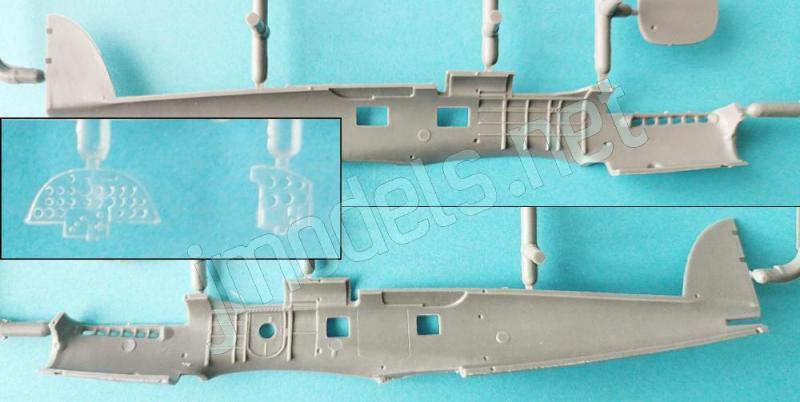
En la caja encontramos dos bastidores de piezas grises, un bastidor transparente, la hoja de calcas y las instrucciones. El plástico está bien moldeado, sin deformaciones. Apenas hay mínimas rebabas marginales en la aleta vertical, una pequeña marca positiva en uno de los lados internos del fuselaje y las habituales líneas de molde, aunque muy finas, sobre los neumáticos. También hay múltiples cilindros de salida del eyector bastante grandes, pero sencillos de limpiar.
Las líneas grabadas son muy pocas en general, en parte porque las alas llevaban recubrimiento de contrachapado de madera. Las del fuselaje son demasiado tenues, y esto afecta en especial a la parte ventral, donde suponemos que debería haber paneles. Todo este detalle tan difuso se perdrá tras la primera mano de pintura. Lo mismo puede ocurrir con el suave relieve de las superficies de las alas que simula el costillaje interno. Este da más pena que desaparezca porque está realmente bien conseguido.
Al modelista se le van a plantear algunas dificultades de inicio en esta maqueta. La primera y más evidente es que los pasos del montaje están impresos sin mucho contraste y demasiado oscuros. Esto afecta al colocar algunas piezas del interior y el tren de aterrizaje. El montaje de estos elementos es bastante profuso, por eso habrían merecido una vista ampliada para facilitar su construcción. En segundo lugar, la maqueta está moldeada con la configuración de la versión civil G-1, de la que hay piezas sobrantes como los asientos en los bastidores, por tanto hay que modificar algunas piezas. Finalmente, y esto no es novedoso en el fabricante, hay algún despiece sin sentido, como el de las mitades inferiores de las alas, separadas en los extremos a partir de los pozos.
No hay más alternativas de montaje que la de colocar el panel acristalado posterior abierto para situar la ametralladora de cola. El tubo Pitot debe ser fabricado por el modelista, pero el símbolo que lo indica en el capítulo 7 del montaje está desplazado y puede llevar a confusión.
Reseña
La carlinga está dispuesta sobre la pieza central de la cara inferior de las alas, pero también hay elementos a los lados del fuselaje. Estos lados sólo están definidos con la estructura en relieve en la mitad delantera de la carlinga, donde destaca la puerta de acceso en el lado izquierdo. El suelo viene en dos partes separadas por un mamparo central unido a dos travesaños que dan refuerzo a las alas. Hay otro travesaño del mismo estilo pegado bajo el suelo de la cabina de pilotaje.
El suelo delantero lleva un mamparo por delante, un asiento, los controles y los pedales. También hay una pieza en forma de caja que parece la mira, ya que está situada justo sobre la lente moldeada en la zona ventral delantera. Si mi suposición es correcta, faltaría un asiento para el operador de la cámara algo retrasado respecto al del piloto. Sobre los lados del fuselaje hay algunos instrumentos y el panel, simulado en una pieza transparente con los indicadores en fino relieve.
El suelo trasero lleva un asiento similar al del piloto, aunque en realidad debería tener forma de banco sin respaldo. Hay también un panel transparente por delante pegado a una parte del techo de la carlinga. Este panel también muestra algunos instrumentos de la radio en relieve. En la parte posterior hay que añadir una fina ametralladora MG 15 bien definida con los tambores de munición separados. La parte trasera del fuselaje está cerrada por un panel con un misterioso agujero en su centro.
Las ventanillas laterales son finas y van pegadas por dentro, incluida la de la puerta de acceso. Para adaptar el fuselaje a la versión militar, hay que recortar la parte superior del puesto trasero, cuyas dimensiones vienen grabadas por dentro. Las cubiertas de la carlinga y la trasera, que tiene la opción de mostrarla abierta, tienen la estructura grabada con finura. Seguramente falta el panel acristalado ventral de observación.
Las mitades del fuselaje muestran las aletas de ventilación del motor nítidas y las aberturas de los escapes, moldeados en hileras e introducidos desde el interior gracias a que la cubierta del motor está separada. Esta cubierta dispone de una pequeña toma de aire cuadrada abierta y hay dos huecos redondos también por debajo del motor que se aprecian en algunas fotos. En la parte superior hay que añadir el mástil de la antena y en la inferior el radiador, no muy bien definido, y su cubierta fina separada. Hay también una pequeña aleta ventral, el tubo Venturi y un segundo mástil en la parte inferior.
La hélice es fina con el buje aparte y va pegada sobre una placa base moldeada con el eje. Tras ella hay varias arandelas para adaptar el conjunto al morro.
Las alas vienen separadas en dos piezas superiores y tres inferiores. De esta últimas la pieza central contiene los huecos de los pozos, que hay que recortar ligeramente en uno de sus extremos. Dos piezas con la forma de la abertura de los pozos simulan sus paredes. Como he dicho, el relieve estructural de las alas es muy sutil y casi el único detalle es el de las tapas de las tomas de combustible junto al fuselaje. Los alerones y flaps son independientes y se añaden tras pegar las mitades de las alas, dispuestos en bisagras que deberían permitir colocarlos en posición no neutra. De las pequeñas luces de las puntas sólo tenemos los huecos apenas perceptibles. El tubo Pitot hay que fabricarlo siguiendo el grosor y medida que figuran en las instrucciones.
Los estabilizadores están unidos con una lengüeta para insertarlos en la cola y el timón vertical viene separado. Ambas piezas van sujetas por el carenado del puro de cola moldeado aparte. El timón vertical tiene el relieve bien definido. Los timones y aletas están grabados con finura y nitidez.
El tren de aterrizaje no se dejará montar sin hacer repetidas pruebas debido a las profusas indicaciones del capítulo 7 de las instrucciones, donde la construcción se mezcla con otros elementos como el tubo Venturi y el radiador. En las patas principales se ve la amortiguación bien definida. Tanto estas como los brazos auxiliares están moldeadas con acierto y gran finura junto con sus tapas. A la compuerta principal, bien detallada por dentro, hay que recortarle el extremo inferior, que es más propio del modelo civil. Las ruedas son de una pieza. Las llantas llevan los tapacubos del modelo civil también, pero sin el hueco de la válvula de llenado de los neumáticos. En la cola hay un patín, en lugar de la rueda de la variante G-1.
La hoja de calcas muestra insignias nacionalistas españolas y numerales con un acabado brillante y fino, buena saturación de color y mínimo exceso de soporte.
Las instrucciones vienen en un folleto de formato A5 que consta de cuatro páginas impresas en blanco y negro. Contiene un sumario histórico y técnico sobre el avión, un diagrama numerado de piezas, siete capítulos de montaje, más una tabla de colores con pinturas equivalentes de Model Master, algunas de ellas identificadas con el código RLM. Una hoja doblada de formato A4 impresa en blanco y negro muestra perfiles de dos aviones.
Como he mencionado, lo peor de las instrucciones es la escasa claridad de las ilustraciones del montaje que complican innecesariamente la construcción del modelo. Tampoco hubiese estado de más que los perfiles llevasen vistas del lado inferior de cada avión.
Las posibilidades de pintura son bastante atractivas y diferentes, aunque no parecen muy aptas para modelistas principiantes, como nada en la maqueta en realidad. Uno de los aviones perteneció a una unidad de reconocimiento de la Legión Cóndor. Este luce una librea bizarra compuesta de rayos blancos y azules sobre las alas y la cola. El segundo ejemplar lleva un camuflaje más al uso compuesto de RLM 61/63 y 70 sobre RLM 65.
Valoración
Aunque no es una maqueta descartable porque mejora sustancialmente la clásica de Matchbox / Revell y sin duda es lo mejor que tenemos por el momento, ICM no lo puso fácil con el diseño del montaje, especialmente en la carlinga y el absurdo despiece de las mitades inferiores de las alas. A esto se añade, por un lado, el hecho de que la maqueta está orientada de inicio a la versión civil y por tanto necesita modificaciones necesarias para obtener el modelo militar, que con seguridad será el más apetecible para la mayoría de modelistas, y por el otro, unas instrucciones bastante mejorables en la claridad de la impresión.
Con todo, si se tiene paciencia y tiento suficiente, se puede lograr una buena répiica del avión, sin negarle a esta edición que los dos acabados de pintura elegidos por el fabricante son variados y atractivos.◊

The kit
Whether in resin, vacuum-formed, or plastic, the Heinkel He 70 has been represented in the 1/72 scale for many years. Matchbox released the benchmark kit in this scale in the late 1980s. I’ve reviewed this kit on this blog previously (Heinkel He 70F-2 / He 70G-1 / He 170A). After the two Matchbox kits and another reissue by Revell in 2005, ICM unexpectedly released a new tool kit. This company also released an F-2 with German decals (reference 72232) and a civilian G-1 with Lufthansa markings (reference 72233). Revell have reboxed it with German versions a couple of times, although their mold has some minor improvements, such as the inclusion of the loop antenna, which is missing in ICM kits.
Inside the box, we found two sprues of gray parts, a clear sprue, the decal sheet, and the instructions. The plastic is well-molded, with no blemishes. There is only minimal flash on the vertical fin, a small raised mark on one of the fuselage side walls, and the usual seam lines, albeit very fine, on the tires. There are also several fairly large ejector nodules, but they are easy to clean.
The engraved lines are very few, partly because the He 70 wings had plywood covering. Those on the fuselage are too faint, and this especially affects the ventral area, where we assume there should be panel lines. All this diffuse detail will be lost after the first coat of paint. The same may happen with the subtle raised detail on the wing surfaces that simulates the internal ribbing. It’s a shame to see this disappear because it’s really well done.
The modeler will encounter some initial difficulties with this kit. The first and most obvious is that the assembly steps are printed with little contrast and are too dark. This affects the placement of some cockpit and landing gear parts. The assembly of these elements is quite profuse, so larger detailed views would have helped construction. Secondly, the kit is molded in the configuration of the civilian G-1 version, as we can see in some unused parts in the sprues, thus needing modification in some parts. Finally, and this is not unusual for this manufacturer, some parts breakdown is absurd, such as the lower wing halves provided separately from the wheel wells to the tips.
The only assembly alternative is to leave the rear glazed canopy open to install the machine gun. The Pitot tube needs to be made by the modeler, but the symbol indicating it in Chapter 7 of the assembly is misaligned and can be confusing.
Review
The cockpit is built on the mid wing piece, but there are also parts to add on the fuselage side walls. These sides are only detailed with the raised structure on the forward cockpit, where the access door stands out on the left side. The floor comes in two parts separated by a central bulkhead integrated with two wing spars reinforcing the wing assembly. There is another piece with spars attached under the cockpit floor.
The forward floor has a bulkhead at the front, a seat, the controls, and the pedals. There is also a box-shaped piece that may be a camera, as it is located just above the lens molded in the forward ventral area. If my assumption is correct, there should be a seat for the camera operator, positioned slightly behind the pilot’s seat. On the fuselage sides are some instruments and the instrument panel, simulated in a clear piece with raised gadgets.
The rear floor has a seat similar to the pilot’s, although in fact it should be a bench without a backrest. There is also a clear panel at the front, attached to part of the cockpit roof. This panel also displays some raised instruments for the radio. At the rear, there is a thin, well-defined MG 15 machine gun with separate ammo drums. The rear fuselage is closed by a panel with a mysterious hole in the middle.
The side windows are thin and glued from the inside. To shape the fuselage according to the military variant, you need to cut away some of the rear fuselage decking. The cockpit and rear canopies, which can be displayed open, have the frames nicely represented. There should be a ventral observation window that is missing in the kit.
The fuselage halves clearly show the engine louvers and exhaust openings. The exhausts are molded in rows and inserted from the inside thanks to the separate engine deck. This deck has a small open square air intake, and there are two round openings below the engine, visible in some photos. There is also an antenna mast between the two cockpits, and the radiator, not very well defined, with a thin separate cover below the engine. A ventral fin, the Venturi tube, and a second mast below the rear fuselage are added next.
The propeller is thin, with a separate hub, and is glued on a base plate molded with the shaft. Behind it are several plastic washers to attach the assembly to the nose.
The wings come in two upper and three lower pieces. The mid lower wing is molded with the wheel wells, which need to be trimmed slightly. Two pieces shaped like the wheel well openings simulate their walls. As mentioned, the structural raised detail on the wings is very subtle, and the only engraved panels are the fuel filler covers next to the fuselage. The ailerons and flaps are separate and added after gluing the wing halves together. They are attached on hinges that should allow them to be posed in a non-neutral position. Only the barely visible gaps remain of the small wingtip lights. The Pitot tube is built by the modeler following the dimensions shown in the instructions.
The stabilizers are molded with a tab in between for insertion into the fuselage, and the vertical stabilizer comes separately. Both pieces are held in place by a tail fairing. The vertical stabilizer has a well-defined surface detail. The rudders and tabs are sharply engraved.
The landing gear cannot be assembled without a thorough testing due to the busy indications in Chapter 7, where assembly is mixed with other elements such as the Venturi tube and radiator. The main landing gear has clearly defined shock absorbers. Both the main legs and the auxiliary arms are accurately and finely molded with their covers. The main covers, well-detailed internally, have a panel to be cut away. This panel is applicable to the civilian model. The wheels are one-piece. The rims also have the hubcaps of the civilian variant, but without the valve opening. There is a skid on the tail instead of the wheel found on the G-1 model.
The decal sheet features Spanish nationalist insignia and numbers with a glossy, fine finish, good color density, and very little surplus carrier.
The instructions come in an A5 booklet consisting of four pages printed black and white. It contains a historical and technical summary of the aircraft, a numbered parts diagram, seven assembly chapters, and a color chart with equivalent Model Master paints, some of which identified with the RLM code. A folded A4 sheet printed in black and white shows profiles of two aircraft.
As mentioned, the worst aspect of the instructions is the lack of clarity in the assembly illustrations, which unnecessarily complicates assembly. It also would have been helpful if the profiles included views of the underside of each aircraft.
Paint finishes are quite attractive and varied, although they don’t seem very suitable for beginners, like nothing else in the kit, really. One of the aircraft belonged to a Condor Legion reconnaissance unit. This one sports a bizarre livery consisting of white and blue lightning bolts on the wings and tail. The second aircraft has a more conventional camouflage pattern consisting of RLM 61/63 and 70 over RLM 65.
Conclusion
Although it’s not a kit to be dismissed, as it substantially improves the classic Matchbox/Revell kits and is undoubtedly the best we have at the moment, ICM didn’t make things easy with the assembly, especially in the cockpit and the absurd parts breakdown in the lower wing halves. Added to this is the fact that the kit was initially conceived to represent the civilian version, and so it needs modifications for the military counterpart, which will surely be the most appealing to most modelers. Also, the instructions could be much clearer.
All in all, with patience and care, the modeler will be able to get a nice replica of the aircraft, and it is also fair to recognise the manufacturer did include two attractive and varied paint finishes.◊
Publicado – Published: 7 / 2026
©www.jmodels.net


Debe estar conectado para enviar un comentario.