
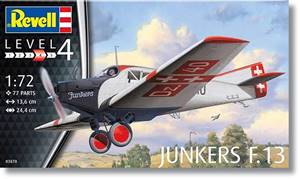
De un vistazo – Quick look
MATERIAL Y PIEZAS
MEDIA & PARTS:
- Plástico inyectado (65 piezas), plástico transparente (11 piezas).
- Injected plastic (65 parts), clear plastic (11 parts).
CALCAS – DECALS:
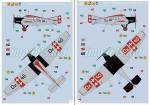
- Matrículas, rútulos y distintivos civiles, panel de instrumentos y algunos estarcidos. Sin exceso de película. Muestran buena saturación y color.
- Civilian codes and markings, instrument panel and some stencils. No excess of film. Show nice saturation and colour.
OPCIONES – OPTIONS:
- Junkers F.13. Lloyd Ostflug (Correo Aéreo de Gdansk), 1923.
- Junkers F.13. Ad Astra Aviación AG, Zúrich (Suiza), 1922.
- Junkers F.13. Lloyd Ostflug (Danziger Luftpost), 1923.
- Junkers F.13. Ad Astra Luftverkehrs AG, Zürich (Switzerland), 1922.
INSTRUCCIONES – INSTRUCTIONS:
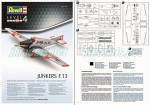
- Folleto de 16 páginas impreso en color. Contiene consejos de montaje, glosario de símbolos empleados en varios idiomas, códigos de colores (esmaltes de Revell), plano numerado de bastidores, 25 secuencias de montaje y perfiles del modelo. Muy claras.
- 16-page booklet printed in colour. It shows modelling tips, a glossary of symbols used in several languages, paint codes (Revell enamels), numbered parts plan, 25 assembly steps and profiles to paint the model. Very clear.
LO MEJOR – THE BEST:
- Superficies corrugadas, Detalle interior aceptable. Opciones de montaje.
- Corrugated surfaces. Acceptable interior detail. Assembly choices.
LO PEOR – THE WORST:
- Encaje delicado en el fuselaje y flotadores. Marcas en la carlinga. Asientos de los tripulantes. Flaps incorrectos.
- Delicate fuselage and floats assembly. Cockpit marks. Crew seats. Incorrect flaps.
VALORACIÓN – CONCLUSION:
- Aún en buena forma pese a su edad. Requiere cierto cuidado en el montaje. Hay calcas y mejoras alternativas para hacerlo de otros países y usos. Recomendable a los aficionados a los aviones de entreguerras.
- Still in good shape after three decades. Needs a careful assembly. There are alternative decals and aftermarkets to make it from other countries and usage. Recommended to fans of interwar aircraft.

Tres décadas y varias ediciones lleva rodando esta maqueta de Revell, que suele aparecer de cuando en cuando. En esta reedición el fabricante sólo ha cambiado la caja y las instrucciones. Las calcas también han sufrido una modificación parcial, combinando ahora un par de versiones ya aparecidas en cajas anteriores. Desgraciadamente, ninguna de ellas representa un avión con flotadores, aunque he encontrado una imagen de época de un hidro perteneciente a Ad Astra Luftverkehrs, con lo cual es históricamente correcto hacer esta versión. De cualquier forma, si el modelista se empeña, puede encontrar calcas alternativas para montar una versión marítima como alguna finlandesa, por ejemplo.
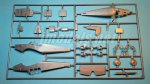
En la caja hay tres bastidores de plástico de color plateado, que recuerdan un poco a maquetas mucho más añejas, un bastidor transparente, las calcas y las instrucciones. Como de costumbre, la hoja de calcas no viene protegida y los transparentes están embalados en la misma bolsa con el resto de las piezas.
El plástico es muy fino, con cierta rigidez que lo hace incluso quebradizo. La clave de este avión es representar adecuadamente las superficies corrugadas. Considerando la tecnología de los años 90, hay que decir que Revell hizo un buen trabajo aquí, y se nota porque la maqueta aún mantiene el tipo bastante bien tantos años después. Las piezas están bien moldeadas y llevan marcas en sitios no visibles. La excepción son las dos marcas positivas a los lados de la carlinga que hay que hacer desaparecer necesariamente y también restos de expulsor en varias piezas, siendo estos muy pequeños y fáciles de eliminar. El fuselaje y las alas son muy finos y sólo observo algunas piezas sobredimensionadas en el interior.
La carlinga de pilotos y pasaje comparte un único suelo que aparece texturizado. Los compartimientos van separados por un mamparo intermedio detallado por ambas caras y delimitados por paneles delante y detrás. La cabina de pasaje dispone de varios asientos: una especie de sofá de dos piezas con almohadillado en relieve y dos asientos individuales, parecidos a sillones de un tresillo como los reales. Los asientos de los pilotos, desgraciadamente, son idénticos a los del pasaje y por ello incorrectos. La carlinga de pilotaje tiene además dos controles, un panel de instrumentos con calca, dos juegos de pedales y el panel de separación del compartimiento del motor. Este viene en dos mitades con el prominente tubo de escape separado y sin horadar. El motor está situado justo por delante de la carlinga, sobre una prolongación del suelo y su detalle es más que suficiente considerando lo que se va a apreciar una vez cerrado el fuselaje. En conjunto, el detalle interior también me parece decente y la única merma es el mencionado grosor y error de los asientos de los pilotos.
El fuselaje viene en cuatro secciones: dos lados, el techo y una pieza que cierra el morro por debajo. El detalle externo del corrugado es muy fino y parece realmente a escala. Los lados muestran algunos paneles marcados acaso demasiado anchos, hecho disculpable por la textura de la superficie. El techo tiene unos rechupes muy ligeros y escasamente visibles debidos a los pequeños vástagos de unión del lado interno que en realidad no son útiles, ya que las instrucciones señalan que deben cortarse. También hay marcas de hundimiento ligeras en la parte exterior de las marcas de la carlinga. Estas imperfecciones no se deben notar mucho cuando la maqueta se pinte. No hay alternativa a la vista, ya que rellenar y lijar llevándose el relieve no es una opción. Los lados interiores vienen planos y disponen de pequeños puntos en relieve para alinear la carlinga. Antes de cerrar el fuselaje hay que eliminar las dos marcas positivas que ya he mencionado arriba e instalar las ventanillas, que vienen por separado y ajustan en finos rebajes realizados alrededor de cada hueco, aunque aprecio que en un lado están mejor conseguidos que en el opuesto.
El encaje del techo con los lados no parece tan fácil como aparenta. La pieza lleva incorporadas las aberturas frontales de la carlinga y el morro, que tiene una salida para el tubo de escape. El frontal del morro también es una pieza aparte que muestra las rejillas de ventilación simuladas y hasta los tapones de los radiadores. La hélice es igualmente de una pieza y posee formas correctas, aunque se debería afinar un poco. Por último, los parabrisas, que van pegados sobre el morro por delante de los puestos de pilotaje, son muy transparentes y un poquito gruesos para la escala.
El empenaje es del tipo inicial y ofrece dos opciones de montaje según la versión elegida. La terrestre lleva los estabilizadores y el timón/deriva en piezas separadas, mientras que el hidroavión lleva la deriva/timón en mitades y emplea idénticos estabilizadores. El detalle superficial es idéntico al del fuselaje y las superficies movibles están bien marcadas. La versión hidroavión muestra el timón alargado correcto, a diferencia de la terrestre, en la que es más corto.
Las alas están separadas en mitades finas. La textura de la superficie es idéntica a las otras ya mencionadas y los flaps están bien señalados, aunque son incorrectos. Revell los ha moldeados con idéntica anchura en los bordes de salida, cuando los reales se ensanchaban hacia las puntas alares. La cara superior muestra buen detalle en las zonas de pisado, con relieve escalonado de acceso al avión. El fuselaje va simplemente pegado encima de la mitad superior. Ignoro si el ajuste de ambos es bueno.
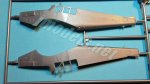
Los soportes del tren de aterrizaje son finos y delicados en ambas versiones. La versión terrestre dispone de dos patas dotadas de amortiguadores pasables, soportes intermedios, ruedas de buenas trazas por ambas caras y patín de cola. La versión marítima lleva flotadores compuestos de cuatro caras bien texturizadas con guías interiores para facilitar el montaje. Las instrucciones indican que se deben montar primero los soportes interiores en los flotadores y pegar estos a las alas, para después añadir los soportes externos. Ignoro si este procedimiento es el más adecuado o hay alternativas mejores y más sencillas. En todo caso, el modelista puede hacer las pruebas pertinentes.
El bastidor transparente incluye los cristales de la carlinga y los parabrisas. El plástico viene muy limpio y transparente, pero es un pelín más grueso de lo necesario. Este hecho no tiene mucha importancia en las ventanillas, aunque se notará más en los parabrisas.
Sospecho, sin pruebas para demostrarlo, que la hoja de calcas está impresa por Cartograf, pero su nombre no figura en la hoja, sino un enigmático “impreso en Italia”. Las calcas tienen buena calidad y están bien impresas. Incluyen matrículas y distintivos de dos compañías civiles, el panel de instrumentos y algunos estarcidos. Aunque no muy coloridas, los motivos no muestran exceso de película ni los colores escasa saturación.
Me alegra ver de nuevo este pequeño F.13 rodando por el mundo demostrando que todavía resulta atractivo de montar y que tiene suficientes alternativas de calcas y mejoras disponibles para hacer otras versiones y usuarios. Recomendable a los aficionados a la aviación de entreguerras.◊


This kit has been around for almost three decades today and has also been released from time to time. In this rebox Revell has only changed the box and the instructions. The decal sheet is only partially different as it includes a combination of previous versions already present in other boxes. Unfortunately, none of the building choices caters for an aircraft with floats, though I have found a picture of a seaplane belonging to Ad Astra Luftverkehrs, which means it is historically correct to build that version. Anyway, if the modeller wishes one, he can still get alternative decals to build a maritime version such as a Finnish one, for example.
Inside the box there are three silvery sprues, which remind me of older kits, a clear sprue, the decals and the instructions. As usual with Revell, the decal sheet comes unprotected and loose, whereas the clear parts are bagged with the rest of the content.
Plastic is quite thin, a bit on the stiff side, which makes it brittle sometimes. The key to any rendering of this aircraft is the representation of corrugated surfaces. Considering the technology used in the 1990s, Revell did a good job with this kit, and this is evident in the fact that it is still in good shape after all these years. Parts are well molded and most marks are in non-visible spots. The exception are two raised marks on the cockpit walls that the modeller must clean off inevitably and some ejector pins, but these are tiny and easy to deal with. Fuselage and wings are very thin, and I can only see just a couple of overscaled pieces.
The cockpit and the passengers´cabin share a common texturized floor. There is a bulkhead in between both compartments detailed on both faces. The floor is limited by two other front and rear bulkheads. Inside the cabin you have a kind of sofa with raised cushioning and two individual seats similar to the real armchairs (the F.13 cabin looked like a sitting-room rather than a cabin). Unfortunately, the cockpit seats are identical and so incorrect, being also too thick to convey the real parts. Inside the cockpit there are two control sticks, an instrument panel with a decal for the gadgets, two sets of pedals and the engine firewall. The engine comes in halves with the prominent exhaust as a separated piece. The engine is placed just in front of the cockpit and detail is more than enough considering it will not be seen once the fuselage is closed. Overall, interior detail seems quite decent, the only blemish being the pilots´seats.
The fuselage comprises four sections: two sides, a roof and a part fitting under the nose. Detail on the external corrugated surfaces is very thin and looks at scale. The sides show some engraved lines for panels which look a bit wide due to the surface texture. There are a couple of very slight sink marks on the roof caused by alignment pins on the other side, which in fact are not useful as the instructions point out they should be trimmed. There are also similar such marks on the sides matching the raised marks on the cockpit walls. I think all of them will not very evident when the model is painted. Anyway, there is no alternative in sight, as sanding the corrugated surface is not an option. The cockpit walls are flat and have small alignment points to attach the interior. Before closing the fuselage, you have to add the windows, all of them separate pieces fitting in recessed gaps. These are molded better on one side than on the other.
The fitting of the roof and sides does not seem as easy as it looks. The roof includes the cockpit openings and the top nose, which has a hole to insert the exhaust. The front nose is also a separate piece showing the air vents and even the radiator caps. The propeller also comes as one part and apparently has a correct shape, though it should be thinned a bit. Lastly, the windshields, which are attached on the nose just in front of the cockpit, are very clear as well as a bit thick for the scale.
The empennage is the early type and has two assembly options according to the version you wish to build. The landplane has the stabilizers and the rudder/fin in separate pieces, while the seaplane has the fin/rudder in halves and makes use of the same stabilizers. Surface detail is identical to wings and fuselage and control surfaces are correctly outlined. The seaplane version shows a correct lengthened rudder and the landplane includes a shorter rudder.
Wings are molded in thin halves. Surface texture has already been described because it is the same as on the fuselage. Flaps are outlined but are incorrect. Revell has made them with the same width, but in fact they were wider as they got closer to the wingtips. Upper surfaces show nice detail on the no step areas, with raised detail to represent the access steps. The fuselage is simply butt joined on the wings. I ignore if both fit correctly.
Landing gear struts are thin and brittle in both versions. The landplane has two acceptable main legs provided with springs, thin middle struts, a pair of nice wheels detailed on both sides and a tail skid. The seaplane floats comprise four sides with interior alignment lines for an easier building. The floats are well rendered and show raised detail. Instructions show that you must attach the inner struts to the floats first, then join them to the wings and finally add the outer struts. I don´t know whether this is the easiest way to build this section or there are easier alternatives. Anyway, the modeller should check this out.
The clear sprue includes the windows and the windshields. Plastic is very clean and transparent, but a bit thicker than necessary. This is not very important in the case of the windows but will be noticed in the windshield.
I suspect, without evidence to prove it, that the decal sheet has been printed by Cartograf, but the company´s name is not present on the sheet, but a mysterious “printed in Italy”. Decals have a very good quality and are correctly printed. The sheet includes codes and names for two civil airliners, the instrument panel and some stencils. Though not very colourful, motifs do not show an excess of carrier film and colours have enough saturation.
It is always good to see this little F.13 around again, showing that it is worth building and has a handful of alternative markings and aftermarkets to build different versions and users. Recommended to interwar aviation fans.◊
Actualizado – Updated: 4 / 2022
Publicado – Published: 6 / 2020
©www.jmodels.net


Debe estar conectado para enviar un comentario.