
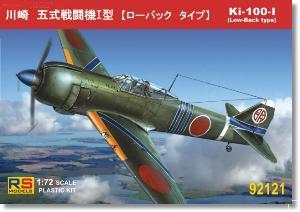
De un vistazo – Quick look
MATERIAL Y PIEZAS
MEDIA & PARTS:
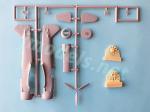
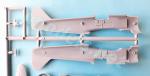
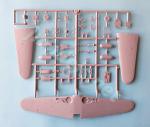
- Plástico inyectado (53 piezas), plástico transparente (1 pieza), resina (4 piezas).
- Injected plastic (53 parts), clear plastic (1 part), resin (4 parts).
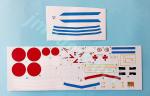
CALCAS – DECALS:
- Dos hojas. Hinomarus, bandas de color para e fuselaje y alas, numerales e insignias de unidad. Apariencia fina. Bien impresas.
- Two sheets. Hinomarus, color stripes for fuselage and wings, numbres and unit markings. Apparently thin and well printed.
OPCIONES – OPTIONS:
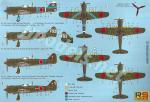
- Kawasaki Ki-100. División de Entrenamiento de Akeno. 11º Sentai (Regimiento Aéreo). Base Aérea de Miki (Prefectura de Hyougo, Japón). Julio 1945. Aparato del Mayor Yohei Hinoki (12 victorias).
- Kawasaki Ki-100. 5º Sentai. Base Aérea de Kiyosu (Prefectura de Aichi, Japón). Julio 1945.
- Kawasaki Ki-100. 244º Sentai. Base Aérea de Kiyosu (Prefectura de Shiga, Japón). Julio 1945. Aparato del Comandante de la unidad, Mayor Teruhiko Kobayashi (12 victorias).
- Kawasaki Ki-100. Akeno Flight Training Division. 11th Sentai (Air Regiment). Miki Air Base (Hyougo Prefecture, Japan). July 1945. Aircraft flown by Major Yohei Hinoki (12 victories).
- Kawasaki Ki-100. 5th Sentai. Kiyosu Air Base (Aichi Prefecture, Japan). July 1945.
- Kawasaki Ki-100. 244th Sentai. Yokaichi Air Base (Shiga Prefecture, Japan). July 1945. Aircraft flown by Regiment Commander Major Teruhiko Kobayashi (12 victories).
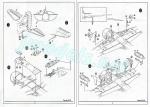
INSTRUCCIONES – INSTRUCTIONS:
- Folleto A5 de 4 páginas impreso en blanco y negro. Contiene un plano de piezas numerado, una lista de colores genéricos y 12 etapas de montaje. La cara trasera de la caja muestra perfiles de 4 aviones acompañados de una lista de colores.
- 4-page A5 brochure printed in black and white. It shows a numbered parts plan, a list with generic colors and 12 assembly steps. The back side of the box shows profiles of 4 aircraft with a list of colors.
LO MEJOR – THE BEST:
- Carlinga. Buen detalle general.
- Cockpit. Nicely detailed.
LO PEOR – THE WORST:
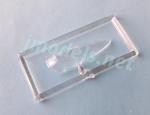
- Cubierta transparente de una pieza.
- One-piece canopy.
VALORACIÓN – CONCLUSION:
- Buena y aprovechable maqueta de un avión japonés no tan conocido como otros. Recomendable a modelistas con alguna experiencia.
- Nice and profitable kit of a not so well-known Japanese aircraft. Recommendable to modellers with some experience.

La maqueta
Durante muchos años solo marcas japonesas, como Aoshima, Fujimi y Fine Molds, le han dedicado alguna atención en la escala 1/72 a este bonito avión poco conocido fuera del país. Al lógico interés nacional de estos fabricantes, se unió a mediados de la década pasada RS Models, cuyas maquetas fueron las primeras de una compañía no japonesa. RS tiene en su catálogo todas las variantes de este avión (Ia, Ib y II).
La caja contiene dos bastidores de piezas grises, un bastidor transparente con la cubierta de la carlinga, unas pocas piezas de resina para el motor y los escapes, las calcas, que en este caso vienen en dos hojas, y las instrucciones. El plástico es más bien rígido pero las piezas son finas y están bien moldeadas. Hay ligeros restos de plástico y líneas de molde, también tenues, en algunas de ellas. No hay marcas visibles, pero otras positivas en el interior de las alas y el fuselaje hay que eliminarlas para pegar las piezas. Considerando el tipo de maqueta y el fabricante, debe señalarse que el molde está muy limpio de imperfecciones.
La maqueta comparte molde con los modelos Kawasaki Ki-100-Ia y II de la misma marca, por ello encontramos piezas dobladas, aunque diferentes, en los bastidores.
La maqueta de esta edición representa un Ki-100-Ib. con cubierta de burbuja en el fuselaje recto, un desarrollo del Ki-100-Ia, derivado a su vez del popular Ki-61 Hien, que poseía un fuselaje escalonado por detrás de la carlinga. Mientras la variante Ia era una conversión con motor radial del Ki-61, el Ib era en realidad un modelo de nueva planta y mejores prestaciones, del que se fabricaron algo más de 100 unidades antes del final de la guerra mundial.
Carlinga
La carlinga viene bien provista. Consta de un suelo detallado con los pedales, un asiento con el respaldo separado, un panel trasero hueco, otro delantero sobre el que va dispuesto el armamento y la mira, la palanca y el panel de instrumentos, detallado con instrumentos en fino relieve. Algunas piezas, como la mira y las armas necesitan un repaso para eliminar las líneas de molde. Los cristales de la mira deben ser fabricados por el modelista, para lo cual podemos valernos de acetato o de cualquier otro material fino y transparente.
Todo esto se complementa a los lados de la carlinga con parte del relieve estructural y algunos instrumentos simulados. En el lado derecho aparecen lo que debe ser la radio y una caja de conexiones. Ambos muestran los indicadores en relieve muy fino.
La cubierta de la carlinga es más bien fina, muy transparente y tiene la estructura bien marcada, pero, desgraciadamente, es de una pieza y no permite enseñar el interior. El hueco para colocar el mástil de la antena no está abierto, por ello el modelista deberá armarse de paciencia y cuidado en operación tan delicada.
Fuselaje y motor
Las mitades del fuselaje incluyen las superficies verticales de cola, las raíces alares y el capó, además del reposacabezas. El panel superior que contiene las troneras del armamento viene por separado al ser diferente en otros modelos de este avión. También hay otra sección en la panza separada, pero esta debe pegarse una vez colocadas las alas. La pieza incluye una toma de aire aparte con dos rejillas internas sin detallar. Hay más elementos menores bien representados, como los actuadores del timón de cola y las aberturas laterales de los escapes.
El panelado y remachado de algunas zonas está bien grabado y es muy fino. En algunos lugares, como en el capó y sus aletas, convendrá repasarlo para que no se pierda al pintar.
El motor está reproducido en dos coronas de cilindros de resina con una calidad excelente en el detalle. Las piezas van superpuestas y pegadas a un panel trasero. La pieza que simula la caja de engranajes de la hélice es de plástico. Para instalar el motor dentro del capó deberemos eliminar dos marcas positivas a los lados que impiden hacerlo. Los pequeños escapes múltiples también son de resina y van insertados en las ranuras laterales del capó. El anillo externo de la toma viene separado y debe pegarse antes que el panel superior con las troneras, ya que este último contiene también la toma de aire superior.
El buje no es demasiado fino, pero parece bien perfilado. Posee una placa trasera para ajustar la hélice. Esta viene de una pieza y carece de eje. Las palas son finas, bien perfiladas y apenas muestran restos de plástico.
Alas y cola
Las alas vienen despiezadas en tres partes. Las líneas de paneles están mejor marcadas que en el fuselaje, son más precisas y nítidas. El relieve estructural de los flaps está bien ejecutado, así como las aletas. También están bien reproducidos los pozos, que muestran suficiente profundidad, y las luces de navegación en las puntas. Las mitades superiores tienen representadas las troneras y carenas del armamento y la base del tubo Pitot. El faro de aterrizaje está marcado pero no ahuecado.
RS no ha olvidado incluir dos depósitos subalares con soportes separados. Están moldeados en mitades con buena representación de los tubos de circulación del combustible, detalle que siempre se obvia en muchos fabricantes.
Las superficies de cola están adecuadamente reproducidas. La aleta y el timón vertical vienen unidos, como he señalado. Tanto las líneas de panel como el relieve estructural del timón están bien conseguidos. Además de los ya mencionados actuadores, la zona muestra también las luces de navegación, la aleta del timón y la base de la antena de radio en la parte superior.
Los estabilizadores vienen de una pieza. Están bien panelados y detallados. Cuentan con aletas y actuadores perfilados, así como una buena representación de la estructura de los timones de profundidad. Como suele suceder en este tipo de maquetas, las pestañas para unirlos al fuselaje son muy cortas y deberán modificarse para reforzar la unión.
Tren de aterrizaje
Se compone de dos patas bien detalladas con los brazos de torsión pero con los ejes de las ruedas demasiado cortos, dos tapas divididas en secciones internas y externas detalladas por el lado interior y las horquillas de plegado. Aunque las horquillas son finas, tal vez se puedan sustituir por hilo de cobre con ventaja. Las ruedas son de una pieza y el buje externo también está detallado. La rueda de cola es sencilla y viene unida a su pata. Pese al tamaño, muestra muy buena definición y limpieza.
Calcas
Vienen en dos hojas. La primera contiene hinomarus, bandas de color para el fuselaje y las alas, numerales e insignias de unidad. La segunda solo tiene impresas bandas de color. Todas ellas muestran apariencia fina y están bien impresas.
Instrucciones
Están publicadas en un folleto de tamaño A5 que consta de cuatro páginas en blanco y negro. Contienen un plano de piezas numerado donde se omiten las piezas no aplicables a esta maqueta, una lista de colores genéricos y 12 etapas de montaje. La cara trasera de la caja muestra perfiles de cuatro aviones acompañados de una lista de colores. Una de las opciones de pintura representa el mismo avión pero con marcas diferentes. Las vistas explosionadas del montaje están representadas con claridad a buen tamaño pese al formato del folleto.
Valoración
Salvo que el montaje de las alas y el fuselaje diga lo contrario, esta es una de las mejores maquetas de RS Models que uno ha visto. El detalle general, y especialmente en la carlinga, me parece notable. Como es de esperar tratándose un avión del Ejército japonés, la pintura no da mucho juego, sin embargo las calcas y sus atractivas marcas de Sentai cubrirán con seguridad el hueco.
Esta maqueta de un avión no tan popular me parece recomendable a los seguidores de la aviación japonesa que lleven algunas maquetas de edición limitada a las espaldas.◊


The kit
For many years only Japanese companies, such as Aoshima, Fujimi and Fine Molds, have paid any attention, at least in the 1/72 scale, to this beautiful and little-known aircraft outside Japan. Their logical interest in the Ki-100 being an IJA aircraft was joined in the middle of the last decade by RS Models, whose kits were the first released by a non-Japanese company. RS have all the variants of this fighter (Ia, Ib and II) in their catalogue.
The box contains two sprues of grey parts, a clear sprue containing the canopy, a few resin parts for the engine and exhausts, the decals, which come on two sheets, and the instructions. Plastic is rather stiff but parts are thin and well molded. There are slight seam lines on some pieces but the kit has no marks on visible spots. Only some raised marks on the inside of the wings and fuselage need cleanup to attach the pieces. Considering the type of kit and the manufacturer, one has to say the tool is very clean from blemishes.
This release shares the tool with RS Kawasaki Ki-100-Ia and -II kits, which is the reason we find some alternative parts on the sprues.
The kit represents a Ki-100-Ib. with a bubble canopy on a straight fuselage, a development of the Ki-100-Ia, itself derived from the popular Ki-61 Hien, which had a stepped fuselage behind the cockpit. While the Ia variant was a radial-engined conversion of the Ki-61, development led to the production of a totally new fighter with higher-performance, designated as Ib model, with just over 100 built before the end of the World War.
Cockpit
The cockpit is well stuffed. It consists of a floor detailed with the pedals, a seat with a separate backrest, a hollow rear panel, a front panel on which the weapons and sight are arranged, the control column and the instrument panel, detailed with thin raised gadgets. Some parts, like the sight and weapons, need some cleanup to remove the seam lines. The modeller has to provide both sight glass reflectors, for which we can use acetate or any other thin and transparent material.
All this is complemented on the cockpit sides with a section of the structural frame provided with some instruments. On the right side we have what must be the radio and a switchbox. Both have very thin raised gadgets molded on.
The canopy is rather thin, very transparent and has a well defined structure, but unfortunately it is molded as one piece and the interior will not be clearly seen. The gap to place the antenna mast is not open and the modeller is supposed to do it himself with tons of patience and care.
Fuselage and engine
The fuselage halves include the vertical tail surfaces, wing roots, and cowling, as well as the headrest. The upper panel that contains the gun troughs comes separately as it was different in other Ki-100 variants and RS have molded it as an alternative piece. There is also a separate belly section, but this is glued on after the wings are attached to the fuselage. The piece includes a separate air intake with two internal filters with no detail. There are some other details rendered, such as the rudder actuators and side exhaust vents that are molded open.
Panel lines and rivets are very thin and thoroughly engraved. However, some lines on the cowl and cooling gills should be retouched as they are weak and could be lost after painting.
The engine is rendered in two resin cylinder rows with excellent quality in detail. The pieces are attached to a rear panel. To install the engine you need to clean up two raised marks on the cowling sides. The propeller gearbox is a plastic piece molded separately. The small exhausts are also resin pieces inserted into the side cowling slots. The nose ring is a separate piece to be attached before the top cowling panel as this includes the front air intake.
The hub is not too thin, but seems well profiled. It has a backplate to adjust the propeller and this comes in one piece without the axle that, again, the modeller is to provide. The blades are thin, well profiled and almost completely clean from flash.
Wings and tail
The wings are molded in three parts. Panel lines are better engraved than on the fuselage, these being more defined and sharper. The raised structure on the flaps is well rendered as are the tabs. The wells are also nice and deep enough, and the wingtips are detailed with the navigation lights. The upper halves include the gun ports and fairings and the base of the Pitot tube. The landing light is only engraved on the port leading edge.
RS have not forgotten to include two underwing tanks with separate racks. They are molded in halves with a good rendition of the fuel ducts, a detail that is overlooked by many manufacturers.
The tail surfaces are adequately reproduced. The fin and the vertical rudder are molded together, as noted. Both the panel lines and the raised structure on the rudder are nicely rendered. In addition to the actuators, the piece also shows the navigation lights, the rudder tab and the antenna base at the top.
The stabilizers come in one piece showing correctly engraved panels. They have profiled tabs and actuators, as well as a correct rendition of the elevators. As it usually happens in short runs, the tabs to attach the stabilizers are too short and should be replaced.
Undercarriage
It consists of two legs provided with torque arms and useless wheel axles as they are too short, two covers with inner and outer sections and detailed on the inner sides and the folding arms. Although the arms are thin, they could be replaced by copper wire for a better appearance. The wheels are one piece and the external hub is also detailed. The tail wheel is simple and is attached to the strut. Despite the size, it shows very good definition and is clean from flash or seam lines.
Decals
They come in two sheets. The first contains hinomarus, color stripes for fuselage and wings, numbers and unit markings. The second sheet only has stripes for the fuselage and wings for one of the painting choices. All of them are apparently thin and well printed.
Instructions
They are printed in black and white on a 4-page A5 brochure. It shows a numbered parts plan with some parts not printed when they are not used in the kit, a list of generic colors and 12 assembly steps. The back side of the box shows profiles of four aircraft with a list of colors for reference. One of the painting options is in fact the same aircraft with different decals. Exploded views are clearly shown despite the small brochure format.
Conclusion
Unless wing and fuselage assembly says otherwise, this is one of the best RS Model kits I have seen. Overall detail, especially in the cockpit, seems remarkable. As you could expect from an IJA aircraft, painting is always the same game, however I am sure the decals with their attractive Sentai markings will make a difference this time.
This is not a so popular aircraft among Japanese aviation fans and that seems a good reason to give it a chance, especially if you are experienced enough and have built a few kits of this type before.◊
Publicado – Published: 2 / 2023
©www.jmodels.net


Debe estar conectado para enviar un comentario.