

De un vistazo – Quick look
MATERIAL Y PIEZAS
MEDIA & PARTS:
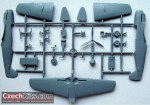
- 31 piezas de plástico inyectado, 2 piezas de plástico transparente y 45 piezas de fotograbado.
- 31 plastic parts, 2 clear parts and 45 PE parts.
CALCAS – DECALS:
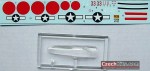
- Hoja pequeña que contiene hinomarus, insignias norteamericanas, códigos y bandas de color. Muy finas, buen registro y color.
- Small sheet containing hinomarus, US markings, codes and colour stripes. Very thin, good colour and register.
OPCIONES – OPTIONS:
- Ki-60, 2º prototipo, Japón 1941.
- Ki-60, 244º Sentai, Unidad de Ataque Especial.
- Ki-60 capturado por los norteamericanos, 1945.
- Ki-60, 2nd prototype, Japan 1941.
- Ki-60, 244th Sentai,Special Attack Unit.
- Ki-60 captured by the US, 1945.
INSTRUCCIONES – INSTRUCTIONS:
- Hoja A4 doblada. Contiene datos histórico-técnicos, diagrama de piezas y montaje en 8 fases principales. En general claras con algún reparo (ver texto).
- Folded A4 sheet containing technical and historical data, parts plan and 8 main assembly steps. Generally clear with exceptions (see text).
LO MEJOR – THE BEST:
- Tema inusual, panelado.
- Unusual topic, panel lines.
LO PEOR – THE WORST:
- Transparente de una pieza. Referencias de color genéricas.
- One-part canopy. Vague colour reference.
VALORACIÓN – CONCLUSION:
- Muy buena y completa maqueta de un avión japonés raro pero importante. Requiere cierta experiencia.
- Outstanding kit of an uncommon but important Japanese aircraft. It needs some modelling experience.

Aunque ya debiera estar acostumbrado, vuelve a sorprenderme la calidad general de esta maqueta de RS Models. Ya no es sólo el molde sino también lo completo del producto, una maqueta de una vez. Sólo se echa en falta un poco de más atención a las instrucciones en pequeños detalles que mencionaré más abajo. Hasta que aparecieron las tres maquetas de RS Models en plástico, sólo teníamos maquetas de resina o vacuforme.
La maqueta tiene tres bastidores, uno de plástico, otro de fotograbado y el último de plástico transparente. Completan el contenido las instrucciones que están impresas en una simple hoja tamaño A4 doblada por su mitad. Se muestran ocho pasos principales de montaje en diagramas claros y sencillos por lo general, pero hay algunas piezas de fotograbado cuya localización es algo dudosa, por ello hay que andarse con tiento y hacer pruebas antes de pegar definitivamente. Con diagramas algo más grandes, el asunto estaría resuelto.
Como suele ser habitual en el fabricante, los perfiles para pintar y colocar las calcas vienen en la parte trasera de la caja. Si bien este procedimiento ahorra costes, en los tiempos que corren la presentación del producto es al menos tan importante como su contenido y no parece la mejor forma de redondearlo el exponer esa información al albur de lo que ocurra con la caja en su manipulación y transporte por esos mundos de Dios. Otras marcas como Italeri, por ejemplo, ya no lo hacen así, aunque sea a costa de imprimir en blanco y negro todavía. También debería haberse cuidado más las referencias de color, que aparecen etiquetadas de modo genérico, sin correspondencia con alguna marca de uso más común. Las opciones de acabado son tres, aunque sólo la del segundo prototipo es históricamente cierta. Las otras dos son las de un avión perteneciente al 244º Sentai en misión de Ataque Especial, designación cursi de lo que no era sino un ataque suicida, que viene pintado al estilo de los Ki-61 Hien de dicha unidad, y un aparato supuestamente capturado en 1945 y probado por los norteamericanos.
El bastidor de plástico gris trae piezas bien moldeadas en las que no se aprecian restos evidentes de rebabas ni marcas fuera de sitio. El panelado de las alas y el fuselaje es excepcionalmente fino y bien hecho para la escala. El plástico recuerda algo al de Hasegawa, pero con más consistencia. También se mecaniza con facilidad al no tener la dureza tradicional de las maquetas de edición limitada. El despiece de alas y fuselaje es el tradicional en mitades y estabilizadores de una sola y fina pieza.
Los lados del fuselaje llevan parte de la estructura interior de la carlinga. Las únicas piezas de plástico aquí dentro son el suelo, el asiento (dos piezas), la palanca de mandos y el pilón antivuelco. Todos los detalles añadidos son de fotograbado: cinturones, pedales, panel (sin calca, hay que pintar la instrumentación), más instrumentos, etc. Una vez cerrado el fuselaje y pegadas alas y estabilizadores, la maqueta ya casi está en sazón para pintar.
El tren de aterrizaje también va detallado con fotograbados para las compuertas. Las ruedas, de una pieza, son creíbles en tamaño y forma, y las patas muestran parecida robustez a la que se aprecia en fotos de los tres prototipos construidos. Por una vez, los pozos son igualmente verosímiles en profundidad. La hélice, el cono y las diferentes tomas de aire están bien representados. No tanto los escapes, piezas separadas, cuyo primer tubo era algo más alargado y protuberante que los cuatro restantes, minucia que se puede pasar por alto a la escala. No puedo, sin embargo, decir nada seguro sobre los abultamientos de las alas para los cañones Mauser de 20 mm. porque es imposible verlos en las fotos que menciono.
El bastidor transparente tiene dos piezas, la cúpula y el faro de la luz de aterrizaje. Uno de los inconvenientes de la maqueta es la cúpula de una sola pieza, que impide mostrar el detalle interior. Quizá lo más acertado hubiese sido añadir otra en varias secciones o al menos una de acetato como opción. Es una pena trabajar este interior tan bueno para ver tan poco de él.
Más que hoja de calcas, RS Models ofrece una tirilla de papel, para hacer economías supongo. Con todo, los motivos tienen buen aspecto, aparentan ser muy finos y tener colores bien saturados. Además de los hinomarus, lleva marcas norteamericanas, numerales y bandas de color. Como ya he mencionado, las opciones del 244º Sentai y la norteamericana son ficticias y se han incluido para dar un poco más de juego al modelista. Un detalle que no se le ha escapado a RS Models son las bandas negras situadas en la parte posterior del fuselaje que se iban añadiendo conforme se fabricaban los tres prototipos finalmente terminados y probados. Son bien visibles en algunas fotos conservadas de ellos. En este caso tenemos las dos bandas del segundo avión.
La plancha de fotograbado incluye todo lo deseable, y aún más, para detallar el interior de la maqueta: cinturones, panel e instrumentos de la carlinga, tapas del tren de aterrizaje, etc. Algunas piezas son realmente diminutas y hay que andarse con ojo en la manipulación.
Sin duda disfrutarán más esta completa maqueta aquellos que tengan cierta experiencia con modelos multimedia y gusten de tener aviones poco frecuentes en la vitrina.◊


Although I should be used to RS Models releases, I keep on being surprised by the quality of this kit. It is not only the fine tooling but also the thorough product, with all you need to detail it. I only miss more attention to instructions in small details that I will mention below. Before the three RS Models releases in the market today, we only had resin and vacform kits.
The kit comprises three sprues, one in grey plastic, a fret of PE parts and the sprue containing the clear parts. The content is rounded off by the instructions, printed on an A4 sheet folded in the middle. They show eight main build steps in exploded views which are generally clear with the exception of some PE parts location, so care and double check are needed before gluing parts definitively. Bigger diagrams would have made things easier.
As usual with RS Models, the painting and decaling profiles are printed on the box. While this is a good way of saving costs, it is also true that presenting the product is at least as important as the content today and this does not seem the best way to round it off, leaving important information in the kit to the hazards of transport and manipulation round the world. Other brands – Italeri is a singular case – stopped doing things this way a long time ago even if their instructions are still printed in black and white. Paint reference should have also been cared as colours are only labelled generically with no correspondence to the most usual brands. There are three finishing options for the model, but only the second prototype was historically true. The other two correspond to a 244th Sentai aircraft, supposedly ready for a suicide mission, painted in the usual colours sported by the real Ki-61 Hiens of this same unit and a captured and tested aircraft in US markings.
The grey plastic sprue has well moulded parts with no trace of flash or marks in critical spots. Panel lines in fuselage and wings are outstandingly thin and fine for the scale. Plastic reminds the quality that of Hasegawa, perhaps a bit denser. It is also easy to work as it lacks the traditional roughness of short-runs. Wings and fuselage follow the usual breakup in halves with stabilizers in one thin part.
The cockpit sides have some of the internal structure moulded on. The only plastic parts are the floor, seat (two parts), control lever and the roll-over crash pylon. Al the rest of detail are PE parts: belts, instrument panel (no decal, it has to be painted), pedals, gadgets, etc. Once the fuselage is closed and wings/stabilizers are attached, the model is almost ready for paint.
The main landing gear also has PE parts for the doors. Wheels come as one part and look verisimilar in size and shape, and the robust legs look the part in pics of the three prototypes built. For once the wells are deep enough to contain the wheels, or at least they look so. Propeller, spinner and the different fuselage intakes are well represented, but not so much the exhausts (also two separate parts) whose first pipe was bigger and more protruding than the other four, a nitpicking detail that can be well overlooked. I can’t say anything about the wing bulges for the 20mm Mauser cannons because they are not evident in the few pics preserved of the Ki-60s.
There are two parts in the clear sprue, the canopy and the landing light. One of the drawbacks of this kit is the one-part canopy, which prevents seeing the interior detail. Perhaps RS Models should have included another canopy in three sections or at least a vacformed alternative. It is a pity your effort inside the model can’t be almost seen.
More than a decal sheet RS has included a decal band to save costs, I imagine. All in all, they look fine and very thin with saturated colours. Apart from hinomarus, there are US markings, codes and colour stripes. As I said, the choice for the 244th Sentai and the US are fictional and have been included for the sake of variety. A detailed that RS has not overlooked is the double black stripes in the rear part of the fuselage, which were added when the prototypes were finished, so in this case we have two for the second aircraft. These stripes are also quite evident in preserved pics.
The PE fret includes all the desirable parts to detail the interior: seat belts, instrument panel, some cockpit gadgets, main gear doors, etc. Some parts are really tiny so extra care is needed when handling them.
This kit will be most enjoyable for those modelers with some experience in multimedia models and who like having uncommon aircraft in their shelves.◊
Actualizado – Updated: 4 / 2022
Actualizado – Updated: 5 / 2017
Publicado – Published: 9 / 2015
©www.jmodels.net


Debe estar conectado para enviar un comentario.