
De un vistazo – Quick look
MATERIAL Y PIEZAS
MEDIA & PARTS:
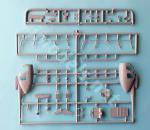
- Plástico inyectado (43 piezas), plástico transparente (8 piezas).
- Injected plastic (43 parts), clear plastic (8 parts).
CALCAS – DECALS:
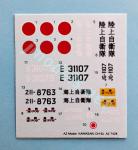
- Hoja pequeña que contiene hinomarus y matrículas. Bien impresas.
- Small sheet containing hinomarus and registers. Well printed.
OPCIONES – OPTIONS:
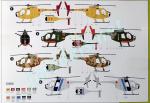
- Kawasaki OH-6J. 8763. Museo de la Base Aeronaval de Kanoya (Japón).
- Kawasaki OH-6J. JG-1075. Fuerzas Terrestres de Autodefensa Japonesas. Años 1980.
- Kawasaki OH-6J. JG-1107. Fuerzas Terrestres de Autodefensa Japonesas.
- Kawasaki OH-6J. JG-1065. Fuerzas Terrestres de Autodefensa Japonesas. Museo de la Aviación de Tokorozawa (Japón).
- Kawasaki OH-6J. 8763. Kanoya Naval Air Base Museum (Japan).
- Kawasaki OH-6J. JG-1075. JGSDF. 1980s.
- Kawasaki OH-6J. JG-1107. JGSDF.
- Kawasaki OH-6J. JG-1065. JGSDF. Tokorozawa Aviation Museum (Japan).
INSTRUCCIONES – INSTRUCTIONS:
- Folleto de tamaño A5 y cuatro páginas impreso en blanco y negro. Contiene un plano numerado de piezas, una tabla de colores, 7 pasos de montaje y perfiles. Muy claras. La cara trasera de la caja contiene perfiles a color y referencias de esmaltes de Humbrol. Los perfiles tienen errores (ver texto).
- 4-page A5 brochure printed in black and white. It shows a numbered parts plan, a table of colors, 7 construction stages and profiles. Very clear. The back side of the box shows profiles in color for 4 helicopters and Humbrol enamel paints references. The profiles have some mistakes (see text).
LO MEJOR – THE BEST:
- Buen detalle interno. Relativa sencillez de montaje.
- Detailed cockpit. Easy assembly for a short-run kit.
LO PEOR – THE WORST:
- Puertas cerradas. Errores en los perfiles de pintura.
- Doors molded closed. Some mistakes in the painting choices.
VALORACIÓN – CONCLUSION:
- Muy parecida a la maqueta de Italeri, pero en edición limitada. Para modelistas con cierta experiencia.
- Very similar to Italeri kit but in a limited edition. For modellers with some experience.

La maqueta
Hace ya alrededor de una decena de años que AZ Model produjo su molde del conocido helicóptero Hughes OH-6 Cayuse. De este molde sacó varias ediciones con versiones de distintos países operadores, que ciertamente no han sido escasos. Esta caja está dedicada a la versión japonesa Kawasaki OH-6J, primera que se produjo en el país y que posteriormente fue seguida por el modelo OH-6D, que también sacó AZ Model en una de sus ediciones.
Este helicóptero está bastante bien representado en prácticamente todas las escalas, incluso las más grandes, gracias a su pequeño tamaño, que lo hace idóneo para quien no tiene mucho espacio en la vitrina y gusta de modelos a buen tamaño. En la escala 1/72 el molde de Italeri fue de los primeros y es ya casi un clásico. Observando las instrucciones de esta maqueta, he reparado en la casi total similitud entre el molde de Italeri y el de AZ Model. Ambas no son idénticas, ya que se diferencian, por ejemplo, en que las puertas en la maqueta de la marca italiana pueden mostrarse abiertas, pero sin duda la maqueta de AZ debe mucho a la de Italeri, ya sea por colaboración o copia casi directa. Incluso las instrucciones están casi calcadas.
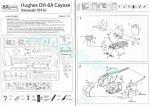
La caja de AZ trae dos bastidores de piezas grises, un bastidor transparente, una pequeña hoja de calcas y las instrucciones. Hay piezas dobladas o añadidas destinadas a otras versiones de la maqueta, ya que todas comparten el mismo molde. El plástico no es duro y posee cierta flexibilidad. Las piezas son finas, están bien moldeadas con un aspecto muy mate, sin rebabas ni marcas visibles excepto una en la parte trasera del panel intermedio de la carlinga. Las del interior del fuselaje no afectan a la carlinga, aunque podrían eliminarse como cautela. Salvo que el montaje de la carlinga y de las piezas transparentes dicten lo contrario al ser una edición limitada, esta maqueta no debería presentar más dificultades en su construcción que la de Italeri, tanto por el número de piezas como por el hecho de seguir muy de cerca el montaje de la maqueta del fabricante italiano.
Carlinga
Está integrada por un suelo detallado, dos juegos de pedales, un único mando de control, un tablero de instrumentos con los indicadores grabados, algunos de ellos con un moldeado peor definido pero pasable, y otro panel situado sobre el suelo anterior que podría ser un compartimento de aviónica. Hay dos piezas para simular los paneles verticales que compartimentan la carlinga. El anterior incorpora los reposacabezas, pero los asientos vienen separados, lo mismo que las palancas de control de cabezada. El panel posterior deja un compartimento trasero vacío y detallado sólo en el suelo. Los lados de la carlinga y el techo del habitáculo carecen también de detalles.
Algunas piezas pequeñas, como la palanca de control o los asientos, muestran muy ligeros restos de plástico que eliminar. Los asientos tienen aspecto algo rugoso y se deben repasar con lija, pero por lo demás la carlinga viene bastante bien detallada.
Fuselaje
Lo forman los dos lados moldeados con la cola, el acristalamiento delantero, realizado en una sola pieza, y las ventanillas laterales. Las líneas de panel y el detalle externo me parece pasable cuando menos. Las líneas son finas aunque cabe la posibilidad de repasar algunas que podrían quedar poco definidas tras pintarlas.
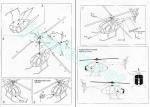
Como señalaba arriba, las puertas vienen cerradas, aunque la mayor parte del interior será visible. Las ventanillas son finas y transparentes. Las instrucciones indican que deben pegarse desde afuera, aunque acaso sea más sensato hacerlo en sentido inverso, ya que no hay rebajes en los contornos para encajarlas. El morro transparente incluye también los paneles acristalados del techo y los marcos de la estructura están bien definidos. La pieza parece ligeramente más gruesa que las ventanillas, lo que es razonable teniendo en cuenta su función. Hay otros dos finos paneles transparentes situados a los lados de la base del rotor. Antes de unir las mitades del fuselaje hay que incluir entre ambas la salida del tubo de escape bajo la cola. La pieza está bien detallada y muestra un panel divisorio en su extremo.
Las instrucciones ofrecen algunas opciones de montaje en forma de aletas de sensores y un dispositivo ventral cuya función ignoro. En cualquier caso, los perfiles de las instrucciones y los de la caja no los muestran en el OH-6J japonés.
Hay dos juegos de patines en los bastidores y para acertar el correcto, el modelista tiene que guiarse por los perfiles de la caja, ya que las instrucciones no lo indican. Las piezas son muy finas y deben separarse de los bastidores con delicadeza para no partirlas.
Rotores y hélices
El rotor principal se monta a partir de un eje detallado con la cabeza del rotor y su capotaje en piezas aparte. Las conexiones de control debe hacerlas el propio modelista con varilla plástica. Las palas vienen separadas y son finas. Los puntos de conexión con el rotor están adecuadamente detallados.
El extremo de la cola viene separado y dotado de un eje para la hélice. Esta viene de una pieza unida al rotor sin más detalle, con las palas un poco gruesas que podrían afinarse para conseguir mejor aspecto. Las aletas de cola están separadas. Son piezas finas, bien perfiladas y detalladas con delgadas líneas en relieve. Una de ellas incluye el patín trasero.
Calcas
Están impresas en una hoja pequeña que contiene hinomarus, matrículas y rótulos en japonés. Los motivos muestran un aspecto brillante y están bien impresos, con buena saturación de color y registro correcto.
Instrucciones
El folleto de tamaño A5 está impreso en blanco y negro y posee cuatro páginas. Contiene un plano numerado de piezas, una tabla de colores, siete pasos de montaje y perfiles. La cara trasera de la caja muestra perfiles a color y referencias de esmaltes de Humbrol. El folleto es común con otras ediciones de la maqueta, y por ello muestra el montaje de algunas piezas que no son aplicables a la versión japonesa.
AZ ha cometido errores en todas las opciones de pintura de la caja. El aparato del Museo de Kanoya (8763) está mal representado, ya que tanto la parte superior del aparato como las puertas están pintados en el mismo color de la cola. La segunda opción (JG-1075) también parece incorrecta. Este ejemplar está fotografiado en blanco y negro en la revista Air International, pero no parece llevar la panza de color naranja como la reproduce AZ Model, sino del mismo color del fuselaje. Otras fotos de época en color encontradas en internet muestran esto mismo. La tercera opción (JG-1107) no lleva el plano inferior de cola ni la banda trasera de blanco, aunque sí la hélice del rotor. El último (JG-1065) no lleva bandas en la panza de color diferente al gris del resto del aparato. Parece evidente que el modelista tendrá que cerciorarse de los colores adecuados antes de pintar la maqueta incluso más de lo que suele ser habitual.
Valoración
Con los condicionantes de una maqueta de edición limitada, esta es una alternativa a las ediciones clásicas de Italeri. Si la versión que se desea montar es importante y el modelista no desea preocuparse en buscar otras calcas, las ediciones de AZ Model parecen la opción más recomendable.◊

The kit
It is now around ten years since AZ Model produced their new tool of the well-known Hughes OH-6 Cayuse helicopter. From this tooling several editions were released including a range of versions from different operators, which certainly have not been few. This box is dedicated to the Japanese version Kawasaki OH-6J, the first to be produced in the country, later followed by the OH-6D variant, which was also released by AZ Model.
This helicopter is quite well represented in most scales, even the largest ones, thanks to its small size, which makes it ideal for modellers who do not have much space on the shelves and like good-sized models. In the 1/72 scale, the Italeri kit was one of the first and is now almost a classic. Checking the instructions of this kit, I have noticed the similarity between the Italeri and AZ Model kits. They can’t be the same tool as they differ, for example, in that the doors on the Italeri kit can be shown open, but the AZ releases clearly owe a lot to Italeri. Even the instructions are quite similar.
The AZ box includes two gray sprues, a clear sprue, a small decal sheet, and the instructions. There are doubled or added parts intended for other Cayuse variants because they all share the same tool. Plastic is not hard and has some flexibility. Parts are thin, well molded with a very matte appearance, with no visible flash or marks except one behind the rear cockpit bulkhead. There are also marks on the fuselage interior that do not affect the cockpit, but I would remove them just in case. Unless cockpit assembly and the clear parts say a different thing, this being a limited edition, the kit should not pose any more difficulties in construction than the Italeri kit, due to the number of pieces and the fact that both kits are very much alike.
Cockpit
It consists of a detailed floor, two sets of pedals, a single control column, an instrument panel with engraved gadgets, some of them less defined but passable, and another square piece located at the front that could be an avionics compartment. There are two parts to simulate the bulkheads dividing the cockpit. The front one includes the headrests, but the seats and the control levers are separated. The rear bulkhead leaves an empty compartment that only shows a detailed floor. The cockpit sides and roof are also empty.
Some small parts, such as the control lever or the seats, show some slight flash to be removed. The seats are somewhat rough and need some sanding, but otherwise the cockpit is pretty well detailed.
Fuselage
It is made up of two sides molded with the tail boom, the front glazing in one piece, and the side windows. Panel lines and external detail seem passable to say the least. The lines are thin, although some of them could be retouched to avoid poor definition after painting.
As noted, the doors come closed, although most of the interior will be visible. The windows are thin and transparent. The instructions indicate that they should be glued from the outside, although it seems more sensible to do it the other way round since there are no recesses in the contours to fit them. The clear nose also includes the glazed roof panels and has the structural frames well defined. The piece looks slightly thicker than the windows, which is reasonable considering its function. There are two other thin clear panels located on the rotor base sides. Before joining the fuselage halves, the exhaust pipe outlet is to be included under the tail.
The instructions offer some assembly choices in the form of antenna fins and a ventral device whose function I ignore. Anyway, both the instructions profiles and those on the box do not show any of these on the Japanese OH-6J.
There are two sets of landing skids on the sprues. The modeller is only guided by the box profiles to choose the correct set, since the instructions do not show the difference. The pieces are very thin and some care is needed to cut them off the sprues so as not to break them.
Rotors and propellers
The main rotor consists of a detailed mast with the rotor head and the hub in separate parts. The control rods are to be made from plastic by the modeller. The blades come separate and are thin. The blade grips are also detailed.
The rear tail cone is separated and molded with a shaft for the propeller. This comes in a single piece with the blades, which should be thinned to get a more realistic look. The tail fins are separated. They are thin pieces molded with thin raised lines. One of them includes the tailskid.
Decals
They are printed on a small sheet containing hinomarus, registers, and labels in Japanese. The items look glossy and are well printed, with good color saturation and correct registration.
Instructions
The A5 size brochure is printed in black and white and has four pages. It contains a numbered parts plan, a table of colors, seven assembly steps, and profiles. The back of the box shows profiles printed in color and a list of Humbrol enamel paints. The brochure is common with other AZ releases of this kit, and therefore it shows some subassemblies that are not applicable to the Japanese version.
AZ have made mistakes on all the paint options shown on the box. The Kanoya Museum helicopter (8763) is poorly represented, as both the top and the doors are painted in the same color as the tail. The second option (JG-1075) also seems wrong. A black and white picture of this example was printed on Air International magazine, but it does not seem to have an orange belly as AZ Model show, but rather the same fusekage color. Other vintage color photos I found on the Internet show the same thing. The third option (JG-1107) does not have the lower tail fin or the rear fuselage stripe in white, although the rotor blades do. The last one (JG-1065) does not have stripes on the belly in a different color from the overall fuselage gray. It seems clear that the modeller will have to do some research about the colors before painting the kit.
Conclusion
With the limitations of a short-run kit, this is an alternative to the classic Italeri offer. If the modeller wishes to build a specific version of the Cayuse without worryng about getting alternative decals, then any of the AZ Model kits seem the most recommendable choice.◊
Publicado – Published: 2 / 2023
©www.jmodels.net


Debe estar conectado para enviar un comentario.