
De un vistazo – Quick look
MATERIAL Y PIEZAS
MEDIA & PARTS:
- Plástico inyectado (61 piezas), plástico transparente (4 piezas).
- Injected plastic (61 parts), clear plastic (4 parts).
CALCAS – DECALS:
- Impresas por Techmod. Hinomarus, marcas de unidad y algunos numerales. Finas en apariencia y de buen aspecto.
- Printed by Techmod. Hinomarus, unit markings and some numbers. Apparently thin and well printed.
OPCIONES – OPTIONS:
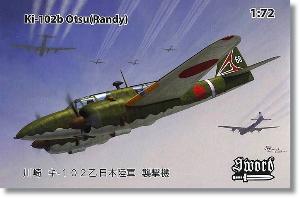
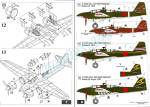
- Kawasaki Ki-102b Otsu. 3er Sentai. Base aérea de Noshiro, 1945.
- Kawasaki Ki-102b Otsu. 3er Sentai. Base aérea de Noshiro, 1945. (Camuflaje alternativo).
- Kawasaki Ki-102b Otsu. 28º Sentai. Base aérea de Togane, 1945.
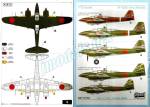
- Kawasaki Ki-102b Otsu. 45º Sentai. Base aérea de Hokota, 1945.
- Kawasaki Ki-102b Otsu. 45th Sentai. Base aérea de Hokota, 1945. (Aparato con numeral alternativo y góndolas parcialmente camufladas).
- Kawasaki Ki-102b Otsu. 3rd Sentai. Noshiro air base, 1945.
- Kawasaki Ki-102b Otsu. 3rd Sentai. Noshiro air base, 1945. (Alternative camouflage).
- Kawasaki Ki-102b Otsu. 28th Sentai. Togane air base, 1945.
- Kawasaki Ki-102b Otsu. 45th Sentai. Hokota air base, 1945.
- Kawasaki Ki-102b Otsu. 45th Sentai. Hokota air base, 1945. (Alternative aircraft number with camouflaged nacelles).
INSTRUCCIONES – INSTRUCTIONS:
- Folleto A4 de 10 páginas impreso en blanco y negro y color. Contiene un resumen histórico, un plano numerado de piezas, una lista de colores con pinturas equivalentes, 13 capítulos de montaje y dos páginas de perfiles a color. Claras.
- 10-page A4 brochure printed in color and black and white. It shows a historical reference, a numbered parts plan, a list of colors with paint matches, 13 assembly stages and two pages of color profiles. Clear.
LO MEJOR – THE BEST:
- Avión inusual. Buen detalle general.
- Unusual type. Nice overall detail.
LO PEOR – THE WORST:
- Encaje alas-fuselaje. Cubiertas de una pieza.
- Fuselage-wings join. One-piece canopies.
VALORACIÓN – CONCLUSION:
- Un avión que se echaba de menos y por fin recuperado por Sword. Detalle algo por encima de suficiente y algunas marras que no sorprenderán al modelista de cierta experiencia.
- A type that was missing long ago and finally brought back by Sword. Detail is a little more than average for a short-run and there are some tricks to contend with, but nothing new for the experienced modeller.

La maqueta
Hacía mucho tiempo que no veíamos un Ki-102 desde que Pavla sacó el último allá por los años 90 más o menos. Siendo también una maqueta de tirada corta, esta de Sword me parece mejor considerando que no lleva aderezos en forma de resinas, fotograbados y cosas así. No todo es coser y cantar, como luego se verá. De este molde nuevo hay ya 4 ediciones, la última con el añadido del misil Igo-I-B, otra de esas armas experimentales japonesas que quedaron en nada.
Esta maqueta representa el modelo Otsu (b), el más fabricado del avión, que era un caza pesado de ataque al suelo (o “de asalto”, como se decía en su tiempo) dotado con un cañón Ho-401 de 57 mm. a proa y cañones automáticos Ho-5 de 20 mm. bajo el fuselaje. Toda una batería volante.
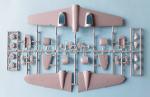
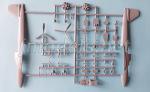
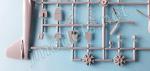
La maqueta comprende dos bastidores de piezas grises, un bastidor transparente, las calcas y las instrucciones. A primera vista las piezas presentan un aspecto brillante magnífico y vienen limpias de rebabas. Las marcas positivas, típicas de Sword, en el interior del fuselaje y alas no afectan al montaje, pero las del interior de los capós motores impiden pegar los motores dentro.
El plástico es fino y presenta buena flexibilidad, especialmente en las piezas de mayor tamaño. El panelado es preciso, hecho a base de líneas delgadas y no muy profundas, pero bien marcadas en las superficies móviles de alas y fuselaje.
Carlinga
La carlinga delantera está delimitada por una pieza en forma de Z recta que forma tanto el suelo como el panel trasero y la parte posterior de la carlinga. Además de los pedales moldeados en el suelo, hay piezas para el panel blindado tras el piloto, el asiento, la palanca y dos consolas laterales con pocos instrumentos en relieve. El panel principal muestra los instrumentos grabados y es la mejor pieza de todo el conjunto. Los lados del fuselaje de esta zona apenas muestran algún detalle.
Tras la carlinga aparece una especie de tapón y un pequeño depósito separado, acaso un contenedor de glicol para mejorar la carburación de los motores, como en algunos Ki-43 tardíos. Vaya usted a saber.
La carlinga del artillero tiene mejor detalle en los lados interiores del fuselaje y contiene un suelo, un panel trasero y otro delantero, el asiento y la ametralladora con su afuste. El arma guarda cierto parecido con la Ho-103 de 12,7 mm. que llevaba este avión.
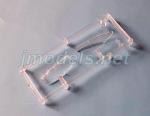
Las cubiertas transparentes de ambos puestos vienen de una pieza y no pueden ponerse abiertas. Las dos son finas, muy transparentes y la estructura en relieve está bien representada.
Fuselaje
Las mitades incluyen la deriva y el timón vertical, así como las raíces de las alas. A proa hay un hueco para situar el tubo sin horadar que representa el Ho-401. Tenemos la opción de eliminar la parte posterior de la carlinga trasera que tapaba el armamento. En la zona situada entre ambos puestos hay que colocar el carenado de la antena direccional y el soporte de la antena.
Alas, empenaje y motores
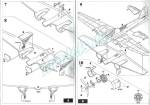
Las alas están despiezadas en dos mitades superiores y una inferior. Todas ellas llevan las góndolas de los motores moldeadas in situ. La pieza inferior muestra, además, el hueco de los pozos. Las puntas no coinciden, de modo que las caras inferiores van encajadas en las superiores para conseguir afinar las puntas. Por mucho que el motivo sea razonable, personalmente me disgusta esta disposición porque siempre deja líneas difíciles de simular con una profundidad creíble. Los bordes de ataque presentan huecos para incluir la pieza transparente del faro de aterrizaje y el tubo pitot.
Las superficies están bien paneladas y además se aprecian diversos registros por ambos lados y las luces de posición en la parte superior. Sin embargo, el relieve de los flaps entelados es muy escaso y está moldeado con poca definición. La mitad inferior comprende una sección ventral del fuselaje que muestra las salidas de los cañones Ho-5 y las de las vainas, pero estas vienen cegadas. Curiosamente, Sword se ha molestado en hacer parte de los cañones para colocarlos dentro del fuselaje aunque no se verán.
El foro checo de IPMS Nymburk contiene fotos del deficiente encaje de las alas y el fuselaje, en parte debido al grosor del suelo de la carlinga del piloto. Nadie puede sorprenderse de que ocurra esto en una maqueta de Sword ni en la de casi cualquier fabricante.
Los estabilizadores vienen separados y moldeados con lengüetas para unirlos al puro de cola. Aunque el panelado es bueno y el detalle ciertamente aceptable, los flaps vuelven a mostrar poca definición en el entelado.
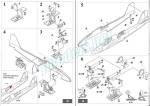
El capó motor está separado de cada góndola y dividido en mitades que incluyen los escapes. Estos no muestran mucha definición y parecen poca cosa, tal vez conviene sustituirlos por algo con más relieve. El capó va apoyado en una pestaña situada sobre el hueco frontal de la góndola, por ello hay que cuidar la alineación al pegarlo. En la parte inferior del capó hay una pieza para simular la toma de aire.
Antes de colocar el motor dentro del capó hay que eliminar un par de molestas marcas positivas que impiden hacerlo. Los motores son de una pieza con detalle aceptable y llevan la caja de engranajes separada. Las hélices y los bujes también vienen separados, mostrando las primeras finura y buen perfilado.
Tren de aterrizaje
El interior de cada pozo está dotado de un panel frontal y un fondo con relieve simulando la estructura. Las patas y los brazos de plegado son convincentes y están moldeados en piezas delgadas con adecuada definición en los amortiguadores y los brazos de torsión. Las tapas separadas no tiene detalle interno.
Las ruedas están divididas en mitades y presentan bujes bien marcados. La rueda de cola viene unida a la pata, que realmente quedó así de larga en la realidad, tras algunos problemas detectados en las pruebas de vuelo.
El montaje del tren de aterrizaje se hace más fácil gracias a las varias vistas de perfil y de frente que aparecen en las instrucciones.
Calcas
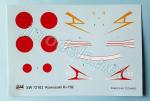
La hoja está impresa por Techmod, sinónimo de calidad. Contiene hinomarus, marcas de sentai para la cola y algunos numerales. La hoja la veo muy buena pero corta, echo en falta algunos estarcidos que dieran algo más que una simple identificación de los aviones.
Instrucciones
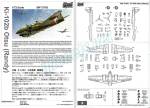
El folleto de instrucciones de 10 páginas tiene tamaño A4. Está impreso en blanco y negro, excepto las páginas finales de perfiles a color. Estas ilustraciones también aparecen en la cara trasera de la caja. El manual incluye también un resumen histórico breve, una lista de colores con equivalentes en pinturas de Gunze Sangyo y 13 capítulos de armado. El desarrollo del montaje es claro y puede seguirse sin problemas.
Valoración
Todos los Ki-102 de Sword son más que bienvenidos, después de años de sequía sin este avión olvidado por los fabricantes populares. Las carencias de esta maqueta no impresionarán al modelista experto al que va dirigida.
El detalle interior me parece suficiente y el externo en general está bien conseguido. Tal vez la maqueta sería mejor con unos cintos en la carlinga, otros escapes, flaps algo más marcados y unas calcas más completas.
Creo que cualquiera de esta serie de maquetas de Sword será bien recibida por los del negociado de seguidores de la Aviación Imperial.◊

The kit
It’s been a long time since we saw the last Ki-102 in the market. I think Pavla relased the last one back in the 1990s or so. Being also a short-run kit, this one from Sword seems better considering it doesn’t include aftermarkets in the form of resins, photo-etched parts and things like that. Not everything is that beautiful, as we will see later. There are already 4 editions of this new tool, the last including the Igo-I-B missile, another one of those Japanese experimental weapons that came to nothing.
This kit represents the Otsu (b) variant, the most produced of the aircraft, which was a heavy ground-attack fighter (or «assault plane», as it was called at the time) equipped with a 57mm. Ho-401 cannon in the nose and 20mm. Ho-5 automatic cannons under the fuselage. A whole flying battery.
The kit includes two sprues of gray pieces, a clear sprue, the decals and the instructions. At first sight parts have an attractive shiny look and are free from blemishes. Raised marks, common in Sword, are present on the inside of the fuselage and wings, but do not affect assembly. However, those on the inside of the engine cowlings prevent the engines from being glued.
Plastic is thin and has good flexibility, especially in the larger pieces. Panels are well done, engraved with thin and not very deep lines, but correctly marked on the moveable surfaces of wings and fuselage.
Cockpit
The front cockpit includes a straight Z-shaped piece that renders the floor, the rear panel and the area behind the cockpit. In addition to the pedals molded on the floor, there are pieces for the armored panel behind the pilot, the seat, the control column and two side consoles with a few raised instruments. The instrument panel shows engraved instruments and is the best part of the whole set. The fuselage sides barely show any detail.
Behind the cockpit there is a kind of plug and a small separate tank, perhaps a glycol container to improve engine performance, as in late Ki-43s. Who knows.
The gunner’s cockpit has better detail on the inner fuselage sides and contains a floor, a rear and front panel, the seat and the machine gun with the mount. The weapon looks like the 12.7mm. Ho-103 which the aircraft had as a defensive armament.
The canopies in both cockpits come in one piece and cannot be posed open. Both are thin, very transparent, and the raised structure is well rendered.
Fuselage
The halves include the fin and vertical rudder, as well as the wing roots. In the nose there is a hole to place the undrilled barrel that conveys the Ho-401. We have the option to remove a section of the fuselage that covered the machine-gun behind the rear cockpit. Between the two cockpits, there are pieces for the fairing of the directional antenna and the antenna mast.
Wings, empennage and engines
The wings consist of two upper and one lower halves. All of them have the engine nacelles molded on. The lower piece also shows the wells. Wingtips do not match, so that the lower faces are embedded in the upper ones to get thinner tips. As much as this is reasonable, I personally dislike this arrangement because it always leaves hard-to-simulate lines. The leading edges have gaps to include the clear landing light and the pitot tube.
Nicely engraved panels, several registers and position lights on the upper surfaces can also be seen on wings. However, flaps are molded soft and lack definition. The lower half comprises a ventral fuselage section that shows the troughs of the Ho-5 guns and the ammo chutes, but these are molded closed. Interestingly, Sword has bothered to make part of the cannons to be attached inside the fuselage although they will not be seen.
The Czech IPMS Nymburk forum shows photos of the poor fit of wings and fuselage in this kit, partly due to the thickness of the pilot’s cockpit floor. Nobody can be surprised that this happens in a Sword kit or in that of almost any manufacturer.
Stabilizers come separately and molded with tabs to attach them to the tail cone. Although panels look nice and detail is certainly acceptable, the flaps again show little definition.
The engine cowling is separate for each nacelle and split in halves that include the exhausts. These do not show much definition and seem too small, perhaps it would be a good idea to replace them. The cowling is attached on a tab located on the nacelle opening, so careful alignment is needed. The air intake under each cowling is a separate piece.
Before glueing the engine inside the cowling you have to remove a couple of annoying raised marks. The engines are one piece with acceptable detail and have a separate gearbox. The propellers and hubs also come separately, with the first showing finesse and good shapes.
Undercarriage
The interior of each well is provided with a front panel and a bottom side with raised structure. The legs and folding arms are convincing and molded in thin pieces with adequate definition in the shock absorbers and torque arms. The separate covers have no internal detail.
The wheels are split in halves and feature well-marked hubs. The tailwheel is molded with the leg. The leg was really that long, after changes made during flight tests.
Undercarriage assembly is easier thanks to the several side and front views shown in the instructions.
Decals
The sheet is printed by Techmod, a synonym of quality. It contains hinomarus, sentai tail markings and some numbers. I think the sheet is quite good but it falls short. I miss some stencils that would give something more than a simple identification of the planes.
Paint choices offer alternative colors and numbers in some of the aircraft, apart from the colourful sentai markings.
Instructions
The 10-page instruction brochure is A4 size. It is printed in black and white, except for the profiles showed in the last pages. These also appear on the back of the box. The manual also includes a brief historical summary, a list of colors with Gunze Sangyo paint matches, and 13 assembly chapters. Views of the assembly are clear and can be followed easily.
Conclusion
The release of this Sword’s Ki-102 is good news after years without seeing this aircraft around. The shortcomings of this kit will not impress the expert modeller as they are common in any short-run.
Interior detail seems enough and the general look of the aircraft is well achieved. Perhaps the kit would have been better with some belts for the cockpit, better exhausts, improved flaps and some stencils printed on the decal sheet.
I imagine Japanese aviation followers will be happy to have any of the boxes in this series of Sword kits.◊
Publicado – Published: 8 / 2022
©www.jmodels.net


Debe estar conectado para enviar un comentario.