
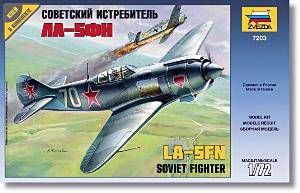
De un vistazo – Quick look
MATERIAL Y PIEZAS
MEDIA & PARTS:
- Plástico inyectado (38 piezas), plástico transparente (2 piezas). Incluye 1 figura.
- Injected plastic (38 parts), clear plastic (2 parts). One figure included.
CALCAS – DECALS:
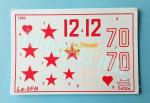
- Estrellas rusas con borde amarillo, numerales e insignias. Sin exceso de soporte.
- Soviet stars with yellow edges, registers and badges. No excess of carrier film.
OPCIONES – OPTIONS:
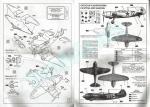
- Lavochkin La-5FN. 12 rojo. Pintado en camuflaje invernal estándar.
- Lavochkin La-5FN. 15 blanco. 159º Regimiento de Cazas. Leningrado, 1944. Aparato pilotado por el Capitán Likholetov.
- Lavochkin La-5FN. Red 12. Painted in standard winter camouflage.
- Lavochkin La-5FN. White 15. 159th Fighter Regiment. Leningrad, 1944. Aircraft flown by Captain Likholetov.
INSTRUCCIONES – INSTRUCTIONS:
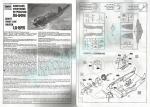
- Folleto A4 de 4 pginas impreso en blanco y negro. Muestra un resumen histórico sobre el avión en varios idiomas, un plano numerado de piezas, 8 secuencias de montaje, perfiles y una tabla de pinturas de Zvezda y Humbrol. Claras.
- A4 4-page brochure printed in black and white. It contains a short historical summary about the fighter in several languages, a numbered parts plan, 8 assembly sequencies, profiles and a table of paints from Zvezda and Humbrol.
LO MEJOR – THE BEST:
- Molde bastante limpio con algunos detalles no del todo mal conseguidos.
- Clean tool with some details not that badly rendered.
LO PEOR – THE WORST:
- Líneas de panel (tanto en relieve como grabadas). Motor. Hélice incorrecta.
- Panel lines (both raised and engraved). Engine. Incorrect propeller blades.
VALORACIÓN – CONCLUSION:
- Muy superada por las de otras marcas, puede ser aún útil a modelistas novatos o de poca experiencia.
- Surpassed by modern kits from other companies, it can still be useful for the novice or less experienced modeller.

La maqueta
Este molde lleva rodando por ahí desde 1972 y es original de Italaerei, ahora Italeri. Lo han reeditado Revell, Bilek y también Zvezda, que suele sacarlo cada cierto tiempo. Dicho esto, poco hay que explicar del molde y de la propia maqueta, que hoy están superados por otros fabricantes como la moderna KP o Clear Prop. Esta última maqueta es sin duda la más detallada hasta ahora, pero parece más adecuada para modelistas de nivel avanzado.
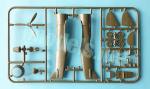
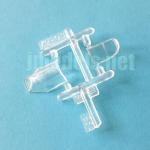
La caja contiene dos bastidores de piezas verdes, un pequeño bastidor transparente, las calcas y las instrucciones. El plástico es fino aunque un poco rígido, sin ser duro. Las piezas están bien moldeadas y sorprendentemente limpias de rebabas y casi de marcas de eyector. Las del interior de la carlinga quedan por debajo del suelo, con lo cual no hay que dedicarles ni atención ni tiempo.
Las líneas de paneles, que en este avión no son muchas, están reproducidas tanto en relieve fino como grabadas aquellas que representan superficies móviles de timones, flaps o alerones.
La maqueta representa un La-5FN, el modelo definitivo de este caza. El desarrollo tuvo muchos problemas con el motor, hasta que se logró cambiar el modelo M-82F con carburador por el M-82VN de inyección de combustible. Se fabricaron alrededor de 1.500 cazas de esta versión, que entró en combate a partir del verano de 1943.
Carlinga
Los lados internos de la carlinga llevan detalles de los paneles y cableado reproducidos en relieve fino. El suelo viene de una pieza en forma escalonada con los pedales moldeados en la pieza. El asiento no me parece muy real y muestra una ligera marca de eyector que no se verá si se emplea la figura del piloto. Hay también una palanca y el panel de instrumentos con los indicadores en relieve. Encima del panel hay una pieza exenta que parece reproducir la mira.
La figura del piloto resulta un tanto tiesa y su pose se podría describir como faraónica. No es de gran calidad que digamos, pero al menos en el traje de vuelo se ven las gafas y casco, la cazadora y las botas. Además, los miembros están proporcionados.
El interior no parece nada malo considerando la edad de este molde y el hecho de que viene bastante limpio de imperfecciones.
La cubierta de la carlinga viene en dos secciones. Las piezas no son demasiado finas ni transparentes y probablemente agradecerían un ligero pulido. La estructura del marco acristalado está simulada en ligero relieve.
Fuselaje
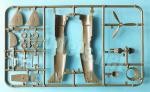
Está moldeado en mitades que incluyen la deriva y parte de las raíces de las alas, pero sin el anillo del capó. Como se ha dicho, las líneas de paneles y accesos están representadas en relieve muy fino. Las salidas laterales del motor vienen abiertas aunque no lo parecen porque hay que limpiar ligeros restos de plástico en las ranuras. También destacan los carenados del armamento sobre la cubierta delantera. Hay también una pieza para el mástil de la antena.
La parte anterior del capó viene separada en una pieza que muestra las troneras del armamento bien perfiladas. Por debajo hay una pieza abierta por ambos extremos y con la aleta posterior que simula la toma del refrigerador de aceite, y por encima la toma del compresor, que en el modelo FN llegaba hasta el borde del capó. La toma también viene abierta y su perfil trasero no es demasiado correcto al no poseer forma puntiaguda.
El motor es simplón, sin embargo carece de rebabas y sólo muestra ligeras líneas de molde. De cualquier forma, poco se verá cuando instalemos la persiana de la toma de aire por delante. La persiana viene muy simplificada también y no se parece a la real. La hélice es de una pieza con palas limpias y aceptables que pueden afinarse algo más, aunque el perfil y su orientación no son correctos. El buje está separado y parece un poco grande.
Alas y cola
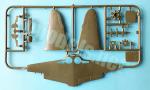
Las alas están divididas en tres piezas, dos mitades superiores y una inferior. Las puntas están moldeadas con las mitades superiores. Los alerones y sus aletas están panelados en negativo con la estructura simulada mediante líneas finas en relieve. Las dos caras de los alerones están moldeadas con las superficies superiores y las bisagras aparecen mal definidas en la mitad superior. Por contra, los flaps sólo están grabados en la mitad inferior. Los pocos paneles están representados mediante líneas muy finas en relieve. También aparecen grabados los listones automáticos de los bordes de ataque. Todas las líneas grabadas son exageradas por anchas y están claramente sobreescaladas. Las tomas de combustible vienen en piezas separadas que hay que pegar por dentro de las alas. Posiblemente estas piezas sobresalen de la superficie del ala, pero será fácil dejarlas al ras. También se aprecian las pequeñas luces de navegación sobre las alas. El tubo Pitot viene aparte y se pega debajo del ala izquierda.
Los pozos de las ruedas aparecen abiertos en la mitad inferior de las alas. El fondo no está detallado y muestran algunas marcas de eyector de escasa profundidad que podrían ser visibles.
Los estabilizadores y el timón de dirección vienen separados. Los estabilizadores encajan mediante lengüetas en el fuselaje y muestran los timones bien marcados y la estructura simulada con líneas en relieve. El estabilizador de babor lleva la aleta grabada, lo mismo que el timón de dirección, cuya estructura está reproducida de la misma forma que en los estabilizadores.
Tren de aterrizaje
Está compuesto de dos patas y sus respectivos brazos de plegado. Las piezas son finas y las patas tienen la amortiguación bien detallada, sin líneas de molde, pero carece del brazo de torsión. Las ruedas están separadas en mitades que encajan unas en otras. El neumático es liso pero está bien marcado, mientras que los bujes no muestran detalle. El interior está provisto de un tope separado que permite el giro de la rueda. Las tapas son finas y carecen de detalle.
Como única opción de montaje, el tren se puede poner plegado para mostrar el avión en vuelo. Las instrucciones no lo indican, pero la parte inferior de las alas tiene marcada la ranura para introducir el soporte que la maqueta no trae.
Calcas
La hoja está impresa por el fabricante. Contiene estrellas rusas con borde amarillo, numerales e insignias. Los motivos no tienen exceso de soporte y son aparentemente finos. Hay un juego de numerales (70 blanco) y el emblema del corazón que no está representado en esta maqueta, pero que también podría emplearse en ella. Al parecer este avión lo volaba el Teniente Sementsov del 41 GIAP (Regimiento de Cazas) en Ucrania en 1944.
Instrucciones
Están impresas en un folleto de tamaño A4 que consta de cuatro páginas en blanco y negro. Muestra un resumen histórico sobre el avión en varios idiomas, un plano numerado de piezas, ocho secuencias de montaje, perfiles y una tabla de pinturas de Zvezda y Humbrol. Los pasos de montaje son sencillos de seguir. Sin embargo, los perfiles a color que se muestran en la cara trasera de la caja no son de mucha ayuda en el caso del aparato de Likholetov, ya que los colores están muy azulados.
Valoración
Aunque esta maqueta está claramente superada hoy y no es la más acertada para representar un La-5FN, aún sorprende un poco la limpieza del molde y algunos detalles no del todo mal conseguidos. Uno ha visto, por ejemplo, carlingas bastante más vacías y detalles mucho más crudos y llenos de restos de plástico en otras maquetas muy posteriores a esta. Creo que el modelista novel o de escasa experiencia podría sacar bastante partido de ella sin que llegue a dolerle la cartera.◊

The kit
This kit has been around since 1972 and is original from Italaerei, now Italeri. It has been reiboxed by Revell, Bilek and also by Zvezda, which also reissue it from time to time. That said, there is little to explain about the tool and the kit itself, which have been left behind by more modern La-5s from KP or Clear Prop. The Clear Prop offer is undoubtedly the most detailed so far, but it must not be a quick build and looks more suitable for experienced modellers.
The box contains two sprues of green pieces, a small clear sprue, the decals and the instructions. Plastic is thin, a bit stiff but not hard. Parts are well molded and surprisingly clean from flash. There are less pin marks than one could expect. The marks on the cockpit sides are below the floor level, so you can simply leave them where they are.
Panels, which are not many in this aircraft, are rendered both in thin raised lines but they are engraved to represent the moveable surfaces of rudders, flaps or ailerons.
The kit depicts a La-5FN, the definitive variant of this fighter. The development had many problems with the engine, until it was possible to change the M-82F engine with carburetor for the M-82VN with fuel injection. The Soviets built around 1,500 fighters of this version, which saw combat from the summer of 1943 onwards.
Cockpit
The internal cockpit sides are detailed with raised panels and some wiring. The floor comes in one piece in a staggered shape with the pedals molded on. The seat doesn’t look the real counterpart and shows a slight ejector mark that won’t be seen if you use the pilot figure. There is also a control column and an instrument panel with raised gadgets. Above the panel there is a separate piece that seems to reproduce the sight.
The pilot figure is somewhat stiff and his pose could be described as “pharaonic”. It’s not very good, but at least you can identify the goggles, helmet, jacket and the boots. In addition, the body and limbs proportions are well achieved.
The interior doesn’t look bad at all considering the age of this kit and the fact that it comes pretty clean from blemishes.
The canopy comes in two sections. The pieces are not too thin or transparent and would probably get a better look after a light polish. The structure of the glazed frame is slightly raised.
Fuselage
It is molded in halves including the fin and a section of the wing roots, but without the cowling outer ring. As said, panels and accesses are rendered with raised lines. The engine side outlets are in fact open but here you will have to clean up the slight flash present inside the slots. Nothing serious, anyway. The gun bulges on the engine sides are correctly molded and there is also a separate piece for the antenna mast.
The front cowling ring is molded in a piece that shows nicely outlined gun troughs. Under the cowling there is a piece open at both ends with a small rear fin for the oil cooler intake. The characteristic compressor intake placed on the cowling comes separately. This intake reached the cowling rim in the FN model, as the kit correctly shows. The intake is also open but the rear profile is not very correct as it has been molded round and should have a pointed shape.
The engine is quite basic, however it is free from flash and shows only slight seam lines. Anyway, little will be seen when we include the front air intake shutter. The shutter is also very poor and does not look the real thing. The propeller is one piece with decent clean blades that can be refined a bit more, although the profile and shape are not correct. The hub is separate and looks a bit large for the scale.
Wings and tail
The wings are divided in three pieces, two upper halves and one lower half. The wingtips are molded with the top halves. Ailerons and flaps are engraved with the structure simulated by thin raised lines. Both sides of the ailerons are molded with the upper wing halves but the hinges are on the upper half and look quite simple. However the flaps are only engraved on the lower half. The few panels are again showed as thin raised lines. The automatic slats on the leading edges are also engraved. All the etched lines on the moveable surfaces are clearly oversized. The midwing fuel fillers come as separate pieces that are attached from the inside of the wings. The pieces seem to protrude from the wing surface, but some sanding will get them flush. Other details include the small navigation lights on the wings and the Pitot tube, which is attached under the left wing.
The wheel wells are molded open on the lower wing halves. The floor inside is flat and shows some shallow ejector marks that might be visible.
Stabilizers and the rudder come separate. The stabilizers are provided with tabs to attach them to the fuselage. They show correctly engraved rudders and raised lines representing the internal structure. The port stabilizer and the rudder are also provided with small fins. Rendition of the structure on the rudder is similar to that on the ailerons.
Undercarriage
It comprises two legs and their folding arms. The pieces are thin and the legs have nicely detailed shock-absorbers with no seam lines present on them. The torque arms are missing. The wheels are separated in halves with internal rings to make them fit tight. The tires are flat but well marked around the hubs, while these show no detail. The interior hub is provided with a separate plastic bearing that allows the wheel to turn. The covers are thin and flat without detail.
The only asembly option is to build the undercarriage folded to display the aircraft in flight. The instructions do not indicate it, but the lower wing half has a slot engraved to be opened if you wish to use a stand. This is not included in the kit.
Decals
The sheet is printed by the manufacturer. It contains Russian stars with yellow outlines, registers and badges. The items do not have too much carrier and are apparently thin. There is a set of numbers (white 70) and the heart symbol that is only showed on the boxart. No information is given about this La-5FN, but I learned this plane was flown by Lieutenant Sementsov of the 41 GIAP (Fighter Regiment) in Ukraine in 1944.
Instructions
They are printed in an A4 size brochure consisting of four black and white pages. It shows a historical summary about the aircraft in several languages, a numbered parts plan, eight assembly sequences, profiles and a chart with Zvezda and Humbrol paints. The assembly steps are easy to follow. However, the color profiles shown on the back of the box are not of much help in the case of Likholetov’s aircraft, as they look too bluish.
Conclusion
Although this kit is clearly outdated today and is not the most accurate to build a La-5FN, the clean tool and some details decently rendered are still a bit surprising. One has seen worse kits released many years after this one. I think that newbies and less experienced modellers could still get a lot out of it without going broke.◊
Publicado – Published: 4 / 2023
©www.jmodels.net


Debe estar conectado para enviar un comentario.