
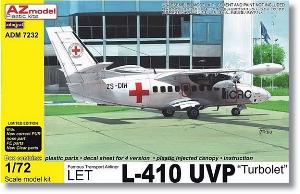
De un vistazo – Quick look
MATERIAL Y PIEZAS
MEDIA & PARTS:
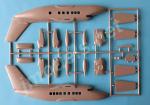
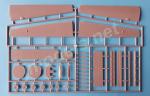
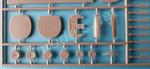
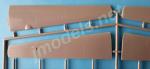
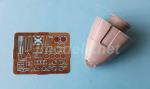
- Plástico inyectado (129 piezas), fotograbado (37 piezas), plástico transparente (20 piezas), resina (1 pieza).
- Injected plastic (129 parts), photo-etched (37 parts), clear plastic (20 parts), resin (1 part).
CALCAS – DECALS:
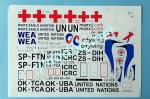
- Una hoja con rótulos de compañías privadas, Naciones Unidas y Cruz Roja, algunos estarcidos y logotipos. Acabado brillante y apariencia fina. Bien impresas.
- One sheet containing private airlines, UN and Red Cross markings, some stencils and logos. Gloss finish and apparently thin. Well printed.
OPCIONES – OPTIONS:
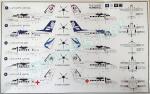
- LET L-410 UVP-E. Manx2, OK-TCA. 2006-2012.
- LET L-410 UVP-E. White Eagle Aviation, SP-FTN. 1992-2010.
- LET L-410 UVP. Citywing, OK-UBA. 2012-2017.
- LET L-410 UVP-E. Naciones Unidas [United Nations], LZ-CCS.
- LET L-410 UVP-E. Cruz Roja [Red Cross], ZS-DIH.
INSTRUCCIONES – INSTRUCTIONS:
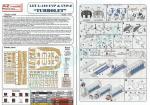
- Folleto de 4 páginas impreso en color. Contiene un sumario histórico sobre el avión, una tabla de colores con equivalencias de Humbrol y 23 secuencias de montaje. Ilustraciones algo pequeñas, pero claras en general.
- 4-page leaflet printed in color. It contains a historical summary on the aircraft, a table of colors with matches in Humbrol paints and 23 main assembly steps. Assembly views a bit small, but clear.
LO MEJOR – THE BEST:
- Buen detalle general. Calcas.
- Nice overall detail. Decals.
LO PEOR – THE WORST:
- Palas separadas en las hélices. Ruedas en mitades. Falta de transparentes en los faros de correteo. Instalación del morro de resina.
- Propellers with separate blades. Wheels molded in halves. Lack of clear parts for the nose. Assembly of the resin nose.
VALORACIÓN – CONCLUSION:
- Maqueta multimedia para modelistas con experiencia. Buen detalle general con algunas fases del montaje donde será preciso mostrar recursos y habilidades. Buenas calcas para mejorar versiones poco atractivas.
- Short-run kit for experienced modellers. Nicely detailed with some assembly stages which will need modelling skills. Good decal sheet to improve the unattractive paint choice.

La maqueta
Es una reedición del molde original que el fabricante Gavia sacó a finales de los noventa. Ahora AZ Model la vuelve a poner en circulación con el sello Admiral. Las ediciones son similares en ambos casos, excepto en las versiones de las calcas.
El contenido comprende tres bastidores de plástico, una plancha de fotograbados, un bastidor de piezas transparentes, una pieza de resina, la hoja de calcas y las instrucciones. Como de costumbre en los fabricantes checos, las piezas están protegidas en bolsas separadas y los fotograbados traen su propio cartón de respaldo para evitar daños.
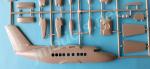
El plástico es algo rígido, más evidente en las alas y fuselaje, pero las piezas están bien moldeadas y en general muestran un grosor adecuado a la escala. Lo mejor del molde es que no hay rebabas en las piezas, y lo menos bueno son las marcas positivas que encontramos en el interior del fuselaje y las alas. Las del fuselaje, aunque pocas y pequeñas, estorban el montaje de la carlinga y las de las alas impiden la unión de las mitades que las forman en algunos puntos. Estas últimas no son visibles y quitarlas no tiene mayor problema, sin embargo las del fuselaje requieren lija y masillas para tapar los restos, una vez eliminadas.
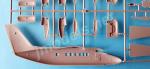
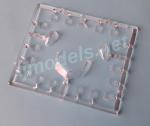
Las piezas transparentes son un pelín gruesas, especialmente las ventanillas laterales. El parabrisas, sin embargo, está algo mejor mejor. Todas las piezas están bien moldeadas sin imperfecciones.
La única pieza de resina es el morro completo del avión, pero es opcional. Obviamente, la pieza tiene más definición que el morro moldeado con las mitades del fuselaje, especialmente en el detalle de las luces de correteo de proa que no están presentes en las piezas de plástico. Desgraciadamente, los faros no tienen piezas transparentes. Lo mejor de todo es que al ser la pieza alternativa, el modelista puede decidir si hacer modificaciones de importancia durante el armado que implicarán tener que usar cianocrilato, por ejemplo, para pegar no sólo el morro, sino también otras piezas añadidas sobre este.
La maqueta permite hacer dos modelos del LET-410, UVP y UVP-E, este último caracterizado por la opción de llevar tanques auxiliares en las puntas, hélices de 5 palas y dos burbujas acristaladas laterales a los lados de la carlinga, aunque estas últimas no aparecen en los perfiles de esta edición dedicada a aviones civiles.
Carlinga y cabina
Esta zona de la maqueta tiene un suelo común para ambos habitáculos. En la parte delantera, la carlinga dispone de un panel con instrumentos en relieve y que parece algo sobredimensionado. Las instrucciones señalan pintura diferente para el modelo UVP y UVP-E. Los asientos están despiezados en base, respaldo y soportes, y también encontramos las habituales palancas, con mandos de fotograbado, pedales y una consola intermedia. La cabina de pasaje está delimitada por sendos mamparos, un techo y dos piezas longitudinales a los lados que sirven de apoyo a los asientos. Los asientos totalizan 19 de tres en fondo, pero dobles en la fila de estribor y sencillos en la de babor. El despiece es similar a los de los pilotos, pero los asientos en este caso sólo tienen un soporte al ir apoyados en los lados interiores del fuselaje. Estos apoyos sirven a su vez de guía para alinearlos correctamente.
Antes de cerrar el fuselaje, hay que pegar las ventanillas laterales desde el interior. También es necesario decidir si vamos a usar el morro de resina para acortar la parte delantera del suelo, y también del pozo de la rueda delantera, de modo que no interfieran con el ajuste del morro.
Fuselaje
Viene en mitades moldeadas con el timón y la deriva. También muestran las luces de navegación en la cola y el timón, aunque parecen algo grandes para la escala. El panelado es bueno, representado con finas líneas bien trazadas y limpias. Las puertas y escotillas carecen de mucho detalle, y lo mismo ocurre por dentro, donde sólo encontramos cierto detalle poco definido, que más parece por rellenar el espacio, en la zona de la carlinga.
Como he mencionado, el morro es una pieza opcional mejor detallada que el morro moldeado en el fuselaje. Para sustituir el de plástico, hay que seccionarlo justo por delante del parabrisas. La línea de corte coincide con un panel grabado incluso por debajo del fuselaje, por ello la tarea es más sencilla. Las instrucciones son de ayuda en este caso, aunque las ilustraciones son algo pequeñas. El folleto señala que hay que añadir un poco de lastre en la pieza de resina haciendo un hueco en la parte posterior porque es maciza, sin embargo esto no se indica si decidimos quedarnos con el morro de plástico.
El parabrisas es de una pieza encajada en el hueco del fuselaje. Muestra los marcos bien detallados en el plástico. El fuselaje lleva además algunas aletas y otras piezas menores de fotograbado en la panza y una aleta en la parte superior. También está presente la aleta de cola bajo el fuselaje en una pieza separada.
Alas y empenaje
Tanto las alas como los estabilizadores están moldeados en mitades. Las alas son finas y están ahuecadas por dentro, pero los estabilizadores son gruesos y macizos. Las líneas de paneles y registros están bien grabadas y son delgadas. Este panelado me parece más convincente que el del fuselaje y, además, está detallado con múltiples fotograbados de pequeño tamaño. Como opción, el modelo UVP-E lleva dos depósitos en las puntas despiezados en mitades.
Las góndolas están fabricadas en mitades con las tomas inferiores abiertas dotadas de una pieza de cierre que impide que el espacio interior se vea vacío. Llevan tomas superiores y escapes separados sin horadar. Hay dos tipos de hélices con las palas por separado y buje común. Tras el buje, una pieza alternativa muestra tres o cinco ranuras para poder pegar las palas y orientarlas correctamente. De nuevo las instrucciones nos salen al paso en ayuda, señalando la orientación correcta de las palas con los motores parados.
Las alas encajan en el fuselaje mediante pestañas, sin embargo los estabilizadores van pegados directamente a las raíces marcadas en la cola.
Tren de aterrizaje
El tren principal dispone de dos estabilizadores laterales que en el avión real alojan los depósitos de combustible. Los estabilizadores están representados aquí por dos mitades, la inferior con los pozos moldeados en la pieza, cuya profundidad no es mucha. También hay una compuerta separada, fina y con la forma cóncava correcta. Las patas son gruesas, como en el avión real, pero vienen lisas, sin definición en los amortiguadores. Las ruedas vienen en mitades pero no están mal, por mucho que parezcan también demasiado gruesas, y la cara externa de los bujes está detallada con fotograbado. Los estabilizadores van unidos al fuselaje con la ayuda de un perfil que simula la raíz.
El tren delantero comprende una pata y una rueda, además de la compuerta del pozo separada y demasiado gruesa, que hay que cortar si no se muestra cerrada.
Calcas
La hoja de calcas tiene muy buen aspecto y los motivos son finos. Contiene rótulos de compañías privadas, de las Naciones Unidas y la Cruz Roja, algunos estarcidos y logotipos. El acabado es brillante y el soporte está bien recortado sin exceder mucho la calca.
Instrucciones
Están impresas a color en una hoja de tamaño A5 de 4 páginas. Contiene un sumario histórico sobre el avión, una tabla de colores con equivalencias de Humbrol y 23 secuencias de montaje. Es una pena que AZ siga ahorrando costes con sus instrucciones, que podría imprimir a más tamaño, o bien aumentar un poco el número de páginas para obtener vistas del montaje más grandes.
Los perfiles de las diferentes opciones de pintura y calcas se encuentran en el lado posterior de la caja. Todas las versiones son civiles, principalmente de líneas aéreas privadas ya desaparecidas, o bien de organismos internacionales como la Cruz Roja y la ONU. La pintura no es atractiva y son las calcas las que en realidad le dan un sello particular a cada versión.
Valoración
En general, la maqueta me parece bien detallada dentro y fuera, con algunas ausencias menores como la de los faros del morro. El montaje del interior será algo laborioso por el número de piezas, así como el del morro de resina por necesitar de varias modificaciones para ajustarlo. A mi juicio, el resto del montaje no supone ningún reto para el modelista con experiencia. La hoja de calcas es muy buena y es la que realmente aviva un poco las sosas versiones de esta caja, donde sólo se han incluido aviones pintados de blanco.◊


The kit
It is a reissue of an original Gavia tooling that it was released in the late nineties. Now AZ Model has reboxed it under their affiliate company Admiral. The editions are similar in both cases, except in the decals.
The content includes three plastic sprues, a photo-etched fret, a clear sprue, a resin part, the decal sheet and the instructions. As usual with Czech manufacturers, parts are protected in separate bags and the photoetched pieces come with their own cardboard backing to prevent damage.
Plastic is somewhat stiff, most evident in the wings and fuselage, but the parts are well molded and generally show adequate thickness for the scale. The best thing about the tool is that there is no flash on parts, and the least good thing is the positive marks we find on the inside of the fuselage and wings. Those of the fuselage, although few and small, hinder the assembly of the cockpit and those of the wings prevent the join of the halves in some points. The latter are not visible and removing them is not a major problem, however those on the fuselage require sandpaper and putty once removed.
The clear parts are a bit thick, especially the side windows. The windshield, however, is somewhat better. All parts are well molded with no blemishes.
The only resin part is the nose, but it is optional. Obviously the part has more definition than the plastic nose molded with the fuselage halves, especially in the detail of the front lights which are not present in the plastic parts. Unfortunately, the resin headlights do not have clear parts. The good news is that the modeler has the choice to decide whether to make important modifications during the assembly that will imply having to use cyanoacrylate, for example, to glue not only the nose, but also other pieces added to it.
The kit allows you to build two LET-410 variants, either UVP or UVP-E, the latter characterized by the option to carry wingtip auxiliary tanks, 5-blade propellers and two glazed blisters on the cockpit sides, although these do not appear in the profiles printed on the back of the box.
Cockpit and cabin
The interior has a common floor for both rooms. At the front, the cockpit features an engraved instrument panel that looks somewhat oversized. The instructions indicate different paint for the UVP and UVP-E panels. The seats come with separate pieces for the base, backrest and supports, and we also find the usual levers, with photo-etched controls, pedals and a console located in between the crew seats. The passenger cabin is delimited by two separate bulkheads, a roof and two longitudinal pieces on the sides that support the seats. There are 19 seats three deep, doubles on the starboard row and singles on the port row. The exploded view is similar to that of the pilots, but in this case the seats only have one support as they rest on the inner fuselage sides. These supports are also used to align the seats on the floor.
Before closing the fuselage, the side windows must be glued from the inside. It is also necessary to decide if we are going to use the resin nose to shorten the front part of the floor, and also the front wheel well, so that they do not interfere with the nose fit.
Fuselage
It comes in halves molded with the tail and the rudder. The parts also show the navigation lights on the tailcone and rudder, although they look a bit large. Panels look good and are engraved with clean thin lines. The doors and hatches lack much detail, and the same thing happens inside, where we only find some raised detail on the cockpit sides, which seems to be there just to fill the space.
As mentioned, the nose is an optional piece. To replace the plastic nose, you have to section it just in front of the windshield. The cutting line matches a panel that is engraved even below the fuselage, so the task is easier. The instructions are helpful here, although the illustrations are a bit small. The leaflet points out that you have to add some ballast to the resin piece by making a hole in the solid piece. However, this is not stated if you decide to stick to the plastic nose.
The windshield is one piece fitted into the fuselage that shows well-detailed frames. The fuselage also has some fins and other minor photoetched parts on the belly and a fin on the roof. The tail fin is also present under the fuselage in a separate piece.
Wings and empennage
Both wings and stabilizers are molded in halves. The wings are thin and hollow inside, but the stabilizers are thick and solid. Panel and register lines are nicely engraved and thin. I find these panels more convincing than those on the fuselage. They are detailed with small photoetched parts. As an option, the UVP-E variant has two wingtip tanks that come in halves.
The nacelles are made in halves with the lower intakes open, both provided with a piece that prevents the interior space to be seen. They also have upper intakes and separate exhausts which are not hollowed. There are two types of propellers with separate blades and a common hub. Behind the hub, an alternative piece shows three or five slots to glue the blades. Again, the instructions are helpful, pointing out the correct orientation of the blades when engines are stopped.
The wings fit into the fuselage by means of tabs, however the stabilizers are glued directly to the roots molded on the tail.
Undercarriage
The main undercarriage has two side sponsons also housing the fuel tanks in the real aircraft. The sponsons are rendered here with two halves, the lower one with the wells molded in the piece. The wells do not look deep enough. There is also a separate door, which is thin and with the correct concave shape. The legs are thick, as in the real plane, but they have no definition on the oleo struts. The wheels come in halves but they are not bad, as much as they look too thick too, and hubs are provided with PE pieces to detail the outer faces. The sponsons are attached to the fuselage with the help of a profile that simulates the root.
The front gear includes a leg and a wheel, as well as a separate door which looks too thick, and must be cut if it is not shown closed.
Decals
The decal sheet looks fine and decals are thin. It contains airline logos and markings, United Nations and Red Cross markings and some stencils. Decals have a glossy finish and there is not too much surplus carrier film.
Instructions
They are printed in color on a 4-page A5 leaflet. The leaflet shows a historical summary about the aircraft, a color chart with Humbrol enamel paint matches and 23 assembly sequences. It’s a shame that AZ is still mean with their instructions, which could be printed larger, or the number of pages slightly increased for larger exploded views.
Profiles for the different paint and decal choice are located on the back of the box. The aircraft shown belonged to private airlines that have now disappeared, or to international organizations such as the Red Cross and the UN. The paint is unattractive and it is the decals that actually give each version a particular difference.
Conclusion
In general, the kit seems well detailed inside and out, with some minor parts missing such as the headlights on the nose. Cockpit and cabin assembly will be somewhat tedious due to the number of pieces, as well as attaching the resin nose because it needs several modifications to fit it. In my opinion, the rest of the assembly is not a challenge for the experienced modeler. The decal sheet is very good and spices up a bit the dull versions of this box, where only planes painted white have been included.◊
Actualizado – Updated: 4 / 2022
Publicado – Published: 2 / 2022
©www.jmodels.net


Debe estar conectado para enviar un comentario.