

De un vistazo – Quick look
MATERIAL Y PIEZAS
MEDIA & PARTS:
- Plástico inyectado (88 piezas), plástico transparente (9 piezas).
- Injected plastic (88 parts), clear plastic (9 parts).
CALCAS – DECALS:
- Hinomarus, indicadores del panel de instrumentos, matrículas, líneas de no pisado y diversos estarcidos. Finas, con acabado brillante. Buena saturación de color y registro. Sin exceso de soporte.
- Hinomarus, instrument panel gauges, registrations and several stencils. Thin and glossy finish. Good register and color saturation. No excess carrier.
OPCIONES – OPTIONS:
- 12-Shi Experimental Zero fighter. 1st aircraft. 1939.
- 12-Shi Experimental Zero fighter. 2nd aircraft. 1939.
INSTRUCCIONES – INSTRUCTIONS:
- Folleto doblado formando 8 páginas impresas en blanco y negro. Contiene una introducción histórica con datos técnicos, 10 secuencias de montaje, un plano numerado de piezas, una lista de colores con equivalencias de pinturas de Gunze Sangyo y 2 páginas de perfiles.
- 8-page folded leaflet printed in black and white. It shows a historical introduction with technical data about the aircraft, 10 assembly steps, a numbered parts plan, a list of colors with matches in Gunze Sangyo paints and 2 pages of profiles.
LO MEJOR – THE BEST:
- Aparente sencillez de montaje. Buen detalle general y correcto para esta versión. Cubierta de la carlinga separada. Opciones de montaje.
- Apparent ease of assembly. Overall nice and correct detail for this variant. Separate canopy pieces. Assembly alternatives.
LO PEOR – THE WORST:
- Motor mejorable. Ligeras modificaciones necesarias en las alas.
- Engine could be better. Some slight modifications are necessary on the wings.
VALORACIÓN – CONCLUSION:
- Única maqueta del A6M1 en esta escala por ahora. Notable réplica de los prototipos originarios del famoso caza. Muy recomendable a los seguidores de este avión y a quienes busquen algo aparte de lo muy conocido.
- Only A6M1 kit at the scale so far. Very nice rendition of the prototypes of the famous fighter. Highly recommendable to Zero fans and those looking for something a bit out of trodden paths.

La maqueta
Hasegawa tuvo un día la feliz idea de lanzar por fin un A6M1, origen del avión japonés más conocido de la historia. Esta maqueta continúa siendo la única en la escala 1/48. La edición está basada en el molde lanzado a mitad de los años 90, pero la maqueta tuvo su primera salida en 2008 y una copia en 2019, última por ahora. El fabricante incluye cambios en las piezas para adaptarlas a los dos prototipos del Reisen, que eran muy parecidos, aunque fueron ligeramente diferenciados a lo largo de meses de pruebas.
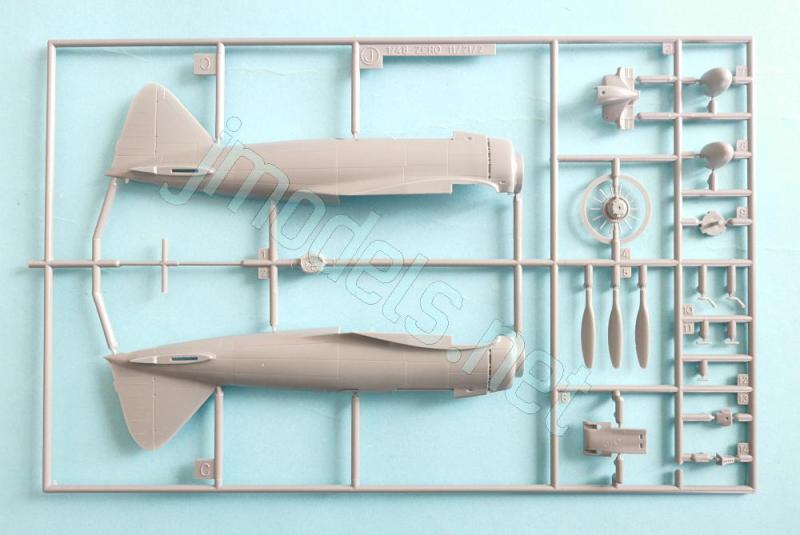
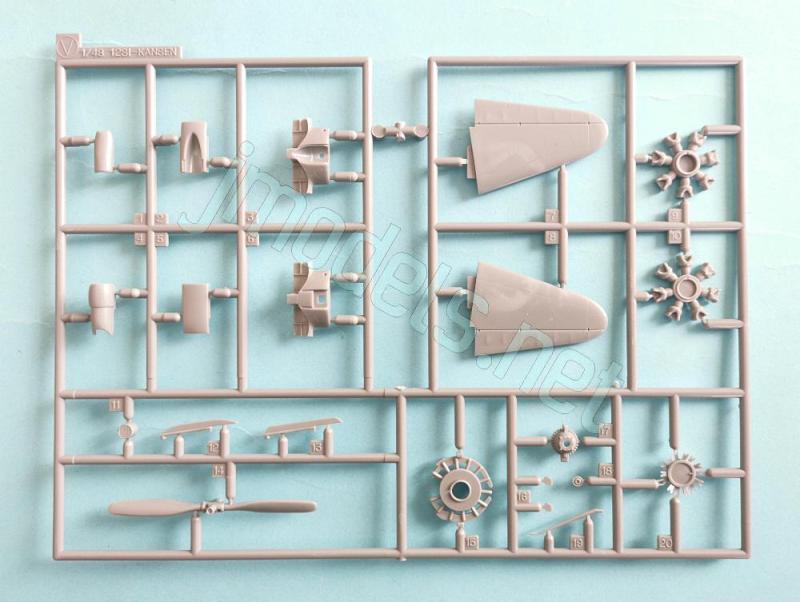
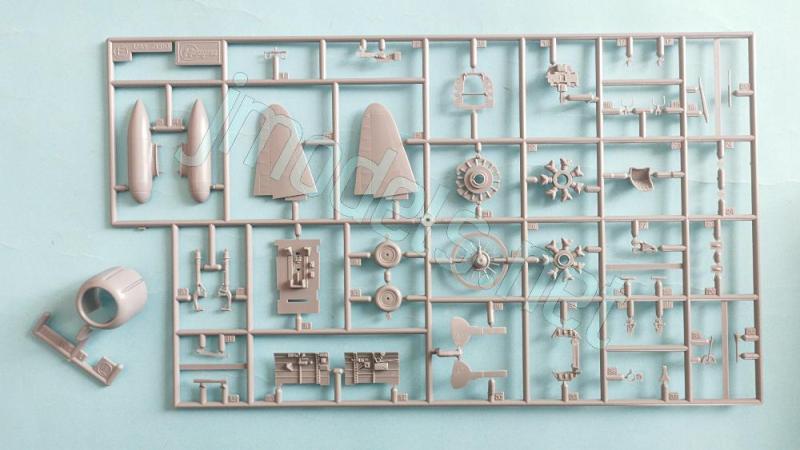
Dentro de la caja encontramos cuatro bastidores de piezas, el capó del motor separado, un bastidor transparente, las calcas y las instrucciones. Nos van a sobrar en torno a una treintena de piezas del total, entre las que hay varias que podrían ser útiles si queremos recambiar algunos elementos como la hélice.
Como es norma en el fabricante, las piezas tienen un buen moldeado, suelen mostrar gran nitidez y carecen de marcas relevantes, de modo que todo augura que la construcción del modelo será bastante ágil. Las alternativas de montaje son únicamente tres y en la pintura tampoco encontraremos diferencias, salvo en las matrículas.
El lector sabrá perdonarme toda la erudipausia que sigue a continuación. Me pareció necesaria incluirla en esta simple revisión de una maqueta, pese a todo. Primero debo aclarar que ni soy ni me considero experto en aviación, menos aún en aviación japonesa ni por supuesto en este avión concreto. Si hay todavía algún ingenuo que pueda pensar lo contrario, es menester que espabile. Queda lejos de mi intención parecer otro ratón con cara de conejo de los que abundan en tantos saraos modelísticos.
Como vemos en la caja, estamos ante la maqueta de un avión experimental, muy diferente de otro de serie, que se copia cientos de veces con las mismas características en una fábrica. Por ello, los cambios en un aparato así, desde su estado embrionario hasta las pruebas de vuelo y durante estas, suelen ser numerosos. En el A6M1 estos cambios han provocado confusión desde hace muchos años, principalmente debido a errores en los perfiles que han pasado de una publicación a otra sin contrastar.
El mejor artículo para despejar dudas sobre ciertas características del A6M1 es, a mi juicio, el publicado en seis capítulos por Jim Long en la web j-aircraft.com (la conclusión en: A6M1 Drawings. Evidence and Theory Presented. Part Six. The Conclusion). Según Long, estas publicaciones confundieron la configuración planeada para crear el Reisen con la que realmente llevaba en el momento de las pruebas en abril de 1939 y en meses posteriores. Otro error fue la atribución de perfiles al A6M2 cuando en realidad muchos de ellos pertenecen en realidad al A6M1 experimental.
Lejos de ser un tema para gente rara que vive en una burbuja investigando detalles de cacharros del siglo pasado, esto tiene su efecto práctico sobre los fabricantes más exigentes de productos modelísticos que suelan investigarlos antes de ponerlos a la venta. Y también sobre muchos modelistas, los consumidores a fin de cuentas, que lógicamente desean saber si esa maqueta que cada vez cuesta más es una copia acertada del original y las modificaciones pertinentes en caso de no serlo.
He reunido en una simple lista algunas de las características del A6M1 que con cierta seguridad tendrían los prototipos al iniciar las pruebas o durante ellas, momento que parece representar Hasegawa en esta maqueta a juzgar por la ilustración de caja.
- El motor de los prototipos era un Mitsubishi Zuisei 13 con algo más de diámetro que el Nakajima Sakae 12 adoptado finalmente para los primeros aviones de serie (A6M2 Modelo 11). Lo relevante para la maqueta, y más aún a esta escala, es que el capó del A6M2 no sirve para el A6M1.
- El capó del A6M1 tiene una toma de refrigeración de aceite en la parte inferior diferente a la de los modelos de serie.
- Según el artículo citado antes, la toma de aire del carburador sobresalía por encima del capó en el diseño original del avión, pero fue colocada en la parte inferior, justo por encima de la toma de refrigeración de aceite, antes de las pruebas de vuelo. Producto de la confusión en los perfiles, las maquetas del A6M1 de fabricantes japoneses, como Hasegawa (1/48) y FineMolds (1/72), no la llevan, pero sí la maqueta de A+V Models en resina (1/72). Los perfiles de publicaciones japonesas y europeas, al menos las que he consultado, la reproducen por fuera del capó. La toma en sí no es incorrecta, pero su presencia o no indica diferentes momentos del desarrollo de los prototipos.
- La hélice original era bipala de paso variable sin cono. En un momento posterior se cambió a otra tripala de paso fijo debido a problemas de vibración. Supongo que la tripala puede emplearse en la maqueta, si queremos reflejar este cambio en cierto momento de las pruebas. Ignoro si llevaba cono o no.
- La parte posterior de la carlinga situada por detrás del mástil tenía los últimos paneles más largos y anchos, con el hueco de aireación tapado por un panel de plexiglás. El mástil de la antena tenía más inclinación hacia adelante que el de serie y parece algo más largo. En realidad no estaba completamente centrado respecto al eje longitudinal del avión, pero el margen era tan escaso que creo que se puede obviar.
- Armamento. Seguramente, se probó completo (dos ametralladoras en la cubierta del motor más dos cañones en las alas) al menos en determinados momentos de los meses de pruebas, ya que el peso total de los prototipos sería una característica muy relevante.
- El fuselaje trasero del A6M1 era más delgado y ligeramente más corto a partir del mamparo número 11. Si tomamos como referencia la distancia entre el borde de salida del ala y el borde de ataque del estabilizador, ese mamparo quedaría un poco por detrás de la mitad de dicha distancia.
- Al inicio de las pruebas la parte inferior del fuselaje de cola llevaba una aleta compensadora para evitar la entrada en barrena a causa de la tracción del motor. La forma y situación exacta de la aleta es desconocida, aunque algunos perfiles la muestran como le pareció al dibujante.
- Las alas del primer prototipo sólo llevan contrapesos externos en los alerones a partir de mayo de 1941, cuando se descubren y corrigen los problemas de vibración a gran velocidad. Desde abril del 39 hasta ese momento los alerones no llevan contrapesos. El segundo prototipo nunca tuvo contrapesos, ya que se estrelló en marzo de 1940, antes de que se descubriese el problema.
- El perfil superior de la aleta de cola es ligeramente más puntiagudo en los prototipos y su borde de ataque tenía más inclinación hacia detrás. Los encastres de los estabilizadores estaban más retrasados y bajos que los de los modelos posteriores.
- Para los muy despistados. Las puntas de las alas no eran plegables. Esta característica se añade desde el A6M2 modelo 21. Ni siquiera la llevaba el modelo 11, primero producido en serie.
Veamos ahora las trazas que Hasegawa se ha dado para reproducir todas estas características.
Reseña
La carlinga está diseñada a partir de un suelo y los dos paneles laterales del fuselaje separados de este y pegados paralelos al suelo. Este contiene la base de los pedales y del asiento y algunos pequeños detalles en un lado, que podrían ser el equipo de radio. Los lados del fuselaje tienen un detalle excelente de la estructura interna. Hay varios instrumentos de vuelo moldeados sobre las piezas así como una consola separada con calcas.
Para detallar el interior contamos con el asiento, la palanca de control, la palanca de ajuste del asiento, el mamparo trasero y el panel de instrumentos. Este último tiene varias calcas para definir los indicadores y las cajas de mecanismos de las ametralladoras aparte. La mira es transparente y también lleva una calca. Salvando los arneses ausentes, todo este interior está bastante bien. Sin embargo, falta el equipo de radio (si no es el que supongo), el extintor y la botella de aire, como poco.
La cubierta de la carlinga está separada en tres piezas y aparentemente la sección deslizante se puede mostrar abierta, Las piezas son bastante finas y la estructura está bien reproducida. Hasegawa ha incluido una pieza alternativa para representar adecuadamente los paneles diferentes de la parte posterior. La forma del mástil de la antena y su inclinación más adelantada parecen correctos a juzgar por los perfiles de las instrucciones.
Las mitades del fuselaje no son las mismas que las que Hasegawa proporciona en otras maquetas del Reisen. Esto se nota en tres detalles: la menor longitud del fuselaje por detrás de las alas, la forma de la aleta de cola y los encastres de los estabilizadores. Todos ellos son adecuados para el representar el A6M1. El grabado de los paneles es fino y limpio como de costumbre y el timón vertical está bien grabado, pero la reproducción de su estructura mediante finas líneas en relieve no es convincente.
Una vez pegado el fuselaje, hay que añadir la cubierta delantera, que lleva la tapa del depósito de combustible grabada y los cañones de las ametralladoras. Estas piezas no tienen los agujeros de aireación del arma, seguramente por la dificultad en reproducirlos. La aleta del extremo trasero inferior del fuselaje tiene doble opción según el prototipo. Hasegawa se ha tomado una licencia aquí porque desconocemos su forma y posición verdadera, como he dicho arriba. En cualquier caso, su presencia es un detalle acertado.
El motor también es específico para esta maqueta y consta de cinco piezas. La trasera lleva el colector de escape. Las dos coronas del motor tienen los cilindros sin terminar en la cara trasera. Las piezas vienen limpias y los cilindros muestran cierto detalle por delante, pero nada extraordinario. No se aprecian los alzaválvulas y la pieza que se añade a la corona externa parece querer reproducir más bien los conductos de inducción. Finalmente, tenemos la caja de engranajes de la hélice en la parte delantera.
La hélice bipala está moldeada de una pieza y tiene la cara frontal del eje detallado con dos piezas pequeñas en la base de las palas que supongo reguladores del paso o algo parecido. Las palas son finas, pero tienen menos torsión comparadas con una foto de un prototipo donde se ve instalada. Los bastidores contienen una hélice tripala que podríamos usar de querer representar un prototipo en una fase avanzada de pruebas.
Certeramente, Hasegawa proporciona un nuevo capó de una pieza para este modelo. La pieza cuenta con las dos troneras bien marcadas en la parte superior y no tiene la toma de aire del carburador del diseño inicial. Un panel inferior y las salidas de los escapes vienen separados. El panel tiene alternativas particulares para cada prototipo. El del prototipo 1 tiene una profunda muesca en su centro, mientras que el del prototipo 2 es simplemente plano. La forma del primero seguramente facilitaba la entrada de aire a la toma de refrigeración de aceite situada por detrás, ya que tenía menor altura que la instalada en modelos posteriores.
Terminados el motor y el capó, se añaden los estabilizadores, también propios de esta maqueta. Uno de los bastidores contiene otro par de réplicas no aplicables a esta edición. Comparando ambas, se aprecia que los del prototipo tiene la punta algo más corta. La representación del entelado de los timones también es distinta. En el A6M1 la estructura viene simulada en suave relieve con una aleta grabada en la parte interna.
Las alas vienen separadas en tres piezas, con dos mitades en las superficies superiores. El grabado de paneles y tapas de los accesos es fino. El remachado de algunos paneles inferiores posee nitidez. Las piezas superiores tienen las luces de identificación bien definidas y las de las puntas son piezas transparentes. Hasegawa ha incluido los contrapesos separados en los alerones. Estos no serían correctos para el segundo prototipo, pero sí para el primero si deseamos representarlo con la configuración que tuvo a partir de mayo de 1940, ya muy avanzadas las pruebas. Las superficies inferiores presentan los pozos perfilados y detallados en su interior. Los abultamientos de los cañones son nítidos y las salidas de la munición aparecen abiertas.
En contraste con otras zonas del avión, Hasegawa no proporciona las alas específicas del A6M1, por eso hay que cubrir en ambas caras una de las líneas que limitan el panel situado junto a las aletas del borde de fuga así como un fino actuador situado por encima de ese panel en las caras inferiores.
Una vez formadas las alas, se añade la pieza que contiene la toma de refrigeración de aceite en la parte delantera de la mitad inferior. La pieza es alternativa para cada prototipo, más baja y redonda para el primero, y algo más alta y cuadrada para el segundo. Ambas contienen el dispositivo de intercambio de calor en su interior. Ninguna de estas dos tomas es igual a las empleadas por los modelos siguientes del Reisen.
Sin embargo, con el tren de aterrizaje no ocurre lo mismo, porque es prácticamente igual al de otras versiones. La rueda de cola está moldeada con la pata y va colocada en el interior del pozo sin tapas laterales. El tren principal consta a cada lado de una pata, la rueda y la cubierta del pozo, con sus respectivas tapas menores en la parte externa e interna. Esta última tiene el mecanismo de apertura por separado. Las patas copian bien la amortiguación y las cubiertas son bastante finas y realistas. Las ruedas son de una pieza con el neumático liso y una fina línea de molde que limpiar. Las llantas están correctamente grabadas.
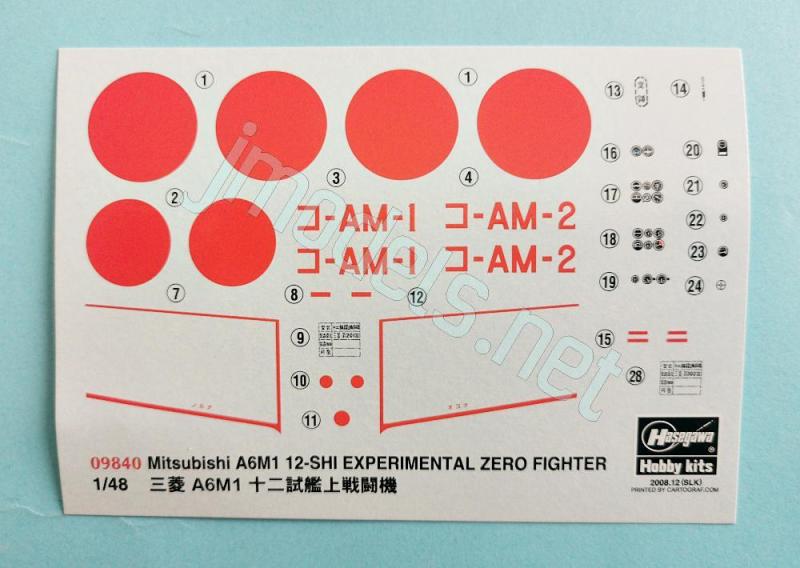
La hoja de calcas contiene Hinomarus, los indicadores del panel de instrumentos, matrículas, líneas de no pisado y diversos estarcidos. Poseen un aspecto fino y brillante, buena saturación de color y registro. No hay exceso de soporte.
El manual de instrucciones está impreso en blanco y negro en un folleto doblado de ocho páginas. Contiene una introducción histórica con datos técnicos, diez secuencias de montaje, un plano numerado de piezas, una lista de colores con equivalencias de pinturas de Gunze Sangyo y dos páginas de perfiles.
Aparte del capó el color externo que se sugiere es un verde grisáceo (H128 en el código de Gunze). Ignoro qué pintura ni tono concreto podrían llevar estos dos aviones. Una imagen de un prototipo lo refleja pintado de color claro. Tal vez lo mejor es que el modelista investigue por su cuenta y para no acabar mareado con este tema, me permito recomendar dos sitios web con buena información: j-aircraft.com y aviationfromjapan.com.
Valoración
Visto lo que podemos llegar a saber del A6M1 en general y de estos dos aviones en sus particularidades, se aprecia que la maqueta de Hasegawa refleja en general bastante bien muchas de sus características externas. Al fabricante le cundió el esfuerzo de investigar y poner a la venta este modelo experimental, por mucho que posiblemente no sea el Zero más vendido de los numerosos que tiene en su catálogo.
En definitiva, es una maqueta recomendable a los muy cafeteros del tema y también a los que busquen algo conocido pero poco trillado. Quien desee tener una colección de variantes del caza a esta escala, debe incluirla sin excusa porque el A6M1 fue el inicio de todas los demás.◊






The kit
Hasegawa had the brilliant idea one day to finally release an A6M1, the origin of the most famous Japanese aircraft in history. This kit remains the only one available in the 1/48 scale. The mold first appeared in the mid-1990s, but the kit was first released in 2008, with a rebox in 2019, being the latest so far. The kit includes some new parts to render the two Reisen prototypes, which were very similar at first, but were later slightly differentiated over months of testing.
Inside the box, we find four grey sprues, a separate engine cowling, a clear sprue, the decals, and the instructions. There are around thirty unused parts, but some of which will come in handy if we want to replace some elements, such as the propeller.
As is typical of this manufacturer, parts are crisply molded and lack any visible marks, so everything suggests this is a straightforward build. There are only three assembly choices, and paint finishes are identical, except for the tail codes.
The reader will surely forgive the long explanation that follows. Nevertheless, I felt it could be necessary to include it here. First, I must say that I am neither an aviation expert nor do I consider myself one, much less an expert on Japanese aviation, and certainly not in this particular aircraft. If there is still anyone naive enough to think otherwise, he is quite mistaken. It is far from my intention to appear as just another mouse in a rabbit’s face, of which there are so many in modeling gatherings.
As we see on the box, this is a kit of an experimental aircraft, very different from a production airplane, which is copied hundreds of times with the same characteristics in a factory. Therefore, the changes in such a machine, from its early stages to and during flight tests, are usually numerous. In the A6M1 these changes have caused confusion for many years, mainly due to mistakes in the profiles that have passed from one publication to another without being verified.
The best article to clear up doubts about certain characteristics of the A6M1 is, in my opinion, the one published in six installments by Jim Long on the website j-aircraft.com (the conclusion at: A6M1 Drawings. Evidence and Theory Presented. Part Six. The Conclusion). According to Long, these publications confused the planned configuration to create the Reisen with the one actually built at the time of testing in April 1939 and in the following months. Another mistake was the attribution of profiles to the A6M2 when in fact many of them actually belonged to the experimental A6M1.
Far from being a topic for strange people living in a bubble and researching gadgets from the last century, this has its practical effect on the most demanding manufacturers of modeling products who usually do some research before release them. And also on many modelers, the customers after all, who logically want to know if that kit that costs a fortune is a good rendition of the original and the necessary modifications he needs to make if it is not.
I have gathered in a simple list with some of the characteristics the A6M1 prototypes would have had at the beginning of tests or during them, a period that Hasegawa seem to represent in this kit judging by the boxart.
- The prototype engine was a Mitsubishi Zuisei 13, which was slightly larger than the Nakajima Sakae 12 ultimately adopted for the first production aircraft (A6M2 Model 11). The relevant point for the kit is that the A6M2 cowling cannot be used with the A6M1.
- The A6M1 had a different oil cooler intake under the cowling than the following production variants.
- According to the said article, the carburetor air scoop protruded above the cowling in the aircraft’s original design, but it was relocated in the lower cowling just above the oil cooler intake, before flight tests. Due to mistakes in the published profiles, the A6M1 kits from Japanese manufacturers, such as Hasegawa (1/48) and FineMolds (1/72), do not include the scoop, but the A+V Models resin kit (1/72) does. Profiles from Japanese and European publications, at least those I’ve consulted, depict it on the cowling. The scoop itself is not incorrect, but its presence or not indicates different stages in the development of the prototypes.
- The prototypes had a two-bladed, variable-pitch propeller without a spinner. Later, it was changed to a three-bladed, fixed-pitch propeller due to vibration problems. I suppose the three-bladed propeller could be used in the kit if we want to show this change at some point during testing. I don’t know if it had a spinner or not.
- The rear canopy section behind the mast had longer and wider panels, with the ventilation opening covered by a plexiglas panel. The antenna mast was more slanted forward than the standard mast and appears slightly longer. It was actually a bit off-center from the aircraft’s longitudinal axis, but the margin was so small that I think it can be overlooked in the kit.
- Armament. It was most probably tested in its full configuration (two machine guns in the engine deck plus two wing cannon) at least at certain times during the tests, as the total weight of the prototypes would be a very relevant factor to consider.
- The rear fuselage of the A6M1 was thinner and slightly shorter aft of bulkhead 11. If we take as a reference the distance between the wing’s trailing edge and the stabilizer’s leading edge, that bulkhead would be positioned slightly behind the midpoint of that distance.
- At the start of tests, the lower rear fuselage had a fin to prevent spinning caused by engine thrust. The exact shape and position of the fin are unknown. Some profiles show it but this is in fact an artistic license.
- The wings of the first prototype only had external mass-balanced ailerons from May 1941 onwards, when the high-speed vibration problems were discovered and corrected. From April 1939 until that point, the ailerons were unbalanced. The second prototype never had them, as it crashed in March 1940, before the problem was discovered.
- The upper profile of the tail fin is slightly more pointed on the prototypes, and its leading edge was steeper. The stabilizer mounts were further back and lower than on later variants.
- For those who may have missed it: the wingtips were not folding. This feature was added starting with the A6M2 Model 21. Even the Model 11, the first mass-produced version, did not have it.
Let’s now examine the steps Hasegawa have taken to reproduce all these features.
Review
The cockpit is built using a floor and the two fuselage sidewalls, which come separated and are glued to the floor. This floor contains the base for the pedals and seat, and some small details on one side, which could be the radio set. The fuselage sides have excellent detail of the internal structure. There are several flight instruments molded on the pieces as well as a separate console with decals.
Separate detail includes the seat, the control stick, the seat adjustment lever, a rear bulkhead, and the instrument panel. The latter has several decals to enhance the gauges and separate machine gun receivers. The sight is a clear piece and also has a decal. Aside from the missing harnesses, this interior looks quite good. However, the radio set (if it’s not the one I suppose), the fire extinguisher and the air bottle are missing, at the very least.
The cockpit canopy is separated into three pieces, and the sliding section can apparently be displayed open. Parts are quite thin, and the frame is well reproduced. Hasegawa included an alternative part to represent the different panels at the rear. The shape and slant of the antenna mast seem correct, judging by the profiles in the instructions.
The fuselage halves are not the same as those Hasegawa provide in other Reisen kits. This is noticeable in three details: the shorter length of the fuselage behind the wings, the shape of the tail fin, and the stabilizer mounts. All of these are suitable for representing the A6M1. Panel lines are fine and clean as usual, and the vertical stabilizer is well engraved, but the reproduction of the structure using very thin raised lines is not convincing.
Once the fuselage halves are glued, the engine deck is attached. This piece features an engraved fuel filler cap and the machine gun barrels. These parts lack the weapon’s cooling jacket, most probably due to the limitations of plastic. The fuselage lower tail fin has two options depending on the prototype. Hasegawa took some liberties here, as its true shape and position are unknown, as mentioned above. In any case, its presence is a welcome detail.
The engine is also specific to this kits and consists of five parts. The rear piece is the exhaust manifold. The two cylinder rows have unfinished cylinders on their rear sides. Parts are clean, and the cylinders show some detail on the front, but nothing extraordinary. The valve tappets are not visible, and the piece added to the outer row seems to represent the induction tubes. Finally, the propeller gearbox is located at the front.
The two-bladed propeller is molded as a single piece and has a detailed shaft front with two small pieces at the base of the blades, which I assume are pitch adjusters or the like. The blades are thin, but they have less twist compared to a photo of a prototype with the propeller installed. The sprues contain a three-bladed propeller that we can use to represent a prototype in the late stages of testing.
Hasegawa provide a new one-piece cowling for this kit. The part has two clearly defined gun troughs on the top and lacks the carburetor air scoop of the early Reisen design. A lower panel and the exhausts are separate. The panel has alternative pieces for each prototype. The part for prototype 1 has a deep notch in the middle, while the panel for prototype 2 is simply flat. The notch in prototype 1 panel likely facilitated airflow to the oil cooler intake located behind it, as it was more shallow than the one installed on later Zero variants.
Once the engine and cowling are finished, the stabilizers, also specific to this kit, are added. One of the sprues contains another pair of stabilizers not used with this kit. Comparing the two, it’s evident that the prototype’s stabilizers have slightly shorter tips. The representation of the rudder fabric is also different. On the A6M1, the structure is simulated with soft raised detail and the piece has an engraved fin.
The wings come in three pieces, with two halves for the upper surfaces. The engraving on the panels and access covers is fine. Rivet lines on some of the lower panels are crisp. The upper pieces have well-defined identification lights, and the wingtip lights are clear pieces. Hasegawa included separate aileron mass balances. These would not be correct for the second prototype, but they are for the first if we want to represent it with the configuration it had from May 1940 onwards, when flight tests were well in progress. The lower surfaces show the wheel wells with enough depth and detailed inside. The gun bulges are clearly defined, and the ammo chutes are open.
In contrast to other components of the aircraft, Hasegawa do not provide specific parts for the A6M1 wings; so, we need to fill one of the panel lines next to the trailing-edge tabs on both sides as well as a thin actuator molded raised on that panel on the undersides.
Once the wing halves are glued, the next step is to attach a front panel with the oil cooling intaketo the lower wing half. This part is different for each prototype: lower and rounder for the first, and slightly taller and squarer for the second. Both contain a separate heat exchanger. Neither of these intakes is the same as those used on subsequent Reisens.
However, the landing gear is virtually identical to that of other versions. The tailwheel is molded with the leg and placed inside the wheel well without side covers. The main landing gear consists of a leg, the wheel, and the cover on each side, with their smaller outer and inner covers. These last pieces have a nice folding gear. The legs accurately replicate the suspension, and the covers are quite thin and realistic. The wheels are one-piece with smooth tires and a thin seam line that needs cleaning. The rims are correctly engraved.
The decal sheet contains Hinomarus, instrument panel gadgets, registrations, no-step lines, and several stencils. They have a fine, glossy finish, good color saturation, and register. There is no excess carrier film.
The instruction manual is printed in black and white in an eight-page folded booklet. It contains a historical introduction with technical data, ten assembly sequences, a numbered parts diagram, a color list with Gunze Sangyo paint equivalents, and two pages of profiles.
Apart from the cowling, the suggested external color is a grayish green (H128 in Gunze’s code). I don’t know what specific paint or shade these two aircraft might have had. An image of a prototype shows it painted a light color. Perhaps the best thing is for the modeler to do their own research, and to avoid getting overwhelmed by this topic, I recommend two websites with good information: j-aircraft.com and aviationfromjapan.com.
Conclusion
Given what we know about the A6M1 in general, and these two prototypes in particular, it’s clear that the Hasegawa kit accurately reflects many of their external features. The manufacturer’s work in researching and releasing this experimental model was well worth the effort, even if it’s probably not the best-selling kit among the many Zeros in their catalog.
In short, this is a highly recommended kit for any Zero fan and those looking for something familiar but not so common. Anyone wishing to build a collection of variants of the fighter in this scale should definitely include it, just because the A6M1 was the origin of all the others.◊
Publicado – Published: 8 / 2026
©www.jmodels.net


Debe estar conectado para enviar un comentario.