
De un vistazo – Quick look
MATERIAL Y PIEZAS
MEDIA & PARTS:
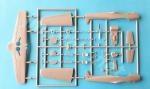
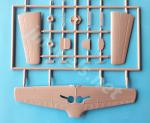
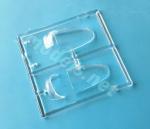
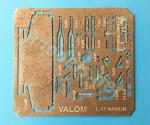
- Plástico inyectado (39 piezas), resina (4 piezas), plástico transparente (5 piezas), fotograbado (29 piezas), acetato (1 pieza).
- Injected plastic (39 parts), resin (4 parts), clear plastic (5 parts), PE (29 parts), acetate (1 part).
CALCAS – DECALS:
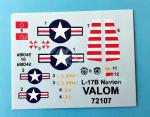
- Insignias norteamericanas, matrículas, insignias de unidad y marcas para la cola. Bien impresas sin exceso de soporte. Aspecto brillante. Las matrículas de ambas versiones son probablemente erróneas.
- US markings, registrations, unit badges and tail markings. Nicely printed with shiny finish. No excess of carrier film. Registrations for both aircraft seem mistaken.
OPCIONES – OPTIONS:
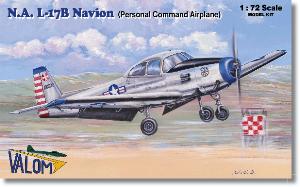
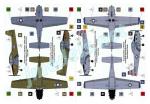
- North American (Ryan) L-17B Navion. Aparato personal del comandante de las fuerzas de la ONU en Corea, General Douglas MacArthur. Corea, 1951.
- North American (Ryan) L-17B Navion. Aparato personal del comandante del 8º Ejército Norteamericano en Corea, General Matthew B. Ridgway.
- North American (Ryan) L-17B Navion. Personal aircraft of the commander of UN forces in Korea, General Douglas MacArthur. Korea, 1951.
- North American (Ryan) L-17B Navion. Personal aircraft of the commander of the 8th Army in Korea, General Matthew B. Ridgway.
INSTRUCCIONES – INSTRUCTIONS:
- Folleto de 8 páginas impresas en blanco y negro y color. Contiene un breve sumario histórico y técnico del avión, 6 secuencias principales de montaje, perfiles a color y una lista de colores con equivalencias en varias marcas y código Federal Standard. Ver texto.
- 8-page brochure printed in color and black and white. It shows a historical and technical summary about the aircrat, a numbered parts plan, 6 main construction chapters, profiles and a color list with matches in several paint ranges and Federal Standard code. See text.
LO MEJOR – THE BEST:
- Avión inusual. Buen detalle interior con reservas (ver texto). Posibilidad de mostrar el interior.
- Unusual aircraft. Nice interior detail despite the mistakes (see text). Choice for open/closed canopy.
LO PEOR – THE WORST:
- Errores de dimensiones y perfil en el fuselaje, alas, cola y cubierta transparente. Encaje de alas y fuselaje.
- Dimensional and profile mistakes on the fuselage, wings, tail and canopy. Fuselage-wings fitting.
VALORACIÓN – CONCLUSION:
- Una oportunidad perdida con este infrecuente avión. Pese a los numerosos errores, la maqueta es factible y se parece a un Navion, aunque mucho menos de lo que debiera. Para modelistas con experiencia y ganas de rectificar lo que el fabricante no ha sabido reproducir.
- A lost opportunity to bring the Navion back to life for modelling. Despite the mistakes, the kit is buildable and looks like a Navion, though quite less than it should. For experienced modellers with enough motivation to fix what the manufacturer did wrongly.

La maqueta
El Navion disfruta en los EE.UU. de una popularidad entre los entusiastas de la aviación recreativa que es claramente desconocida en el resto del mundo. Aún hoy este modelo sigue volando con muchas actualizaciones, mejoras y adaptaciones. Incluso se le ha convertido en bimotor. Estos cambios introducidos por sus propietarios civiles a lo largo de más de 60 años hacen difícil tener una imagen acertada de un Navion tal y como fue producido a finales de los años 40, especialmente si nuestra intención es conocer su variante militar, denominada L-17. Los ejemplares conservados en museos no son demasiado fiables en ocasiones, ya que provienen del mercado civil, donde han sido modificados y actualizados en su totalidad.
En el modelismo el avión ha estado olvidado durante mucho tiempo. Tuvo una época, allá por los 50, en la que algunas marcas sacaron maquetas a escalas hoy raras, como 1/21 o 1/27, para el mercado norteamericano. En la escala 1/48 no se ve una edición desde los años 80 a cargo de la mejicana Pegaso, según se informa en la web de Scalemates. En la escala algo menor, la compañía alemana Constanza nos trajo una maqueta de resina hace bastante tiempo, mientras que en años recientes Valom ha sido, hasta hoy, la última marca en crear un molde de este avión, del que tenemos varias cajas editadas entre 2015 y 2018. Una de ellas está dedicada a versiones de la Marina norteamericana, que en realidad nunca empleó el Navion. Sin embargo, otra de las ediciones incluye versiones interesantes de la Fuerza Aérea de Uruguay, también desconocidas fuera del país. La caja que comento hoy contiene dos L-17B que fueron empleados en Corea por el General MacArthur y el General Ridgway respectivamente como aparatos de enlace.
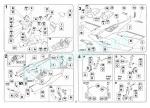
La caja contiene un único bastidor de piezas, un bastidor transparente, una plancha de fotograbados, una lámina de acetato, piezas de resina, las calcas y las instrucciones. Los fotograbados y las piezas transparentes están protegidos en bolsas separadas. El plástico está bien moldeado y en su mayoría las piezas son finas, con excepciones como la base de plástico del panel de instrumentos. Los paneles están bien grabados, con diferente anchura y profundidad en las superficies móviles. Las piezas carecen de rebabas y sólo hay marcas de eyector en los lados de la carlinga que no afectan a la zona visible tras montarla.
Desgraciadamente, pese al buen aspecto que tiene en la caja, la maqueta tiene múltiples deficiencias que podríamos resumir en tres aspectos: dimensiones, ajuste y perfiles. Mencionaré en su lugar los errores más evidentes con la ayuda de las revisiones publicadas respectivamente en las webs de IPMS Nymburk (República Checa), que contiene pruebas de ajuste de las piezas, e IPMS Deutschland, que muestra una comparación entre la maqueta de Valom y la de Constanza.
Pese a lo expresado en la caja, la maqueta intenta representar en realidad un Ryan L-17B Navion, ya que esta compañía adquirió el diseño de North American para producirlo de 1948 a 1951 con motores Continental O-470 de 205 hp. (153 kW), o bien Lycoming O-435 de 250 hp. (190 kW). Ryan terminó un lote de 163 unidades de este modelo para el Ejército estadounidenses, aunque los cinco últimos ejemplares fueron vendidos a Grecia, y posteriormente también a Uruguay, según he averiguado en internet. En 1962 la designación de este avión en las Fuerzas Armadas de EE.UU. fue cambiada a U-18B.
Carlinga
El suelo está moldeado en una pieza que muestra en el lado inferior el detalle del pozo de la rueda delantera. En la cara superior la pieza tiene moldeados el asiento posterior, las bases de los asientos delanteros, una consola central inexistente en la realidad, y un detalle redondeado con marcas, supuestamente para insertar los pedales. Hay piezas aparte para los asientos delanteros, el respaldo del trasero, un panel posterior que cubre el compartimento de la radio, la base del panel de instrumentos, y piezas de fotograbado para las palancas de control, los cinturones y el panel de instrumentos, que tiene los indicadores reproducidos en una lámina de acetato. El panel de instrumentos presenta buena factura e incluye los pedales. La base de plástico del panel está bien dimensionada, pero la pieza de fotograbado es demasiado ancha y no encaja en la carlinga.
Por otro lado, queda la duda de qué controles emplear. La maqueta trae tanto palancas de fotograbado como los controles característicos del Navion en forma de volantes semicirculares de plástico. Las instrucciones parecen indicar que deben usarse las palancas, aunque el modelista debería estudiar bien las referencias para averiguar la opción correcta.
Fuselaje y motor
Las mitades están moldeadas con la aleta de cola y las raíces alares. Como es de esperar en maquetas multimedia, no hay puntos para guiar la alineación. A simple vista se detecta que el perfil de la cola en su parte inferior es erróneo porque carece de bastante diedro. Valom lo ha representado casi recto. El morro tampoco se libra de defectos, ya que resulta demasiado ancho y por ello el frontal del motor, que es una pieza separada, se queda corto de dimensiones. El frontal muestra una toma de aire que resulta demasiado grande y con perfil erróneo. Además, la rejilla no viene hueca, sino cegada por el plástico. Hubiese estado mejor representada con un fotograbado. La hélice, afortunadamente, es fina y está bien perfilada. Carece de eje, aunque esto sí puede arreglarse.
Bajo el fuselaje hay que colocar los escapes y a un lado del fuselaje los tubos Venturi, que tienen alternativa de resina, así como un estribo que parece colocado en lugar erróneo si se comprueba en los perfiles de las instrucciones. Antes de cerrar el fuselaje hay que colocar los lados del pozo delantero. Mis instrucciones no son claras respecto a si deben pegarse sobre la cara inferior del suelo de la carlinga, o bien en los lados internos del fuselaje. Otro punto que tener en cuenta es el de añadir peso al morro, ya que las instrucciones no lo indican.
Una de las ventajas de la edición es que Valom ofrece piezas para mostrar la cubierta transparente abierta o cerrada. Aunque las piezas son finas y muy transparentes, no tienen la forma correcta al ser planas a los lados en vez de abultadas. También los parabrisas son demasiado pequeños y poseen demasiada inclinación, lo que le da menor altura total a la cubierta. Errores aparte, las piezas están bien grabadas y muestran incluso la ventanilla trasera, que le da a este avión esa mezcla de avión y coche. En mi lista de autos voladores sólo queda por detrás del Airacobra, que se lleva la palma con sus puertas. Sobre las piezas transparentes hay que colocar lo que parecen un par de antenas minúsculas de fotograbado.
Alas y cola
Las alas están separadas en dos mitades superiores y una inferior que muestra los huecos de las ruedas. El panelado, ya se ha dicho, no es malo y la reproducción de los alerones y flaps parece correcta y suficiente para la escala. El defecto más evidente de las alas es su muy escaso diedro, lo que se nota mucho en este avión e incluso tiene consecuencias al montar el tren de aterrizaje. Aunque la envergadura total es correcta, la anchura de las alas es algo escasa, en torno a algo más de 1 mm. en algunos puntos. Esto es menos evidente que lo anterior.
Antes de unir las mitades del fuselaje hay que colocar la pieza de fotograbado que representa los pozos de las ruedas. Creo que Valom ha perdido el tiempo con esta pieza, ya que ni siquiera llega a cubrir ambos pozos en su totalidad y es mejor descartarla. La pieza, además, no muestra detalle interior y resulta difícil colocar en ella las patas del tren. Quien desee meterse en dibujos podría mejor reproducir los pozos con perfiles de plástico. Creo que le saldría a cuenta y se ahorraría los problemas de este fotograbado para adaptarlo al diedro de las alas.
Las alas cuentan con fotograbados que reproducen los actuadores de los alerones y piezas de resina para los compensadores. Los fotograbados son muy pequeños y deben manipularse con cautela.
No lo he comprobado personalmente, pero al parecer el ajuste del fuselaje y las alas no es muy bueno y necesita masilla y lija. Para un modelista con cierta experiencia, esto no resultará nuevo en este tipo de maquetas.
Los estabilizadores vienen en piezas aparte y no tienen vástagos para unirlos al fuselaje, pero los puntos de unión sí están marcados en el fuselaje. Las piezas son finas y están bien paneladas. Su defecto es el mismo de las alas, careciendo de la anchura correcta, lo cual es aún menos evidente que en el caso anterior. El timón está separado de la aleta de cola y muestra buena representación de la superficie con líneas finas en relieve. Además de omitir la aleta de trimado, Valom le ha dado anchura y altura incorrecta a la cola para que no quede punto de la maqueta sin errores.
Tren de aterrizaje
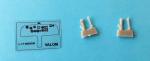
El tren delantero comprende una pata, bien reproducida con su horquilla, un brazo de torsión de fotograbado y un brazo de plegado de plástico. La rueda está moldeada en una pieza.
El tren posterior presenta la misma distribución de piezas en cada pata, pero cuenta también con faros de aterrizaje y tapas para los pozos, aunque los L-17 no solían llevarlas. Las tapas deben colocarse con un soporte de hilo de cobre que debe hacer el modelista. Las ruedas también son de una pieza y están bien detalladas en ambas caras, sin embargo parecen demasiado grandes al compararlas con las reales.
Al intentar colocar el tren principal, el modelista se va a enfrentar al mismo problema que algunos diseñadores de aviones. En este caso, el escaso diedro de las alas hace que las patas del tren parezcan demasiado largas. Acortarlas sin más puede no ser la solución óptima y deben hacerse comprobaciones antes de decidir qué hacer.
Calcas
La pequeña hoja de esta caja contiene insignias norteamericanas, matrículas, insignias de unidad y marcas para la cola. Las calcas están bien impresas y carecen de exceso de soporte. Su aspecto es brillante. Las matrículas de ambas versiones son erróneas según he leído, pero esto no lo he comprobado.
Instrucciones
Están impresas en un folleto de ocho páginas impresas en blanco y negro y color. Contiene un breve sumario histórico y técnico sobre el avión, seis secuencias principales de montaje, perfiles a color y una lista de colores con equivalencias de pinturas de las gamas de Humbrol, Agama, Model master, Gunze Sangyo y código Federal Standard.
Deben estudiarse con atención los pasos de montaje porque, especialmente los primeros, no quedan muy claros. El contraste con imágenes y otras posibles referencias es imprescindible.
También me parece necesario cerciorarse de los colores que empleó este avión durante la Guerra de Corea, o al menos de los que llevaba a inicios de los años 50 en el Ejército norteamericano. Otra tarea no demasiado fácil, pues las fotos de L-17 actuales, incluso aquellos conservados en museos, pueden no servir de mucha ayuda.
Las páginas centrales de mis instrucciones no son exactamente iguales a las que he encontrado en Scalemates. Las referencias a ciertas partes del montaje de la carlinga descritas en esta revisión hacen referencia al folleto que tengo, y no del todo a las instrucciones que acompañan a esta revisión.
Valoración
No puedo recomendar esta maqueta sino a modelistas con experiencia y ganas de solucionar los muchos detalles erróneos que Valom ha dejado en el camino. Si se observan con atención la caja y los perfiles de las instrucciones, hay detalles en ellos que el fabricante supo representar y luego no fueron recogidos en el molde de igual manera, como la forma de la cubierta de la carlinga, el diedro de las alas o la posición del estribo. Está claro que alguien no fue diligente al pasar del plano a las piezas.
Aún con todo lo que he señalado como faltas o excesos, el lector debe entender que este Navion es factible para alguien que suele hacer maquetas multimedia y no le importe que esta no sea una réplica certera de un L-17B, sino algo parecido.
No sé cuántas veces más volverá a sacar Valom esta maqueta, o si rectificará sus numerosas marras alguna vez, pero lo cierto es que este molde fue una oportunidad perdida para rescatar este avión del olvido en el que va a seguir.◊


The kit
The Navion enjoys a popularity among aviation enthusiasts in the US that is clearly unknown in the rest of the world. Even today this model continues to fly with many updates, improvements and adaptations. It has even been redesigned as a twin-engined aircraft. These changes introduced by civilian owners over more than 60 years make it difficult to have a correct image of a Navion as it was produced at the end of the 1940s, especially if our intention is to know the US military variant, called L-17. Copies kept in museums are sometimes not very reliable, since they came from the civil market, where they had been modified and updated.
In modelling the aircraft has been forgotten for a long time. There was a time, back in the 50s, when a few brands released some kits in odd scales for today’s standards, such as 1/21 or 1/27, for the North American market. In the 1/48 scale, there has not been a new release since the 1980s by the Mexican Pegaso company, according to what I have checked on the Scalemates website. On a somewhat smaller scale, the German company Constanza brought us a resin kit quite some time ago, while in recent years Valom have been, until today, the last brand to release a new-tool kit of this aircraft. The kit has been reboxed some times between 2015 and 2018. One of them is dedicated to US Navy versions which were never actually used by that service. However, another rebox includes interesting versions from the Uruguayan Air Force, also unknown outside that country. The box I deal with here today contains two L-17Bs that were used as liaison aircraft in Korea by General MacArthur and General Ridgway respectively.
The box contains a single sprue of parts, a clear sprue, a photo-etched fret, an acetate sheet, resin parts, the decals and the instructions. Both the photo-etched parts and the clear parts are protected in separate bags. Plastic is well molded and parts are thin, with exceptions like the plastic base in the instrument panel. Panels look correctly engraved, with different width and depth on the moveable surfaces. Parts arrive free from flash or blemishes and there are only ejector marks on the cockpit sides which are not visible after assembly.
Unfortunately, despite the good appearance in the box, the kit has multiple mistakes that we could summarize in three aspects: dimensions, fit and profiles. I will mention the most obvious ones with the help of the reviews published on the IPMS Nymburk (Czech Republic) website, which contains fit tests of the kit, and on the IPMS Deutschland (Germany) website, which shows a comparison between the Valom and Constanza kits.
Unlike what the box reads, the kit actually tries to represent a Ryan L-17B Navion, since this company acquired the North American design to produce it from 1948 to 1951 with 205hp (153 kW) Continental O-470 engines. or 250hp (190 kW)Lycoming O-435. . Ryan finished a batch of 163 units for the US Army, although the last five copies were sold to Greece, and later also to Uruguay, according to what I found out on the Internet. In 1962 the aircraft designation in the USAAF was changed to U-18B.
Cockpit
The floor is molded in one piece showing the detail of the front wheel well on the underside. On the upper side, the piece has the rear seat, the front seat bases, a center console that is fictional, and a rounded detail with marks, supposedly to insert the pedals. There are separate parts for the front seats, rear backrest, a rear panel covering the radio compartment, the base of the instrument panel, and photo-etched parts for the control sticks, seat belts, and instrument panel, which has the gadgets rendered on an acetate sheet. The instrument panel is nice and includes the pedals. The plastic base of the panel is well dimensioned, but the PE piece is too wide and does not fit in the cockpit.
On the other hand, there remains the question of which controls to use. The kit includes both photo-etched sticks and the Navion’s characteristic controls in the form of semicircular steering wheels in plastic. The instructions seem to indicate that the sticks should be used, but the modeller should study the references carefully to find the correct choice.
Fuselage and engine
The halves are molded with the tail fin and wing roots. As you would expect in multimedia kits, there are no pins to guide alignment. At first glance you can see the fuselage profile in the tail is wrong because it lacks enough dihedral. Valom has molded it almost straight. The nose is also not free from mistakes, since it is too wide and the engine front, which is separate, is not big enough to match the cowling. The front shows an air intake that is too large and with a wrong profile. In addition, the grill is not hollow. It would have looked much better as a PE part. The propeller, fortunately, is thin and well profiled. It lacks an axle although this can be fixed.
Under the fuselage you have to place the exhausts and the Venturi tubes on a side. These have resin alternatives. There is also a foothold that seems to be placed in the wrong place if you check the profiles shown on the instructions. Before closing the fuselage you have to attach the front well sides. My instructions are not clear as to whether they should be placed either on the underside of the cockpit floor or the fuselage inner sides. Another point to consider is to add some weight to the nose, since the instructions do not indicate it.
One of the advantages of the release is that Valom included pieces to show the canopy open or closed. Although the pieces are thin and very transparent, they do not have the correct shape as they are flat on the sides instead of bulged. Also, the windshields are too small and have too much slope, which makes the canopy lower than it should be. Mistakes aside, the pieces are well engraved and even show the rear window, which gives this aircraft a look of something between a plane and a car. In my list of “flying cars” it is only behind the Airacobra, which takes the cake with the doors. On the clear pieces you have to attach what looks like a pair of tiny photo-etched aerials.
Wings and tail
The wings are separated into two upper halves and a lower one showing the wheel well gaps. Panels, as said, are not bad and the rendering of both ailerons and flaps seems correct and enough for the scale. The most obvious downside of the wings is the very low dihedral, which is very noticeable in this aircraft. This even has consequences when building the landing gear. Although the total wingspan is correct, the width of the wings is somewhat small, around a little more than 1 mm. in some points. This fact is less obvious to the eye than the dihedral.
Before joining the fuselage halves, a PE piece for the wheel wells is added. I think Valom have wasted their time with this piece, as it doesn’t even fully cover both wells and should be discarded. Furthermore, the piece does not show any interior detail and the undercarriage struts are difficult to attach on a metal piece. Those wishing to correct the piece, may want to build two new wells with plastic. I think it would pay off and save yourself the problems to fit the PE part to the wing dihedral.
The wings have photo-etched parts that reproduce the aileron actuators and resin parts for the aileron counter-balances. The photo-etched parts are tiny and must be handled with care.
I haven’t checked it, but it seems the fit of fuselage and wings is not very good and needs putty and sandpaper. For a modeller with some experience, this is nothing new in a short-run.
Stabilizers come in separate pieces and do not have pins to glue them to the fuselage, but the attachment points are marked on the fuselage. The pieces are thin and the panels correctly engraved. As on the wings, they also lack some width, but this is even less evident than in the previous case. The rudder is separate from the tailfin and shows good surface detail in thin raised lines. In addition to omitting the trim tab, Valom have given the tail the wrong width and height so that there is no point in the kit without mistakes.
Undercarriage
The front gear includes a leg, nicely molded with the fork, a photo-etched torsion arm and a plastic folding arm. The wheel is molded in one piece.
The rear undercarriage has the same parts layout on each leg, but also has clear landing lights and plastic covers for the wells, though the US Army L-17s did not usually carry them. The covers are attached by means of a length of wire provided by the modeller. The wheels are also one piece and nicely detailed on both sides, however they seem a bit too big when compared to the real thing.
When trying to fit the main gear, the modeller is going to face the same problem as some aircraft designers. In this case, the narrow dihedral of the wings makes the undercarriage struts look too long. Simply trimming them may not be the best solution and tests should be made before deciding what to do.
Decals
The small sheet contains US stars, registrations, unit badges, and tail markings. The decals are well printed without too much carrier and look glossy. Registration numbers on both versions are wrong according to what I read somewhere, but I have not checked this.
Instructions
They are printed in an eight-page brochure printed in black and white and colour. It contains a brief historical and technical summary about the aircraft, six main assembly sequences, profiles and a color list with paint matches from Humbrol, Agama, Model Master, Gunze Sangyo and Federal Standard code.
Assembly should be carefully studied because they are not very clear, especially in the first chapters. Contrast with images and other possible written reference is essential.
I also think it is necessary to ascertain the colors that this plane used during the Korean War, or at least those that it had in US Army service in the early 1950s . This won’t be that easy since current L-17 photos, even those kept in museums, may not be of much help.
The assembly pages in my instructions are not exactly the same as what I have found on Scalemates. References to the assembly of certain cockpit parts described in this review refer to the instructions I have, and not quite to the instructions that are published here.
Conclusion
I can only recommend this kit to experienced modellers who want to mend the list of mistakes Valom have left along the way. If the artbox and the profiles in the instructions are carefully observed, one notices there are details of the Navion that Valom knew but they were not rendered in the tool, such as the canopy shape, the wing dihedral or the foothold position. Clearly someone did not do his job when going from blueprint to parts.
Even with all that I have mentioned as faults or excesses, the reader should understand that this Navion is buildable for someone who usually makes multimedia kits and can live without an accurate replica of an L-17B, but with a near lookalike.
I don’t know how many more times Valom will release the kit, or if they will ever rectify the mistakes, but the truth is that this kit was a missed opportunity to rescue this aircraft from an oblivion in which it will surely continue.◊
Publicado – Published: 1 / 2023
©www.jmodels.net


Debe estar conectado para enviar un comentario.