
De un vistazo – Quick look
MATERIAL Y PIEZAS
MEDIA & PARTS:
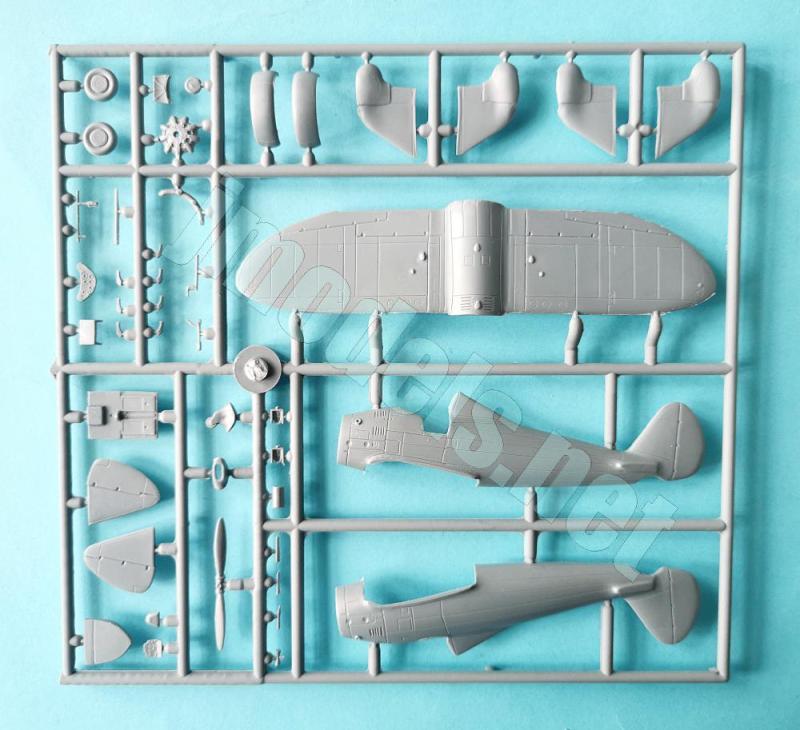
- Plástico inyectado (44 piezas), resina (1 pieza), acetato (1 pieza).
- Injected plastic (44 parts), resin (1 part), acetate (1 part).
CALCAS – DECALS:
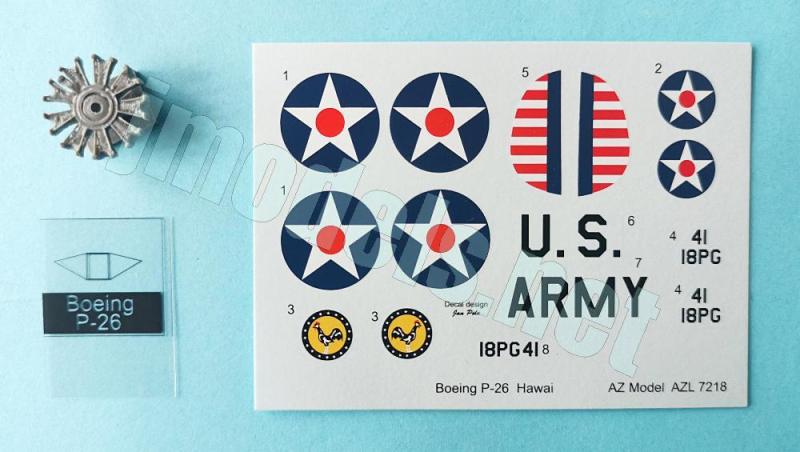
- Insignias nacionales de preguerra y de unidad, marcas de cola y matrículas. Aspecto fino y brillante. Buen registro y saturación de color. Mínimo soporte excedente.
- Prewar US Army roundels, unit insignia, tail markings and registrations. Thin and glossy finish. Good saturation and correct register. Minimal surplus carrier film.
OPCIONES – OPTIONS:
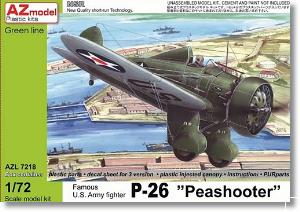
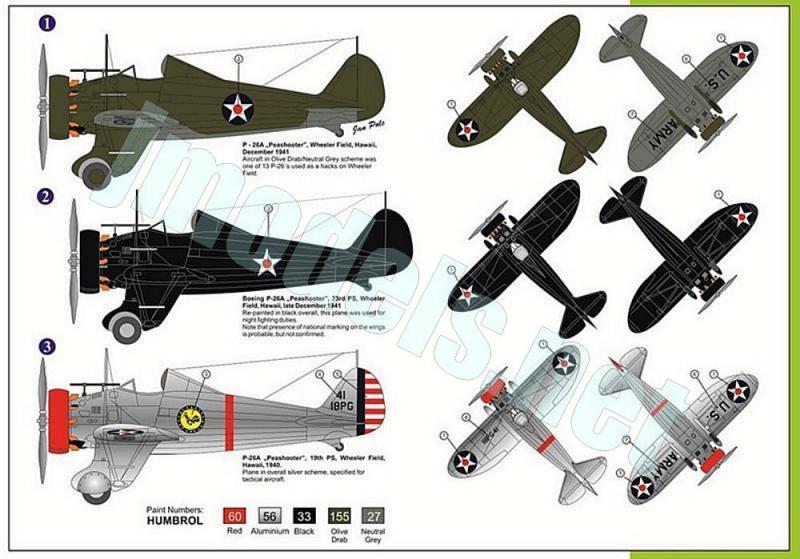
- Boeing P-26A “Peashooter”. Wheeler Field (Hawaii). December 1941.
- Boeing P-26A “Peashooter”. 73rd Pursuit Squadron. Wheeler Field (Hawaii). Late December 1941.
- Boeing P-26A “Peashooter”. 19th Pursuit Squadron. Wheeler Field (Hawaii). December 1940.
INSTRUCCIONES – INSTRUCTIONS:
- Folleto A5 de cuatro páginas impreso en blanco y negro. Contiene un sumario histórico sobre el avión, un plano numerado de piezas, una tabla de colores con equivalencias de pinturas de Humbrol y 12 secuencias de montaje. La cara trasera de la caja muestra perfiles en color y una lista de pinturas de Humbrol.
- 4-page A5 booklet printed in black and white containing a historical summary about the aircraft, a chart of colors with Humbrol paints matches plus 12 assembly sequences. The back side of the box shows profiles in color and a list of Humbrol paints.
LO MEJOR – THE BEST:
- Molde muy limpio. Buen detalle general. Montaje sencillo para quienes tengan suficiente experiencia.
- Clean tooling. Nice overall detail. Ease of assembly for those with a few short-runs behind.
LO PEOR – THE WORST:
- Asiento del piloto incompleto.
- Missing pilot’s seat backrest.
VALORACIÓN – CONCLUSION:
- Una maqueta muy competente para reproducir un Peashooter en esta escala. La limpieza del molde y su aparente sencillez de montaje la avalan sobradamente. Para modelistas con cierta experiencia.
- A very nice kit for reproducing a Peashooter in this scale. The clean mold and apparent ease of assembly more than justify its quality. For modelers with some experience.

La maqueta
Antes de que AZ Model lanzase su nuevo molde en 2013, sólo hubo dos maquetas del P-26 Peashooter en la escala 1/72: la vieja y muy reeditada de la Revell británica y otra de Pavla Models que sólo apareció una vez en 2003. El molde más reciente, sin embargo, es el de Kovozávody Prostějov, parecido al de AZ Model, pero sin el motor de resina. Esta caja comparte el molde con otras dos que AZ Model puso a la venta simultáneamente con el mismo nombre pero diferentes acabados.
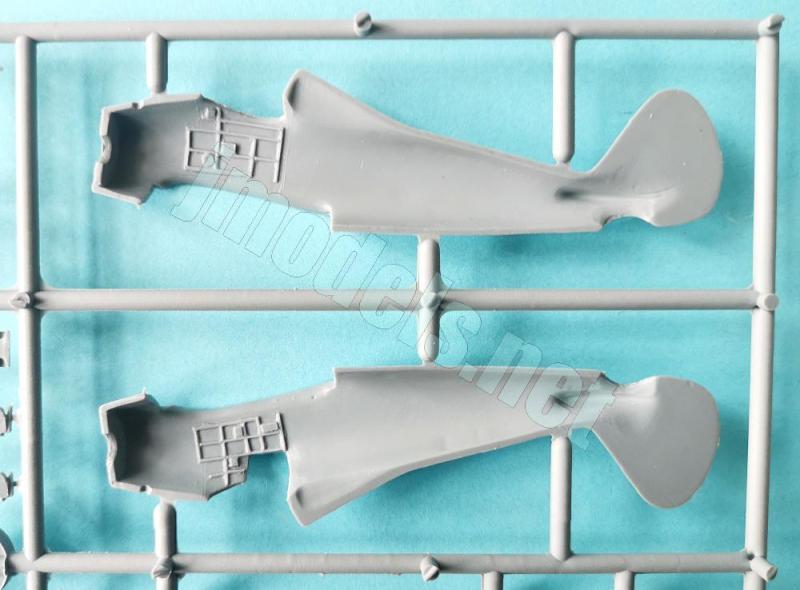
La caja nos entrega un bastidor de piezas grises, un parabrisas de acetato transparente, el motor de resina, las calcas y las instrucciones. El molde se presenta muy limpio, carece de defectos, rebabas o marcas, ni siquiera dentro del fuselaje. Los bordes de las alas muestran mínimas líneas de molde, pero no darán guerra. El grabado de los paneles de las alas, cola y fuselaje se corresponde con la buena factura de la maqueta. Pocas veces he visto a esta marca lucirse así en este aspecto.
A primera vista, la construcción del modelo no planteará dificultades al modelista con un cierto bagaje en las maquetas de serie limitada. Las posibilidades para pintar la maqueta de caja me parecen sencillas de realizar y variadas. Si preferimos calcas distintas que nos den otras alternativas, afortunadamente hay una oferta variada en el mercado, como las de Kora Models o Starfighter Decals, entre otras.
Reseña
La carlinga lleva un detalle bastante adecuado para la escala. Además del relieve estructural más algunos instrumentos poco definidos sobre los lados del fuselaje, esta zona dispone de un suelo detallado y piezas aparte para los pedales, la palanca, la base del asiento y un mamparo posterior con el reposacabezas en dos piezas. El panel tiene los controles inferiores separados, pero los indicadores están limpiamente grabados en las dos partes.
El panel abatible de acceso del lado izquierdo está separado para colocarlo abierto. La pieza está bien detallada por ambos lados. El parabrisas es de fino acetato transparente con la estructura impresa en la pieza. La mira tubular es fina pero tiene dos soportes en lugar de tres, faltándole el central. Unido a los arneses, la carlinga necesita el respaldo del asiento y su atalaje posterior para completarla.
Las mitades del fuselaje incluyen la estructura dorsal antivuelco bien representada más un panelado fino y consistente. El detalle sobre la cubierta delantera deja ver las rejillas de ventilación tras el motor y la toma de aire del carburador. Los dos escapes laterales debe hacerlos el modelista con varilla de plástico y sobre el lado derecho hay un diminuto tubo Venturi. La posición del mástil de la antena no se ve claramente ubicada en las instrucciones, pero podemos guiarnos por su posición marcada en el fuselaje y también por la ilustración de la caja, donde aparece bien colocado, por delante del parabrisas con una leve desviación a la derecha.
El motor está reproducido en la única pieza de resina. AZ Model ha sido práctica y no ha perdido el tiempo en detallar al máximo la parte anterior porque está cubierta por la placa frontal, sin embargo el detalle sobre los cilindros en la parte trasera es mejor. La placa está bien detallada, pero las aberturas de refrigeración no están abiertas. Esto no supone ningún problema porque es sencillo taladrarlas al estar bien marcadas en la pieza. Los escapes situados en la parte posterior del motor vienen en piezas individuales, junto con el anillo superior de soporte del motor. Las instrucciones ayudan a colocarlos gracias a una vista que nos señala claramente la posición de cada elemento.
Todo este conjunto va coronado por el anillo del capó, separado en mitades. Antes de pegar el motor al fuselaje hay que añadir las salidas de las ametralladoras a los lados del fuselaje. Su posición es evidente por las tapas de municionamiento situadas justo por detrás. La hélice es una pieza fina, limpia y moldeada con los manguitos del cubo bien definidos. El eje es demasiado corto, pero tiene fácil remedio.
Las alas son de una pieza que encaja bajo el fuselaje. El grosor me parece consistente con la escala y poseen un detalle bien logrado, con líneas finas pero algo más anchas y profundas en los alerones y flaps, que muestran el pequeño hueco de las bisagras. Las luces de navegación y las aletas de los alerones muestran nitidez suficiente. Para colocar las riostras superiores e inferiores así como la antena es de gran ayuda el último capítulo de las instrucciones. A estos cables el modelista tiene que añadir los tensores hechos de varilla plástica.
Las superficies de cola tienen los timones bien grabados. Los estabilizadores carecen de lengüetas o vástagos de unión, nada extraño en este tipo de maquetas.
Las carenas del tren principal se proporcionan en mitades con la rueda entre ambas y el eje moldeado en una de las piezas. El detalle de las ruedas es básico, pero está bien reproducido por ambas caras. La rueda de cola tiene dos opciones. La pieza pertinente aquí, según se aprecia en la cara trasera de la caja, está moldeada junto con la carena y es más alargada que su alternativa.
La hoja de calcas lleva impresas insignias nacionales de preguerra, de unidad, marcas de cola y matrículas con aspecto fino y brillante, buen registro y saturación de color. El soporte sobrante es mínimo..
El folleto de instrucciones consta de cuatro páginas de formato A5 y está impreso en blanco y negro. Contiene un sumario histórico sobre el avión, un plano numerado de piezas, una tabla de colores con equivalencias de pinturas de Humbrol y doce secuencias de montaje. La cara trasera de la caja muestra perfiles en color y una lista de pinturas de Humbrol. Afortunadamente, las instrucciones son bastante mejores y más claras que las que el fabricante ha hecho para algunas otras maquetas, pese a que el folleto sigue siendo el mismo para las tres cajas dedicadas al P-26.
Las terminaciones de pintura nos permiten elegir entre tres libreas muy diferentes y sencillas de pintar, en olive drab del Ejército norteamericano, negro para una versión de caza nocturno o bien el acabado en aluminio empleado en muchos aviones del Ejército y la Marina antes de la Segunda Guerra Mundial. Todas las unidades que representan estuvieron basadas en Wheeler Field en la época del ataque Japonés a Pearl Harbour.
Valoración
AZ Model hizo una maqueta muy competente del feorro Peashooter de la que el modelista con experiencia puede sacar buen provecho gracias a un molde limpio y con un detalle muy correcto para la escala. Seguramente, no le resultará ni la más difícil de armar ni de pintar con las que se haya topado.◊
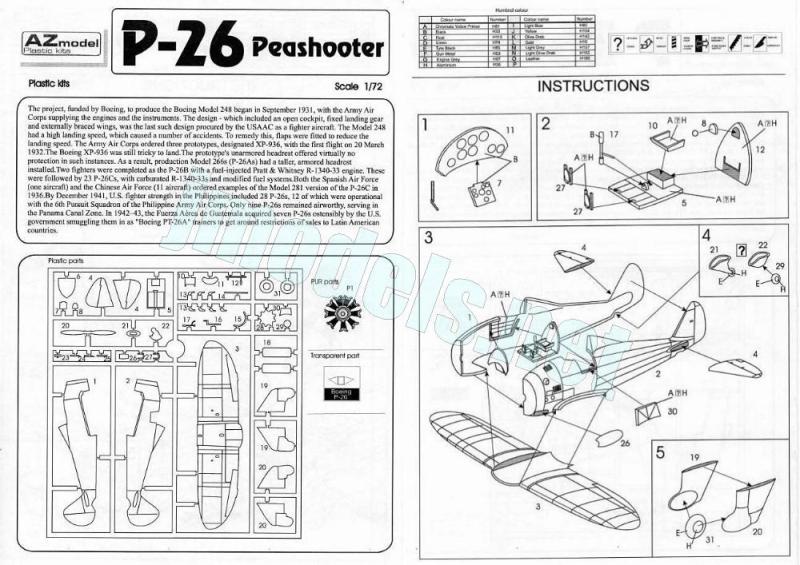

The kit
Before AZ Model released their new tool in 2013, there were only two 1/72 Peashooter kits: the old and frequently reboxed offer from Revell and another from Pavla Models that only appeared once in 2003. The most recent kits, however, have been released by Kovozávody Prostějov. They are similar to the AZ Model kit but without the resin engine. This kit shares the same tool with two other boxings released simultaneously with the same name but different liveries.
The kit comprises a sprue of gray parts, a clear acetate windscreen, the resin engine, the decals, and the instructions. Parts are very clean, free from blemishes, flash, or marks, even inside the fuselage halves. The wings show minimal seam lines on the leading edges, but these should be easy to clean up. Panel lines on the wings, tail, and fuselage are consistent with the kit’s first good impression.
At first glance, building this P-26 shouldn’t pose any difficulties for modelers with some experience in short-run kits. The options to paint the kit as per the instructions seem straightforward and varied. If you prefer different decals for other liveries, fortunately there’s a wide range on the market, such as those from Kora Models or Starfighter Decals, among others.
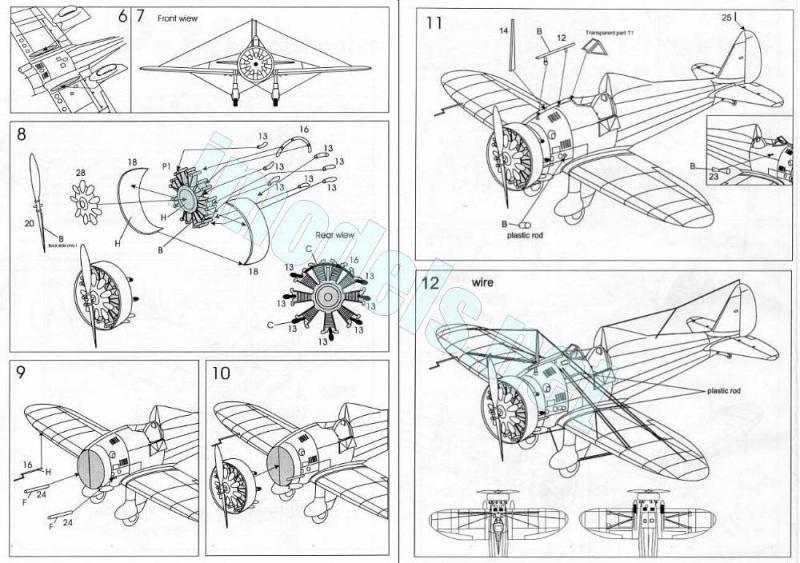
Review
The cockpit has a detail quite appropriate for the scale. In addition to the raised structural ribbing and some not very sharp instruments on the fuselage sides, there is a detailed floor and separate parts for the pedals, the control stick, the seat base, and a rear bulkhead with a two-piece headrest. The instrument panel consists of two pieces, but the gadgets are cleanly engraved on both.
The hinged entry flap on the left side is a separate piece to pose it in the open position. This part is detailed on both sides. The windshield is made of thin, clear acetate with the structure printed on it. The tubular gunsight is thin but has two supports instead of three, lacking the center one. Along with the pilot’s harnesses, the cockpit only needs the seat back, which strangely AZ didn’t provide, and the rear support frame to be fairly complete.
The fuselage halves include the well-represented dorsal turnover structure and thin, consistent panel lines. Detail on the engine deck reveals the ventilation louvres behind the engine and the carburetor air intake. The modeler needs to make the two side exhausts using plastic rod, and there’s a tiny Venturi tube on the right side. The antenna mast position isn’t clearly shown in the instructions, but we can use the boxart as a guide. This shows it correctly positioned in front of the windshield with a slight offset to the right.
The engine is reproduced as a single resin piece. AZ Model was practical and didn’t waste time detailing the front face extensively because it will be hidden behind the face plate. Detail on the rear engine side is better. The plate is well-detailed, but the cooling inlets aren’t hollowed. This isn’t a problem because they’re easy to drill out. The exhausts around the rear side of the engine come as single pieces, along with the upper engine bearer ring. The instructions help with placement thanks to a very clear detailed view.
The cowling ring comes in halves. Before attaching the engine to the fuselage, the machine gun barrels are glued to the fuselage sides. The propeller is thin and molded with well-defined hub sleeves. The shaft is too short, but can be improved with plastic rod.
The wings are a single piece fitting under the fuselage. They look thin enough for the scale and are engraved with thin lines that are a bit wider and deeper on the ailerons and flaps. These show the small hinge recesses. The navigation lights and aileron tabs are sharp. The last chapter of the instructions is very helpful for attaching the upper and lower braces, as well as the antenna. The modeler must provide the stays on the landing wires with plastic rod.
Tail surfaces show well-engraved rudder and elevators. The stabilizers are butt joined to the tail without pins or tabs as in most short runs.
The main landing gear spats are molded in halves with the wheel between them and the axle molded on one of the pieces. Wheel detail is basic, but well reproduced on both sides. The tailwheel has two options, with the wheel separated or molded with the fairing. The correct choice can be seen on the back of the box.
The decal sheet includes pre-war roundels, tail and unit markings, and registrations. They are printed with a fine, glossy finish, correct register, and good color saturation. Surplus carrier film is minimal.
The A5 instruction booklet consists of four pages printed in black and white. It contains a historical summary of the aircraft, a numbered parts diagram, a color chart with Humbrol paint matches, and twelve assembly sequences. The back of the box shows profiles in color and a list of Humbrol paints to apply. Fortunately, the instructions are much better and clearer than others the manufacturer has made for some kits, even though the booklet remains the same for all three P-26 boxings.
Paint finishes allows you to select from three very different and easy-to-paint liveries: US Army olive drab, black for a night fighter version, or the aluminum finish used on many Army and Navy aircraft before World War II. All the units depicted were based at Wheeler Field around the time of the Japanese attack on Pearl Harbor.
Conclusion
AZ Model produced a very nice kit of the ugly Peashooter which experienced modelers can greatly benefit from thanks to its clean mold and good detail for the scale. It’s unlikely to be the most difficult short-run kit to build or paint they’ve ever come across.◊
Publicado – Published: 7 / 2026
©www.jmodels.net


Debe estar conectado para enviar un comentario.