
De un vistazo – Quick look
MATERIAL Y PIEZAS
MEDIA & PARTS:
- Fotograbado (45 piezas), plástico inyectado (43 piezas), plástico transparente (2 piezas), acetato (3 piezas), máscaras adhesivas (8 piezas).
- PE (45 parts), injected plastic (43 parts), clear plastic (2 parts), acetate (3 parts), masks (8 pieces).
CALCAS – DECALS:
- Insignias polacas, matrículas, insignias de unidad, bandas, estarcidos y panel de instrumentos. De apariencia fina y muy bien impresas.
- Polish markings, unit badges, numbers, stencils and instrument panel. Apparently thin and nicely printed.
OPCIONES – OPTIONS:
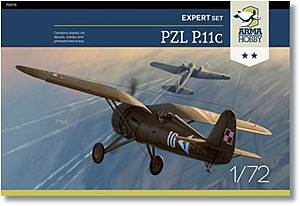
- PZL P11c. 113ª Escuadrilla de Cazas, Brigada de Cazas. Varsovia, 1939. Avión del Primer Teniente Hieronim Dudwał (4 victorias en septiembre de 1939).
- PZL P11c. Pruebas de camuflaje en el Instituto Técnico de Aviación.
- PZL P11c. 131ª Escuadrilla de Cazas, Ejército de Poznań. Poznań, 1939. Avión del Segundo Teniente Henryk Bibrowicz (2 victorias) y del Segundo Teniente Lech Grzybowski (2 victorias).
- PZL P11c. 141ª Escuadrilla de Cazas, Ejército de Pomerania. Toruń, 1939. Aparato del Capitán Florian Laskowski, comandante del Ala III/4.
- PZL P11c. 113th Fighter Squadron, Pursuit Brigade. Warsaw, 1939. Airplane of 1st Lt. Hieronim Dudwał (4 victories in September 1939).
- PZL P11c. Camouflage tests in the Aviation Technical Institute.
- PZL P11c. 131st Fighter squadron, Poznań Army. Poznań, 1939. Aircraft flown by 2nd Lt. Henryk Bibrowicz (2 victories) and 2nd Lt. Lech Grzybowski (2 victories).
- PZL P11c. 141st Fighter Squadron, Pomorze Army. Toruń, 1939. Aircraft flown by Capt. Florian Laskowski, III/4 Wing commander.
INSTRUCCIONES – INSTRUCTIONS:
- Folleto a color de 8 páginas impreso en papel satinado. Contiene referencia histórica sobre el avión, tabla de contenidos y de pinturas (Federal Standard y Hataka), 26 secuencias de montaje sin numerar y 4 páginas de perfiles. Bien presentadas y muy claras.
- 8-page booklet printed in colour on good satin paper. Includes a short introduction about the plane, table of contents and paints (Federal Standard and Hataka), 26 unnumbered assembly steps and 4 pages with profiles. Nicely printed and very clear.
LO MEJOR – THE BEST:
- Bien detallada por dentro y por fuera. Calcas. Incluye mascarillas.
- Nicely detailed inside and outside. Decals. Masks included.
LO PEOR – THE WORST:
- Un par de marcas de eyector visibles. Instrucciones (ver texto).
- A couple of visible sink marks. Instructions (see text).
VALORACIÓN – CONCLUSION:
- Gran avance respecto a maquetas anteriores. Al alcance de cualquier modelista en diferentes ediciones.
- A great step forward compared to previous kits. Suitable for any modeller in its Junior or Expert sets.

En los últimos años hemos conocido un resurgimiento del interés de ciertas marcas polacas por el PZL P.11, un caza importante a finales de los años 30. Dejando aparte la maqueta de Azur, la oferta de este avión a esta escala llevaba años limitada a ediciones muy antiguas como la de Heller, por ejemplo.
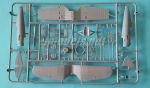
Como viene siendo habitual, este nuevo molde de Arma Hobby tiene dos ediciones con dos niveles de dificultad y detalle. En concreto, este Expert Set contiene un único bastidor de piezas de plástico, un bastidor de piezas transparentes, una plancha de fotograbados, una hoja de calcas, una de acetato y otra de máscaras adhesivas además de las instrucciones. Todo el contenido viene en bolsas separadas con cierre sellado de fácil apertura.
El plástico es fino, de dureza media y está bien fabricado. Las piezas muestran en general buena definición y están correctamente moldeadas. Las líneas de panel grabadas muestran, en mi opinión, profundidad y anchura correctas para la escala, siendo la primera más evidente en las superficies de control y en las alas y estabilizadores. No hay restos de plástico muy evidentes y las únicas marcas de eyector visibles están a los lados de la parte inferior del timón, ambas muy leves y fáciles de rellenar.
El fuselaje se compone de dos mitades sin el motor, la cola, la sección superior donde van montadas las alas ni la inferior que incorpora el tren de aterrizaje. Los lados interiores muestran parte de la estructura interna en relieve tenue y muy fino y algunos instrumentos en el lado de babor. Hay marcas positivas de eyector a ambos lados que no afectan a la zona de la carlinga.
Hay piezas suficientes para detallar la reducida carlinga., complementadas con multitud de piezas de fotograbado, algunas de tamaño diminuto. Es fácil saltarse alguna porque las instrucciones no siguen el orden habitual, como comentaré luego.
Los lados de la carlinga tienen dos bastidores que simulan parte de la estructura. Sobre ellos hay que colocar varias piezas de fotograbado que representan palancas e instrumentos además de las culatas de las ametralladoras. Sobre el suelo, también detallado con varios fotograbados, hay que colocar el asiento, los pedales y la palanca de control. Los pedales están bien representados pese a ser de plástico. El reposacabezas, con anclaje para los cinturones, está separado del asiento y ha de pegarse cuando el fuselaje esté ya cerrado, lo cual añade cierta dificultad para pegar los arneses al asiento. El panel de instrumentos es idéntico para las dos ediciones de la maqueta, por ello muestra los indicadores en relieve y una calca para simularlos, pero también encontramos en esta edición una pieza de acetato con la misma función y un frontal de fotograbado.
Las superficies externas del fuselaje muestran detalle correcto en las líneas de panel y en las aberturas de ventilación del motor. Dada la edición, inevitablemente hay más fotograbados que añadir, como registros circulares, asas y tapas de los reposapiés de acceso a la carlinga. Ha de añadirse también los cañones de las ametralladoras, una rejilla de ventilación y el tubo Venturi.
El capó está dividido en mitades con anillo externo de una pieza. El motor muestra los cilindros bien definidos y sin rebabas, y el frontal en pieza separada. La hélice va insertada en esta pieza y tiene buena factura y perfil. El buje es también una pieza aparte. El motor va unido directamente al hueco frontal del fuselaje. La anchura del capó parece suficiente para que este cumpla su función y no quede pegado al fuselaje como sucede en muchas otras maquetas.
Las características alas de este PZL están divididas en mitades no coincidentes en las puntas, que están moldeadas con la mitad superior para ganar en finura. Los paneles vienen muy bien grabados con líneas finas y de profundidad suficiente, y la textura de las superficies ha sido muy bien representada. Los flaps son fijos y están fabricados con la cara superior de las alas. En la zona intermedia, por delante de la carlinga, hay que añadir la mira, el punto de mira y un registro de fotograbado. En el borde de ataque podemos incluir como opción una tercera ametralladora, que no todos los aparatos tenían.
La cara inferior muestra los puntos de unión de los soportes y dos piezas curvadas opcionales, que en realidad representan las salidas de los casquillos de un P.11f y que no serían aplicables a la maqueta, pero las instrucciones no lo señalan. Las alas van pegadas sobre el hueco del fuselaje y el ajuste en apariencia no debe presentar problemas. Los soportes de las alas muestran buen perfil y son sencillos de colocar, al tener los puntos de unión bien grabados tanto en las alas como en el fuselaje.
La cola está moldeada de forma muy simple pero efectiva. Se compone de dos piezas, estabilizadores y aleta-timón. Los paneles están correctamente trazados y las superficies muestran parecidas hechuras a las de las alas. Las líneas son algo más anchas en las superficies móviles. Ya he señalado la presencia de marcas a cada lado del timón que no suponen una contrariedad insalvable. Hay también dos soportes de los estabilizadores con buen perfil. La colocación del empenaje sobre el fuselaje tampoco aparenta ser problemática.
Las patas del tren de aterrizaje van unidas a una sección inferior del fuselaje. Entiendo que el motivo de ello ha sido no cortar por la mitad el buen detalle exterior que muestra la pieza. En mi opinión, hubiese sido mejor fabricar las patas por separado, ya que, a fin de cuentas, el ajuste de la pieza en el fuselaje no es del todo bueno y Arma Hobby se ha visto obligada a incluir una fe de errata en una hoja separada que nos indica los leves ajustes que hay que hacerle a dicha pieza. El patín de cola y las ruedas tienen buena definición y para estas últimas tenemos además mascarillas para pintarlas. El único inconveniente es que las máscaras sólo cubren el neumático y el borde del tapacubos debe taparse con máscara líquida.
El bastidor transparente tiene dos parabrisas distintos. El que corresponde a esta maqueta está detallado con un retrovisor de fotograbado y dispone de mascarillas que son de gran utilidad para pintarlo. Ambos parabrisas son muy finos y transparentes.
La hoja de calcas me parece excelente y muy bien impresa. Los motivos no tienen exceso de soporte y su apariencia es muy fina. Contiene marcas polacas, matrículas, el panel de instrumentos, emblemas de diferentes unidades, una banda para una de las opciones y diversos estarcidos.
El folleto de instrucciones tiene ocho páginas impresas a color en buen papel satinado. En él aparece una breve introducción histórica en polaco en inglés, una muestra de contenidos de la maqueta, una tabla de pinturas descritas en códigos Federal Standard y de Hataka, cuatro páginas de perfiles de las diversas opciones de pintura (también representados en la cara posterior de la caja) y 26 secuencias de montaje sin numerar. El orden de estos pasos no es el habitual, ya que se muestran primero las zonas de la maqueta donde se han de pegar los fotograbados, incluidas las alas y el fuselaje. Por este motivo hay que alterar el orden de lectura con frecuencia. Las vistas de montaje son, eso sí, muy claras y no llevan a confusión. Las cinco opciones de pintura corresponden a cazas que combatieron en septiembre de 1939, excepto una de ellas que muestra un interesante ejemplar con camuflaje experimental.
La maqueta sigue corroborando el buen hacer de Arma Hobby del que ha dado buena muestra desde sus comienzos. Está bien detallada y pone al día un avión importante para los aficionados a la Segunda Guerra Mundial. En conjunto y en detalle, me parece superior al molde de Azur. Como ya señalé en otra revisión anterior, ningún modelista se debe quedar sin disfrutar de esta maqueta, ya que además de la presente edición destinada a expertos, hay otra para los que lo son menos.◊


In the last years some new Polish manufacturer have shown a renewed interest on the PZL P.11, an important fighter from the late 1930s. Apart from the Azur kit, the offer of this aircraft at the scale was limited to old releases such as the Heller kit, for example.
As usual with Arma Hobby, this new tooling has a double edition catering for two levels of difficulty and detail. In the case of this Expert Set the box contains only one plastic sprue, a clear sprue, a decal sheet, a PE fret, an acetate sheet and a mask sheet as well as the instructions. All the content comes in separate self-sealing bags.
Plastic is thin and medium-hard. Parts show good definition overall and are correctly molded. I think engraved panel lines have correct depth and width for the scale, this latter being more evident in wings and ailerons control surfaces. There isn´t any flash on parts and the only visible sink marks are on both sides of the rudder, though are very shallow and easy to fill.
The fuselage comprises two halves molded without the engine cowling, a top section where the wings are attached, the tail and a belly section that includes the undercarriage struts. The interior sides show part of the structure rendered with very thin raised lines and some instruments on the port half. There are some positive marks on both sides that don´t affect the cockpit area.
Inside the cockpit there are a good bunch of pieces for detailing, most of them tiny PE parts. It is very easy to skip some because the instructions don´t follow the traditional assembly sequence. More on this later.
The cockpit sides are provided with separate plastic frames simulating the internal structure. There are some PE parts to add here, such as levers, gadgets as well as plastic machine-guns. The floor is also detailed with some PE parts and there is a seat with separate headrest, pedals and the control lever. Pedals are plastic, pieces but they look nice. The headrest includes a tiny attachment point for the belts, but this part is to be added once the fuselage is closed, which means that gluing the belts on the seat will be more difficult. The instrument panel is the same for both the Junior and Expert sets, so in fact you can choose either a decal to set on the raised gadgets or just follow the instructions and use an acetate piece and a PE panel front.
Fuselage external surfaces show nice detail in panel lines and the engine air vents. As this is an edition aimed at advanced modellers, there are a few more PE bits to add, such as circular registers, handles and foothold covers, the Venturi tube and an extra air intake grille. The machine-gun barrels are made of plastic and they look fine.
The cowling comes in halves with a one-piece outer ring. The engine has well defined cylinders showing no flash and a separate front section where the propeller is inserted. The propeller also shows a good shape, is thin and has a separate spinner. The engine is simply inserted into the fuselage front opening. The cowling seems wide enough to leave some space with the fuselage surface for a more realistic look.
The characteristic PZL wings are separate halves and wingtips are molded with the upper piece to make them thinner. Panels are nicely engraved with thin lines that show correct depth for the scale. Wing texture is also quite well rendered. Flaps come molded with the upper wing half and, obviously, are not posable. The mid-wing section in front of the cockpit has a PE round register, crosshairs and front sight. On the wing leading edge we can include a third machine-gun barrel that not all the aircraft shown in the instructions carried.
The bottom side has two optional bent pieces that are in fact the wing machine-guns ammo chutes. These are applicable to a P.11f, but the instructions do not say anything about this. The wings are attached directly onto the fuselage top, but fitting does not seem to be difficult. Wing struts show nice shapes and look easy to build having engraved attachment points on both fuselage and wings.
The tail has been molded in just two pieces (fin/rudder and stabilizers), which is a simple and effective way to make things easier for the modeller. Detail and texture are similar to those on the wings with wider lines for the movable surfaces. I have already pointed out the slight sink marks on either side of the rudder that should be nothing but a small nuisance during assembly. The tail also includes two struts for the stabilizers.
The landing gear struts are molded with a section of the fuselage belly. I think the reason is to avoid cutting the piece in halves thus losing part of the nice detail molded on the part. In my opinion molding the struts separately could have been better and, after all, Arma Hobby has been forced to include a sheet showing the modifications to make in the part due to a small mistake which makes correct fitting a bit difficult. The tail skid and wheels have good definition. Wheels are provided with masks for the tyres but the modeller has to use liquid mask to cover the hub rims.
The clear sprue includes two different windshields. The applicable piece in this kit is provided with a PE mirror and we also have masks that will be quite handy to paint it. Both pieces are quite thin and transparent.
The decal sheet looks outstanding and very well printed. Decals have no excess of carrier film and are apparently thin. The sheet contains Polish markings, an instrument panel, unit badges, several stencils and a stripe for one of the aircraft included as options.
The instructions booklet has eight pages printed in color on good satin paper. It shows a brief historical reference about the aircraft in Polish and English, a view of the kit content, a table of paints in Federal Standard codes and Hataka acrylic paints, four pages of profiles to be used as painting reference (these are also represented on the back of the box) and 26 unnumbered assembly steps. The sequence is not the usual one, as the first steps are devoted to attaching the PE parts all over the model, including fuselage and wings. For this reason, you will have to read back and forth checking the correct next step. Fortunately, exploded views are very clear. The five painting choices belong to fighters present in Polish squadrons in September 1939, except for one of them that sports an interesting experimental camouflage.
The kit continues to back up the good job Arma Hobby has been doing since it first appeared on the market. It is well detailed and updates older kits of an important aircraft from the early WWII period. As a whole and in detail, it seems to me better than the Azur kit. As I already pointed out in another review, no WWII fan should avoid enjoying this model. If this edition looks too much for your skills, there is another one for those who are less so.◊
Actualizado – Updated: 4 / 2022
Publicado – Published: 6 / 2020
©www.jmodels.net


Debe estar conectado para enviar un comentario.