
De un vistazo – Quick look
MATERIAL Y PIEZAS
MEDIA & PARTS:
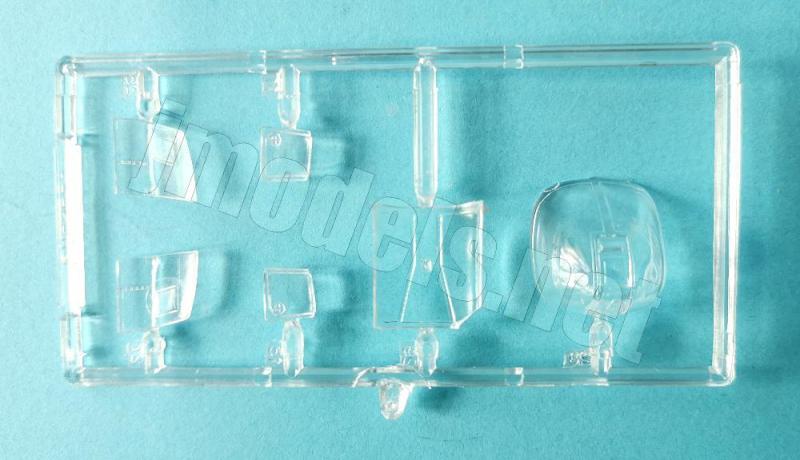
- Plástico inyectado (32 piezas), plástico transparente (6 piezas). Incluye 2 figuras.
- Injected plastic (32 parts), clear plastic (6 parts). Two figures included.
CALCAS – DECALS:
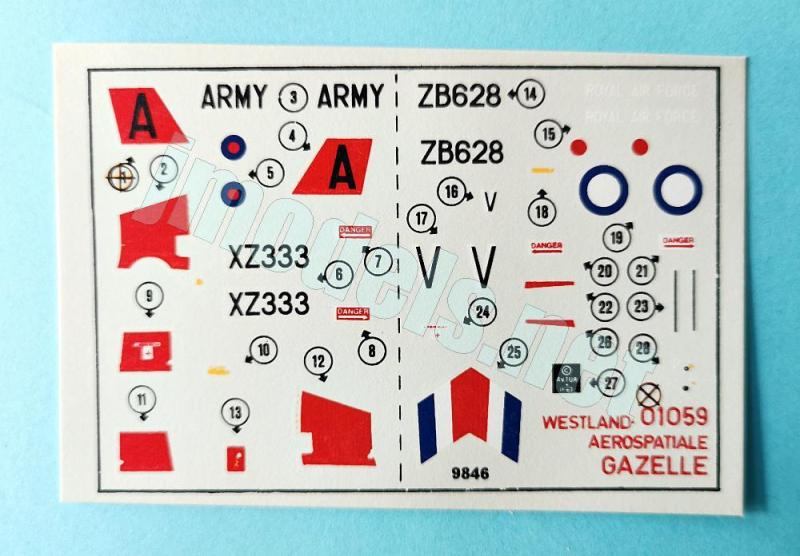
- Escarapelas británicas, marcas del fuselaje y cola, matrículas y algunos estarcidos. Acabado fino y mate. Saturación de color regular, buen registro. Poco exceso de soporte.
- British roundels, fuselage and tail markings, registrations and some stencils. Thin and matte finish. Not very good saturation, good register. Little excess of carrier film.
OPCIONES – OPTIONS:
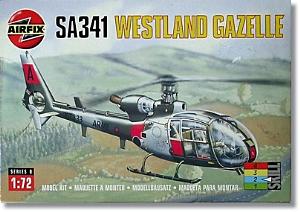
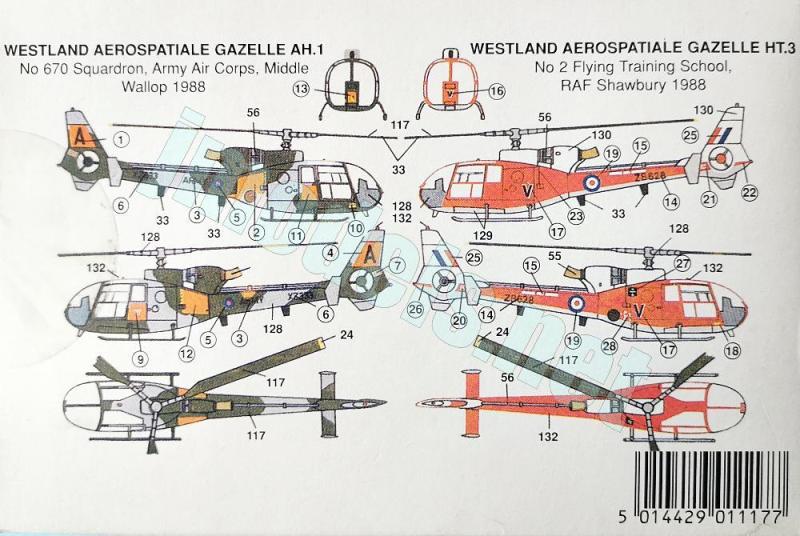
- Westland Aerospatiale Gazelle AH.1. Army Air Corps. No. 670 Squadron. Middle Wallop (England), 1988.
- Westland Aerospatiale Gazelle HT.3. No. 2 Flying Training School. RAF Shawbury (England), 1988.
INSTRUCCIONES – INSTRUCTIONS:
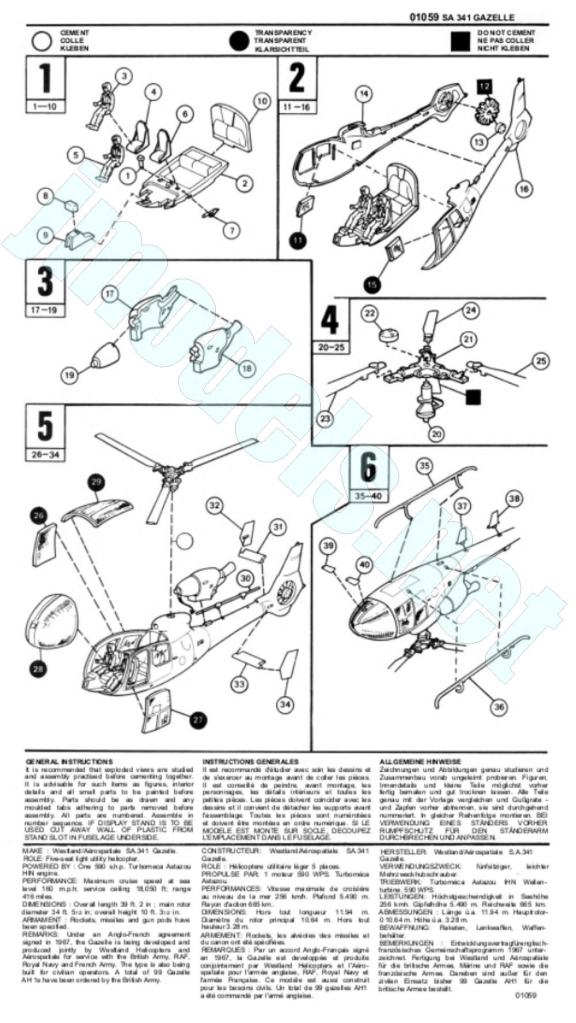
- Folleto doblado impreso en vertical en blanco y negro. Muestra 6 secuencias de montaje. La cara trasera de la caja muestra las opciones de acabado en color con códigos de pinturas esmaltes de Humbrol.
- Folded brochure printed vertically in black and white. It only shows 6 assembly steps. The back side of the box shows the paint finishes in color and codes from Humbrol enamel paint range.
LO MEJOR – THE BEST:
- Montaje sencillo. Posibilidad de colocar las puertas abiertas.
- Ease of assembly. Doors can be posed open.
LO PEOR – THE WORST:
- Detalle escaso en la carlinga.
- Poor cockpit.
VALORACIÓN – CONCLUSION:
- Junto con la copia de Heller, es el único molde del Gazelle en esta escala. Ofrece posibilidades para el modelista novato gracias a su sencillez de montaje, y para el avanzado que quiera sacarle partido.
- With Heller rebox, it is the only 1/72 kit of the Gazelle. Ease of assembly makes it suitable for the newbie, but it also offers the advanced modeler room to get a nice model.

La maqueta
Procede de un molde de Airfix lanzado por vez primera en 1973 en formato blíster que llevaba la conocida peana de plástico transparente que la marca no ha incluido después. Esta caja concreta data de 1994 y es una de las últimas ediciones que Airfix ha hecho hasta hoy sin acompañamiento de pinturas, pinceles o pegamento. Desde finales de los años 80 Heller también ha copiado este molde en varias ocasiones.
Tanto las instrucciones como las alternativas de pintura han cambiado muy poco a lo largo del tiempo. Esta edición tiene las mismas instrucciones de la primera e idénticas alternativas para pintar la maqueta que en la mayoría de copias anteriores, que llegan a las diez, señal de que las ventas le debieron ir bien a Airfix.
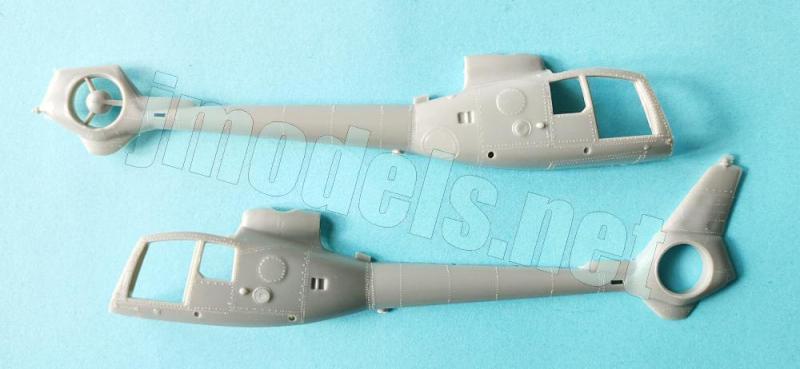
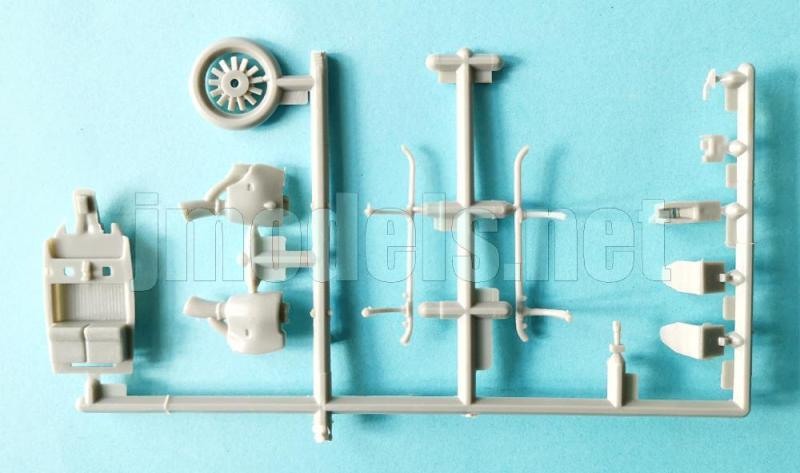
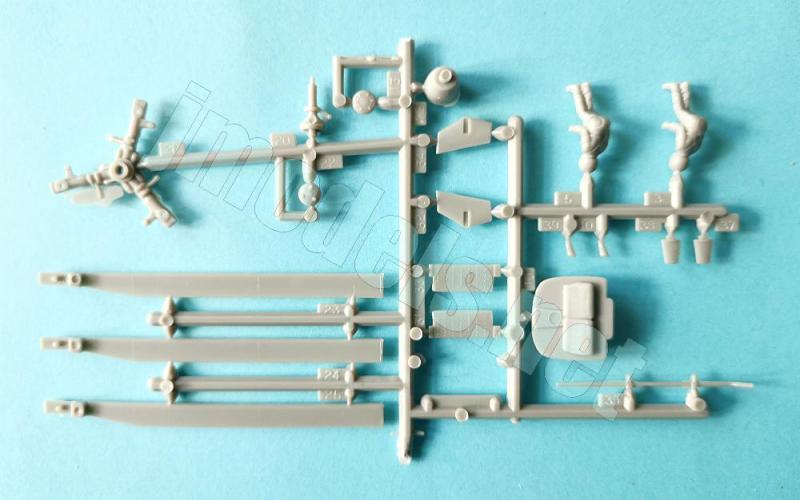
La caja contiene un bastidor cortado aproximadamente por la mitad para hacerlo caber en ella, las mitades del fuselaje por separado, un bastidor transparente, la hoja de calcas y las instrucciones. El plástico está bien moldeado, sin deformaciones ni defectos graves. En general, las pocas marcas de eyector son leves y sencillas de tapar, aunque la limpieza necesitará más atención para eliminar las rebabas, especialmente en el rotor, patines y en determinados extremos de las piezas del fuselaje.
La maqueta está diseñada para construirla con rápidez y facilidad y carece de opciones de montaje, por eso no es de extrañar, por ejemplo, que Airfix no haya incluido detalles adicionales como el posible armamento del AH.1.
Reseña
Los lados del fuselaje no tienen detalle y una marca a cada lado fácil de cubrir. La carlinga la forman un suelo, que incluye el habitáculo trasero y dos asientos sobre este, en lugar de los tres habituales; una consola intermedia con el panel separado, sin detalle en ambas piezas; los asientos de los tripulantes, la palanca de control de cabezada y una pequeña pieza cilíndrica que simula un control del rotor situado entre los asientos delanteros. Faltan, por tanto, los pedales y palancas de control como poco. En la parte trasera hay un panel separado con los respaldos de los asientos. Ciertamente es muy poco lo que Airfix se molestó en detallar. Por ver el vaso medio lleno, hay que decir que apenas hay unas leves marcas de eyector sobre los asientos delanteros y en mitad del panel posterior.
Las piezas transparentes son desiguales en calidad. Las ventanillas traseras son gruesas y van engastadas en el fuselaje desde el interior, mientras que las demás piezas (techo, morro y lados de la carlinga) se pegan una vez cerrado el fuselaje. De estas tres últimas, las mejores y más finas son las laterales, que coinciden con las puertas y se podrían colocar abiertas, aunque las instrucciones no lo señalan. El techo y el morro muestran un grosor bastante razonable para un molde tan antiguo. El morro incluye el panel de acceso a la batería y la toma de aire frontal, más dos pequeñas antenas de aleta separadas, pero le falta el tubo Pitot. La pieza del techo muestra un resalte diminuto encima que parece querer reproducir la salida de ventilación de la carlinga.
El fuselaje encaja bastante bien y sin holguras. Las mitades incluyen la cola y el rotor además de la cubierta de la caja de cambios por detrás del techo de la carlinga. Los paneles se han simulado con lineas de remaches microscópicos pero consistentes incluso en la cola. Realmente asombra este detalle, que muchas marcas de hoy seguramente eludirían reproducir al mismo tamaño. El detalle externo del fuselaje incluye un panel ventral grabado, los paneles de acceso al compartimento de carga y de relleno de combustible y los reposapiés para acceder a la transmisión durante el mantenimiento.
La cubierta del motor está separada en mitades pegadas tras la cubierta de la caja de cambios. El escape está ahuecado y parece bien proporcionado. En la cola hay una pieza fina para el eje de la transmisión del rotor auxiliar y dos aletas por debajo de este.
El rotor principal consta de un eje, la cabeza, la cubierta cilíndrica superior y las palas separadas, que son bastante finas, aunque carecen de las aletas o de cualquier otro detalle.
Hay muy pocos paneles grabados, el más importante se encuentra en la zona ventral. La zona de la cola está moldeada con el rotor auxiliar separado en mitades desiguales, entre las que hay un eje para situar una pieza redonda moldeada con palas diminutas. La punta de la aleta de cola muestra una baliza sobre ella. Los estabilizadores están separados de las aletas de cola, todas ellas piezas finas.
El tren de aterrizaje lo forman dos patines finos que necesitan un poco de cuidado para limpiar las pequeñas rebabas del molde.
Las calcas comprenden escarapelas británicas, marcas del fuselaje y cola, matrículas y algunos estarcidos, todas ellas con un aspecto en apariencia fino y mate. La saturación de color no es del todo buena en algunas, pero tienen buen registro. Hay poco exceso de soporte en la gran mayoría.
Las instrucciones vienen en un folleto doblado impreso en blanco y negro en vertical por una cara que muestra seis secuencias de montaje. La cara trasera de la caja muestra las opciones de pintura en color. Los códigos que identifican las pinturas pertenecen a la gama de esmaltes de Humbrol.
Uno de los acabados permite construir el modelo de carga SA 341B, denominado en Gran Bretaña AH Mark 1. Inicialmente estaba desarmado, aunque en la Guerra de Las Malvinas llevaba anclajes para transportar cohetes no guiados. La otra alternativa es un AS 341C (o HT Mark 3) empleado como entrenador por la RAF. Por fortuna, podemos encontrar multitud de hojas de calcas y algunas mejoras específicas para esta maqueta si no deseamos conformarnos con lo que la caja trae.
Valoración
Todavía no hay otra alternativa para hacer un Gazelle en la escala 1/72 que esta maqueta o la de Heller, que son una y la misma salvo las calcas. Ciertamente el detalle es escaso, sin embargo la maqueta me parece aprovechable tanto para el modelista novato por su facilidad de montaje, como para el avanzado que pretenda sacarle partido con la ayuda de las mejoras disponibles en el mercado.◊

The kit
This tool dates back from 1973, when Airfix launched it for the first time inside a blister packaging containing the familiar clear stand that the brand has not included since. This particular kit was released in 1994 and is one of the last boxings Airfix has produced to date without paints, brushes, or glue. Since the late 1980s, Heller has also reboxed this kit several times.
Both the instructions and the paint finishes have changed very little over time. The instructions in this kit are the same as the first ones and paint choices are identical to most of the previous ten copies. The number may explain the success of this kit decades ago.
The kit comes with a sprue cut approximately in half to fit the box, two loose fuselage halves, a clear sprue, the decal sheet, and the instructions. Plastic is well molded, without any serious blemishes or sinks. In general, the few ejector pin marks are very shallow and easy to fill, although clean-up will need more attention to remove some flash, especially on the rotor, skids, and the tips of the fuselage parts.
The kit is designed for quick and easy build and lacks assembly options, so it’s not surprising, for example, that Airfix hasn’t included additional details such as the AH.1’s possible armament.
Review
The fuselage sidewalls lack detail and have a mark on each side easy to clean up. The cockpit consists of a floor molded with the rear cockpit and two seats on it, instead of the usual three; a mid-console with a separate panel, both without instruments; the crew seats; the pitch control lever; and a small cylindrical piece simulating a rotor control located between the front seats. The pedals and control sticks are missing. The rear bulkhead is also separate and molded with the backrests. Clearly, Airfix made very little effort to detail the interior. To see the glass half full, pin marks are only present on the seats and in the middle of the rear bulkhead.
Clear parts are of uneven quality. The rear windows are thick and fitted into the fuselage gaps from the inside, while the other pieces (roof, nose, and cockpit sides) are attached after the fuselage is closed. Of these last three, the best and thinnest are the side panels, which align with the doors and could be positioned open, although the instructions don’t mention this. The roof and nose show a fairly reasonable thickness for such an old kit. The nose includes the battery access panel and the front air intake, plus two small, separate fin antennas, but it lacks the Pitot tube. The roof piece has a tiny bump on top that seems to be the cockpit’s air extractor duct.
The fuselage fits together quite well and without any gaps. The halves include the tail and rotor, as well as the gearbox cover behind the cockpit roof. Panel lines are rendered with microscopic but consistent rivet lines, even on the tail. This detail is truly astonishing, and many brands today would surely avoid reproducing it at this size. The fuselage external detail includes an engraved ventral panel, the access panels to the cargo compartments; the fuel tank access panel, and foot holds for accessing the transmission during maintenance.
The engine cover is separated into halves glued behind the gearbox cowling. The exhaust is hollowed out and looks well proportioned. The tail has a thin piece for the tail rotor transmission shaft and two fins below it.
The main rotor consists of a shaft, head, upper hub cover and separate blades, which are thin, although they lack the tabs or any other detail.
The tail is molded with the rotor separated into unequal halves, with a shaft in between to insert the tiny rotor blades molded around a plastic ring. The tip of the tail fin shows a beacon above it. The stabilizers are separate from the tail fins, all of which are thin pieces.
The landing gear is made up of two thin skids that need a little care to clean up the slight flash from the molding.
The decals include British roundels, fuselage and tail markings, registrations, and some stencils, all with a fine, matte finish. Color saturation isn’t entirely good on some, but they look in register. There’s minimal carrier film on most of them.
The instructions come in a folded brochure printed in black and white showing six assembly sequences. The back of the box shows the paint finishes in color. Paints are only identified with codes, these corresponding to the Humbrol enamel range.
One of the paint schemes allows you to build the SA 341B cargo variant, designated AH Mark 1 in Great Britain. It was initially unarmed, although during the Falklands War it carried hardpoints for unguided rockets. The other option is an AS 341C (or HT Mark 3) used as a trainer by the RAF. Fortunately, numerous decal sheets and some specific upgrades for this kit are available if you wish to go beyond what the box offers.
Conclusion
There is currently no other alternative for building a Gazelle in the 1/72 scale than this kit or the Heller re-pop, which are essentially the same except for the decals. While the level of detail is truly limited, I still believe the kit is suitable for both the novice modeler, due to its ease of assembly, and the advanced modeler who wants to enhance it with the available aftermarket upgrades.◊
Publicado – Published: 6 / 2026
©www.jmodels.net


Debe estar conectado para enviar un comentario.