
De un vistazo – Quick look
MATERIAL Y PIEZAS
MEDIA & PARTS:
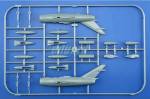
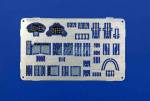
- Plástico inyectado (83 piezas), plástico transparente (10 piezas), fotograbado (58 piezas), máscara adhesiva (17 piezas).
- Injected plastic (83 parts), clear plastic (10 parts), PE (58 parts), mask (17 parts).
CALCAS – DECALS:
- Una hoja. Muestra insignias nacionales y de unidad, numerales, paneles de instrumentos, líneas de pisado, adornos de cola y algunos estarcidos. Muy bien impresas.
- One sheet showing national and unit markings, numbers, instrument panels, step lines, tail markings and some stencils. Very well printed.
OPCIONES – OPTIONS:
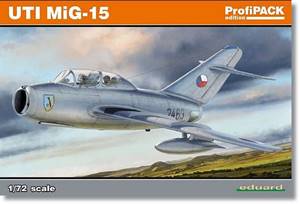
- UTI MiG-15. 6º Regimiento de Cazabombarderos, Base de Prerov. Checoeslovaquia, verano de 1974.
- UTI MiG-15. Fuerza Aérea Indonesia, Base de Jakarta-Kemajoran Air Base, años 60.
- UTI MiG-15. URSS, entre los años 60 y 70.
- UTI MiG-15. Fuerza Aérea Argelina, entre los años 60 y 80.
- UTI MiG-15. avión nº 922226, Hävittäjälentolaivue 31, Base de Rissala. Finlandia, finales de los años 60.
- UTI MiG-15. 6th Fighter-Bomber Air Regiment, Prerov Air Base. Czechoslovakia, Summer, 1974.
- UTI MiG-15. Indonesian Air Force, Jakarta-Kemajoran Air Base, 1960s.
- UTI MiG-15. Soviet Union, 1960s through the 1970s.
- UTI MiG-15. Algerian Air Force, 1960s through the 1980s.
- UTI MiG-15. c/n 922226, Hävittäjälentolaivue 31, Rissala Air Base, Finland, late 1960s.
INSTRUCCIONES – INSTRUCTIONS:
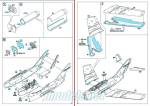
- Folleto de 16 páginas en color en papel satinado. Contiene introducción histórica, plano de piezas sin numerar, tabla de colores (pinturas de Gunze Sangyo), alrededor de 30 secuencias de montaje no numeradas. Muy claras y bien presentadas.
- 16-page booklet printed in color on satin paper. Contains historical introduction, parts plan, table of paints (Gunze Sangyo), around 30 construction steps (not numbered). Very clear and finely edited.
LO MEJOR – THE BEST:
- Muy bien detallada. Opciones de montaje. Aparentemente no difícil de montar.
- Very well detailed kit. Assembly options. Apparently not difficult to build.
LO PEOR – THE WORST:
- Tamaño de algunas piezas de fotograbado. Aerofrenos cerrados.
- Some very tiny PE parts. Closed airbrakes.
VALORACIÓN – CONCLUSION:
- La presentación y el detalle están a la altura de una edición Profipack y las versiones tienen la suficiente variedad. Muy recomendable a los modelistas con cierta experiencia.
- Box content and detail are on par with a Profipack edition and painting choices have certain variety. Very recommendable to modellers with some experience.

Cada edición que Eduard pone en circulación de esta maqueta debe ser bien recibida, aunque la que describo aquí no es la más reciente. Como es habitual, suele aparecer con otras cajas y aspectos, en ediciones diferentes y con añadidos cambiantes según el formato. En esta ocasión contiene tres bastidores, una plancha de fotograbados, un bastidor de piezas transparentes, la hoja de calcas, una hoja de mascarillas adhesivas y las instrucciones. El contenido viene perfectamente presentado en bolsas separadas con cierres de fácil apertura.
El plástico tiene muy buena calidad y las piezas están correctamente moldeadas. Salvo algunos restos de salida del eyector, que se eliminan con facilidad, no hay nada más que reseñar sobre el molde en cuanto a limpieza.
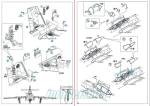
Como de costumbre en Eduard, la carlinga se va a llevar gran parte del tiempo de montaje, más aún en este modelo UTI que tiene dos. El suelo está delimitado por dos paneles, delantero y trasero, más un panel intermedio. Los asientos vienen en dos piezas bien detalladas con cinturones de fotograbado, y además hay pedales del mismo material y dos palancas de control. El panel de instrumentos trasero va pegado al mamparo intermedio y se puede representar opcionalmente con piezas de fotograbado ya pintadas, con una calca, o bien mediante una pieza de plástico alternativa con los instrumentos en relieve que, lógicamente, hay que pintar. Lo mismo ocurre con el panel delantero, salvo que este es una pieza aparte que se pega una vez terminada la carlinga. El suelo presenta un vástago en su parte anterior para pegar una pieza que representa el pozo de la rueda delantera.
Los lados de la carlinga vienen separados del fuselaje y detallados con ciertos elementos en relieve a los que hay que añadir numerosas piezas de fotograbado, entre los que distingo las consolas laterales. Hay piezas muy pequeñas y delicadas, aunque para algunas hay suplentes de calca. Las piezas laterales de la carlinga van alineadas con los mamparos y todo el conjunto se pega dentro del fuselaje. Afortunadamente, las instrucciones señalan los huecos donde debemos añadir peso para mantener el modelo equilibrado al terminarlo. La parte interna posterior del fuselaje incluye la tobera separada, formada por tres sencillas piezas.
El fuselaje está moldeado con la aleta de cola y dividido en mitades que tienen excelente detalle exterior, con líneas finas grabadas y paneles bien ejecutados. Se echa en falta poder mostrar los aerofrenos abiertos, ya que no hay piezas para hacerlo. Las mitades contienen las raíces alares y antes de unirlas hay que incluir los dos timones de la cola, que vienen de una pieza. Debajo del morro hay que añadir dos ventanillas ventrales para las que hay mascarillas. El anillo de la toma frontal viene separado y detallado con la cámara de combate y el cuerpo central de la bifurcación interior también en pieza separada. Por último, encontramos la carena de salida del cañón, único en el modelo UTI.
La cubierta transparente está dividida en tres piezas. Antes de pegar el parabrisas hay que incluir la mira, que es también una pieza transparente. Además, debemos añadir una pieza transparente más y un arco central entre las dos carlingas. La sección central de la cubierta puede posicionarse abierta. Es destacable el grosor y transparencia de todas estas piezas. Como es usual en las ediciones Profipack de Eduard, hay una completa hoja de mascarillas que nos facilitará mucho la pintura.
Las alas están divididas en mitades. Ambas caras muestran líneas de paneles finas y registros correctamente grabados. Las mitades superiores tienen los característicos alambrados a buen tamaño y grosor para la escala y flaps interiores y exteriores moldeados en la misma pieza. Las caras inferiores están fabricadas sin los flaps y con cierto detalle en relieve en el fondo de los pozos. El faro de aterrizaje está bien marcado y su lente es una pieza transparente, también dotada de mascarilla para pintar. Los estabilizadores son piezas aparte que muestran paneles finos y bien grabados. Bajo las alas podemos incluir tres tipos de depósitos de combustible, todos separados en mitades y dos de ellos con tomas de combustible en piezas aparte.
El tren de aterrizaje delantero es bien sencillo, ya que se compone de una rueda moldeada con su pata y dos compuertas para los pozos. Sin embargo, el tren principal es un poco complejo de montar. Las ruedas son piezas completas y llevan los tapacubos separados con dos opciones para el dibujo por ambas caras, lo que facilita su pintura. La pata de la rueda está bien detallada con minúsculas piezas de fotograbado, que serán complicadas de manipular y pegar, más el brazo hidráulico de apertura separado, una pieza muy fina y delicada. Las tapas vienen separadas en tres partes que muestran buen detalle en sus caras internas.
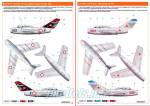
La hoja de calcas está muy bien impresa. Incluye insignias nacionales y de unidad, numerales, los dos paneles de instrumentos, marcas de pisado para el aparato checoeslovaco, llamativas marcas de cola del avión indonesio y algunos estarcidos. Todos los motivos muestran colores saturados y parecen muy finos y mates.
El folleto de instrucciones tiene 16 páginas impresas a color sobre buen papel satinado. Contiene una introducción histórica sobre el avión, un plano de piezas sin numerar, una tabla de colores con referencias a pinturas de Gunze Sangyo, unas 30 secuencias de montaje no numeradas y cuatro páginas de perfiles para pintar y colocar calcas. Las versiones tienen cierta variedad, destacando la indonesia por el decorado de su cola y la tunecina por su camuflaje bicolor. Las instrucciones de Eduard son siempre elogiables y este folleto no lo es menos.
La maqueta, sea o no edición en formato Profipack, me parece muy recomendable a la legión de modelistas aficionados a los reactores y en especial a los ubicuos MiG. La inclusión de fotograbados en tal número y tamaño no la hace muy apta para modelistas con escasa experiencia.◊


Every time Eduard release this kit should be welcome, though the reference I review here is not the latest. As usual, the kit has been marketed with other boxes, in different editions and with varying aftermarkets on several occasions through the years. This box contains three plastic sprues, a PE fret, a clear sprue, the decal sheet, a mask sheet and the instructions. The content comes thoroughly packed inside separate self-sealing bags.
Plastic is quite good and parts are neatly molded. Except for a few ejector pins, which can be easily dealt with, there is nothing to point out about this clean tooling.
As it is standard with Eduard, the cockpit will take up most of the modeller´s time to build the kit, even more so in this UTI with two of them. The floor is limited by a front and a rear bulkhead, plus an intermediate panel. The seats come in two pieces with guide rails molded on and are detailed with PE belts, but we also find two PE pedal sets and two control columns. The rear instrument panel is attached to the intermediate bulkhead and you have three choices for it. You can use a pre-painted PE part, a decal or an alternative plastic part with raised gadgets that you have to paint. The same happens with the front panel, but this piece is attached once the cockpit is finished. The floor is molded with a strut to glue the front wheel well.
The cockpit sides are separate parts showing nice raised detail and are enhanced with a bunch of PE parts for the instruments and consoles. The parts are tiny and delicate, but some of them also have a decal replacement. Alignment of the cockpit walls with the floor is achieved by means of the three bulkheads. The side pieces of the cockpit are aligned with the bulkheads and the whole assembly is glued inside the fuselage. Fortunately, the instructions indicate the gaps where we must add weight to keep the model balanced when finished. The fuselage rear includes a separate nozzle, made up of three simple pieces.
Fuselage is molded in halves with the fin and shows good external surface detail, with thin engraved lines and panels correctly rendered. Air brakes are molded closed and one misses the choice to show them open, but there are no parts to do it. Wing roots are also molded with the fuselage halves and before attaching them, you have to include two rudder segments that come as one piece. Under the nose we find the gun fairing and two ventral windows in clear parts provided with masks to paint them.
The canopy is divided into three pieces. Before gluing the windshield, the gunsight, which is also a transparent piece, must be included. In addition, we must add one more transparent piece and a central arch between the two cockpits. The canopy center section can be positioned open. The thickness and transparency of all these pieces is remarkable. As is usual in Eduard’s Profipack editions, there is a complete sheet of masks that will make painting much easier.
Wings are molded in halves. Both sides show thin panel lines and correctly engraved registers. The upper halves have the characteristic wing fences that look OK for the scale, and inboard and outboard flaps molded in the same piece. The lower faces are made without the flaps and with some raised detail on the wheel wells. The landing light is correctly marked, and its lens is a transparent piece, also provided with a painting mask. Stabilizers are separate pieces that show well engraved panels. Under the wings we can include three types of fuel tanks, all separated in halves, two of them with fuel intakes in separate pieces.
The front landing gear is very simple, just a wheel molded with the leg and two doors. However, the main undercarriage is a bit complex to build. The wheels are complete pieces and have separate hubcaps with two options on both sides, which makes painting handy. Leg struts are well detailed with tiny photo-etched parts, which will be a bit difficult to handle and glue, plus the separate hydraulic folding arm, a very thin and brittle part. The covers are separated into three sections that show good detail on their internal faces.
The decal sheet is very nicely printed. It includes national and unit markings, numerals, two instrument panels, walkaway lines for the Czechoslovakian aircraft, striking tail markings for the Indonesian aircraft and some stencils. All the decals show saturated colors and look very thin and matt.
The instruction booklet has 16 pages printed in color on good glossy paper. It contains a historical introduction to the airplane, a parts plan, a color chart with references to Gunze Sangyo paints, some 30 unnumbered assembly sequences, and four pages of profiles for painting and setting decals. The versions shown have a certain variety, the Indonesian option being outstanding for its tail decoration and the Tunisian aircraft for its two-color camouflage. Eduard’s instructions are always remarkable, and this booklet is just another example of this.
The kit, whether or not in its Profipack edition, is highly recommendable to the legion of jet fans and especially to lovers of the ubiquitous MiGs. The inclusion of photo-etched parts in such a number and size does not make it very suitable for modelers with little experience.◊
Actualizado – Updated: 4 / 2022
Publicado – Published: 10 / 2020
©www.jmodels.net


Debe estar conectado para enviar un comentario.