
De un vistazo – Quick look
MATERIAL Y PIEZAS
MEDIA & PARTS:
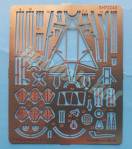
- Plástico inyectado (67 piezas), plástico transparente (5 piezas), resina (23 piezas), fotograbado (58 piezas).
- Injected plastic (67 parts), clear plastic (5 parts), resin (23 parts), photo etched (58 parts).
CALCAS – DECALS:
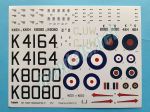
- Impresas por Aviprint. Insignias británicas de guerra y preguerra, numerales y varios estarcidos. Muy bien impresas y de apariencia fina.
- Printed by Aviprint. War and prewar British markings, numbers, and several stencils. Very well printed and apparently thin.
OPCIONES – OPTIONS:
- Vickers Vildebeest Mk. IV. K8080. RAF, Escuadrilla Nº 42. Donibristle (Escocia), enero 1937-marzo 1938.
- Vickers Vildebeest Mk. IV. NZ123 (ex RAF K6414). Escuadrilla Nº 7 (GR, Reconocimiento General). Waipapakauri, 1942-43.
- Vickers Vildebeest Mk. IV. K4164. Primer prototipo del modelo Mk. IV convertido de un Mk. III en 1936.
- Vickers Vildebeest Mk. IV. K8080. RAF No. 42 Squadron. Donibristle (Scotland), January 1937-March 1938.
- Vickers Vildebeest Mk. IV. NZ123 (ex RAF K6414). No. 7 (GR, General Reconnaissance) Squadron. Waipapakauri, 1942-43.
- Vickers Vildebeest Mk. IV. K4164. First Mk. IV prototype converted from a Mk. III in 1936.
INSTRUCCIONES – INSTRUCTIONS:
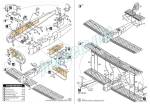
- Manual de 12 páginas impresas en blanco y negro. Contiene una referencia histórica sobre el avión, un plano con piezas numeradas, 10 capítulos de montaje, una guía con perfiles para colocar los estarcidos y tres páginas de perfiles para pintar las diferentes opciones. Aunque correctas en general, les falta una vista frontal del modelo y más claridad en algunas atapas del montaje.
- 12-leaflet printed in black and white. it shows a historical reference about the aircraft, a numbered parts plan, 10 assembly sequences, a guide with profiles to set the stencils and three pages of profiles to paint the three optional versions. Though correctly printed, the leaflet lacks a front view of the finished model and clearer exploded views in some assembly steps.
LO MEJOR – THE BEST:
- Tema inusual. Muy bien detallada.
- Unusual topic. Very nicely detailed.
LO PEOR – THE WORST:
- Múltiples piezas muy pequeñas y delicadas. Requiere experiencia y mejores referencias que las instrucciones.
- Lots of tiny brittle parts. Needs experience and better references than only the instructions.
VALORACIÓN – CONCLUSION:
- Una maqueta completísima, excelentemente detallada y al par nada fácil por la multitud de piezas en diferentes materiales. Requiere modelistas con experiencia.
- A very thorough kit with an excellent level of detail, but also not easy to build due to the number of parts in different media. It needs experienced modellers.

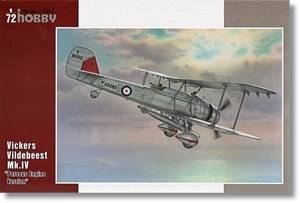
A partir de un molde con el marbete de Azur, Special Hobby ha editado varias versiones de este Vildebeest, entre ellas el interesante Vickers/CASA tipo 245 español. Las distintas cajas de ambas marcas comparten casi todas sus piezas. Este Mk. IV representa el último modelo del Vildebeest, fabricado en escaso número y caracterizado por un motor más potente con cubremotor y la supresión del puesto de observador, situado en posición intermedia dentro de la carlinga en modelos precedentes.
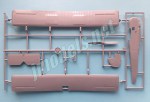
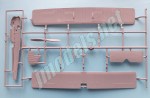
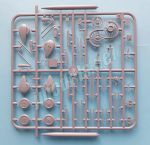
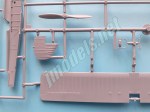
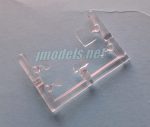
La caja trae cinco bastidores de piezas de plástico gris, tres de ellos cortados a partir de un bastidor más grande, un bastidor transparente, una plancha de fotograbados, cinco bebederos de piezas de resina, una hoja de calcas y el manual de instrucciones.
Las piezas de plástico y de resina están bien moldeadas. Hay muy leves restos de plástico sobrante en algunas piezas y no existen marcas de eyector visibles. El detalle externo en las alas y el fuselaje en muy bueno y muestra gran definición, aunque los planos superiores no llevan los slats separados, sino moldeados en la pieza para simplificar. Destaco especialmente el relieve de las alas en todas sus caras.
Las mitades del fuselaje contienen en sus lados internos parte de la estructura en fino relieve. La carlinga cuenta con multitud de piezas para detallar los dos puestos, muchas de ellas fotograbados de diminuto tamaño y delicado aspecto. El puesto de pilotaje lleva ventanillas de plástico transparente a los lados, un panel de instrumentos con indicadores en relieve y sin calca alternativa, un asiento en dos piezas con cinturones de fotograbado, un bastidor de soporte en lugar de suelo, pedales de resina complementados con fotograbados, una palanca de control de resina y, a los lados, algunos instrumentos más de fotograbado.
El puesto trasero dispone de diferentes instrumentos a los lados del fuselaje, un banco con cintos de fotograbado, un perfil en forma de anillo que va pegado sobre el puesto y que se incluye tras cerrar el fuselaje al igual que el montaje de la ametralladora. Este arma viene perfectamente detallada con su tambor de munición aparte y las miras de fotograbado.
El fuselaje se completa con la adición de la ametralladora proel de resina, el estribo, el parabrisas, fino y muy transparente, y una delicada pieza de fotograbado que simula la mira.
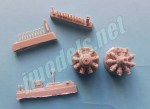
El morro tiene un capó dividido en mitades, detallado con un escape bien definido y horadado, acompañado de una toma por debajo del capó. La maqueta incluye dos motores diferentes ambos de resina sin que las instrucciones indiquen cuál es el pertinente en la maqueta. El Perseus de este modelo está dotado de varios escapes de resina, dos por cilindro, orientados hacia adelante, que van unidos al colector frontal escamoteado en el capó tipo NACA. También hay dos hélices de buena factura, pero en este caso las instrucciones señalan correctamente que la del Mk. IV es la tripala.
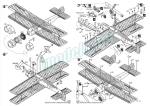
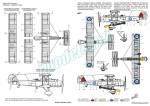
Las alas, la deriva y los planos horizontales de cola vienen en piezas completas, lo cual ayuda a simplificar un montaje ya de por sí bastante entretenido. Las dos piezas del empenaje van colocadas a cola una sobre la otra. Los estabilizadores cuentan con soportes de fotograbado y también los distintos actuadores del timón, los estabilizadores e incluso las aletas del mismo material.
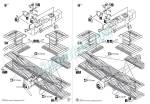
Los soportes entre los planos principales son finos y están bien perfilados. Hay marcas en las alas y el fuselaje para situarlos, pero el montaje no se ve ayudado por la falta de vistas frontales del modelo en las instrucciones. Lo que sí está bien indicado es la posición y grosor de las riostras. Las alas están detalladas con diversas piezas de fotograbado muy pequeñas y delicadas, entre ellas diversos actuadores de los slats representados como piezas sólidas triangulares cuando en realidad eran brazos en V, cuya posición no aparece del todo clara en las instrucciones.
El tren de aterrizaje está compuesto por una rueda de cola con carena y finos soportes que aparenta ser frágiles, dos carenas en mitades con las ruedas moldeadas en las piezas, dos soportes en V y la amortiguación, dotada de carenas bien perfiladas.
Una de las versiones que se muestran en las instrucciones lleva un torpedo con soportes y sujeciones de fotograbado. El torpedo está detallado al máximo, e incluye fotograbados para representar las hélices, las aletas e incluso la espoleta.
Como de costumbre, Special Hobby ha incluido unas calcas de calidad impresas por Aviprint. La hoja muestra insignias británicas de guerra y preguerra, matrículas y numerosos estarcidos, incluidas entre ellos las marcas en forma de huella de zapato que delimitaban las zonas de pisado en las alas.
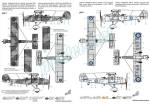
Las instrucciones incluyen un texto sobre la historia del avión, un plano con la numeración de las piezas, una tabla de colores con equivalencias en pinturas de Gunze Sangyo, 10 pasos de montaje con las secuencias 9 y 10 repetidas con la única diferencia de dos pequeñas piezas de fotograbado, y cuatro páginas de perfiles, mostrando una de ellas una guía para colocar los estarcidos. Los perfiles muestran el prototipo del Mk. IV, un avión basado en Inglaterra en los primeros meses de la Segunda Guerra Mundial y otro neozelandés con pintura de camuflaje. El manual está impreso en blanco y negro y sus hojas no están grapadas. Como he señalado, se echa de menos alguna vista frontal del avión y también más claridad en el montaje de piezas muy pequeñas en las alas.
La maqueta es compleja de montar por el número de piezas en materiales diferentes y, sobre todo, por su tamaño diminuto y delicadeza. Las instrucciones requieren un buen estudio previo complementado con información visual adicional de publicaciones o internet. El nivel de detalle es muy alto, y podríamos señalar sin exageraciones que esta edición puede bien ser la definitiva de este inusual avión. Por este motivo, y no es de extrañar, el Vildebeest ha pasado décadas sólo en forma de maquetas de resina y vacuforme.◊


From a new tool with the Azur label, Special Hobby have released several versions of this Vildebeest, among them the interesting Spanish Vickers / CASA type 245. The different boxes of both brands share almost all their pieces. This Mk. IV represents the latest model of the Vildebeest, manufactured in small numbers and characterized by a more powerful engine with cowling ring and the elimination of the observer´s station, located in an intermediate position inside the cockpit on previous variants.
The box has five grey plastic sprues, three of them cut from a larger one, a clear sprue, a photoetched fret, five resin gates, a decal sheet and the instruction manual.
The plastic and resin parts are well moulded. There is very slight flash on some parts and there are no visible ejector marks. The external detail on wings and fuselage is very good and shows great definition, although the upper planes do not have separate slats, but are molded in the piece for simplicity. I especially like the raised surface of wings on both sides.
The fuselage halves contain part of the raised structure on their internal sides. The cockpit has plenty of pieces to detail the two crew stations, many of them tiny and delicate photo-etched pieces. The cockpit has clear plastic side windows, an instrument panel with raised gauges and no alternate decal, a two-piece seat with etched belts, a support frame instead of floor, resin pedals complemented with etched parts, a resin control lever and, on the sides, a few more PE instruments.
The rear station has different instruments on the sides of the fuselage, a bench with photo-etched belts, a ring-shaped profile that is glued on the rear station and which is attached after closing the fuselage as well as the machine-gun mount. This weapon comes perfectly detailed with its separate ammo drum and photo-etched sights.
The fuselage is completed with the addition of the resin forward machine-gun, footholds, a thin and very transparent windshield, and a delicate PE part which represents the aiming sight.
The nose features a split-halved ring, detailed with a well-defined drilled exhaust, and an air intake placed below the nose. The kit includes two different engines, both resin parts, but the instructions don´t point out which one is relevant in the kit. The Perseus included is provided with several resin exhausts, two per cylinder, facing forward, which are attached to the front manifold concealed in the NACA-type hood. There are also two well-made propellers, but in this case the instructions do correctly indicate that the three-bladed one is for the Mk. IV.
The wings, fin, and horizontal tail planes come in complete pieces, helping to simplify an already entertaining build. The two pieces of the empennage are glued one on top of the other. The stabilizers show photo-etched struts, and also the different rudder actuators, stabilizers and even the fins of the same material.
The struts between the main planes are thin and well profiled. There are markings on the wings and fuselage for placing them, but assembly is not helped by the lack of front views of the model in the instructions. However, the position and thickness of the braces are clearly shown. The wings are detailed with very small and delicate photo-etched parts, including several slat actuators represented as solid triangular pieces when in fact they were V-arms, whose position is not entirely clear in the instructions.
The landing gear is made up of a faired tail wheel and thin struts that look brittle, two fairings in halves with the wheels molded on the pieces, two V-shaped struts and the damping, equipped with well-shaped shock absorbers.
One of the versions shown in the instructions carries a torpedo with photo-etched brackets and fasteners. The torpedo is very nicely detailed and includes photo-etched propellers, fins and fuse.
As usual, Special Hobby has included some quality decals printed by Aviprint. The sheet shows British war and pre-war insignia, license plates and a bunch of stencils, including shoe print markings that limited no-step areas on the wings.
The instructions include a text on the history of the aircraft, a numbered parts plan, a color chart with matches in Gunze Sangyo paints, 10 assembly steps with sequences 9 and 10 repeated with the only difference of two small PE pieces, and four pages of profiles, one of them showing a guide for setting the stencils. The profiles show the prototype of the Mk. IV, a plane based in England in the first months of World War II and another from New Zealand with camouflage paint. The manual is printed in black and white, and its sheets are not stapled. As I have pointed out, I miss some front view of the plane, and also more clarity in the assembly of very small parts on the wings.
The model is complex to build due to the number of pieces in different materials and, above all, to its tiny size and delicacy. Instructions need a good preliminary study complemented with additional visual information from publications or the Internet. The level of detail is very high, and this tool could be the definitive kit of this unusual aircraft. For this reason, and not surprisingly, the Vildebeest has been only available in resin and vacformed kits for decades.◊
Actualizado – Updated: 4 / 2022
Publicado – Published: 4 / 2021
©www.jmodels.net


Debe estar conectado para enviar un comentario.