
De un vistazo – Quick look
MATERIAL Y PIEZAS
MEDIA & PARTS:
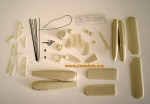
- Resina de poliuretano (29 piezas), lámina de acetato (1 hoja), 8 varillas de metal, plástico vacuoforme (4 piezas), 6 piezas metálicas menores para palancas y soportes.
- Polyurethan resin (29 parts), acetate (1 sheet), 8 metal rods, 4 vacformed windshields, 6 small metal parts for control columns and fuselage wing struts.
CALCAS – DECALS:
- Dos hojas pequeñas con hinomarus en una y numerales en otra. Correctas.
- Two small sheets including hinomarus on one of them and codes on the other. Fine.
OPCIONES – OPTIONS:
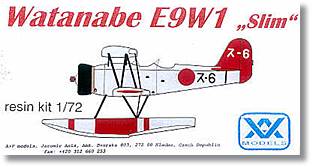
- Watanabe E9W1 del submarino I-6.
- Watanabe E9W1 on board submarine I-6.
INSTRUCCIONES – INSTRUCTIONS:
- Hoja A4 en inglés. Verso: montaje, datos técnicos, código de colores y notas de pintura. Reverso: Fotos (malas) del avión real y perfiles con la posición de las calcas. El diagrama de montaje requiere estudio previo y atención al detalle.
- A4 sheet in English. Assembly, technical data, colour codes and painting notes on one side. Pictures (bad) of the real aircraft and profiles showing decal positions on the other. Assembly diagram needs thorough study and attention to detail.
LO MEJOR – THE BEST:
- Tema poco usual. Molde bastante bueno y limpio.
- Unusual topic. Good tooling. No bubbles and only minor cleanup needed.
LO PEOR – THE WORST:
- Interior muy pobre. Requiere mucha lija y masilla en los encajes.
- Poor cockpit. Fitting needs a lot of putty and sanding.
VALORACIÓN – CONCLUSION:
- Maqueta nada fácil de montar. Para modelistas expertos.
- Not an easy kit to assemble. For experienced modellers.

Mucha paciencia requerirá montar y pintar esta pequeña maqueta checa, que se presenta en una caja bien diseñada de cartón resistente y con el contenido nítidamente empaquetado en una bolsa sellada y dividida en compartimientos según el tipo de piezas. Como en casi todas las maquetas de resina, no hay demasiadas piezas del material básico, sólo 29, pero éste es bastante bueno, sin burbujas y sólo rebabas en las piezas pequeñas que se pueden limpiar con facilidad. El detalle general es aceptable en el fuselaje y mejor en las alas. El grosor de éstas parece adecuado para la escala y tanto los relieves como las líneas de panel son finos y bien realizados. Aun así, hay que lijar algunas ligeras imperfecciones en los bordes de ataque y salida no demasiado evidentes.
El interior viene bastante escaso, con el suelo, dos asientos, una palanca de mando de metal y una pieza para el panel de instrumentos. Los diales y controles aparecen en una laminita de acetato que viene repetida No hay rastro de la ametralladora ni de otro tipo de artilugios del interior. El motor se compone de dos piezas más el anillo de los escapes. El detalle no es nada del otro mundo y mejoraría horadando las salidas de los escapes y simulando el cableado ya que tenemos que abrir el agujero en la parte frontal para la hélice. El anillo del motor es de una sola pieza donde va introducido tanto el motor como los escapes. Me temo que aunque el motor encaja bastante bien, el conjunto dará problemas al unirlo con el fuselaje y será necesario enmasillar y lijar. Los parabrisas son dos piezas de plástico vacuforme más otros dos de repuesto.
Los planos de las alas, como es de esperar, no tienen guías de unión con el fuselaje. Los inferiores darán menos problemas porque van unidos directamente a éste, pero en los superiores, que están formados de dos piezas, primero habrá que eliminar la unión entre ambas y luego ajustar bien los pequeños soportes de metal que los mantienen sobre el morro. Esta zona es delicada y requiere mucha paciencia y habilidad. Al mismo tiempo también hay que asegurar bien los soportes principales que vienen de resina e igualmente sin guías de pegado. Los planos de cola tienen las superficies de control separadas y ofrecerán mucho menos problema. La última fase debería ser el montaje de los flotadores, que son de una pieza y en este caso sí llevan marcados por dónde se deben unir los soportes. Imagino que las varillas de metal son para simular las riostras de las alas, no se me ocurre otro uso que darles.
Las instrucciones son de poca ayuda ya que las piezas no están numeradas y el único diagrama de montaje es bastante impreciso, especialmente en la localización exacta de los soportes de las alas y flotadores, por ello se hace imprescindible hacerse con buenos planos del aparato. Los colores apenas están designados con letras de manera genérica. El avión aparece pintado en colores de preguerra, plateado con las superficies de cola en rojo vivo. En el reverso de la hoja encontramos tres vistas del avión con la localización de las calcas. Hay además un par de fotos conocidas del avión real de escaso valor documental ya que son malas fotocopias, pero es de agradecer el detalle de incluirlas al ser difícil obtener imágenes del Slim.
Esta maqueta es para aquellos que ya tienen algunas resinas en sus vitrinas y será sin duda un avión muy singular y poco conocido en su colección.◊


Tons of patience will be needed to build and paint this small Czech resin kit which comes neatly packed in a sturdy cardboard box with parts also thoroughly bagged. As in most kits of this kind there are few resin parts, only 29, but the media is quite good, with no bubbles and only some flash on smaller parts which can be easily cleaned. General detail is acceptable on fuselage and better on wings. Thickness of parts seems correct for the scale and both panel lines and raised wing structure are well represented. There are only minor rough areas on the leading and trailing edges of wings which require some smooth sanding.
The cockpit is rather poor as it only comprises the floor, two seats, a couple of metal control sticks, a part for the pilot’s instrument panel (there’s none for the copilot) and two tiny acetate sheets for the instruments. There’s no trace of the rear machine-gun or any other cockpit gadgets. The engine comes in two parts plus the exhaust ring. Detail here is a bit disappointing but can be improved by drilling the exhausts and adding the engine wires. The engine and the exhaust ring are to be glued inside the engine cowling which comes in one part. Although the engine fits inside the cowling quite good, it will be difficult to fit the fuselage front into the cowling and filling and sanding will surely be needed here again. The kit also includes two vacform windshields plus two spares.
Wings, as one might expect, has no fitting guides with the fuselage. Lower wings will be less troublesome as they are shorter and fit directly in the fuselage sides but the upper wing come in two separate parts so you will have to fill and sand the join first. On top of that, extreme care and patience is necessary for a correct alignment of the fuselage struts on the front cowling. Main wing struts have no guides on the wings either. Assembling the floats should be the last building step, but in this case, they do have guidelines to fit the struts. The box also includes thin metal rods that are supposed to be struts, I can’t imagine any other alternative use.
Instructions are not very helpful because parts are not numbered and the only assembly diagram is quite vague, especially on the exact location of wing struts and floats so good plans of the Slim are really a must. Colour reference is generic and designed by letters. The floatplane appears in pre-war colours of the Japanese navy, overall silver with red tail surfaces. On the other side of the sheet we find 3-D views showing the decals placement. There are also a couple of well-known pics of the real aircraft but they are not helpful as a guide either as they are simply bad photocopies. At least there they are, and nothing is less because good detailed pics of the Slim are difficult to find.
This kit is obviously for those with a few resin kits under their belts, it will be a singular and not very common piece in their shelves.◊
Actualizado – Updated: 4 / 2022
Actualizado – Updated: 5 / 2017
Publicado – Published: 7 / 2009
©www.jmodels.net


Debe estar conectado para enviar un comentario.