
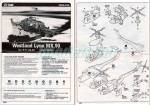
De un vistazo – Quick look
MATERIAL Y PIEZAS
MEDIA & PARTS:
- Plástico inyectado (90 piezas), plástico transparente (9 piezas).
- Injected plastic (90 parts), clear plastic (9 parts).
CALCAS – DECALS:
- Insignias danesas y portuguesas, numerales y gran número de estarcidos. Apariencia fina y brillantes.
- Danish and Portuguese markings, codes and lots of stencils. Apparently thin with a glossy finish.
OPCIONES – OPTIONS:
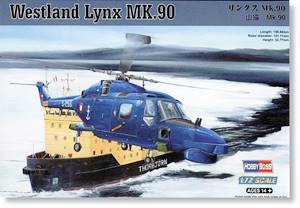
- Westland Super Lynx Mk.90. Marina Danesa.
- Westland Super Lynx Mk.95. Marina Portuguesa, 2000.
- Westland Super Lynx Mk.90. Danish Navy.
- Westland Super Lynx Mk.95. Portuguese Navy, 2000.
INSTRUCCIONES – INSTRUCTIONS:
- Folleto de 4 páginas impreso en blanco y negro. Contiene plano numerado de piezas y 10 secuencias principales de montaje sin numerar. Una hoja separada impresa a color en papel brillante muestra las opciones de pintura, calcas y una tabla de equivalencias de colores en pinturas de Mr Hobby, Vallejo, Model Master, Tamiya y Humbrol. Muy claras.
- 4-page leaflet printed in black and white. It shows a numbered parts plan and ten main assembly steps without numbers. A separate glossy sheet shows the painting, decalling choices and a table of colours with matches in Mr Hobby, Vallejo, Model Master, Tamiya and Humbrol paints. Very clear.
LO MEJOR – THE BEST:
- Buen detalle interno. Piezas trasparentes. Variedad de armamento.
- Nice interior detail. Clear parts. Different armament included.
LO PEOR – THE WORST:
- Marcas en el interior. Puertas correderas no diseñadas para mostrarlas abiertas.
- Marks on the cockpit and cargo compartment. Sliding doors are not devised to be posed open.
VALORACIÓN – CONCLUSION:
- Deja atrás moldes anteriores de otras marcas y está mejor detallada. El montaje también parece más sencillo. Me parece la mejor opción a esta escala hoy día.
- Leaves old kits from other companies well behind and it is much better detailed. Assembly also seems easier. I think it is the best choice at this scale today.

La maqueta de la revisión de hoy es sobradamente conocida por los aficionados a los helicópteros porque ha sido editada por Hobbyboss en diferentes modelos (HAS.2, HAS.3, Super Lynx, Mk 88 y Mk 90) y nacionalidades. En general, el molde me parece claramente superior en detalle y finura a todos los anteriores a la escala, singularmente a los de Airfix/Heller, Matchbox/Revell y Fujimi.
Esta edición contiene dos versiones del Westland Lynx destinadas a la exportación con la denominación de Mk. 90 (Dinamarca, aunque inicialmente destinada a Argentina) y Mk. 95 (Portugal). Ambos modelos han sido actualizados en su aviónica y otros sistemas al estándar Super Lynx, de ahí que la caja los denomine de una forma y las instrucciones de otra. Las cinco maquetas de HobbyBoss son idénticas, excepto en las calcas, algunos detalles de las instrucciones y especialmente en los cambios en el armamento y en el morro, con la adición o no del radomo del radar Seaspray Mk. 1, Bendix o similar y el sistema de adquisición de imágenes Sea Owl u otro análogo.
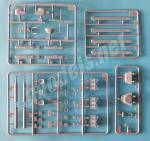
La caja contiene 8 bastidores, dos de ellos transparentes, las calcas y las instrucciones. Las piezas son finas, están bien moldeadas y limpias de plástico sobrante. Las marcas de eyector son muy tenues y afectan al compartimento de transporte, tres a cada lado, el lado interno de las escotillas de acceso, el respaldo de algunos asientos, el suelo y el techo, en estas dos últimas piezas se sitúan en los bordes.
El montaje permite poner las puertas de la carlinga abiertas y agregar o no diferente armamento. Las compuertas laterales vienen separadas y teóricamente podrían mostrarse abiertas, pero el detalle de los carriles de apertura no está bien representado por ser muy tenue y habría que hacer modificaciones. En todo caso, las instrucciones no contemplan la opción de colocarlas abiertas.
El interior contiene un suelo y un techo que abarcan tanto la carlinga como el compartimento de carga, así como un panel posterior de cierre en el que van unidos. La carlinga contiene tres asientos con almohadillado separado, dos palancas, el panel de instrumentos y la consola intermedia, ambos con indicadores en relieve, y una especie de caja tras la consola que simula otro instrumental. La zona de carga tiene tres filas de asientos separados moldeados con su bastidor y patas. En el techo no hay detalle alguno. La base y el soporte del eje del rotor principal van directamente pegadas sobre el techo y hay que añadir también la cruceta central que soporta las palas, provista de un eje y un tope separado que permite el giro.
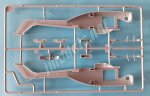
El fuselaje está dividido en mitades hasta la cola, incluido un fino patín, pero carece de morro. El detalle superficial muestra algunos paneles remachados con finura y líneas tanto grabadas como en relieve. Todo ello tiene muy buen aspecto, salvo los finos carriles de las compuertas, como he mencionado. Las puertas de la carlinga vienen separadas con sus respectivas ventanillas en piezas transparentes, así como las dos ventanas de observación a los lados. Las compuertas también tienen ventanillas del mismo tipo y carecen del cabrestante auxiliar, supongo que por estar diseñadas para colocarlas cerradas. El parabrisas viene en una sola pieza que incluye la sección frontal de la carena de los controles del rotor, las dos ventanas cenitales y los limpiaparabrisas.
El morro está dividido en esta versión en tres piezas principales, dos para la parte superior y una para la inferior. La pieza inferior muestra el radomo y en su parte frontal las lentes de las cámaras del radar. La parte superior está detallada con dos aletas de antenas UHF.
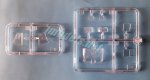
La cubierta del motor viene en mitades. Dos paneles de acceso, las tomas de aire y los escapes vienen separados. Sorprendentemente, las tomas son piezas transparentes con buena definición en las rejillas y su marco de sujeción, mientras que los escapes están bien horadados. Bajo el fuselaje hay diversas piezas para representar el sistema de lanzamiento del cable de sujeción, lo que aparenta ser el protector del sistema de aviónica, las antenas de banda I, UHF y VHF, y los soportes del cable de la antena HF.
A cola, el plano horizontal y el rotor vienen separados. El rotor está moldeado con las palas y resulta un poco simple, si bien las palas son finas y su perfil muy bueno. El rotor principal muestra mejor detalle y las palas son piezas separadas y finas que incluyen las características puntas BERP.
El tren de aterrizaje delantero está detallado mediante una base, la pata con amortiguador de tijera, y dos ruedas con buen detalle por ambos lados. El tren principal consta de dos ruedas correctamente detalladas, dos extensiones de una pieza y dos patas alargadas, que se introducen en las extensiones del fuselaje para mostrar el amortiguador por encima.
De acuerdo con las instrucciones, el armamento opcional consiste en misiles aire-superficie Sea Skua, torpedos Sting Ray y torpedos Mk 46. Los misiles Sea Skua no están incluidos en esta maqueta. Los torpedos vienen en dos mitades y los Mk 46 llevan además el anillo de cola separado. Hay dos tipos de soportes de transporte, según el torpedo. Al Mk 90 danés no es sencillo verlo con armamento, al menos yo no le he visto, mientras que los Super Lynx Mk 95 portugueses emplean los Mk 46.
Las piezas transparentes están repartidas en dos bastidores. Todas ellas son finas y transparentes, destacando, como he mencionado, las piezas que simulan las tomas del motor.
Las calcas están impresas en una hoja de mediano tamaño que contiene insignias nacionales, decenas de estarcidos, numerales y bandas en diferentes colores. Los motivos muestran aspecto brillante, apariencia fina y no tienen excesivo soporte sobrante.
Las instrucciones están impresas en blanco y negro en un folleto de cuatro páginas. Muestra un plano de piezas numerado y 10 secuencias de construcción sin numerar. Como de costumbre, HobbyBoss ha incluido una hoja en color con perfiles para pintar y colocar las calcas. Los colores y calcas del armamento también están incluidos en la hoja, así como una tabla de colores con equivalencias en pinturas de Mr Hobby, Vallejo, Model Master, Tamiya y Humbrol. Las ilustraciones son claras y los pasos de construcción son intuitivos y no deben dar problemas pese a no estar numerados.
En conclusión, esta parece la mejor opción para hacer un Lynx a esta escala por el momento. Comparada con moldes anteriores, estos quedan muy lejos en detalle y en aparente sencillez de montaje, incluso considerando que un helicóptero nunca es tan fácil de construir o pintar. Recomendable a expertos y novatos en cualquiera de sus versiones.◊


Today’s review is for a well-known kit to helo fans as it has been released by HobbyBoss in different variants (HAS.2, HAS.3, Super Lynx, Mk 88 and Mk 90) and nationalities. Overall, the kit looks clearly better in detail and finesse than all the previous releases at the scale, singularly those from Airfix / Heller, Matchbox / Revell and Fujimi.
This edition contains two export variants of the Westland Lynx with the designation of Mk. 90 (Denmark, although initially built for Argentina) and Mk. 95 (Portugal). Both models have been updated in their avionics and other systems to the Super Lynx standard, hence the box names them one way and the instructions another. The five HobbyBoss kits are identical, except for the decals, some details in the instructions and especially the changes in armament and the nose, with the addition of the Seaspray Mk 1 or Bendix radar radome and the Sea Owl image acquisition system (or similar equipment).
The box contains 8 frames, two of them of clear parts, the decals, and the instructions. The pieces are thin, well molded, and clean from flash. The ejector marks are very shallow and affect the cargo compartment, three on each side, the internal side of the side hatches, the back of some seats, the floor, and the ceiling. In these last two pieces they are located on the edges.
Assembly allows to pose the cockpit doors open and add different armament. The sliding doors are separated and could be shown open, but the fuselage rails are thinly rendered, and modifications are needed. Anyway, the instructions do not have the option to show them open.
The fuselage interior contains a floor and a roof for both the cockpit and the cargo compartment, as well as a rear panel to attach them. The cockpit contains three seats with separate pads, two levers, the instrument panel, and the console, both with raised gauges, and a kind of box behind the console that simulates other instruments. The cargo area has three separate rows of seats molded with the frame and legs. There is no detail on the ceiling. The base of the main rotor shaft is directly glued on the roof and the central cross-piece to attach the blades must also be added at this stage. The part is provided with a shaft and a separate bottom top that allows rotation.
The fuselage is divided in halves including the tail and a thin tail skid, but without the nose. Surface detail shows some finely riveted panels and both raised and engraved panel lines. The fuselage looks fine, except for the thin door rails, as mentioned. The cockpit doors are separate with the windows in clear pieces, as well as the two observation windows on the sides. The sliding doors also have windows, but the hoist is not included, maybe because they are designed to be placed closed. The windshield comes in a clear piece that includes the front section of the rotor controls fairing, the roof glazing, and the windshield wipers.
This Mk 90/95 version has the nose in three main pieces, two for the upper section and one for the lower part. The lower piece shows the radome and the front lenses of the radar cameras. The upper nose is detailed with two UHF antenna fins.
The engine cover comes in halves. Two access panels, the air intakes and the exhaust nozzles come separate. Surprisingly, the intakes are clear pieces with good definition on the grilles and the frame, while the nozzles are hollowed. Under the fuselage there are some pieces to render the ventral cable launch system, the avionics system cover (so it seems), the I-band, UHF, and VHF antennas, and the HF antenna cable struts.
The tail is provided with the horizontal plane and the rotor. The rotor is molded with the blades and looks a bit simple, though the blades are thin and show a very nice shape. The main rotor looks better, and the thin blades featuring BERP tips are moulded apart.
The front landing gear comprises a base, a leg and two wheels with good detail on both sides. The main gear consists of two wheels with torque scissors links, two one-piece sponsons, and two long struts. The sponsons are drilled so that the shock absorber struts can be seen, as in the real Lynx.
According to the instructions, the optional armament consists of Sea Skua air-to-surface missiles, Sting Ray torpedoes and Mk 46 torpedoes. The Sea Skua missiles are not included in this kit. The torpedoes come in halves and the Mk 46s also include separate tail rings. There are two types of pylons, depending on the torpedo. It is not easy to see the Danish Mk 90s carrying weapons, at least I have not seen them, while the Portuguese Super Lynx Mk 95s carry the Mk 46.
Clear pieces come in two sprues. All of them are thin and transparent. A special mention goes to the parts rendering the engine intakes, as said.
Decals are printed on a medium-sized sheet containing national markings, tens of stencils, numerals, and stripes in different colours. They look glossy, thin, and do not have excessive carrier film.
The instructions are printed in black and white on a four-page booklet. It shows a numbered parts plan and 10 construction sequences without numbering. As usual, HobbyBoss have included a colour sheet with profiles for painting and setting decals. Colours and decals placement for the armament are also included in the sheet, as well as a table of paints with matches from Mr Hobby, Vallejo, Model Master, Tamiya and Humbrol ranges. Illustrations are clear and assembly steps are intuitive and easy to follow despite not being numbered.
In conclusion, this seems the best choice to build a Lynx at this scale for the moment being. Compared to previous kits, these are very far behind in detail and apparent ease of assembly, even considering that a helicopter is never that easy to build or paint. I think any of the HB Lynx kits can be recommended to experts and novices alike. ◊
Actualizado – Updated: 4 / 2022
Publicado – Published: 9 / 2021
©www.jmodels.net


Debe estar conectado para enviar un comentario.