

De un vistazo – Quick look
MATERIAL Y PIEZAS
MEDIA & PARTS:
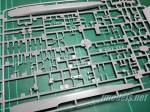
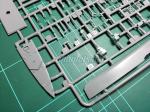
- Plástico inyectado (107 piezas, incluidas dos piezas de la peana).
- Injected molded plastic (107 parts, including two parts for the stand).
CALCAS – DECALS:
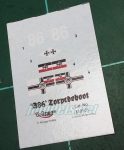
- Hoja muy pequeña con número de gallardete y banderas alemanas. Finas. Colores e impresión correctos.
- Very small sheet containing ship pennant number and German WWI flags. Thin. Correct register and colours.
OPCIONES – OPTIONS:
- Torpedero costero A86. Marina Imperial alemana, 1916.
- A 86 coastal torpedoboat. Imperial German Navy, 1916.
INSTRUCCIONES – INSTRUCTIONS:
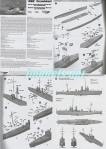
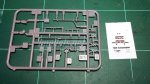
- Folleto tamaño A4 de cuatro páginas impreso en blanco y negro. Una hoja separada del mismo tamaño impresa a color en papel satinado muestra la guía de pintura y colores RAL y Vallejo. Incluye introducción histórica, diez pasos de montaje. Claras y a buen tamaño.
- A4 four-pages leaflet printed in black and white. One separate colour sheet of the same size printed in satin paper contains the painting guide in RAL/Vallejo colours. Includes ten assembly stages. Clear with exploded views in adequate size.
LO MEJOR – THE BEST:
- Tema poco frecuente. Molde decente y limpio.
- Uncommon topic. Decent clean tooling.
LO PEOR – THE WORST:
- Detallado básico. Algunas piezas delicadas. Peana muy mejorable.
- Basic detail and stand. Some tiny brittle parts.
VALORACIÓN – CONCLUSION:
- Sin reparos por el equilibrio precio/calidad. Interesará más a los que busquen algo diferente.
- Price and quality are balanced, so nothing objects to recommendation. Modellers with some experience and looking for something different will probably like it best.

Es una suerte que alguien se haya acordado de las embarcaciones menores entre las docenas de maquetas que han aparecido (y aún siguen haciéndolo) con motivo del centenario de la Gran Guerra. Es el caso de este torpedero costero alemán cuyo molde creó Mirage Hobby al inicio de esta década. El molde se ha repartido hasta ahora en tres maquetas: el torpedero alemán A86 y los polacos ORP Podhalanin (A80 en la Marina alemana) y ORP Ślązak (A59 alemán). Estos últimos corresponden a presas entregadas a Polonia tras la guerra y que por ello no actuaron en el conflicto con dicho pabellón. La escala elegida por el fabricante en esta ocasión es la más habitual de 1/350 y no la más corriente en Mirage de 1/400.
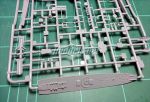
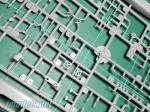
La caja contiene dos bastidores de piezas de plástico, una pequeña hoja de calcas y las instrucciones. El plástico presenta buena calidad y el molde está bien limpio de imperfecciones, sin rebabas ni señales evidentes del eyector en las piezas. Las más finas, como los mástiles, tienen un grosor verosímil para la escala y las piezas pequeñas están bien acabadas. Se nota un esfuerzo gratificante de Mirage en el molde con la tecnología de inyección lenta tradicional en la marca, que va perfeccionando con el tiempo.
El casco se compone de dos mitades bien moldeadas y limpias con tetones de alineación a proa y popa. La cubierta viene despiezada en dos secciones, la más elevada desde el puente a proa y la inferior desde este hacia popa. La sección de popa encaja en el casco mediante un ligero reborde en el filo de este. El reborde está ausente en la parte de proa porque la cubierta va pegada directamente sobre el casco. El detalle en relieve de ambas cubiertas es sencillo pero bien moldeado para la escala. En la cubierta de proa destaca el deflector de olas y en la de popa la posición del tubo lanzatorpedos y la rampa de lanzamiento de minas. Entre ambas cubiertas un par de piezas representan el panel del compartimiento de proa. Una de ellas lleva dos escalerillas moldeadas y dos escotillas con puertas separadas que pueden colocarse abiertas, añadiendo así algo de «vida» a nuestro modelo.
Tras unir el casco hay que colocar los timones y las hélices. El timón de popa no va bajo el casco sino pegado directamente a la popa. Los ejes y las hélices van por separado. Las hélices parecen tales, sin embargo Mirage no acaba de conseguir unas palas menos redondeadas y algo más realistas. La posición de los ejes está ligeramente marcada en la quilla como ayuda para alinearlos correctamente.
El puente se compone de más de 20 piezas. Nada sorprendente si entendemos que se trata de la estructura más compleja de la cubierta y que Mirage ha echado (lógicamente) el resto aquí. Los lados exteriores de los paneles tienen ojos de buey y ventanas bien representados. Las escalerillas de acceso de la cubierta al puente dejan que desear y mejorarían con unas similares de fotograbado. Dentro del puente hay un par de piezas para el timón y el telégrafo de marchas que desgraciadamente no se verán en absoluto.
Las piezas separadas que añadir a la cubierta delantera comprenden el cañón proel de 88 mm. (pieza pequeña, delicada y aceptablemente copiada para la escala), un par de anclas sencillas pero de buena factura, el mástil (pieza frágil y delicada que hay que sacar del bastidor con cuidado), un par de bitas dobles y una grúa que no se asemeja en nada a la real y que acaso pueda ser sustituida por otra de fotograbado.
En la cubierta posterior el mástil resulta fácil de montar, pero hay que tratarlo con respeto al sacarlo del bastidor. La chimenea viene en dos mitades longitudinales y está provista de salida de humos en pieza separada y bien horadada. También tenemos un par de barcas auxiliares, la más grande provista de grúas que la suspenden y la menor, más sencilla y colocada simplemente de lado sobre la cubierta.
En la parte central de esta cubierta hay que montar una entrada de aire compuesta de dos mitades y la pequeña torre de dirección de tiro cuya estructura está formada por cuatro caras, la base y un diminuto telémetro. La estructura va unida a la cubierta mediante cuatro agujeros que hay que horadar y que están marcados en el lado inferior de la cubierta. Este detalle no lo señalan las instrucciones hasta el paso 6 del montaje, demasiado tarde para abrirlos cuando se ha pegado ya la cubierta al casco. Tras la torre hay que colocar aún algunas pequeñas piezas más; además del segundo mástil, más tomas menores de ventilación, el tubo lanzatorpedos y algunas otras que no identifico.
Finalmente, más a popa encontramos la pieza de 88 mm. popel, cabrestantes, bitas, un mástil para la bandera y algunas piezas situadas directamente sobre la popa del casco que será necesario alinear siguiendo la última página de las instrucciones. La base de la maqueta es un simple rectángulo, lo bastante ancho para que el modelo terminado no vuelque y un único soporte que va insertado en el casco mediante un agujero que ya viene abierto. Esta peana no es tan horrible como otras que uno ha visto, pero es aún muy mejorable.
La pequeña hoja de calcas contiene banderas de la Marina Imperial alemana de excelente aspecto. Tanto los colores como los motivos de las cruces germanas están bien representados. Hay también un numeral para la torpedera y un pequeño gallardete para el tope del mástil.
Las instrucciones vienen en dos partes. Por un lado tenemos un sencillo folleto de cuatro páginas a tamaño A4 impreso en blanco y negro. Muestra un resumen histórico en polaco e inglés, 10 fases generales de montaje con algunas indicaciones importantes para facilitar el montaje en los dos idiomas (aunque lo ya mencionado sobre la torre del telémetro debería estar en el paso 1 y no en el 6). Las ilustraciones del montaje están realizadas en sistema CAD (diseño asistido por ordenador), que resulta de gran ayuda en ciertos detalles. La última página del folleto muestra vistas del modelo desde todos los ángulos básicos y también resultan especialmente útiles. Hay también una hoja A4 separada impresa a color en papel satinado que sirve de guía de pintura. Las indicaciones de color están expresadas en el código RAL, sin embargo la primera página del folleto nos ofrece el equivalente en colores acrílicos de Vallejo.
Esta maqueta me parece un molde bastante decente de nivel de dificultad medio-bajo, mejorable en algunos detalles, como las barandillas, para conseguir sacar todo su partido al modelo, aunque no resultarán imprescindibles para quienes sólo pretendan montar algo realmente diferente. A ver si cunde y alguien nos ofrece más buques de este tipo pero algo mayores, como los torpederos británicos y alemanes que tan importante papel (si bien secundario) jugaron en la Gran Guerra.◊
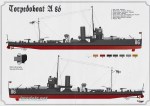

It has been lucky that someone has remembered the lesser ships that took part in WWI among the dozens of kits released to celebrate the centenary of the conflict. Such is the case of this coastal German torpedoboat which Mirage released at the beginning of this decade. The tooling has known three editions: the German torpedoboat A86, and the Polish counterparts ORP Podhalanin (A80 in the German navy) and ORP Ślązak (ex-German A59). These last two were in fact captured after the German rendition and given to Poland, for this reason they did not take part in the war with that flag. Mirage have chosen the more usual 1/350 scale instead of their traditional 1/400.
The box contains two plastic sprues, a small decal sheet and the instructions. Plastic looks good and the tooling is quite clean from flaws, with no evidence of flash or marks on the parts. The thinnest parts, as the masts, are convincing and thick enough for the scale and the smallest parts seem well moulded. You can notice a clear effort has been done by the manufacturer in this kit using their traditional low injection technology, which seems to be improving with time.
The hull comprises two clean and finely moulded halves provided with bow and stern alignment pins. The deck comes in two section, a forward upper deck in front of the bridge and the afterdeck behind it. The afterdeck fits into the hull by means of an engraved flange along the hull rim. This flange is absent from the fore hull as the deck is glued directly onto the hull. Raised detail on both decks is quite simple but looks good for the scale. The baffle plate outstands on the foredeck and so does the torpedo tube station and the mine ramp on the afterdeck. Between the decks there is a bulkhead with two simple ladders moulded on and two doors with separate hatches that you can show open, adding some «life» to the finished model.
After the hull is glued, it is time to add the axles and the propellers. The stern rudder is not below the stern but it is glued directly onto the hull. Axles and propellers are separate parts, however Mirage do not just get less rounded and more realistic blades. The position of the axes is slightly marked on the keel as an aid to align them correctly.
The bridge consists of no less than 20 parts. Nothing surprising if one realizes that this is the most complex structure on the deck and that Mirage have logically put their best in it. The outer side of the walls has well replicated bullseyes and windows. The ladders connecting the afterdeck with the bridge are a bit poor and will improve with a PE equivalent. Inside the bridge we find a couple of tiny parts representing the helm and the engine order telegraph that unfortunately won’t be seen.
Separate parts to be added on the foredeck comprise the 88mm. gun (a small delicate part acceptable for the scale), a pair of nice anchors, a flagpole, mooring bitts and a small crane badly copied from the original that can be replaced, if possible, by a PE counterpart.
The main mast is easy to build as long as you have been careful cutting it out from the sprue. The funnel comes in two halves and has separate hollow cap. There is also a couple of lifeboats, the bigger one is held by two davits and the smaller is simple and rests on one side on the deck.
Amidships there is a big dorade vent moulded in halves and the small fire control director with a base structure comprising four sides, a round base and a tiny rangefinder. The tower fits on the deck with four holes that you have to open and are marked on the other side of the deck part. Unfortunately this is not pointed out in the instructions until you arrive to building step 6, when the deck is affixed to the hull and it’s too late to open the pre-drilled holes. After the deck there are still some parts to attach: the rear mast, small ventilators, the torpedo launcher and a few more that I can’t identify.
Finally, we have another 88mm. gun astern, winches, bitts, a flagpole and a few parts to be placed on the stern that have to be correctly aligned following the last page of the instructions. The kit base is a simple rectangle, wide enough to avoid the model to tip over and a holder to be inserted under the hull. This base is not as ugly as others I have seen but it is still very improvable.
The small decal sheet includes German Navy flags which look fine. Both the colours and emblems are well represented. There is also a number for the boat and a small pennant for the main mast top.
Instructions come in two parts. On one side we find an A4 four-page leaflet printed in black and white. It shows a historical summary in Polish and English, 10 main assembly steps with some important directions to make the build easier (although the one about the rangefinder turret is in step 6 instead of 1). Illustrations have been made by means of CAD, which is certainly helpful with some details. The last page shows different views of the finished model and are also quite handy during assembly. We also have a separate sheet printed in colour on good satin paper as a painting guide. Colour reference is mostly in RAL code, but there is a table showing their equivalent in Vallejo acrylics on the first page of the instruction leaflet.
I think this is a quite decent tooling for modellers with medium-low skills, improvable of course, as most kits, in some details such as railing and ladders, although most modellers can enjoy this little kit without missing those aftermarkets, especially if they only want to build something different. Perhaps one day a company will give us more ships of this type but somewhat larger, like the British and German torpedo boats that played such an important (although lesser) role in WWI.◊
Revisado – Revised: 9 / 2023
Actualizado – Updated: 4 / 2022
Publicado – Published: 10 / 2018
©www.jmodels.net


Debe estar conectado para enviar un comentario.