
De un vistazo – Quick look
MATERIAL Y PIEZAS
MEDIA & PARTS:
- Plástico inyectado (56 piezas), plástico transparente (4 piezas).
- Injected plastic (56 parts), clear plastic (4 parts).
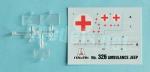
CALCAS – DECALS:
- Insignias norteamericanas y sanitarias, matrículas y numerales. Finas con aspecto brillante. Correcta saturación y registro. Sin exceso de soporte.
- US and Red Cross markings, registers and vehicle numbers. Thin and glossy appearance. Correct color saturation and register. No excess of carrier film.
OPCIONES – OPTIONS:
- U.S. 2nd Armoured Division. Normandy, 1944.
- British Army. Normandy, 1944.
INSTRUCCIONES – INSTRUCTIONS:
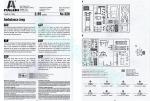
- Folleto doblado de 6 páginas impresas en blanco y negro. Contiene una introducción histórica sobre el vehículo, un plano numerados de piezas, una lista de colores con equivalencias en el código Federal Standard y de pinturas acrílicas de Italeri, 7 capítulos de montaje y perfiles. Claras.
- 6-page folded leaflet printed in black and white. It contains a short historical introduction to the vehicle, a numbered parts diagram, a list of colours with matches in the Federal Standard code and Italeri acrylic paints, 7 assembly chapters and profiles. Clear.
LO MEJOR – THE BEST:
- Montaje sencillo. Cierta variedad en los acabados.
- Easy build. Some variety in paint finishes.
LO PEOR – THE WORST:
- Marcas de eyector. Motor. Detalles poco refinados propios de un molde antiguo.
- Pin marks. Engine. Unrefined detail typical of an old tooling.
VALORACIÓN – CONCLUSION:
- Su detalle está muy superado hoy y necesita muchas mejoras para ponerla al día, sin embargo es fácil de montar y válida, especialmente para novicios y aprendices.
- Its detail is quite surpassed today and needs a lot of improvement, however it is easy to build and still valid for the newbie and those without too much modelling skills.

La maqueta
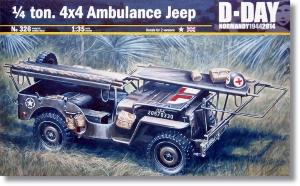
Casi no hay marca importante dedicada a los vehículos militares en la escala 1/35 que no se precie de tener al menos un jeep en su catálogo. Italeri debe ser de las primeras que contó con uno desde antes de llamarse como hoy, ya que este molde es de la vetusta Italaerei de 1976. A lo largo del tiempo se ha reeditado en múltiples versiones y varios fabricantes la han copiado también, como Tamiya, Bilek, Revell o Testors.
Hace ya tiempo le dediqué una revisión al Willys MB de Tamiya en esta escala y sentía curiosidad por ver qué tal es la comparación con el jeep de Italeri, ya que ambas maquetas tienen bastantes años a las espaldas y son muy conocidas por cualquier aficionado al tema. Si los hados no dictan lo contrario y el tiempo es propicio, haré alguna revisión más de la maqueta de hoy en otras versiones.
Esta caja salió hace ya diez años para conmemorar el 70º (se lee “septuagésimo” o “setenta”, no setentavo) aniversario del Día D. Como este año la efemérides se vuelve a celebrar, la casa italiana ha tirado de aquella caja para volverla a poner a la venta otra vez. La edición es idéntica y la caja contiene tres bastidores, uno de ellos transparente, las calcas y las instrucciones.
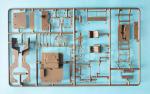
Las piezas están bien moldeadas en general y casi totalmente limpias de rebabas, de las que hay mínimos restos en algunas piezas. Marcas de eyector hay para aburrir, y muchas de ellas visibles. Para no cansar con la enumeración, sólo dejo consignadas las del lado interno de los neumáticos, aunque leves y disimulables en este caso. Con todo, nadie se va a asustar porque las marcas chinchorras y evidentes son seguras en cualquier maqueta de hace 15 años para atrás e incluso hoy, dependiendo del fabricante.
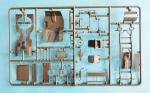
La maqueta es igual a la del jeep estándard con el añadido de las piezas necesarias para convertirlo en vehículo sanitario, como soportes, camillas y equipo médico. No hay alternativas de montaje aparentes en las instrucciones. La única a primera vista es la posición del parabrisas, que puede pegarse bajado o no, aunque en este caso es imposible colocarlo subido si empleamos los soportes necesarios para las camillas.
Chasis, motor y transmisión
El bastidor del chasis viene en una pieza con el paragolpes delantero y los traseros más un panel con la parte inferior del motor y la caja de transferencia moldeados debajo. Los largueros y travesaños tienen un pase, pero los paragolpes traseros tienen mucho grosor.
El motor está muy simplificado. El bloque aparece cortado en mitades con la tapa separada unida al tubo de salida del termostato. Las poleas y correas aparecen sólo sugeridas, aunque está el ventilador y también los filtros de aceite y aire. La malla del radiador está moldeada sobre las dos caras del fondo de una pieza en forma de cubeta pegada tras la parrilla delantera que también contiene los faros. La batería y el alternador son piezas aparte pegadas dentro del compartimento del motor. El tubo de escape no está completo sino sólo el extremo final unido al silenciador.
La transmisión está representada en dos piezas que incluyen los ejes con los diferenciales y los árboles de transmisión con las juntas cardan medianamente detalladas. Los árboles van insertados en ambos extremos de la caja de transferencia y los ejes pegados sobre el bastidor. El eje delantero también contiene la barra estabilizadora. La parte central inferior del bastidor la ocupa una pieza que simula el soporte de la caja de cambios unido a los lados por dos barras que lo fijan al bastidor.
Suspensión y ruedas
La suspensión se compone de cuatro ballestas que no están mal detalladas pero tienen pequeñas marcas de eyector en uno de los lados. Las piezas van pegadas al bastidor una vez colocados los ejes. También hay cuatro amortiguadores finos que se instalan tras unir la carrocería al bastidor.
Los extremos de los ejes acaban en finos cilindros que simulan los tambores de freno con un vástago en medio donde introducir arandelas de plástico con un pasador. Las instrucciones nos indican que el pasador no se debe pegar para que las ruedas puedan girar.
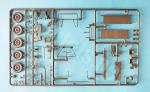
Las ruedas son de plástico y están moldeadas de una pieza. El buje no es el más se ve en las fotos de la Guerra Mundial, parece un modelo diferente que tenía una corona plana sujeta con tornillos alrededor del abultamiento estampado en el centro. Los neumáticos no están mal reproducidos, aunque tienen dos leves marcas en la parte interna y hay una ligera línea de molde en la banda de rodadura.
Italeri ha confundido la numeración de las ruedas en los bastidores al haberlas moldeado alternas y no pareadas, de modo que los traseros son los que tienen en su centro la corona de tuercas central más achatada, mientras que en los delanteros su forma es más saliente y redondeada, aunque este detalle no está bien conseguido y queda muy romo.
Interior
El suelo interior es de una pieza e incluye el panel del compartimento del motor. La pieza tiene algunas marcas, pero escasas y leves. La parte delantera tiene un salpicaderos con los indicadores e interruptores en fino relieve. Italeri sólo ha incluido una mínima calca que no reproduce los indicadores, lo que hubiese venido bien porque pintar el detalle no será fácil, sino un misterioso “TP35” para la zona central. De los pedales únicamente queda la muestra, el acelerador está moldeado en el suelo y los pedales son meros resaltes a los lados de la columna de la dirección, que viene separada al igual que el volante. Finalmente, las palancas están separadas en dos piezas y su aspecto es pasable sin más.
Esta versión carece del asiento del acompañante y del trasero. El del conductor está unido al depósito de gasolina, que es liso, sin las abrazaderas laterales. El asiento no tiene marcas, está detallado por detrás y las superficies están levemente texturizadas, aunque parezcan lisas.
El parabrisas consta de un marco detallado con los motores de los limpiaparabrisas por detrás y los cristales separados con los limpiaparabrisas moldeados en fino relieve. La pieza es sorprendentemente fina para una maqueta tan antigua. Ya podían tomar nota algunos fabricantes de hoy. Para que no falte nada, en la cara trasera del parabrisas hay un par de marcas tenues que eliminar.
La parte trasera muestra las tapas de las cajas de respeto para las herramientas. Los soportes de las camillas lo forman un bastidor trasero pegado a la carrocería por fuera, otro intermedio unido al suelo por detrás del parabrisas y otro, formado por dos piezas, unido al paragolpes y la parrilla delantera. Para sazonar un poco el rol sanitario de este jeep, Italeri nos deja dos camillas desplegadas y otra plegada. Las que aparecen desplegadas no son maravillosas, pero al menos tienen la textura de la tela reproducida con líneas muy finas en relieve. La camilla plegada no merece la pena y, de querer usarla, es mejor hacérsela uno mismo. Así mismo la maqueta incluye un casco, dos mochilas y una caja de material médico que se detallan con calcas con la cruz roja. Estos contenedores tienen una definición pasable en los cierres, bisagras, asas y hebillas.
Carrocería
Armar la carrocería no aparente ninguna dificultad. Consta de un panel trasero y dos laterales, todos ellos pegados al suelo del vehículo. La parrilla delantera va unida a los extremos delanteros de los laterales. La pieza lleva el radiador detrás y muestra los huecos de ventilación definidos y limpios con las pequeñas luces auxiliares bien representadas, aunque los huecos de la parrilla situados en los extremos deberían ser un poco más cortos que el resto en la parte superior y no iguales, como los dejó Italeri. Las lentes de los faros son transparentes y muestran un fino estriado. Falta el nombre del fabricante estampado en la parrilla y el panel trasero.
El capó viene separado y por tanto se puede mostrar el motor. Tiene la bisagra y los cierres moldeados en la pieza. Los guardabarros forman parte de las piezas laterales de la carrocería y no son muy finos. Sobre uno de ellos hay un faro de conducción nocturna y su protector.
Los lados de la carrocería llevan los catadióptricos traseros, las asas de izado más el retrovisor y las herramientas separadas en el lado izquierdo. El panel trasero incluye las luces junto con los catadióptricos. Está detallado con la rueda de repuesto y su soporte. En la parte inferior hay un gancho de remolque en el paragolpes con poco detalle.
Calcas
La pequeña hoja contiene insignias norteamericanas y sanitarias, matrículas y numerales. Las calcas son finas con aspecto brillante. Muestran una saturación y un registro correctos y carecen de soporte sobrante. Como he mencionado, una calca para los instrumentos del salpicadero hubiese venido bien en este caso para no tener que pintar un detalle tan pequeño.
Instrucciones
Consisten en un folleto doblado de seis páginas impresas en blanco y negro que contiene una introducción histórica sobre el vehículo, un plano numerados de piezas, una lista de colores con equivalencias en el código Federal Standard y de pinturas acrílicas de Italeri, siete capítulos de montaje y perfiles. Las vistas del montaje son claras en general, aunque generan dudas sobre la posición del tubo de escape y los amortiguadores que no parecen demasiado graves porque seguramente se aclararán haciendo pruebas durante el montaje. También es importante tener en cuenta el error en la numeración de las ruedas, aunque no es culpa de las instrucciones, que reflejan lo que hay realmente en los bastidores.
Aunque escasas, Italeri buscó diferencias en el acabado de los dos vehículos propuestos en el folleto. El británico lleva el típico camuflaje denominado Mickey Mouse empleado en el teatro europeo al final de la guerra, mientras que el norteamericano está pintado en el clásico Olive Drab.
Valoración
Esta maqueta de molde tan antiguo con detalle en algunos casos pobre y en otros poco refinado no les valdrá a los másteres del universo sin pudor que andan por ahí pontificando y sacando defectos a todo(s) menos a sí mismos. Sin embargo, para una gran mayoría de modelistas del común, y especialmente a los novicios, les vendrá a la mano por su facilidad de montaje y pintura, por mucho que se parezca de lejos a un jeep real en muchos aspectos.
No hay duda que a Italeri esta maqueta y sus otras versiones le deben seguir dando réditos porque nunca desaparecen de las estanterías de las tiendas o de las páginas web.◊

The kit
There is hardly a mainstream brand producing 1/35 AFV kits that does not have at least one jeep in its catalogue. Italeri must be one of the first companies to have had one before it was called as it is now, since this tooling is from the old Italaerei back in 1976. Over time it has been reissued in different versions and several manufacturers have also reboxed it, such as Tamiya, Bilek, Revell or Testors.
Some time ago I published a review about Tamiya 1/35 Willys MB and I was curious to see how it compares with the Italeri jeep, since both kits are quite old and well known by any AFV modeller. If fate does not dictate otherwise and time is favourable, I will publish more reviews about other versions of today’s kit. This box was released ten years ago to commemorate the 70th anniversary of D-Day. As the anniversary has come again this year (the 80th), the Italian manufacturer has reissued the same old box. The box contains three sprues, one of them of clear parts, the decals and the instructions.
Pieces are well moulded and almost completely clean, with only minimal flash on some pieces. There are several pin marks, and many of them are visible. In order not to bore you with the list, I will only mention those on the inner side of the tyres. In this case they are small and shallow and can be easily hidden. No one will be scared of those marks as they are quite usual on any old model kit and even today we are not free from them in many modern releases.
The kit is based to a standard jeep with the addition of the necessary parts to build an ambulance version, such as racks, stretchers and medical equipment. There are no apparent assembly alternatives in the instructions. At first sight, the only one is the windshield, which can be posed raised or lowered, although in this case it is impossible to place it raised if we use the racks for the stretchers.
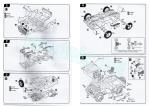
Chassis, engine and transmission
The chassis frame is in one piece with the front, rear bumpers and a panel with the lower engine and transfer case molded on. The side and cross members are not bad, but the rear bumpers are very thick.
The engine is very simplified. The block is cut in halves with the separate rocker cover including the thermostat outlet pipe. The pulleys and belts are only suggested, but the fan and the oil and air filters are provided. The radiator screen is moulded on the two sides of a bucket-shaped piece attached behind the front grille that is moulded with the headlamps. The battery and alternator are separate pieces inside the engine compartment. The exhaust pipe is not complete but the piece only shows the tailpipe joined to the muffler.
The transmission is represented in two pieces that include the axles with the differentials and the drive shafts with the universal joints passably detailed. The shafts are inserted into the transfer case and the axles are glued to the frame. The front axle also contains the stabilizer bar and the lower central frame has the gearbox skid plate.
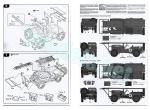
Suspension and wheels
The suspension consists of four leaf springs which are not badly detailed but have small ejector marks on one side. The pieces are glued to the frame after the axles are fitted. There are also four thin shock absorbers which are fitted once the body is attached to the frame.
Each axle ends in thin cylinders simulating the brake drums with a stem in the middle for inserting plastic washers with a pin. The pins are not glued to allow the wheels to turn.
The wheels are plastic and one piece. The hub is not the most usual type seen in WWII jeep photos, it seems to be a different model which had a flat surface held in place with nuts around the bulge stamped in the middle. The tyres are not bad, although they have two small pin marks on the inside and a thin seam line on the tread.
Italeri has confused the numbering of the wheels on the frames by having moulded them alternately and not in pairs. The rear wheels show a flat centre cap with nuts around, while the front ones have a more prominent and rounded hub cap, although this detail is blunt and not very well defined on the pieces.
Interior
The interior floor is in one piece and includes the engine compartment panel. It has some marks, but they are few and shallow. The cab front has the dashboard moulded with raised gauges and switches. Italeri has only included a minimal decal with a mysterious “TP35” for the central dashboard instead of reproducing the gauges, which would have been fine because painting the tiny detail will not be easy. The pedals are just a couple of stacks and a flat accelerator moulded in place. The steering column and the wheel are separate. Finally, the levers are separated in two pieces and look just passable.
This version do not make use of the passenger and rear seat. The driver’s seat is attached to the fuel tank, which is flat and lacks the side straps. The seat has no marks, is well detailed on the back and the surfaces are slightly textured, although they look smooth.
The windscreen includes the wiper motors and a separate clear piece with the wipers moulded as raised detail. The piece is surprisingly thin for such an old kit. Some modern manufacturers could take note. As expected, there are a couple of pin marks on the back of the frame that need to be removed.
The rear cab shows the lids of the tool lockers. The stretcher racks comprise a rear frame glued to the body on the outside, another frame attached to the floor behind the windscreen and the last, made of two pieces, attached to the bumper and front grill. To spice up the ambulance role of this jeep, Italeri includes two unfolded stretchers and one folded one. The unfolded examples are not wonderful, but at least they have the canvas texture represented with very fine raised lines. The folded stretcher is not worth using, it seems better to make it yourself if you need one. The kit also includes a helmet, two backpacks and a medical supplies box, which are detailed with red cross decals. Thes pieces have a passable definition in the straps, hinges, handles and buckles.
Body
Assembling the body does not look difficult. It consists of a rear panel and two side panels attached to the vehicle floor. The radiator grille is glued on the front sides front. The piece has the radiator behind it and shows defined and clean slots with the small turn lights well represented. The first and last slot should be a bit shorter at the top than the rest, but Italeri moulded them on the same level. The headlamp lenses are clear pieces showing very fine striation. The vehicle manufacturer stamped on the front grille and real body panel is missing.
The hood is separate and so the engine can be shown. The piece has the hinge and the latches moulded on. The mudguards are part of the body side pieces and do not look very thin. They include the blackout lamp and a thick bracket.
The body sides have the rear reflectors moulded on and separate pieces for the lifting handles, the rearview mirror and the tools. The rear panel includes the lights and the reflectors. It is detailed with the spare wheel and the support. The pintle hitch is also added on the bumper but the piece is not outstandingly rendered.
Decals
The small sheet contains American and Red Cross insignia, registers and serial numbers. Decals look thin with a glossy appearance. They show correct saturation and register and lack excess support. As mentioned, a decal for the dashboard instruments would have been useful to avoid painting the small detail.
Instructions
These consist of a folded 6-page leaflet printed in black and white containing a historical introduction to the vehicle, a numbered parts diagram, a color list with equivalents in the Federal Standard code and Italeri acrylic paints, seven assembly chapters and profiles. The views are clear in general, although they raise doubts about the position of the exhaust pipe and the shock absorbers, but this does not seem too serious because they will surely be clear by checking fitting during assembly and reference pics of the vehicle. It is also important to note the mistake in the numbering of the wheels, but it is not the fault of the instructions diagram, which is just a copy of what the frames contain.
Italeri proposes minimal differences in the paint schemes of the two vehicles shown in the eaflet. The British jeep sports the typical Mickey Mouse camouflage used in the European theatre at the end of WWII, while his American counterpar is painted in the standard Olive Drab.
Conclusion
This very old kit with some poor and unrefined detail for today’s standards will surely be despised by “masters of the modelling universe” who spend their lives pontificating and pointing out faults in everything but themselves. However, for a large majority of average modellers, and especially for newbies, it will be easy to build and paint, even though it fails to look the part in many aspects.
Clearly this kit and the other versions must still be quite profitable for Italeri because they never disappear from physical shops and websites.◊
Publicado – Published: 10 / 2024
©www.jmodels.net

Debe estar conectado para enviar un comentario.