
De un vistazo – Quick look
MATERIAL Y PIEZAS
MEDIA & PARTS:
- Plástico inyectado (74 piezas), vinilo (7 piezas).
- Injected styrene (74 parts), vinyl (7 parts).
CALCAS – DECALS:
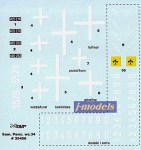
- Hoja con matrículas polacas y cruces alemanas. Como extra incluyen 4 series de numerales y un símbolo de unidad no aplicables en esta maqueta. Muy finas y sin exceso de película.
- Sheet includes Polish plate numbers and German crosses. There are 4 extra number series and an unit symbol not to be used in this kit. Very thin and nice looking.
OPCIONES – OPTIONS:
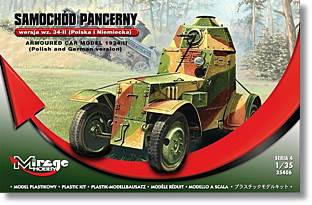
- Modelo 34-II armado con ametralladora Hotchkiss Modelo 1925 con camuflaje introducido en 1931-32.
- Modelo 34-II armado con cañón Puteaux SA 18 en camuflaje introducido en 1936.
- Modelo 34(p) capturado por los alemanes, 1939.
- Model 34 armed with Hotchkiss Mk. 1925 machine-gun. Camouflage scheme introduced in 1931-32.
- Model 34-II armed with Puteaux SA 18 gun. Camouflage scheme introduced in 1936.
- Model 34(p) captured by the Germans, 1939.
INSTRUCCIONES – INSTRUCTIONS:
- Hoja A4 doblada que contiene 9 pasos generales de montaje, resumen histórico y datos técnicos en polaco e inglés. Una hoja aparte a todo color muestra la guía de pintura y calcas. Referencia de colores de Vallejo Model Color y Model Air.
- A4 folded sheet showing 9 main assembly steps, historical summary and technical data in Polish and English. An extra full colour sheet shows the painting and decalling guide. Colour reference in Vallejo Model Color and Model Air range.
LO MEJOR – THE BEST:
- Tema poco usual. Montaje básico. Buen juego de calcas.
- Unusual topic. Basic assembly. Good decal sheet.
LO PEOR – THE WORST:
- Ruedas de vinilo. Requiere afinar o sustituir algunas piezas.
- Vinyl tyres. Some parts should be refined or replaced.
VALORACIÓN – CONCLUSION:
- Maqueta bastante básica y rápida de montar. Necesita un poco de trabajo extra, pero se le puede sacar más partido.
- Quite basic and an easy build kit. With some extra detail you can get a nice model.

Lo primero que sorprende de esta maqueta es el pequeño tamaño de la caja, más propia de otra a escala menor. Las piezas se agrupan en tres bastidores principales, más otro más pequeño que contiene una MG42 alemana. Hay además ruedas de vinilo empaquetadas aparte, un juego de calcas, las instrucciones y una pequeña hoja recortable con banderas de señales a escala 1/35 y 1/72 que describo más abajo.
Hay que reconocer que Mirage Hobby ha realizado un esfuerzo en la presentación de este producto. Tanto es así que lo mejor de la maqueta son, a mi juicio, tanto las calcas como las instrucciones. También el hecho de que las piezas vengan razonablemente empaquetadas. Uno recuerda aquellas primeras maquetas del fabricante donde los bastidores bailaban dentro de cajas enormes con instrucciones impresas en papel amarillento. El plástico, y en esto sí queda camino por recorrer, es el típico de la marca, tirando a duro y con pocas rebabas que limpiar (aunque algunas hay). Las únicas marcas de eyector preocupantes son las que aparecen en la cara inferior de los guardabarros. No serán visibles una vez montados, pero en cualquier caso hay que lijar y taparlas. Con todo, el plástico es razonablemente fino y las piezas están en general correctamente moldeadas. Como suele pasar con Mirage, mejor las piezas grandes que las pequeñas, que siempre parecen más gruesas o grandes de lo que deberían.
Poco hay que reseñar del interior porque está absolutamente vacío con la excepción del radiador, que resulta una pieza excesivamente gruesa y falta de detalle. El chasis del vehículo consiste en tres piezas principales, la base y las dos mitades longitudinales del mismo. La base es apenas una pieza plana que muestra algún detalle del bastidor en la cara inferior, el mínimo para ajustar las ballestas de la suspensión y la dirección. Las piezas laterales muestran buen detalle, con paneles bien grabados y remachados. Las rejillas laterales de ventilación del motor vienen abiertas, lo cual es una ventaja (aunque hay algunas rebabas que limpiar), pero las puertas vienen cerradas y para abrirlas hay que meterse en cirugía. La puerta de acceso trasera viene aparte, pero parece absurdo dejarla abierta cuando no hay interior que mostrar. El visor del conductor también viene en pieza separada con las mirillas abiertas. Las escotillas protectoras del radiador pueden mostrarse abiertas, pero como en el caso de la puerta trasera, poco hay que mostrar. Otras piezas del chasis como las herramientas o las asas son muy básicas y, al menos las últimas, deberían ser sustituidas por hilo de cobre.
La pequeña torreta aparece bien detallada en formas, remaches y escotillas. Hay tres opciones de armamento: ametralladora Hotchkiss Modelo 1925, cañón Puteaux SA 18 y ametralladora MG42 para el vehículo capturado por los alemanes. Las dos primeras piezas son muy básicas y apenas muestran el cañón del arma, que va insertado en un montaje simple pegado al frontal de la torreta. La MG42 aparece en un pequeño bastidor procedente del tractor Renault UE de Mirage que contiene también el trípode, aunque lo único necesario para esta maqueta es el cañón, que hay que cortar y que va insertado igualmente en el montaje frontal.
Las piezas correspondientes a los guardabarros son finas, pero hay que rellenar al menos las marcas de eyector ya comentadas. El montaje de los soportes se hace insertándolos en pequeñas ranuras del chasis. Hay que tener en cuenta que los guardabarros no deben quedar pegados a éste, ya que eran piezas no soldadas que probablemente debían de vibrar bastante con el vehículo en marcha, soltarse o dañarse con facilidad. La suspensión es también muy básica, consiste en un par de ballestas largas para el eje trasero y dos más cortas para el delantero. El cardan viene de una pieza con el eje trasero y hay que orientarlo correctamente de modo que ajuste con la barra de la transmisión, para ello hay que alterar la secuencia de montaje de las instrucciones y no seguirlas tal cual.
Los neumáticos de vinilo llevan correctamente marcada la banda de rodadura pero tienen también ligeras rebabas que es necesario eliminar con cuidado. Teóricamente encajan en las llantas por presión, pero lo normal (lo digo por experiencia) es que tengamos que lijar la parte interna del neumático para poder pegar las piezas externa e interna de la llanta entre sí de modo que quede bien ajustado. Los neumáticos delanteros de este vehículo no eran completamente perpendiculares a su eje, sino ligeramente inclinados hacia adentro en su parte inferior. Al no tener diferenciales, este diseño probablemente intentaba compensar el rodaje diferente de cada rueda en los giros.
Las instrucciones están impresas a color en excelente papel satinado. Muestran nueve pasos generales de montaje y fotos de un vehículo real por sus cuatro lados que, aunque algo pequeñas, son muy útiles para resolver dudas de montaje como las mencionadas sobre los guardabarros y los neumáticos delanteros. Una hoja aparte dentro de las instrucciones muestra las opciones de pintura y los colores de la gama de Vallejo Model Air y Model Color. El vehículo lleva básicamente los dos modelos de camuflaje polaco anteriores a la guerra: el tricolor de manchas irregulares separadas por líneas negras de 1931, que algunos autores llaman «tipo japonés», pero que en realidad es más parecido al usado por los vehículos chinos de aquellos años, el camuflaje tricolor con grandes manchas irregulares sin líneas de separación entre colores introducido en 1936 y el gris panzer en el que fueron repintados por los alemanes en 1939. Hay además un par de fotos de estos últimos coches capturados como referencia con texto explicativo en polaco e inglés.
De la excelente hoja de calcas sólo usaremos las matrículas polacas o las cruces alemanas, ya que el resto de numerales y símbolos de unidad no son necesarios. La hoja viene muy bien impresa, con la película transparente perfectamente ajustada a cada calca. Mirage ha tenido el detalle de incluir también una hojita recortable de papel con banderas de señales de forma triangular, denominadas escudos Słupski, usados sobre la torreta de los carros polacos hasta 1939.
Aunque se trata de una maqueta con pocas piezas y montaje básico, este pequeño coche blindado es un modelo muy singular y, gracias a Mirage Hobby, menos desconocido de lo que ha sido hasta ahora fuera de Polonia. Creo que con un poco de trabajo extra en el montaje y mejorando algunas piezas, se puede sacar un modelo curioso y único.◊


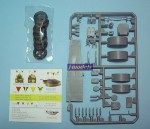

The first surprising thing about this kit is the small size of its box, which seems aimed at another kit in a smaller scale. Parts come in three main sprues plus a smaller one containing a German MG42. There are also a set of 7 wheels (6 for the vehicle and the spare) neatly wrapped apart, a set of decals, the instruction sheet and a small paper sheet depicting signal flags at 1/35 and 1/72 scale which I describe below.
I think it’s fair to recognise Mirage Hobby have made an effort to improve this release. So much so, that perhaps the two best things are the decals and the instructions. Also, the fact that the sprues come appropriately wrapped. Nothing to do with older kits where parts were freely loose inside big boxes and instructions were a yellowish sheet of recycled paper. Plastic, and here there’s still a way to go, is as usual with Mirage a bit on the hard side with some small flash to clean. Ejector pin remnants do not mar any of the important details except fot the undersides of the fenders. Once assembled they won’t be visible but still you have to sand and fill them. Other than that, parts are reasonably thin and parts are correctly moulded. As also typical with Mirage, bigger parts are better molded than smaller ones, which always seem a bit thicker or bigger that they should be.
There are absolutely no parts for the interior except for a thick and poorly detailed radiator. The body of the vehicle is made up of three main parts: the flloor, with the frame and some detail of the engine molded on the underside, and two chassis halves. The floor is quite simple and only a base to fit the axles and suspension. Chassis halves are finely moulded with correctly engraved and rivetted panels. The engine side grills are molded open, this is an advantage not very common in other kits, but the doors are closed so you will need to do some surgery if you decide to show the vehicle open (and scratch some of the interior as well). The rear door comes as a separate part but again it is useless to position it open if there’s no interior to show. The driver’s hatch is also a separate part with sights molded open too. The radiator armoured protection consists of two small hatches that can be positioned open or closed. Other smaller parts such as the pioneer tools are usable but handles could be replaced by wire.
The small turret is cast in two parts, the base and the octogonal top. The base seems a bit thick and some sanding is needed to make it rotate easily. The top is again nicely moulded and shows fine hatches and rivets. The armament is fitted to the front mantlet with two different ball mountings according to the version you choose to build. The choice is for a Hotchkiss Model 1925 machine-gun, a Puteaux SA 18 gun or a MG42 for a captured vehicle in German use. The French armament only have the barrels that are glued into the ball mount on the front side of the turret. The MG42 sprue comes from Mirage Renault UE tractor and also contains the tripod, although we just need the barrel of the gun which is also inserted in the front mounting.
The fender parts are thin, but there are some pin marks to contend with as I said before. Fender holders are assembled by means of tiny slots on the chassis halves. Fenders of this vehicle were not welded but detached from the chassis so they were probably damaged or lost when the car was under way. Suspension is also quite basic, it consists of a pair of the front and rear axles and springs. Spings are longer in the rear axis and shorter at the front. The cardan is moulded with the rear axle and care is necessary to position it to fit the transmission shaft. For this you need to change the assembly sequence in the instructions.
Vinyl tyres have detailed treads but also mold seams which need to be removed carefully. In theory at least they should fit into the wheel rim halves just by pressing them, but you will probably have to either sand the rims or trim the interior side of tyres to be able to glue the halves and get a tight fit. Front tyres were not perpendicular to the front axle, but they had a slight inward slant, probably to balance the wheel turns in bends as there were no differential gears.
The instruction sheet is an exploded-view type printed on excellent glossy paper. It shows nine main assembly steps and pictures of the four sides of a real vehicle which are helpful to assemble the fenders and front wheels as mentioned. An insert shows the painting options and the colours to be used in Vallejo Model Color and Model Air ranges. This car featured both Polish pre-war tricolor schemes: the one introduced in 1931 consisting of irregular spots with delineating black lines, also called «Japanese scheme» in some books, but in fact it was more similar to the scheme used by Chinese tanks of the same period, and the 1936 scheme which featured bigger spots without lines. A third option is for a Panzer grey vehicle as it was repainted by the Germans in 1939. There are a couple of pictures of a German vehicle with a short Polish and English description too.
We will only use a few decals for Polish plates or German crosses from the excellent sheet as the rest of serial numbers and unit markings are not to be used in this kit. The sheet is nicely printed with only the necessary film on each decal. Mirage also offer us a tiny paper sheet rendering signal flags, called Słupski shields, to be cut out. These flags were used by Polish armor just until 1939.
Although this kit is not replete with ultra-fine details, has fewer parts than most kits today and the assembly is quite basic, this small armored car is a singular piece in any collection and now, thanks to Mirage Hobby, a better-known vehicle outside Poland. I think a small extra effort with the assembly and parts refinement will pay good dividends in the end.◊
Actualizado – Updated: 4 / 2022
Actualizado – Updated: 5 / 2017
Publicado – Published: 4 / 2010
©www.jmodels.net


Debe estar conectado para enviar un comentario.