
De un vistazo – Quick look
MATERIAL Y PIEZAS
MEDIA & PARTS:
- Plástico inyectado (81 piezas). Incluye figura (5 piezas).
- Injected plastic (81 pieces). Figure included (5 pieces).
CALCAS – DECALS:
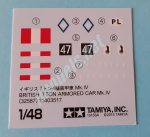
- Distintivos nacionales, de unidad y tácticos, además de números. Bien impresas y de apariencia fina.
- National, unit and tactical markings as well as white numbers. Nicely printed and apparently thin.
OPCIONES – OPTIONS:
- 1ª División Blindada polaca.
- Polish 1st Armored Division.
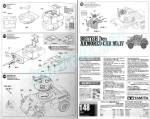
INSTRUCCIONES – INSTRUCTIONS:
-
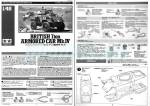
Folleto doblado impreso en blanco y negro de 8 páginas. Contiene 15 secuencias de construcción y una tabla de pinturas acrílicas de Tamiya. Una hoja separada muestra una breve reseña histórica sobre el vehículo en varios idiomas y perfiles para pintar y colocar las calcas. Claras y bien impresas.
-
8-page folded brochure printed in black and white. It shows 15 assembly steps and a table of Tamiya acrylic paints. A separate sheet includes a short historical introduction to the vehicle in several languages and profiles to paint and set the decals. Very clear and well printed.
LO MEJOR – THE BEST:
- Montaje sencillo. Incluye figura.
-
Easy assembly. Bonus figure.
LO PEOR – THE WORST:
- Ausencia de piezas transparentes para faros y periscopios.
- Lack of clear pieces for headlights and periscopes.
VALORACIÓN – CONCLUSION:
- Fácil de montar y, en general, bien detallada. Ideal para iniciados y novatos.
- Easy to assembly and, overall nicely detailed. Ideal for both the novice and the experienced modeller.

La maqueta
Esta es otra maqueta de la exitosa colección que Tamiya viene sacando desde hace alrededor de una década, más o menos. El éxito de la serie no parece estar tanto en los temas elegidos, la mayoría vehículos bien conocidos, y sí mucho en la sencillez de montaje combinada con las escasas piezas, que permiten que el peso del detalle vaya por fuera, pagando el precio de no tener nada en el interior. Para mí, lo mejor es que la mayoría de estas maquetas son perfectas tanto para el iniciado como para el novato. El más exigente siempre encontrará ausencias y partes peor replicadas, y las hay en ocasiones, pero en conjunto el concepto y la escala están bien pensados para pasar buenos ratos sin la habitual dispepsia que sufren algunos por la ausencia o presencia de tal o cual pieza o detalle. Un horror, pero peor para ellos.
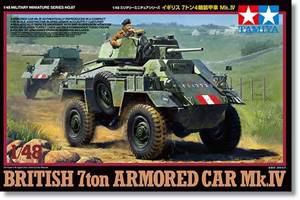
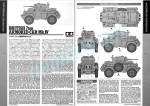
La caja de este Humber Mk.IV contiene tres bastidores, dos de ellos idénticos, una pequeña hoja de calcas, las instrucciones, con una hoja separada que muestra una nota histórica sobre el vehículo y perfiles para pintar y colocar calcas, y, finalmente, otra hoja suelta con consejos básicos para mecanizar, pegar y pintar las piezas.
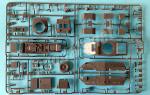
Las piezas aparecen correctamente moldeadas, sin restos especialmente visibles de plástico sobrante. Si uno se fija bien, sólo hay una tenue línea de molde en la rueda de repuesto. Marcas negativas hay bastantes, todas confinadas a zonas no visibles al terminar la maqueta.
Casco
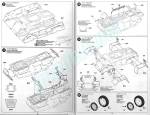
El casco completo del vehículo viene separado en seis partes: la mitad superior, la inferior, los lados completos y las planchas anterior y posterior. El interior está vacío. En esta ocasión, Tamiya decidió no moldear la parte inferior de metal, aunque parece que la idea original era hacerlo, ya que la unión de las dos mitades se realiza mediante tres cilindros huecos que sospecho irían unidos por tornillos, como en otras maquetas de la serie.
La mitad superior muestra huecos para la torre, la cubierta del motor y la mirilla del conductor, que está separada. La cubierta del motor viene en dos piezas separadas y superpuestas. Se echa en falta el hueco de ventilación posterior, situado en la pieza de abajo, y un par de asas laterales muy evidentes y que convendría añadir.
La inferior va semidetallada con parte del bastidor y lo poco visible del motor, además de las ballestas. El detalle no es mucho excepto en las ballestas, pero entra dentro de lo razonable para algo que no se ha de ver. Esta zona está detallada con piezas para los dos ejes, ambos dotados de sus correspondientes diferenciales, la barra de dirección en el eje delantero y la transmisión de una pieza, compuesta por la caja de transmisión, los ejes y sus juntas cardan. También disponemos del tubo de escape separado, un pequeño deflector que parece proteger el diferencia delantero, y de una plancha de protección trasera dotada con un cilindro cerrado cuyo uso no he podido averiguar, pero, según se puede comprobar, estaba presente en el Mk. IV. Todo está bien replicado y resulta fácil de montar.
Las planchas delantera y trasera son simples, esta última contiene la rejilla de ventilación del motor cuyas ranuras no vienen abiertas. Los prominentes enganches de fundición son simplones y no están abiertos. Lo mismo pasa con los dos de la parte delantera del casco. Los que quieran más detalle del que trae la maqueta, deberán sustituirlos.
Los lados encajan en lengüetas moldeadas en los bordes de la mitad superior del casco y, como señalan las instrucciones, debe dejarse un tenue reborde entre planchas. El montaje sigue sin parecer complicado, desde luego.
Suspensión y ruedas
Según las instrucciones, la siguiente operación es montar la suspensión, los guardabarros y las ruedas. Los grandes amortiguadores delanteros fijos vienen separados, unidos por arriba al casco y por abajo al eje delantero. Los traseros, van colocados horizontalmente sobre los guardabarros traseros y semejan bien los reales. Los guardabarros son piezas separadas, con los bordes exteriores biselados para conseguir más realismo, y están provistos de lengüetas para insertarlos a los lados del casco. Todos disponen, además, de las luces de gálibo.
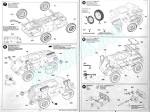
Las ruedas se han moldeado en dos piezas, con la llanta externa y el neumático de una parte, y de otra la llanta interna. La banda de rodadura está bien replicada, así como las llantas, especialmente la exterior, que muestra buena definición en los tornillos y el saliente central. Sólo falta el pequeño hueco de la válvula de llenado, detalle que tampoco quitará el sueño a la mayoría, supongo. La rueda de repuesto tiene el mismo despiece y detalle, con la salvedad de tener moldeado la cruceta del soporte central, dejando huecos los cuatro tornillos de ajuste al tambor de la rueda. Como he señalado arriba, hay una línea de molde muy fina en mitad de la banda de rodadura, pero desaparecerá con un lijado suave.
Detalles adicionales
Estos incluyen en el casco las asas de remolque delanteras y traseras, separadas, adecuadamente finas y con perfil correcto; diversas herramientas moldeadas con sus enganches; la bocina, el faro de visión nocturna, las asas de estiba delanteras y los retrovisores. Todos estas piezas muestran definición suficiente para la escala, salvo los dos enganches delanteros moldeados con el casco que he mencionado arriba.
Las características cajas de respeto y contenedores de combustible o agua están todas fabricadas aparte. El detalle me parece suficiente para su tamaño, aunque las asas no son ciertamente lo mejor.
Torre
Las piezas principales de la torreta son dos mitades y el frontal. Dentro no hay nada sino una pequeña base para colocar la figura si queremos hacerlo. La cubierta de la torre dispone de escotillas separadas, de las que hay que cortar la derecha si vamos a emplear la figura. El detalle copia bien el pliegue de la escotilla hacia detrás. En piezas separadas, también disponemos de las dos bases de las antenas y de la toma de aire situada en la parte delantera. Los periscopios, sin embargo, vienen moldeados con la torre y ahuecados, aunque no hay visores transparentes que colocarles. En cualquier caso, Tamiya nos ha dejado el hueco para poder ponérselos.
La pieza frontal de la torre tiene piezas internas que permiten elevar o bajar el cañón. Por fuera, el mantelete muestra buena definición, con huecos para pegar el tubo del cañón, que viene ya horadado, y la ametralladora coaxial, que se ha moldeado con el soporte. Los tubos lanzafumígeros están fabricados en cilindros ahuecados y el faro en dos piezas, con la lente opaca.
Figura
El comandante del vehículo está despiezado en cuatro partes: los brazos, el torso y la cabeza, tocada con boina. Se le ha intentado dar una pose no rígida, con el torso un poco girado a su derecha en gesto de observación, para lo cual Tamiya ha incluido unos prismáticos separados. El uniforme no presenta muy buena definición, pero los rasgos de la cara me parecen aceptables.
Calcas
No hay muchas, ya que esta edición sólo contiene un vehículo de la 1ª División Blindada Polaca presente en el Frente Occidental entre 1944 y 1945. La hoja incluye distintivos nacionales, de unidad y tácticos, además de números. Los motivos están, como de costumbre, muy bien impresos, mostrando buen registro y colores bien saturados.
Instrucciones
Están impresas en un folleto doblado impreso en blanco y negro de 8 páginas. Contiene 15 secuencias de montaje y una tabla de pinturas acrílicas de Tamiya. Una hoja separada muestra una breve reseña histórica sobre el vehículo en varios idiomas y perfiles para pintar y colocar las calcas. El montaje es fácil de seguir, con algunas ilustraciones de detalle en ciertos pasos, como es habitual en Tamiya.
Valoración
Como decía al inicio, el modelista va a disfrutar con esta maqueta, sencilla de montar sin quebraderos de cabeza. Por eso mismo, hay juego también para los menos experimentados. Cierto es que algunos detalles menores están mal copiados o sencillamente ausentes, y ahí es donde queda espacio para el inconformista. Una vez más, Tamiya ha pensado en todo.◊


The kit
This is another kit from the successful series Tamiya has been releasing from about a decade or so. The success of the series does not seem to lie so much in the vehicles chosen, most of them well-known ones, and much in the ease of assembly combined with the low parts count, which allow the bulk of detail to go outside, paying the price of an empty interior, of course. The best thing to me is that most of these kits are perfect for the beginner and the experienced alike. Most demanding modellers will always find missing or incorrect parts, but as a whole the concept and the scale are wisely chosen to have a good time without suffering the usual stomachache some have because of the absence or presence of a piece or detail. A nightmare, but so much the worse for them.
The box of this Humber Mk.IV contains three sprues, two of them identical, a small decal sheet, the instructions, with a separate sheet showing a historical note about the vehicle and profiles for painting and placing decals, and finally, another loose sheet with basic tips for cutting/sanding, gluing and painting the parts.
Pieces appear correctly molded, without visible flash or blemishes. If you look closely, there is only a very thin seam line on the spare tire. There are quite a few negative marks, all confined to non-visible areas when the model is finished.
Hull
The complete vehicle hull is molded in six parts: the upper half, the lower half, the hull sides, and the front and rear plates. The interior is empty. On this occasion, Tamiya decided not to make a metal lower hull, though it seems that the original idea was to do so, since the part is provided with three hollow pipes that I suspect would be joined by screws, as in other kits of the series.
The upper half shows gaps for the turret, the engine deck and the driver’s sight, which is separate. The engine deck comes in two separate, overlapping pieces. The rear ventilation hole, located in the bottom piece, and a pair of side handles are missing and at least the latter should be added by the modeller as they are too evident.
The lower half is semi-detailed with part of the chassis frame and the engine bottom side, in addition to the leaf springs. Detail is not great except on the leaf springs, but it is acceptable for something which won’t be seen. This area is detailed with pieces for the two axles, both molded with the differentials, the steering bar on the front axle and the one-piece transmission, made up of the transmission case, the axles and their cardan joints. We also have a separate exhaust pipe, a small deflector that seems to protect the front differential, and a rear protection plate equipped with a closed cylinder that I ignore what it was used for, but, as can be seen in preserved Humbers, it was present in the Mk. IV. Everything is nicely rendered and easy to build.
The front and rear hull plates are simple, the latter contains the engine ventilation grille that shows closed slats. The prominent cast hooks are plain and closed. The same goes for the two on the hull front. Those who want more detail than the kit offers, should replace them.
The sides snap into molded tabs on the edges of the hull upper piece, and as instructions show, a slight bevel should be left between plates. Assembly still does not seem complicated, of course.
Suspension and wheels
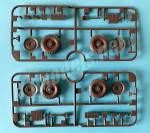
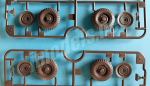
As per instructions, the next step is to build the suspension, fenders and wheels. The large fixed front shock absorbers are separated, attached to the hull above and to the front axle below. Rear fenders are placed horizontally and they look the part. The fenders are separate pieces, with the outer edges beveled for more realism, and are provided with tabs to insert into the hull sides. All the fenders are molded with small clearance lights.
The wheels are molded in two pieces, with the outer rim and tire on one side and the inner rim on the other. The tread is correctly rendered, as well as the rims, especially the outer one, which shows good definition on the bolts and the central section. The only thing missing is the small hole in the filling valve, a detail that won’t make you sleepless, I suppose. The spare wheel has the same breakup and detail, with the exception of having the crosslike support molded on, leaving holes for the four adjustment screws to the wheel drum. As I noted above, there is a very thin seam line in the middle of the tread that will disappear with a light sanding.
Additional detail
This includes separate front and rear towing handles on the hull looking suitably thin and with the correct profile; several tools molded with their brackets; the horn, night vision headlamp, front stowage handles and mirrors. All of these pieces show good definition for the scale, except for the two front hooks that I mentioned above.
The characteristic spare boxes and fuel or water containers come separately. Detail seems enough for its size, though the handles are certainly not the best.
Turret
The main pieces of the turret are two halves and the front. Inside there is nothing but a small base to place the figure if we want to use it. The turret roof has separate hatches, with the right one to be cut if we are to make use of the figure. Detail renders quite well the fold of the hatch backwards. There are separate pieces for the two antenna bases and the ventilator located at the front. The periscopes, however, come molded with the turret and empty and there are no clear pieces for the visors. In any case, Tamiya has left us the gap to include them if we wish.
The turret front side has internal parts that allow the gun barrel to be raised or lowered. On the outside, the mantlet shows good definition, with holes to glue the barrel, which is already drilled, and the coaxial machine gun, molded with the support. The smoke launchers are made of hollowed-out cylinders and the spotlight comes in two pieces, with an opaque lens.
Figure
The commander of the vehicle is broken into four parts: arms, torso and head, wearing a beret. Tamiya has tried to give it a non-rigid pose, with his torso slightly turned to his right in a gesture of observation. To convey this, we also have separate binoculars included. The uniform does not show very good definition, but the face features seem acceptable to me.
Decals
There are not many, as this edition contains only one vehicle from the 1st Polish Armored Division present on the Western Front between 1944 and 1945. The sheet includes national, unit and tactical badges, as well as numbers. Decals are, as usual, very well printed, showing good registration and well-saturated colors.
Instructions
They are printed on an 8 page black and white printed folded booklet. It contains 15 assembly sequences and a Tamiya acrylic paint chart. A separate sheet shows a brief historical overview of the vehicle in several languages and profiles for painting and setting the decals. Assembly is easy to follow, with callouts in some steps for specific attention to detail, as usual in Tamiya.
Conclusion
As I said at the beginning, the modeller will surely enjoy this model, easy to assemble without headaches. For this reason, there is also room for the less experienced. It is true that some minor details are poorly copied or simply absent, and that is where detailers play their role too. Once again, Tamiya has thought of everything.◊
Actualizado – Updated: 4 / 2022
Publicado – Published: 1 / 2022
©www.jmodels.net


Debe estar conectado para enviar un comentario.