
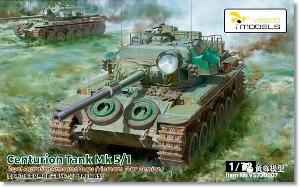
De un vistazo – Quick look
MATERIAL Y PIEZAS
MEDIA & PARTS:
- Plástico inyectado (273 piezas), plástico transparente (2 piezas), aluminio torneado (1 pieza), varilla metálica (4 piezas), fotograbado (49 piezas).
- Injected plastic (273 parts), clear plastic (2 parts), turned alumimium (1 part), metalic rod (4 parts), photo-etched (49 parts).
CALCAS – DECALS:
- Insignias de unidad, numerales, matrículas y logotipos. Aspecto fino y brillante. Nítidas con buen registro. Sin soporte excesivo.
- Formations signs, tank numbers, logos and plates. Thin and glossy finish. Sharp with good registration. No surplus carrier.
OPCIONES – OPTIONS:
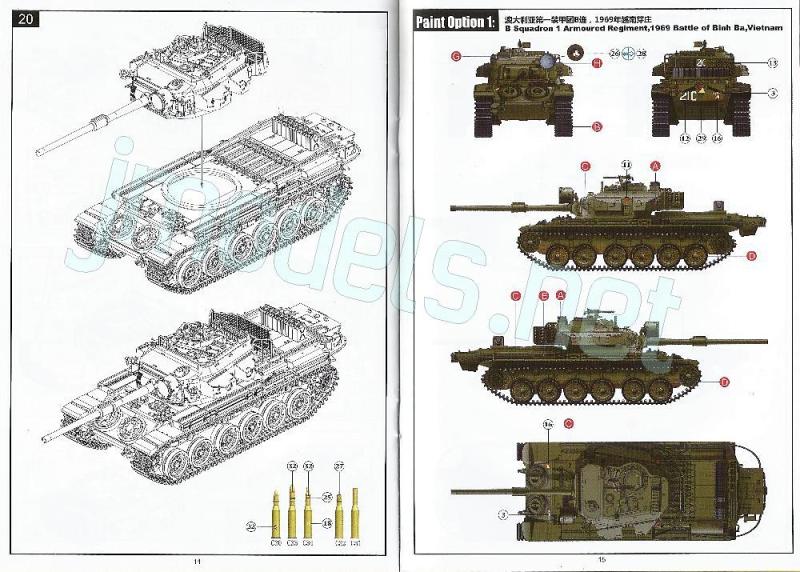
- Centurion Mk 5/1. Australian Army. 1st Armored Regiment. B Squadron. Battle of Binh Ba (Vietnam), 1969.
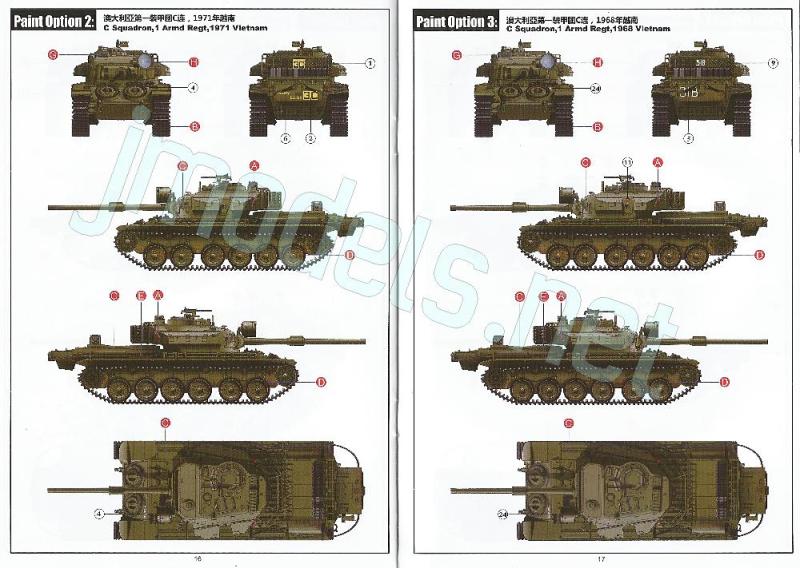
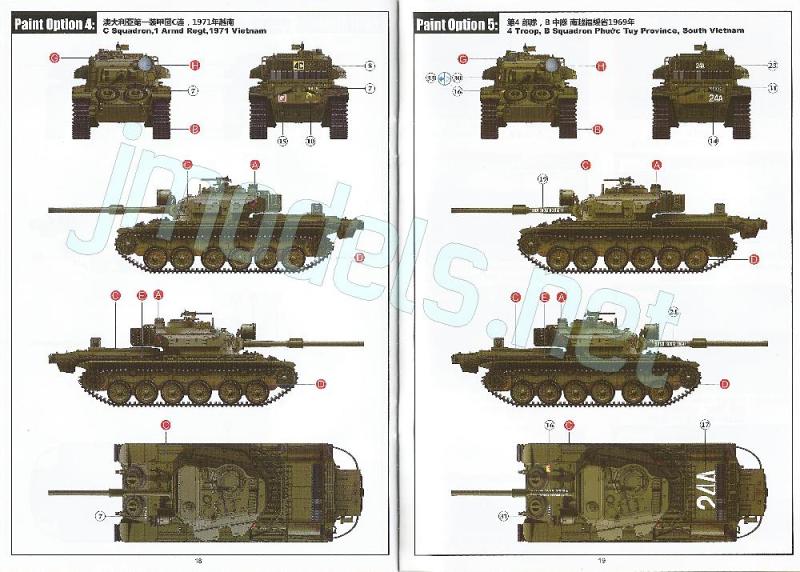
- Centurion Mk 5/1. Australian Army. 1st Armored Regiment. C Squadron. Vietnam, 1971.
- Centurion Mk 5/1. Australian Army. 1st Armored Regiment. C Squadron. Vietnam, 1968.
- Centurion Mk 5/1. Australian Army. 1st Armored Regiment. C Squadron. Vietnam, 1971.
- Centurion Mk 5/1. Australian Army. B Squadron. 4 Troop. Phước Tuy Province (South Vietnam).
INSTRUCCIONES – INSTRUCTIONS:
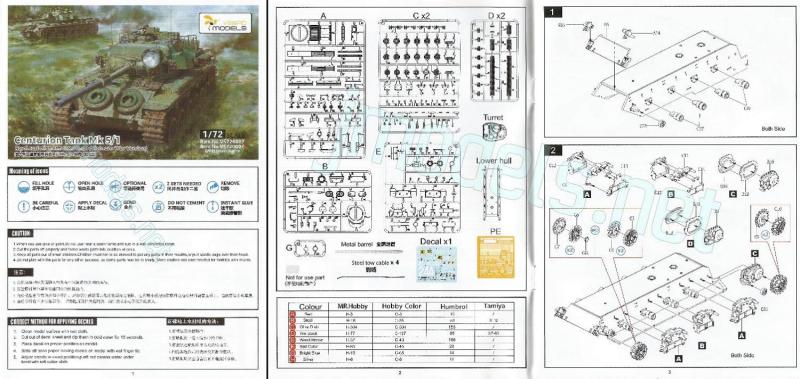
- Folleto A5 de 20 páginas impreso en papel satinado. Contiene un plano numerado de piezas, una tabla de colores con pinturas equivalentes de varios fabricantes, 20 capítulos de montaje y 5 páginas de perfiles.
- 20-page A5 booklet printed in color on satin paper. It contains a numbered parts plan, a color chart with paint matches in several ranges, 20 assembly steps and 5 pages of profiles.
LO MEJOR – THE BEST:
- Excelente detalle general. Alternativas de montaje.
- Excellent overall detail. Assembly choices.
LO PEOR – THE WORST:
- Algunas piezas diminutas y frágiles. Carece de antenas.
- Some tiny brittle parts. Lack of antennas.
VALORACIÓN – CONCLUSION:
- Maqueta multimedia de notable calidad en el detalle, sin nada que envidiar a las de escala mayor. No es difícil de montar, pero necesita habilidad en ciertos momentos.
- A multimedia kit with remarkable attention to detail, rivaling those of larger scales. It is not difficult to assemble, though it skill some skill at certain stages.

La maqueta
En 2022 y 23 Vespid Models lanzó un par de versiones del famoso carro Centurión en la escala 1/72. Además de la maqueta que describo aquí, Vespid puso a la venta un Mk 5/1 del 4th Royal Tank Regiment desplegado en Berlín en los años 60. Las dos cajas cuentan con ediciones especiales, cuya única diferencia es que incluyen el mantelete con lona impreso en 3D.
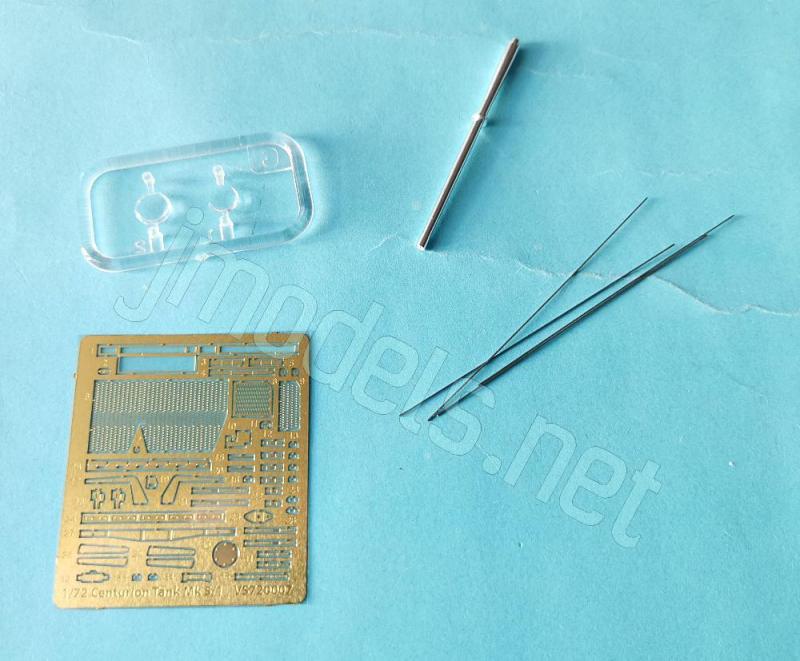
La maqueta comprende siete bastidores, un bastidor transparente, la parte inferior del casco y la superior de la torre separadas, una plancha de fotograbados, cuatro varillas de acero que simulan los cables de remolque, un cañón de aluminio, las calcas y las instrucciones. Como se deduce del recuento, la maqueta no le envidia nada a otra de escala diferente, salvo el tamaño. Las piezas están moldeadas con buena definición, carecen de marcas visibles y muy pocas traen cilindros del eyector.
La secuencia de construcción del modelo no tiene novedades, ya que sigue el tradicional proceso de tantas otras maquetas de carros: comienza por la suspensión y acaba en la torre. La mayor dificultad de la maqueta será tal vez el tener que lidiar con piezas muy pequeñas y frágiles. Las alternativas de montaje ofrecen reemplazar algunos detalles por piezas de fotograbado y el cañón por otro de aluminio. Además, todas las escotillas de los tripulantes pueden colocarse abiertas.
Los acabados no tienen variedad salvo en las calcas. Todos los carros de esta edición pertenecen al Ejército australiano y se emplearon durante el conflicto de Vietnam a finales de los años 60 e inicios de los 70.
Reseña
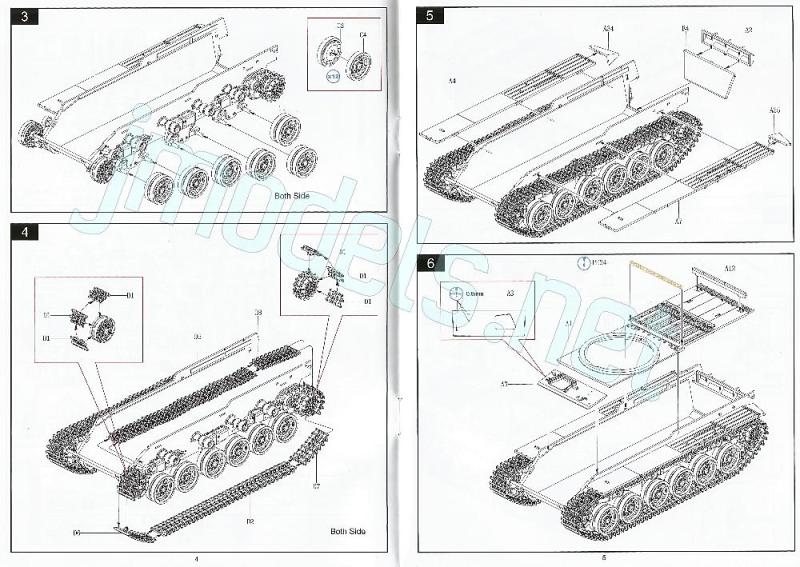
La parte inferior del casco viene en una sola pieza sin las planchas delantera y trasera. Sobre la plancha inferior hay algunos accesos bien grabados. Al comenzar la construcción se pega la plancha inferior delantera del casco, los ejes de las ruedas tensoras así como todos los rodillos de retorno, cada uno de doble rueda y moldeados en una sola pieza. El primer rodillo de retorno de cada lado va pegado sobre un eje unido al casco.
Las cubiertas de los diferenciales constan de tres piezas superpuestas, la más externa con un detalle muy bueno y un rodillo extra pegado sobre ella. Las ruedas tensoras y tractoras son dobles y muestran un detalle nítido tanto en los dientes como en el detalle de los cubos. Las tensoras tienen doble opción, con diferencias en los radios y el detalle interno de la rueda. Una de las alternativas trae la cubierta central del eje separada, sin embargo las instrucciones no indican las más apropiadas en cada caso ni se aprecian diferencias en los perfiles de las últimas páginas.
Los tras carretones de la suspensión en cada lado están formados por tres piezas superpuestas. Los carretones centrales son ligeramente diferentes a los de los extremos de cada lado, pero igualmente constan de dos ruedas. Las ruedas son dobles y muestran un detalle excelente tanto en las bandas de caucho como en su centro. Las ruedas internas tienen el mismo nivel de detalle que las externas, lo que indica que el fabricante no ha flojeado en el detalle.
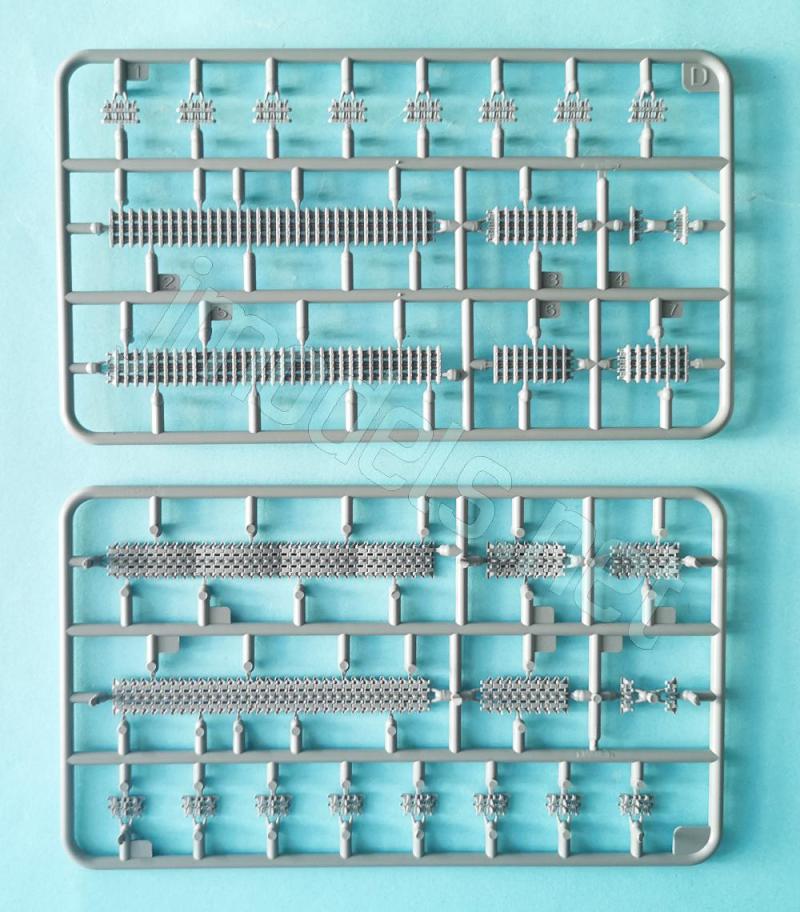
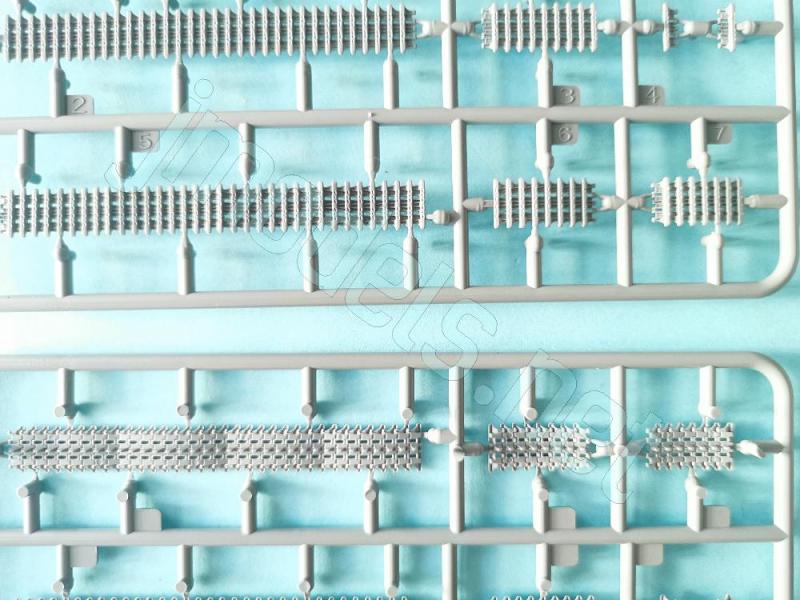
Las cadenas están separadas en diez tramos más un eslabón suelto por banda. El eslabón y los dos tramos más cortos están destinados a ceñir las ruedas y los dos superiores están moldeados con un perfil sinuoso bien simulado. El detalle de los dientes y eslabones es muy nítido, carece de marcas y los espacios entre eslabones están todos correctamente ahuecados.
Terminadas la suspensión y las cadenas, se añaden los guardabarros y la plancha inferior trasera. Los extremos de los guardabarros están separados y los lados inferiores tienen tres marcas de eyector, algunas en ligero relieve, que tal vez haya que lijar para que no se noten. Para terminar el casco, se pegan también la plancha superior del casco, separada de la parte delantera que incluye la escotilla del conductor. Curiosamente, la plancha del glacis, que está moldeada con la parte delantera de los guardabarros, las sigue después.
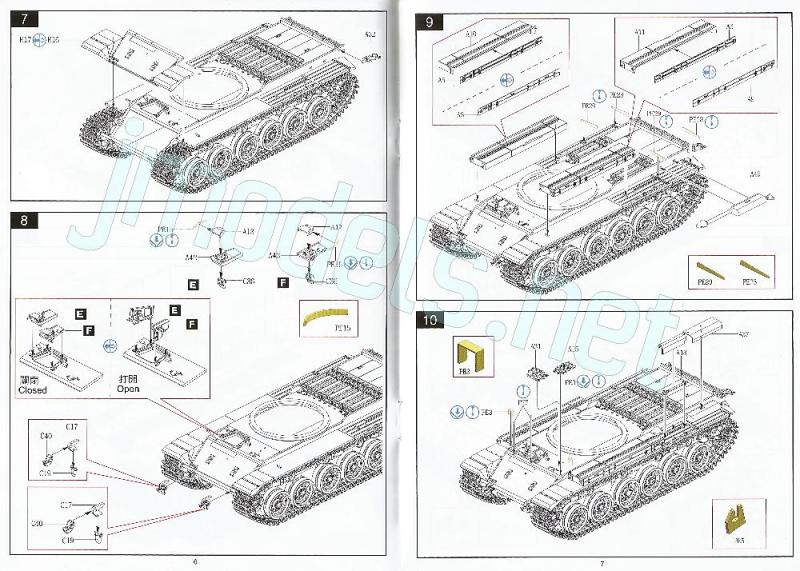
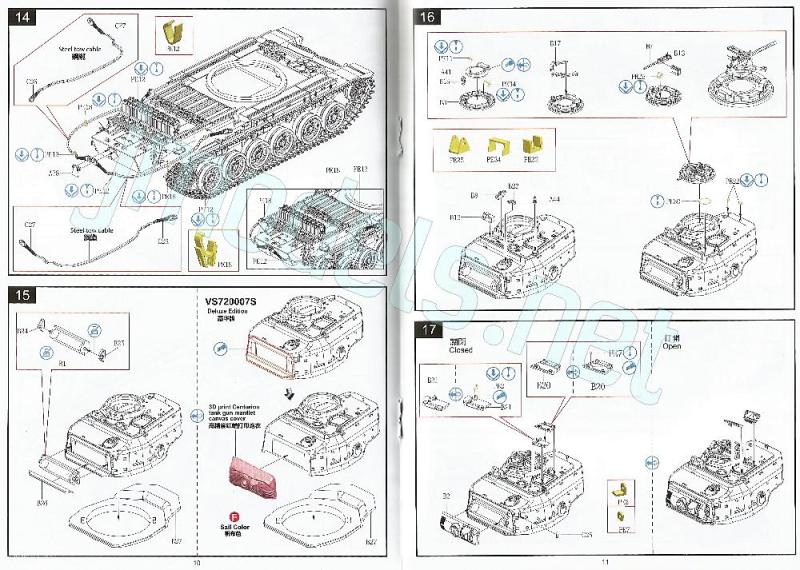
La parte delantera del casco y el glacis contienen dos ganchos de remolque, dos ruedas y dos tramos de cadenas de repuesto, los soportes de los guardabarros y un par de enganches de fotograbado más la escotilla del conductor. Las tapas, los periscopios no transparentes y sus cubiertas vienen separados como si se tratase de una maqueta de escala mayor.
Sobre los guardabarros hay que colocar los soportes de fotograbado, varias cajas de respeto con alternativas en sus caras externas de fotograbado para afinar el detalle, algunas herramientas y los tubos de escape más sus cubiertas aparte.
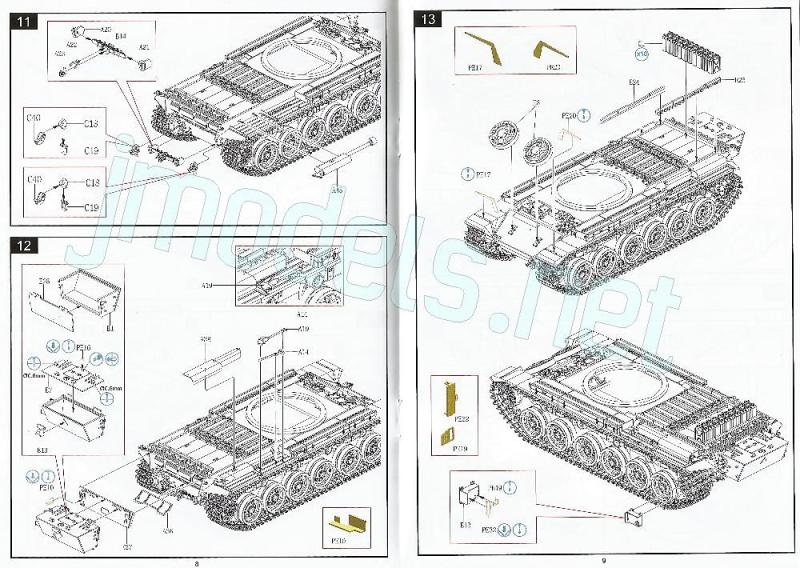
La cara posterior del casco lleva ganchos de remolque complementados con pequeñas argollas por debajo, y una gran caja de estiba con varios fotograbados diminutos que le mejoran el detalle. La caja del teléfono de comunicación con la infantería aparece sobre un lado y también lleva dos cierres de fotograbado. Montar los cables de remolque en la parte posterior puede ser un pequeño reto en esta maqueta y le va a exigir a la motricidad fina del modelista. Cada cable consta de dos varillas metálicas superpuestas y texturizadas simulando el perfil trenzado en cada unidad. Los ojales son de plástico, con un espacio mínimo para pegar los extremos. Veo también difícil horadarlos para insertar los cables por este motivo. Los tramos llevan abrazaderas para sujetarlos y enganches al casco de fotograbado con un tamaño pequeño y difícil de manipular.
La cubierta del motor muestra un detalle definido y lleva varios contenedores de combustible muy bien reproducidos en la parte posterior.
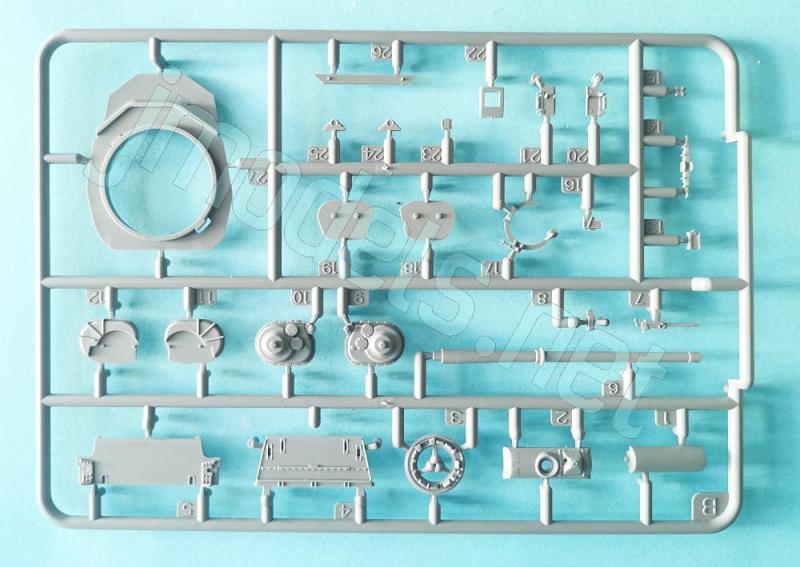
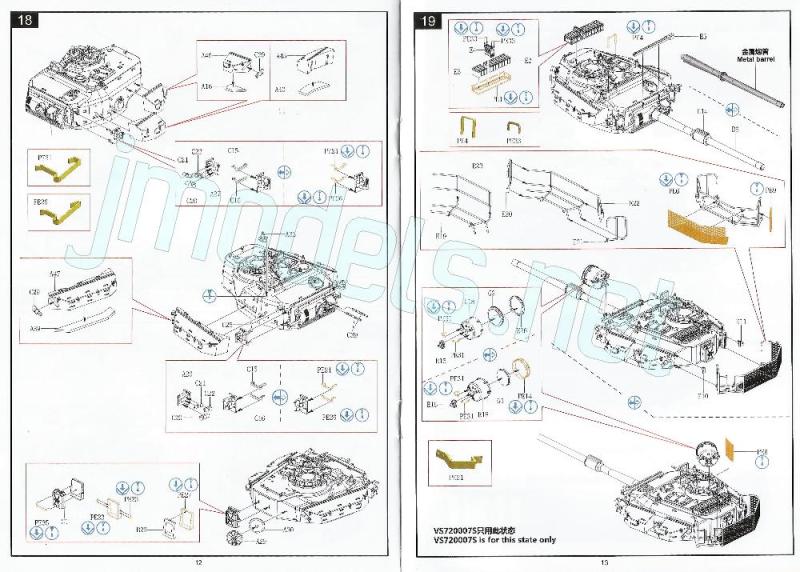
El montaje de la torre es bastante extenso para la escala de la maqueta. La base con el anillo viene separada del resto. La parte interna del mantelete del cañón consta de cuatro piezas, una de ellas dotada de muñones para poder mover el cañón. El arma tiene doble opción (de plástico o fotograbado) en ambos casos con el extractor de humos aparte y la boca horadada. La cubierta del mantelete está separada del resto. La pieza muestra buen detalle en los dos cañones de las ametralladoras coaxiales.
La cúpula del comandante está reproducida en una anillo moldeado con los visores perimetrales y la cubierta del periscopio de fotograbado. La tapa y el afuste de la ametralladora vienen aparte. El arma está bastante bien reproducida y lleva la caja de munición exenta. La escotilla del artillero tiene la tapa doble separada, pero hay más elementos que pegar sobre el techo, como diversas cajas de munición con su baca de fotograbado, una base de antena, el periscopio del artillero y el foco. Este consta de seis piezas, tiene la lente transparente y el anillo exterior posee una alternativa de fotograbado. El foco puede montarse en la parte delantera de la torre o bien estibado en la cesta trasera. La maqueta no trae antenas, pero pueden hacerse de plástico.
Los característicos lados de la torre del Centurión están reproducidos como cajas de respeto separadas. Los lanzadores de fumígeros llevan los tubos moldeados en pares y los soportes de fotograbado. En la parte posterior aparecen un carrete de cable y un contenedor de agua con su soporte también de fotograbado. La cesta posterior la forman tres piezas muy finas con la malla de fotograbado.
El fabricante incluye varios proyectiles de distinto tipo y vainas vacías como complemento para una posible escena.
La hoja de calcomanías muestra insignias de unidad, numerales, matrículas y logotipos, todos ellos con una apariencia fina y brillante, buena nitidez y registro. Carecen de exceso de película de soporte.
El folleto de instrucciones tiene un formato A5 y consta de veinte páginas impresas en color sobre papel satinado. Contiene un plano numerado de piezas, una tabla de colores con pinturas equivalentes de Mr Hobby, Hobby Color, Humbrol y Tamiya, veinte capítulos de montaje y cinco páginas de perfiles. En general las secuencias de montaje son bastante explícitas y no ofrecen problemas para identificar piezas ni cómo colocarlas. Las alternativas de construcción están bien identificadas.
Los acabados de pintura son similares, sin camuflaje, y se diferencian en las calcas solamente. Todos los carros pertenecieron al 1er Regimiento Blindado australiano desplegado en Vietnam entre 1968 y 1971
Valoración
Sin duda el Centurión de Vespid contentará al modelista habituado a escalas mayores. Montada de caja, la maqueta no es en realidad difícil, pero claramente tiene fases donde la paciencia y la habilidad serán puestas a prueba.
La maqueta está avalada por su pulcra presentación, un detalle concienzudamente reproducido en el material más adecuado por lo general y unas secuencias de montaje ordenadas razonablemente. Si la edición no es la mejor que tenemos de este carro en este momento, merece serlo.◊

The kit
In 2022 and 2023, Vespid Models released two boxes of the famous Centurion tank in 1/72 scale. In addition to the kit described here, Vespid released a Mk 5/1 representing a vehicle from the 4th Royal Tank Regiment deployed to Berlin in the 1960s. Both kits ae also released as special editions that differ only by the inclusion of a 3D-printed mantlet with a canvas cover.
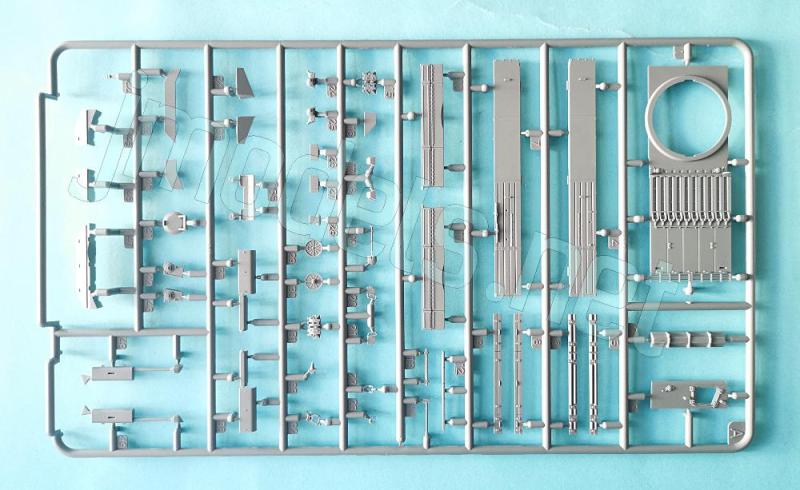
The kit comprises seven sprues, one clear frame, a separate lower hull and upper turret, a photo-etched fret, four steel rods for the tow cables, an aluminum gun barrel, the decals, and the instructions. As this list suggests, the kit has nothing to envy those in larger scales in every aspect except size. Parts are crisply molded, free of visible marks, and only have some ejector nodules.
The assembly sequence follows the standard process typical of many other tank kits: starting with the suspension and finishing with the turret. The main challenge lies in handling some tiny PE and fragile parts. Assembly options allow for replacing certain details with photo-etched parts and the gun barrel with an aluminum alternative. Additionally, all crew hatches can be posed open.
There is little variation in finishing options, save for the decals. All tanks in this release belonged to the Australian Army and saw service during the Vietnam War in the late 1960s and early 1970s.
Review
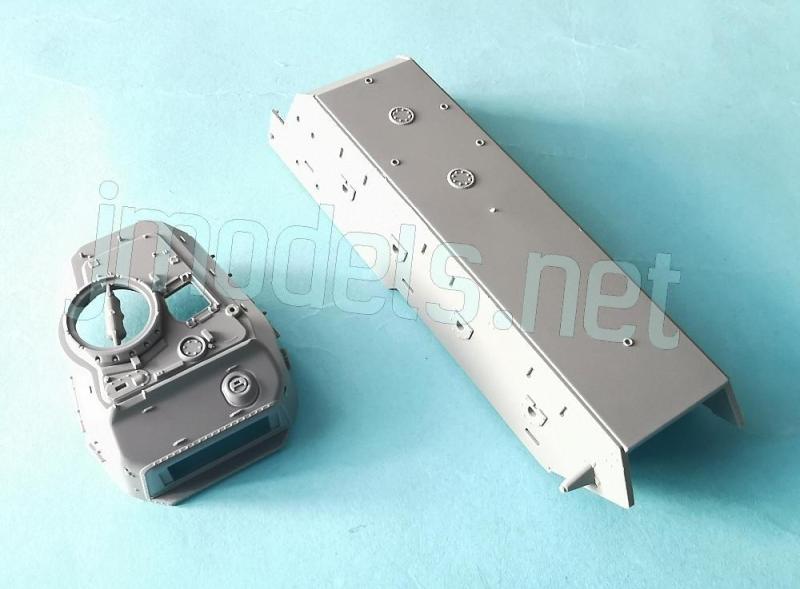
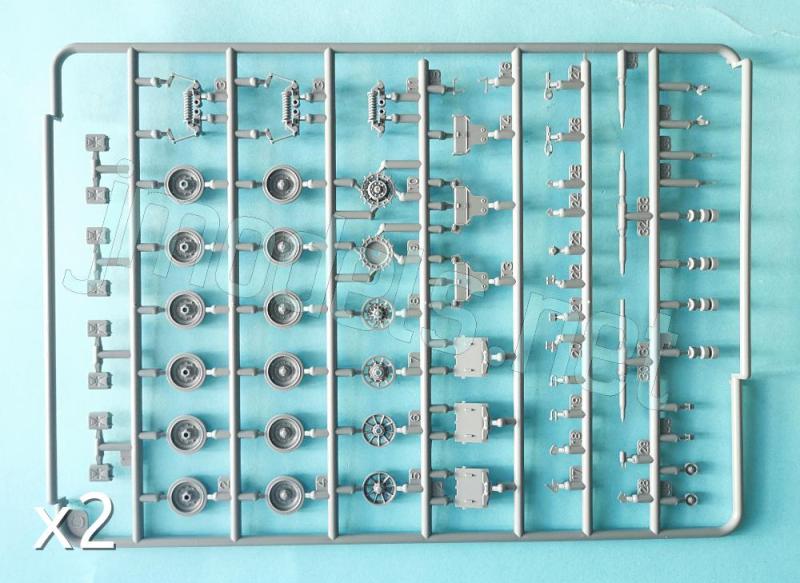
The lower hull comes as a single piece, excluding the front and rear plates. The lower hull plate features some well-molded access panels. Assembly begins by attaching the front lower hull plate, the idler wheel axles, and all the return rollers, each consisting of a pair of wheels molded as a single unit. The first return roller on each side attaches to an axle molded with the hull.
The differential covers consist of three overlapped parts; the outer one features excellent detail and has an additional roller attached to it. The idlers and sprockets are double-wheeled and show crisp detail on both the teeth and the hubs. There are two options for the idler wheels, differing in their spokes and hub detail. One option includes a separate central axle cap; however, the instructions do not specify which version is appropriate in each case, nor are the differences apparent in the profiles shown on the final pages.
The three suspension bogies on each side are made up of three parts. The central bogies differ slightly from the end bogies on each side but also consist of two wheels. These are double wheels featuring excellent detail on both the rubber tires and the wheel hubs. The inner wheels match the outer wheels in detail, demonstrating that the manufacturer did not skimp on quality.
The tracks are broken down into ten lengths plus one loose link per side. The single link and the two shortest lengths are designed to contour the drive sprockets and idler wheels, while the two upper runs are molded with a well-simulated sag. The detail on the teeth and links is very crisp and free of blemishes, and the gaps between the links are all correctly hollowed out.
Once the suspension and tracks are finished, the fenders and the lower rear plate are attached. The fenders are provided in three pieces with the ends separate. The fenders undersides show three ejector pin marks, some slightly raised, that may need sanding to hide them. To complete the hull, the upper hull plate is glued in place; it is separate from the front section that includes the driver’s hatch. Interestingly, the glacis plate, molded with the front fenders, is installed after the two-piece upper hull plate.
The front hull and glacis feature two towing hooks, two spare road wheels and track lengths, the fender supports, a pair of photo-etched tie-downs, and the driver’s hatch. The hatch covers, solid periscopes, and their guards are provided as separate parts, much like in a larger-scale kit.
Photo-etched brackets are attached on the fenders, along with several stowage boxes (featuring optional photo-etched outer sides for better detail), various tools, and the exhaust pipes with their separate covers.
The rear hull includes a hitch, towing hooks complemented by small shackles underneath, as well as a large stowage box enhanced with tiny photo-etched parts. The infantry communication phone box is located on one side and also includes two photo-etched latches. Mounting the towing cables at the rear can be a bit of a challenge with this kit, requiring good modeling skills from the modeler. Each cable consists of two overlapping metal rods featuring a textured surface that simulates the braided appearance. The eyelets are made of plastic and offer very little space for attaching the cable ends; for this reason, drilling them out to insert the cables would also be difficult. The cable lengths
feature photo-etched clamps and brackets for the hull that are tiny and tricky to handle.
The engine deck features crisp detail and includes several well-reproduced fuel containers at the rear.
Turret assembly is quite extensive for the model’s scale. The base ring is a separate part. The gun mantlet’s internal assembly consists of four pieces, one of which includes trunnions to allow the gun to move. The main gun offers a choice of plastic or photo-etched parts; in both cases, the fume extractor is a separate piece and the muzzle is hollowed out. The mantlet cover is separate from the rest of the assembly. The part features good detail on the coaxial machine gun barrels.
The commander’s cupola is rendered as a ring molded with perimeter vision blocks and a photo-etched periscope cover. The hatch cover and machine gun mount are separate parts. The weapon is well-reproduced and includes a separate ammunition box. The gunner’s hatch has a separate two-part cover, but there are additional elements to attach to the roof, such as various ammo boxes with a photo-etched rack, an antenna base, the gunner’s periscope, and the spotlight. This consists of six parts; it features a clear lens, and the outer ring offers a photo-etched alternative. The spotlight can be mounted on the front of the turret or stowed in the rear basket. The kit does not include antennas, though they can be built from plastic.
The Centurion’s distinctive turret sides are reproduced as separate stowage bins. The smoke grenade launchers feature tubes molded in pairs and photo-etched mounts. The rear section includes a cable reel and a water container with a photo-etched rack. The rear basket is formed from three very fine parts and has photo-etched mesh.
The manufacturer includes different types of projectiles and empty shell cases to enhance potential diorama scenes.
The decal sheet features formation signs, tank numbers, registrations, and logos; all are crisp and glossy, with excellent sharpness and registration, and show no excess carrier film.
The instruction booklet is printed in A5 format and consists of twenty pages in color. It includes a numbered parts plan, a color chart with equivalent paints from Mr. Hobby, Hobby Color, Humbrol, and Tamiya, twenty assembly steps, and five pages of profiles. Assembly sequences are very clear, making it easy to identify and position the parts. Construction options are explicitly shown.
The paint schemes are similar, featuring no camouflage, and differ only in the decals. All the tanks belonged to the Australian 1st Armoured Regiment, deployed to Vietnam between 1968 and 1971.
Conclusion
The Vespid Centurion will undoubtedly satisfy most AFV modelers, even those used to larger scales. Built straight from the box, the kit is not particularly difficult, though there are certainly stages where patience and skill will be put to the test.
The kit stands out thanks to its neat presentation, details meticulously reproduced in generally well-chosen materials, and a logical assembly sequence. If this is not be the absolute best version of this tank currently available in this scale, it certainly deserves to be.◊
Publicado – Published: 10 / 2026
©www.jmodels.net


Debe estar conectado para enviar un comentario.