
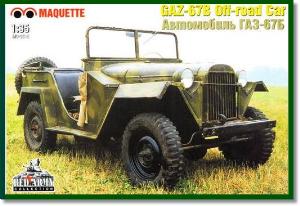
De un vistazo – Quick look
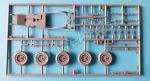
MATERIAL Y PIEZAS
MEDIA & PARTS:
- Plástico inyectado (73 piezas).
- Injected plastic (73 pieces).
CALCAS – DECALS:
- No tiene.
- Not included.
OPCIONES – OPTIONS:
- GAZ-67B pintado en color 4BO.
- GAZ-67B painted overall 4BO.
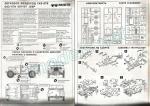
INSTRUCCIONES – INSTRUCTIONS:
- Una hoja de tamaño A4 impresa en blanco y negro. Muestra un sumario histórico sobre el todoterreno, un plano numerado de piezas, 7 secuencias de montaje y perfiles del modelo terminado. Sencillas de seguir en general, aunque la localización de algunas piezas no está del todo clara y tiene omisiones.
- A-4 sheet printed in black and white. It shows a historical summary about the vehicle, a numbered parts plan, 7 assembly steps and profiles of the finished model. Easy to follow but location of some parts is not very clear and omit the attachment of some pieces.
LO MEJOR – THE BEST:
- Nada que señalar.
- Nothing to be noted.
LO PEOR – THE WORST:
- Grosor de muchas piezas. Ausencia de motor. No incluye parabrisas, faros ni toldo.
- Thick plastic parts. Lack of an engine. Windshield, lenses and tarpaulin not included.
VALORACIÓN – CONCLUSION:
- No es la mejor maqueta hoy para representar el vehículo. Necesita mejorar o sustituir muchas piezas.
- Not the best choice to build the vehicle today. It needs improvement and replacement in many parts.

La maqueta
Después de la veterana maqueta de Tamiya, AER Moldova sacó su GAZ-67 allá por los años 90, un molde que fue reeditado por otras marcas del Este europeo como Maquette y casi seguramente, aunque no puedo afirmarlo con rotundidad, por Eastern Express, MSD y Parc Model. Hace menos tiempo apareció el molde de Trumpeter, el mejor hasta hoy, si bien para los que no gustan de ese material, tiene el defecto de incluir los neumáticos de vinilo.
El origen en AER Moldova se aprecia en esta maqueta no sólo en su factura, sino también en el logotipo de la marca grabado en una de las piezas y en los pasos de montaje, que son idénticos a los de la maqueta de AER. La caja contiene tres bastidores de piezas y la hoja de instrucciones. No hay hoja de calcas ni pieza transparente alguna.
El plástico es poco flexible y muestra cierta dureza. Las piezas en su gran mayoría están moldeadas con demasiado grosor y algunas incluso con los vástagos demasiado cercanos a los lados del bastidor, por ello costará un poco seccionarlos, sin embargo no hay marcas visibles y las superficies están bastante limpias, con la excepción de las rebabas presentes en las líneas de molde de los neumáticos y el tubo de escape. Limpiar piezas no será, pues, la principal tarea al montar esta maqueta, sino más bien refinar algunas o directamente sustituirlas.
En cuanto a finura en el detalle, hay que señalar que esta maqueta se parece a un GAZ-67 como un huevo a una cebolla y que, por tanto, no hay que buscarle muchos razonamiento a por qué es mejor evitarla. Puestos a montarla, seguramente el modelista volverá a los viejos tiempos en los que no le daban todo hecho y sabrá apreciar las grandes ventajas de las maquetas de hoy, por defectuosas y caras que resulten, comparadas con muchas de hace unas décadas.
Chasis, suspensión y ruedas
El bastidor del chasis está moldeado de una pieza con un hueco para el lugar donde debería estar el motor y la caja de cambios, cuya presencia sólo se intuye por el relieve en la parte inferior. El eje delantero es de una pieza y está detallado con el diferencial en mitades, que muestran un hueco para introducir el eje de transmisión hacia la caja de cambios auxiliar, y una fina barra estabilizadora. La suspensión se completa con dos medias ballestas por lado con las abrazaderas bien marcadas.
En el eje trasero los diferenciales y el árbol de la transmisión se montan de la misma forma, pero en este lado las ballestas son más largas. El último travesaño del chasis lleva un paragolpes y el gancho de remolque, que es algo grueso y debe limpiarse de restos de plástico. El escape incorpora el silenciador y viene en una pieza que muestra líneas de molde y el tubo de salida sin horadar.
Las ruedas son de plástico y todas idénticas. A decir verdad, uno podría esperarlas peores. Los neumáticos traen líneas de molde y los discos de las llantas son claramente erróneos, pues los característicos huecos se han moldeado en relieve. Los bujes están mejor conseguidos para las ruedas traseras, pero, al ser todos iguales, los delanteros también son erróneos. Los filos de las llantas aparecen bien marcados. Los neumáticos muestran las muescas laterales un poco exageradas y por supuesto no hay dibujo en la banda de rodadura.
Interior
El suelo interior viene en una sola pieza que incluye la cubierta interior de los guardabarros traseros y en el centro del habitáculo delantero la cubierta de la caja de cambios. La pieza no incluye el lado trasero de la carrocería, que está moldeado como pieza separada.
En la zona delantera hay una pieza para el salpicadero que muestra el parco instrumental en relieve y con formas parecidas al real. También encontramos dos pedales separados (el acelerador está moldeado con el suelo), el freno de servicio y la palanca de marchas, que es rotunda y muy gruesa. También el volante es excesivo en grosor, aunque no tanto en tamaño. Del parabrisas sólo encontramos el grueso marco, si bien la pieza muestra un rebaje en su lado interno que indica, como lo señalan las instrucciones, la colocación del cristal. Esta pieza deberá ser fabricada por el modelista. Tampoco hay piezas para los limpiaparabrisas. Los asientos delanteros se componen de dos soportes, el asiento y el respaldo cada uno. En la zona trasera hay sólo un asiento de una pieza cuyo respaldo parece demasiado alto. Todos los asientos son lisos y no están texturizados. Del toldo al menos se ha incluido el bastidor plegado, que no está mal y podría servir, aunque la pieza no es del todo correcta.
Carrocería
Los lados de la carrocería vienen completos y van pegados al suelo del vehículo. Hay un par de asas a cada lado que son inservibles y deben sustituirse. El contorno de los guardabarros no está del todo mal de tamaño y forma, e igualmente poseen los bordes biselados, pero son gruesos.
Los guardabarros delanteros van situados sobre los lados del chasis. Entre ellos hay que colocar el morro, que es una pieza muy gruesa plana en su interior y con la calandria moldeada con las rejillas del radiado en su interior. El capó viene en dos piezas, una base que incluye perfiles rebajados para colocar los faros y la tapa del motor que muestra las características pestañas de sostén y el tapón de llenado del depósito. El paragolpes viene separado y detallado con los dos garfios de remolque. Los faros carecen de lentes y deben ser afinados por dentro.
La plancha trasera de la carrocería muestra el faro trasero moldeado en la pieza, la rueda de repuesto y su soporte. El perfil de la plancha trasera está en ángulo con los lados de la carrocería en lugar de ser redondeado como en el referente real.
Instrucciones
Están impresas en blanco y negro en una hoja de tamaño A4 que muestra un sumario histórico sobre el vehículo, un plano numerado de piezas, 7 secuencias de montaje y perfiles del modelo terminado que enseñan un vehículo pintado en verde 4BO. Los colores tienen denominación genérica y únicamente se señala al color FS 14151 como tono más próximo.
La hoja es sencilla de seguir en su mayor parte, aunque omite la adición del paragolpes delantero y la localización de algunas piezas no está del todo clara. Por eso es conveniente estudiarlas bien y realizar más comprobaciones de las habituales.
Valoración
El modelo terminado de caja debe guardar un remoto parecido con el automóvil de referencia debido al molde tan escasamente refinado de AER. Por ello el modelista debe sustituir o hacer por su cuenta muchos de los detalles de este vehículo para mejorar la maqueta.
Actualmente la opción de Trumpeter es la menos mala de cuantas hay en esta escala, que tampoco son muchas para este vehículo tan conocido. Incluso la vieja maqueta de Tamiya puede ser mejor opción que esta de Maquette y de otras con origen en AER. Si el tamaño no es muy importante, recomiendo la maqueta de Tamiya a escala 1/48.◊


The kit
After the old Tamiya GAZ-67, AER Moldova was the next company to release a new kit of this Russian car back in the 1990s. This kit was reboxed by other Eastern European manufacturers such as Maquette and almost certainly, though I can’t say for sure, by Eastern Express, MSD and Park Model. Trumpeter’s pick is the last one and the best to date, with the only drawback for some modellers of including vinyl tires.
The kit I review here shows its origin in AER Moldova with the brand logo molded on one of the pieces and in the assembly steps seen in the instructions sheet, which are identical to those of AER. The box contains three grey sprues and the instruction sheet. There is no decal sheet or clear sprue.
Plastic is not a bit stiff and somewhat hard. Most of the pieces are molded too thick and some even have the gates too close to the frame sides, so it will be a bit difficult to take them out from the sprues. On the positive side, there are no visible marks and surfaces apperar fairly clean, with the exception of some flash and seam lines present on the tires and the exhaust pipe. Cleaning up parts will not be, therefore, the main task when assembling this kit, but rather refining some or directly replacing them.
In terms of finesse in detail, it should be noted that this kit resembles a GAZ-67 like an egg to an onion and, therefore, you do not have to look for many reasons to convince yourself it is better to avoid it. If you happen to store it in your stash and wants to build it anyway, you will probably return to the old days of modelling when companies did not give you everything done and will appreciate the great advantages of today’s kits, no matter how defective and expensive they may be, compared to many from a few decades ago.
Chassis, suspension and wheels
The chassis frame is molded in one piece with an empty space where the engine and gearbox should be. Their presence is only suggested on the underside. The front axle is one piece and is detailed with the differential in halves, showing a hole to insert the driveshaft to the auxiliary gearbox, and a thin stabilizer bar. The suspension also comprises two half-leaf springs per side with defined clamps.
On the rear axle, the differential and the transmission shaft are built in the same way, but the leaf springs are longer. The last cross member of the chassis has a bumper and the towing hook, which is a bit thick and needs to be cleaned up. The exhaust includes the muffler and comes in one piece showing mold lines and the undrilled tailpipe.
The wheels are made in plastic and all the same. Being honest, they could be worse. The tires have mold lines and the rim discs are clearly wrong, as the characteristic holes have been molded raised. The hubs are better achieved for the rear wheels, but, being all the same, the front ones are also wrong. The rim edges are cleanly defined. The tires show no tread pattern and the sipes on the shoulders look a bit too deep.
Interior
The interior floor comes in one piece that includes the inner sides of the rear fenders and the gearbox cover in the middle of the front passenger compartment. The part does not include the rear body side, which is molded separately.
In the front area there is a piece for the dashboard that shows raised gadgets with shapes more or less similar to the real ones. We also find two separate pedals (the accelerator is molded with the floor), the service brake and the gear lever, which is very thick. The steering wheel and the windshield frame are also too thick, though not so much in size. The windshield frame has a recess on the rear side that indicates the placement of a clear part as shown in the instructions, but the glass is missing and must be scratchbuilt by the modeller. There are also no parts for the windshield wipers. The front seats are made up of two base frames, the seat and the backrest each. In the rear area there is only a one-piece seat with a backrest that looks too high. All the seats are flat without texture. At least the tarpauling folded frame has been included, which is not that bad and could be used, though the piece is not completely correct.
Body
The body sides come in one piece each and are attached to the car floor. There are a couple of handles on each side that are useless and need replacement. The fenders aren’t all that bad in size and shape, and they still have beveled edges, but they are not thin enough.
The front fenders are located on the chassis sides. Between them you have to place the front side, which is a very thick flat piece with the grille molded on the outside. The hood comes in two pieces comprising a base that includes lowered profiles to place the headlights and the engine cover that shows the characteristic holding tabs and the filler cap. The bumper comes separately and is detailed with two towing hooks. The headlights lack the lenses and must be thinned inside.
The rear body plate shows a molded-on taillight, the spare wheel and the bracket. The rear plate profile is angled in the corners rather than rounded as in the real thing.
Instructions
They are printed in black and white on an A4 size sheet including a historical summary about the vehicle, a numbered parts plan, 7 assembly sequences and profiles of the finished model showing a vehicle painted in 4BO green. The colors have generic names and only the color FS 14151 is indicated as the closest one for the 4BO.
The sheet is easy to follow for the most part, although it omits the addition of the front bumper and the location of some parts is not very clear, so double-checking is more than advisable.
Conclusion
From the box, the model should bear a remote resemblance to a GAZ-67 due to AER’s very poorly refined tooling. For this reason, the modeller will need to replace or scratchbuild many pieces to improve the kit. Time and effort are also worth considering.
Currently the Trumpeter kit is the best at the scale. Even the old Tamiya oldie may be a better choice than the AER/Maquette kit. But if size is not very important, I recommend you the Tamiya 1/48 scale kit.◊
Actualizado – Updated: 4 / 2022
Publicado – Published: 4 / 2022
©www.jmodels.net


Debe estar conectado para enviar un comentario.