

De un vistazo – Quick look
MATERIAL Y PIEZAS
MEDIA & PARTS:
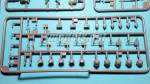
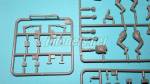
- Plástico inyectado (camión, 380 piezas; figuras, 149 piezas; cajas de munición, 84 piezas), plástico transparente (8 piezas), fotograbado (43 piezas).
- Injected plastic (truck, 380 parts; figures, 149 parts; ammo boxes, 84 parts), clear plastic (8 parts), photoetched (43 parts).
CALCAS – DECALS:
- No tiene.
- Not included.
OPCIONES – OPTIONS:
- GAZ AAA Modelo 1941. Invierno / Winter, 1942.
- GAZ AAA Modelo 1941. Verano / Summer, 1942.
INSTRUCCIONES – INSTRUCTIONS:
- Libreto tamaño A4 de 16 páginas impreso a color en papel satinado. Contiene plano de piezas, tabla de colores con equivalencias en varias marcas, 63 secuencias de montaje de la maqueta, más 2 del armamento de las figuras y 6 de las cajas de munición, y guía para pintar todos ellos. Muy claras y bien editadas.
- 16-page A4 brochure printed in color on satin paper. Contains a parts plan, a table of colors with equivalents in several paint ranges, 63 assembly steps for the kit, plus 2 for the crew´s weapons and 6 for the ammo boxes as well as a guide to paint all of them. Very clear and neatly edited.
LO MEJOR – THE BEST:
- Muy buen detalle general. Opciones de montaje. Extra de figuras y carga.
- Very nice overall detail. Building choices. Figures and load included.
LO PEOR – THE WORST:
- Piezas delicadas. Pocas opciones de pintura. El número de piezas puede aburrir.
- Delicate brittle parts. Painting choices. Parts count may be boring for some.
VALORACIÓN – CONCLUSION:
- No va más para hacer un GAZ de tres ejes. El bono de figuras y carga hacen esta edición más completa. A cambio, el montaje será largo y requiere cuidado en algunas fases. Para modelistas con cierta experiencia.
- Probably the best detailed choice to build a three-axles GAZ truck. The bonus of figures and load rounds it off. In return, assembly will be longer and needs care in some steps. For modellers with some experience.

Hoy voy a hacer una pequeña cata en la serie que MiniArt le ha venido dedicando al camión ruso GAZ de tres ejes en varios modelos y variantes.
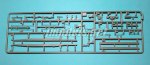
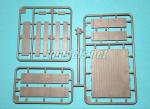
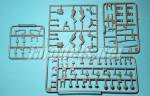
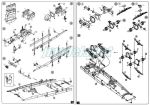
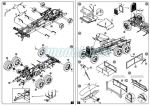
La maqueta representa un camión estándar de carga del Modelo 1941, diferenciado de otros modelos por la ausencia de elementos de la carrocería como las puertas, el techo de la cabina o la eliminación de uno de los faros para ahorrar materiales. Esta edición incluye además una combinación de seis figuras. Dos de ellas proceden de la caja denominada World War II Drivers (referencia 35137) y las otras cuatro de la caja de figuras Soviet Soldiers Riders (referencia 35144), incluida la figura del carrista, que en este caso está fuera de lugar. Al objeto de proporcionar una carga para el vehículo, MiniArt ha incluido también una mezcla de cajas de munición procedentes de las ediciones Soviet 152-mm. Ammunition (referencia 35076) y Soviet 85-mm. Shells w/Ammo Boxes (referencia 35079). Todo esto eleva el total de piezas a más de 600, repartidas en unos 45 bastidores de diverso tamaño, la mayoría pequeños y algunos repetidos. La caja de la maqueta trae también un bastidor transparente, una plancha de fotograbados y las instrucciones.
El plástico está bien moldeado y su dureza tiende ligeramente a blanda. MiniArt ha encontrado un equilibrio conveniente en sus moldes que le permite fabricar piezas de todos los tamaños con gran definición y limpieza, por ello carecen de rebabas y apenas contienen líneas de molde. Las marcas que he encontrado se restringen a zonas no visibles, como el lado inferior de los guardabarros y el techo que, en cualquier caso, habría que tapar por si acaso. Hay piezas realmente pequeñas y finas en los bastidores que necesitan extremo cuidado al cortarlas por ser delicadas y frágiles.
Como en otros vehículos del estilo, el montaje comienza por el chasis y el motor. Este último está bien detallado e incluye cuatro piezas para el bloque motor y varias piezas aparte para el ventilador, la correa de transmisión, el motor de arranque, la bomba de aceite y de gasolina, el colector de escape, etc. En su parte trasera también hay dos piezas para la caja de cambios. El tubo de escape es fino y se compone de dos piezas, una de ellas moldeada con el silenciador. El radiador comprende dos mitades separadas con el tapón de relleno aparte. Un diminuto fotograbado simula el logotipo del fabricante.
Los largueros laterales del bastidor vienen en dos piezas prolongadas y unidas mediante grapas muy finas de plástico a dos largueros de refuerzo en la parte trasera. Hay varios travesaños moldeados de una pieza, uno de ellos formado por la caja de transferencia, compuesta de tres piezas.
Los dos ejes traseros se han dividido en secciones separadas, unidas a los diferenciales, que vienen en dos mitades más otras tres piezas para detallarlos. Los ejes disponen a cada lado de dos ballestas superpuestas, fabricadas por separado. Hay que cuidar la alineación de las piezas para que el bloque de los ejes traseros quede plano y nivelado. El montaje de los ejes en el bastidor debe estudiarse bien, pues el árbol intermedio entre los diferenciales hay que pegarlo después de los ejes. El resto del árbol de la transmisión viene en dos secciones unidas por juntas cardan al diferencial delantero y a la caja de transferencia. Los ejes traseros llevan juntas elásticas y tambores de freno separados.
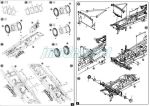
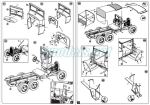
El eje delantero tiene su respectiva barra tensora y brazos de la dirección en piezas separadas, más una ballesta y barras rígidas en V. El eje también tiene juntas elásticas separadas sin tambores de freno para las ruedas delanteras.
Las ruedas están despiezadas en varios bastidores idénticos. Las llantas vienen de una pieza y muestran gran definición en el detalle. Los neumáticos están fabricados en dos mitades compuestas a su vez de tres anillos en la parte externa y de cuatro en la interna. Este sistema de MiniArt, aunque tedioso, permite fabricarlos de plástico y conseguir un magnífico detalle en la banda de rodadura. En esta maqueta hay que montar ocho neumáticos, más otros dos de repuesto.
La cabina se compone de ocho piezas principales. Hay un suelo con palancas de marcha y freno, así como pedales separados. Parte del asiento está moldeado en el suelo y la mitad superior muestra el tejido texturizado. El parabrisas dispone de un marco con refuerzo intermedio separado y dos piezas transparentes y finas para los cristales. El limpiaparabrisas se compone de tres piezas y su escobilla es de fotograbado. Tres pequeñas piezas de este material permiten mostrar el parabrisas abierto como opción de montaje. El parabrisas ha de pegarse a la sección fija del capó, a la que hay que añadir el tapón del depósito de la gasolina y el panel sobre el que va pegado el parco salpicadero. Esta sección fija tiene dos piezas laterales separadas y ajusta por delante con el panel del motor, cuya parte delantera hay que detallar con varias piezas. Al pegar la parte delantera de la cabina ha de cuidarse el ajuste de la columna de dirección, que viene en dos secciones separadas, con soporte y volante separados también.
La pared trasera de la cabina incluye el respaldo del asiento por separado y el techo está detallado con un par de perfiles laterales de fotograbado. Las puertas de este modelo se han reemplazado por dos paneles fijos que cubren sólo en parte el habitáculo y que vienen detallados con pequeños enganches de fotograbado para la lona de protección. La lona aparece enrollada en dos piezas a cada lado dejando ver el interior. A los lados de la cabina hay dos ruedas de repuesto. Ambas incluyen las barras de soporte, compuestas de cuatro piezas más un tornillo o tuerca de ajuste de la rueda al soporte.
Los guardabarros vienen de una pieza y son bastante finos. Incluyen los pescantes, detallados con planchas que simulan madera con el veteado grabado muy fino. Los soportes de los pescantes vienen separados y unidos al chasis.
El capó puede mostrarse abierto o cerrado. Hay dos soportes interiores separados bajo el capó que servirán de guía para disponer las piezas que lo forman. Las cuatro piezas del capó son sorprendentemente finas, están limpias de marcas, además de mostrar magnífica definición en las bisagras y las rejillas laterales, que son finas y vienen abiertas. Los laterales están detallados con asas y cierres de fotograbado y enganches de plástico muy fino se pueden poner en posición abierta o cerrada de acuerdo con la posición del capó.
Por delante del radiador hay una fina barra de soporte para los faros. En este modelo sólo hay uno, que tiene el cristal separado en pieza transparente. Junto al radiador hay que pegar la bocina, que tiene su propio soporte aparte. La luz trasera también está bien detallada y se compone de cinco piezas (dos de ellas de fotograbado) pegadas a la parte posterior del chasis.
Moviéndonos ahora hacia la parte posterior del camión, la caja de carga va montada sobre dos travesaños. Uno de ellos, el central, va unido al chasis. La caja se compone básicamente de un suelo y cuatro lados que muestran la tablazón bien definida y con fino grabado en el veteado de la madera. Aunque la caja carece de bastidores para el toldo, el suelo sí lleva los enganches para sujetarlo representados en pequeñas y finas piezas separadas. Las paredes de la caja están también detalladas con los cierres en piezas de fotograbado. Hay también piezas para formar la caja de respeto trasera cuyos cierres son de plástico. Con pequeñas modificaciones en los cierres, cualquiera de los tres lados de la caja puede mostrarse abierto.
Como decía arriba, MiniArt ha incluido varias cajas de munición como carga para el camión. Estos añadidos proceden de cajas ya editadas antes por separado denominadas Soviet 152-mm. Ammunition y Soviet 85-mm. Shells w/Ammo Boxes. En el primer caso las cajas, que simulan bien la madera y el interior separado por paneles, contienen dos tipos de proyectiles de 152 mm. con vaina propelente separada. Las instrucciones los identifican como proyectiles de fragmentación OF-540 y anti-hormigón G-530. Las cajas de proyectiles de 85 mm. vienen en cajas de diferente tipo, pero similares en la imitación de la madera. La munición es igualmente de dos tipos: proyectiles de fragmentación UO-365K y perforantes UBR-365, ambos modelos deben pertenecer a la dotación de carros de combate como el T-34/85 o el cañón autopropulsado SU-85.
Figuras
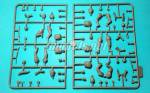
La maqueta incluye siete figuras procedentes de las cajas mencionadas arriba (World War II Drivers y Soviet Soldiers Riders). En la primera está incluida también la figura de carrista que no procede usar en esta maqueta. Tampoco parece muy adecuada la figura de uno de los conductores que simula manejar un tractor con las manos en las palancas de marcha. Las demás figuras representan a cuatro fusileros y un conductor despiezados en cabezas, brazos, piernas y torsos. Las poses son relajadas y todas ellas se muestran sentadas. Los uniformes, de verano, y los rostros están bien definidos para ser de plástico. El equipo individual viene por separado y se compone de cascos y gorras, mochilas, cantimploras, palas, cananas de munición y hasta cucharas. El armamento es variado y representa subfusiles PPSh-41 con tambor de munición aparte, carabinas Mosin-Nagant Modelo 1938, rifles de francotirador Mosin-Nagant PU 91/30 y rifles Mosin-Nagant 91/30. Estas armas llevan cierres y bayonetas en piezas separadas y el arma del francotirador tiene la mira aparte.
Las instrucciones están impresas a color en buen papel satinado en un libreto de tamaño A4. Muestran una tabla de colores para las figuras, el armamento, la munición y el camión con referencias de Vallejo, Testor, Tamiya, Humbrol, Revell, Mr. Color y Life Color, 63 pasos de montaje de la maqueta, otros dos para el armamento de las figuras y seis para las cajas de munición. También hay una guía a color para pintar el camión y montar y pintar las figuras. Las secuencias de montaje son muy claras y el folleto es un modelo de edición que contiene información relevante para el modelista tanto en lo referente a la pintura como a la identificación de las armas y municiones. Las opciones de pintura que podemos ver no son muy originales. Tan sólo muestran dos camiones en colores de verano e invierno, y por este lado la edición flojea un poco, aunque los modelistas experimentados pueden encontrar camuflajes con más aliciente.
Si, como parece, este es el nivel de las demás ediciones del GAZ-AAA que MiniArt ha ido sacando con el tiempo, podemos estar ante un molde definitivo a la escala. Poco margen de mejora les va a quedar a otros fabricantes después de que MiniArt haya puesto en circulación este molde tan dilatado y extenso en modelos y variantes, con y sin extras. Aunque el despiece es muy alto y ciertas piezas son pequeñas y muy delicadas, el nivel de detalle que el fabricante ha logrado es realmente destacable. La adición de las figuras y la carga aumentan el valor de esta edición, que puede resultar demasiado complicada y larga de terminar para el modelista menos experto.◊


Today I am going to have a look at one of the kits in the Russian GAZ truck series MiniArt have been releasing in several models and variants in the last years.
The kit renders a standard Model 1941 truck which differed from other types by the absence of some body parts, such as the doors, the cabin roof or one of the headlights to save valuable materials. This edition also includes a combination of six figures, two of them coming from a previously released set called World War II Drivers (MiniArt reference 35137) and the other four from a similar set named Soviet Soldiers Riders (MiniArt reference 35144). A tanker figure from this latter release is included in the kit too, though it seems quite out of place for the topic. MiniArt has also included some ammo boxes as a load for the truck. The boxes come from two different releases: Soviet 152-mm. Ammunition (reference 35076) and Soviet 85-mm. Shells w/Ammo Boxes (reference 35079). All this makes for a total parts count of more than 600 pieces in no less than 45 sprues, most of them small and some identical. The kit also has a clear sprue, a PE set and the instructions.
The quality of the moulding is really good and plastic is a bit on the soft side. MiniArt have found a suitable balance in their molds that allows them to build all kinds of parts with a great definition and cleanness. For this reason, parts have no flash and just a few slight seam lines. The pin marks I have found are on apparently non-visible spots as on the bottom side of fenders and the cabin roof. These last should be filled just in case they could be seen once the model is finished. There are also very small and brittle pieces that will need extreme care when taking them out from the sprues.
As in other vehicles of its type, assembly starts with the chassis and the engine. This is well detailed and has four pieces for the engine block and the oil sump as well as separate piece for the ventilator, belts, generator, oil pump, exhaust manifold, etc. There is also a two-piece gearbox to be install behind the engine. The exhaust pipe comes in two parts, one of them molded with the muffler. The radiator is made up of two parts with separate filler cap. A tiny PE piece renders the GAZ logo on the radiator front.
The chassis beams come in two long pieces joined by means of brackets and U bolts to two reinforcement beams on the rear section. There are also several cross members molded in separate parts, one of them including the transfer case, which is made up of three pieces.
The two rear axles have been molded in two sections joined to the differentials, which come in halves with a few pieces molded apart to detail them. There are two double leaf spring units on both sides for the axles, with each leaf spring molded as one piece. Careful alignment of the rear suspension is needed to get levelled rear axles and even wheels on the ground. Attachment of the axles on the frame also needs a careful study since the middle drive shaft in between the differentials should be added after the axles are in place. The rest of the drive shaft is molded in two sections with cardan joints to fit the front differential and the transfer case. The rear axles also have separate brake drums and joints.
The front axle has its own steering and stabilizer bars plus a leaf spring and a V yoke in separate pieces. There is also a couple of joints but no brake drums for the front wheels.
Wheels come in several identical sprues. The one-piece hubs show great definition in detail. The tyres are molded in separate ring “slices”, with four of them for the inner tyre half and three for the outer half. This system is a bit tiring, but in return you get a perfectly detailed tread pattern. In this kit you need to build eight wheels, plus two spare wheels.
The cabin comprises eight main parts. There is a floor with gear and brake levers as well as separate pedals. A part of the seat is molded with the floor and the top half shows texturized fabric. The windscreen comes in a separate frame with a crossbar molded separately and two clear parts for the panes. The wiper is made up of three pieces with a PE brush. The windscreen can be posed open or closed by means of tiny PE brackets and it is to be glued to the upper cowling, detailed with a separate filler cap. Careful alignment is needed to add the two body panels and the inner small dashboard, which shows some raised instruments. When attaching the front firewall, care is also needed to add the steering column, molded in two different lengths, with the steering wheel as a separate piece too.
The cabin rear wall includes the seat backrest molded separately and the roof is detailed with two side PE mouldings. The doors in this truck model have been replaced by two side panels that partially cover the door gap and are detailed with small PE pegs for the tarps. These are molded as rolled pieces and they let the interior be seen. On both cabin sides there are two spare wheels with separate holders comprising four pieces and a screw or nut fitting the wheel to the holder.
The fenders come as separate pieces and are quite thin. The parts are molded with the running boards and these show wooden planks with very thin engraved grain. The fender supports are separate and are glued to the chassis.
The hood can be showed open or closed. There are two supporting rods under the hood that are used to set the side panels in place. The four hood panels are outstandingly thin, clean and defined and the side pieces also have thin open louver slits. Some small PE handles and latches are used to detail the sides and the latter can be posed open or close according to the position of panels.
In front of the radiator there is a thin bar between the fenders to attach the headlights. In this model there is only one which is provided with a separate clear lens. Next to the radiator we also find a horn with separate holder. The tail light is also a separate item made up of five PE and plastic pieces attached to the rear frame.
Moving on to the rear tray, we find three cross support beams, the one in the middle being attached to the chassis and the other two to the tray underside. The tray comprises five parts, one floor and four sides, showing nide definition on the wood planking. Though there is no tarp or frame for it, the sides have small separate pegs to hold it. The walls are also provided with PE locks. There are some pieces to build the rear storage box, but the locks are made in plastic. Any side could be showed open with just a few modifications.
As stated above, MiniArt have included some ammo boxes as a load. These come from previous boxes released separately as Soviet 152-mm. Ammunition and Soviet 85-mm. Shells w/Ammo Boxes. In the first case, the ammo boxes, which show a nice rendition of the wooden surfaces and the interior panels, have two kinds of 152mm shells with sabots molded apart. The instructions identify them as OF-540 fragmentation shells and anti-concrete G-530 shells. The 85mm ammo boxes have different boxes and also include two types of ammunition, namely HE UO-365K and armor-piercing UBR-365 projectiles, both models probably belong to T-34/85 tanks or SU-85 SPGs
Figures
The kit includes seven figures coming from the sets mentioned above (World War II Drivers and Soviet Soldiers Riders). Apart from the tanker figure, there is a figure of a tractor driver molded with hands in gear levers that does not fit the truck. The rest of the figures represent four infantrymen and a driver broken down in heads, arms, legs and torsos. Poses are relaxed and all of them appear sitting. Summer uniforms and the faces are well defined for plastic. The personal equipment comes as separate pieces and comprises a wide range of gear, such as helmets and caps, backpacks, canteens, spades, ammo poaches and even spoons. Weapons are varied and range from PPSh-41 submachineguns with separate ammo drums to Mosin-Nagant Model 1938 carabins, Mosin-Nagant PU 91/30 sniper rifles and Mosin-Nagant 91/30 rifles. All of them have separate bolts, bayonets and sights.
The A4 instructions booklet is printed in color on good satin paper. It shows a table of colors for the figures, weapons, ammo and truck in Vallejo, Testor, Tamiya, Humbrol, Revell, Mr. Color and Life Color paints, plus 63 construction steps for the kit, two for the weapons and six for the ammo boxes. There is also a guide to paint the truck and another one to build and paint the figures. Exploded views are very clear and the booklet is informative, containing relevant information for painting and about the weapons and ammunition included. Paint choice is not very original and shows two trucks painted in overall summer and winter color, and this may be the weakest point in this release. Anyway, an experienced modeller may always find other attractive non-standard paint schemes for the kit.
If, as it seems, this is the level of the rest of MiniArt GAZ-AAA kits, we may be facing a definitive tooling at the scale. Little room for improvement will probably remain for other manufacturers after all the models and variants, with and without figures, MiniArt have released. Although parts count is very high and some pieces are small and very delicate, the level of detail is truly remarkable. The addition of figures and the ammo load add to the value of this edition. However, the inexperienced modeller may find it too complicated and time-consuming to complete.◊
Actualizado – Updated: 4 / 2022
Publicado – Published: 12 / 2020
©www.jmodels.net


Debe estar conectado para enviar un comentario.