

De un vistazo – Quick look
MATERIAL Y PIEZAS
MEDIA & PARTS:
- Plástico inyectado (73 piezas), fotograbado (1 pieza), cadenas en plástico DS (2 piezas).
- Injected styrene (73 parts), PE (1 part), two lengths of DS tracks.
CALCAS – DECALS:
- Hoja pequeña con numerales y marcas de unidad. Finas y bien impresas.
- Tiny sheet including numerals and unit markings. Thin and well printed.
OPCIONES – OPTIONS:
- Carro con numeral 101, Isla Kwajalein, 1944.
- Carro con numeral 105, Papúa Nueva Guinea, 1944.
- Carro con numerales opcionales (601-604), Papúa Nueva Guinea, 1944.
- «101» tank, Kwajalein Island, 1944.
- «105» tank, Papua New Guinea, 1944.
- Choice for «601» – «604» tank, Papua New Guinea, 1944.
INSTRUCCIONES – INSTRUCTIONS:
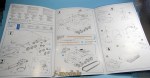
- Folleto doblado de seis páginas en color. Contiene diagrama de despiece, seis pasos generales de montaje, opciones de calcas y pintura y referencia de colores. Muy bien impresas y claras.
- Six-page folded leaflet printed in colour. It shows parts plan, six main assembly steps, decal and painting options and colour reference. Very well printed and clear.
LO MEJOR – THE BEST:
- Detalle general, ajuste de piezas, montaje sencillo. Flotadores opcionales. Escotillas de la torreta y de la torre desechable de vadeo en piezas separadas.
- Overall detail, fitting of parts, easy assembly. Optional pontoons. Separate parts for hatches in turret and commander’s splash-guard.
LO PEOR – THE WORST:
- Cadenas DS (ver texto). Ajuste de la cúpula del comandante.
- DS tracks (see text). Fitting of commander’s cupola.
VALORACIÓN – CONCLUSION:
- Muy buena maqueta. Sin complicaciones de montaje y pintura que compensan el precio.
- Very good kit. Easy building and painting which largely compensate for its price.

Los modelistas aficionados a los carros a esta escala nos hemos visto beneficiados por el nuevo impulso que Dragón le ha dado a su catálogo en tiempos recientes. A cambio de un precio más elevado, la calidad de las maquetas y su presentación suelen compensar el apretón al bolsillo. Este Ka-mi no es una excepción.
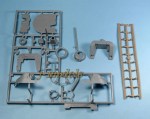
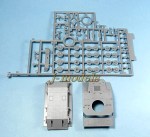
La maqueta comprende dos bastidores de mediano tamaño, el casco del carro en dos piezas separadas, un pequeño fotograbado para fabricar el protector del tubo de escape, las calcas, las instrucciones y dos secciones de plástico DS para las cadenas. Como es de esperar, la calidad del molde es muy buena, las piezas no presentan rebabas ni marcas evidentes de eyector y su encaje es de muy bueno a perfecto. Los numerosos detalles (escotillas, remaches, etc.) de la parte superior del casco, la torreta y los flotadores están en general muy bien representados.
El carro puede montarse con o sin flotadores y para esto último disponemos también del equipo de vadeo de la torre y de la entrada de aire del motor. En la parte inferior del casco, el tren de rodaje está fabricado en piezas separadas con la excepción de las ruedas de los bogies que vienen en dos piezas unidas a sus brazos. Igualmente son piezas separadas las hélices y sus ejes en la zona posterior. El frontal con el mantelete de la ametralladora es una pieza separada que encaja perfectamente pese a su perfil angulado. La ametralladora viene completa hasta la empuñadura y no sólo con la zona visible del cañón como sería de esperar. Se ha incluido el faro delantero (pieza A19) que no se puede usar con los flotadores montados y este es el mayor error evidente que he detectado en la maqueta, comparándola con los planos publicados en el volumen 3 de la serie Japanese Armor de AJ Press. En la maqueta de Dragón la parte posterior del flotador delantero muestra un pequeño entrante en forma de «U» que permite tan sólo el montaje de la ametralladora frontal, pero de hecho este rebaje era mucho más ancho y profundo para sortear precisamente la posición fija del faro y la escotilla del conductor a la derecha de este, con ello casi todo el frontal del carro quedaba al aire y no tendría (teóricamente) que inundarse al estar por encima de la línea de flotación. Sobre el casco encontramos también el tubo de escape de una pieza con su protector en fotograbado.
La torre está perfectamente detallada. El mantelete viene en tres piezas separadas con el cañón (ya horadado) y la ametralladora coaxial (como la del casco, completa). La escotilla del comandante y el visor posterior vienen en piezas separadas y por ello se pueden mostrar abiertas. Es aconsejable no pegar la escotilla principal si se va a usar la cúpula desechable para no dificultar el ajuste de esta con la torre. La torreta se completa con las antenas, el afuste de la ametralladora antiaérea y la barandilla posterior de sujeción.
El flotador delantero, cuyo perfil erróneo ya ha quedado señalado, comprende tres piezas que encajan perfectamente entre ellas y con el carro una vez montado. La barandilla de protección es extremadamente fina y conviene sacarla del bastidor con una sierra de fotograbado o una cuchilla muy afilada para evitar su rotura. El flotador trasero consta de dos piezas a las que hay que añadir los timones y los topes del cable que los gobernaba. Es una pena que Dragón no haya incluido también como pieza separada los balancines de perfil circular y los haya moldeado directamente encima del flotador. El sistema de ajuste del flotador posterior al casco es idéntico al real, mediante enganches en forma de tenaza que podían manejarse desde dentro para liberar el flotador en tierra. Es casi obvio decir que ambos flotadores encajan perfectamente en el casco. Eso sí, les faltan los pernos de amarre cuyas bases remachadas sí están representadas a ambos lados.
El equipo de vadeo se completa con la torre de ventilación del motor, que incluye el soporte de la ametralladora antiaérea, y la cúpula de gobierno del jefe de carro, que viene en tres secciones más la escotilla superior por separado. Los periscopios no son piezas transparentes, sino que deben pintarse y las mirillas de la zona superior vienen abiertas, aunque podían cerrarse mediante una cubierta deslizante. La cúpula no encaja demasiado bien sobre la torre, especialmente si pegamos la escotilla cerrada. Lo más recomendable en tal caso es afinar con lima o cuchilla el perfil interno de la base de la cúpula.
He dejado las cadenas para el final, ya que merecen un comentario por separado. Con la longitud proporcionada por Dragón sobra un eslabón por lado para colocarlas con la caída necesaria entre ruedas. Afortunadamente este plástico DS se puede unir con pegamento normal. El inconveniente principal es que los eslabones no encajan fácilmente en los dientes de la rueda tractora, por ello la tarea se hace más sencilla si hacemos las comprobaciones antes de pegar la rueda al carro. Debo esta información a mi amigo Mario Gabás, que ya ha lidiado brillantemente con su maqueta cuando escribo estas líneas.
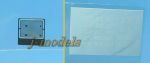
La mínima hoja de calcas incluye abundantes numerales y unas marcas de unidad para las tres opciones idénticas que se muestran en las instrucciones. Aparentemente no deben dar problemas por el tamaño y su escaso grosor. Las instrucciones están impresas en papel satinado de gran calidad y a color, con pasos de montaje muy claros y referencias de pintura de Gunze Sangyo en sus gamas de acrílico y esmalte.
En conclusión, esta es otra excelente maqueta de Dragón en la escala pequeña a la que no quitan valor los errores que he señalado. Recomendada a los que deseen realizar una maqueta sencilla y casi detallada al máximo que permite su tamaño.◊

Those of us who like AFV kits at this scale have been benefited by the new thrust Dragon has given to their 1/72 catalogue in the last three years or so. In exchange for a rise in their price, the quality of kits and the product display inside the box usually compensate for the squeeze to your wallet. This Ka-mi is no exception.
The kit includes two medium-size sprues, two halves of the hull as separate parts, a small PE fret to make the exhaust cover, a decal sheet, the instructions and a couple of lengths in DS plastic for the tracks. As expected, the quality of the tooling is quite good, the parts are free from flash and visible ejector marks and overall fitting ranges from very good to perfect. Detail such as rivets and hatches all around the turret, hull and pontoons are generally well represented for the scale.
The kit can be built with or without the pontoons and for the first choice we have the disposable commander’s cupola and the tower-shaped engine air intake. The running gear comes as separate parts with the bogies split into two parts containing the wheels and the axles molded in each part. Propellers and their shafts are also separate parts in the rear hull. The hull front is also a separate part which incredibly fits perfectly into the hull in spite of its angled profile. The front machine-gun comes in one part molded right to the handle, which won’t be visible from outside. The front headlight (part A19) has also been included although you can’t use it if you attach the front pontoon, and this is the major flaw I see in the kit checking the plans of the tank published in volume 3 of the Japanese Armor series published by AJ Press. In Dragon’s kit the rear shape of the front pontoon shows an «U» indentation which allows the assembly of the front machine-gun, but in fact this recess was wider and deeper in the real pontoon and avoided the gun, the headlight and also the driver’s porthole. All the front section of the tank was above waterline and should not be flooded (presumably at least) when sailing. On the hull there is also the exhaust molded as one part and its PE protection.
The turret comes very crisply detailed. The mantlet comprises three parts with the gun (already hollowed) and the coaxial gun, again complete to its handle. The commander’s hatch and the rear porthole are also separate parts and can be showed open. It is advisable not to attach the upper hatch if you want to use the cupola as this doesn’t fit very well onto the turret. The aerials, machine-gun holder and the rear railing round off this section.
The front pontoon, whose mistaken shape has already been dealt with, comprises three parts which fit perfectly among them and with the hull and need no filler. The protection railing is very thin and crispy and to avoid breaking it you can use a PE saw or a very sharp blade to cut it off the sprue. The rear pontoon includes just two parts with the rudders and the locks of the steering cables in separate parts. It is a pity Dragon has molded the circular sway-beam on the pontoon and not as a separate part. The adjustment system of both pontoons to the front and rear hull is identical to the real one, by means of claw-shaped hooks which could be released from inside the tank. It is almost obvious to mention that they fit quite well into the hull. I only miss the mooring bolts on both sides but their riveted bases are there, so it is not very difficult to make your own in plastic or other material.
The wading kit also comprises the towering air intake, which also includes the machine-gun holder, and the commander’s steering cupola, which comes in three parts plus a separate hatch. Periscopes are not clear parts but are to be painted and the vision ports on the top section come open, although they could be closed by sliding doors. As said before, the cupola doesn’t fit well onto the turret if you use the turret hatch. If you do so, you can thin the round base inner rim using a blade or file.
The tracks deserve a separate comment since Dragon’s DS tracks are not everybody’s cup of tea. With the lengths provided you will have to remove one link per side to get the correct sag between wheels. Fortunately, DS plastic can be glued with your favourite cement. Another issue is that the teeth don’t fit well in the sprockets so you will need extra care to deal with them. Perhaps a previous check before attaching the wheel to the hull is a must to make things easier. I owe this information to my friend Mario Gabás, who has recently finished his model (brilliantly as usual) by the time I’ve written these lines.
The tiny decal sheet includes several numbers and unit markings to set on the turret and rear float for the three basic painting options (virtually identical) shown in the instructions. Apparently, we shouldn’t expect problems as they are very small and thin. The instructions are printed on satin paper in full colour and show very clear assembly steps. Paint reference is given in Gunze’s acrylic and enamel ranges.
In short, this is another excellent little kit by Dragon in the small scale which is not marred by the mistakes I have pointed out. Recommended to those who like the scale and wish to build an easy but thoroughly detailed kit.◊
Actualizado – Updated: 4 / 2022
Actualizado – Updated: 5 / 2017
Publicado – Published: 12 / 2014
©www.jmodels.net


Debe estar conectado para enviar un comentario.